Building extensions #1: Creating, testing, and editing Zoho Projects extensions using the cloud editor
Hello!! We're happy to announce the beginning of a new series called "Building Extensions," which aims to help guide developers in creating and developing extensions for Zoho Projects. The goal of this series is to assist developers with the extension creation process, as well as to explore the features and functionalities that are available in the developer platform to build extensions for Zoho Projects.
Extensions are essentially plugins or add-ons that extend a Zoho product's existing functionality by either enhancing itsexisting features or integrating with other applications and performing third-party actions from within the Zoho product itself. Zoho offers a developer platform named Sigma, which is intended exclusively for building extensions for various Zoho products.
In our first post of this new series, we'll look at how to create, test, and edit a Zoho Projects extension. Let's take a look at each of these topics individually.
Creating an extension using the Sigma cloud editor
- Log in or sign up into developer.zoho.com.
- Go to Sigma and access your workspace.
- Once you enter your workspace in Sigma, you will be taken to the Extensions section in Sigma.
- You may either build a new extension entirely from scratch, or use one of Sigma's current templates to begin your extension development process.
- To begin creating an extension using a template, simply select the Extensions Gallery option in your workspace.

- Choose an extension from the options available in Zoho Projects to begin creating one with a template. When you select an extension, you will be taken to the Sigma cloud editor, where you will find a template for that extension.
- Alternatively, you can also start building an extension entirely on your own. To do this, click the New Extension button to start creating and building an extension.
- Enter a Name and Description for the extension. Choose the service as Zoho Projects.
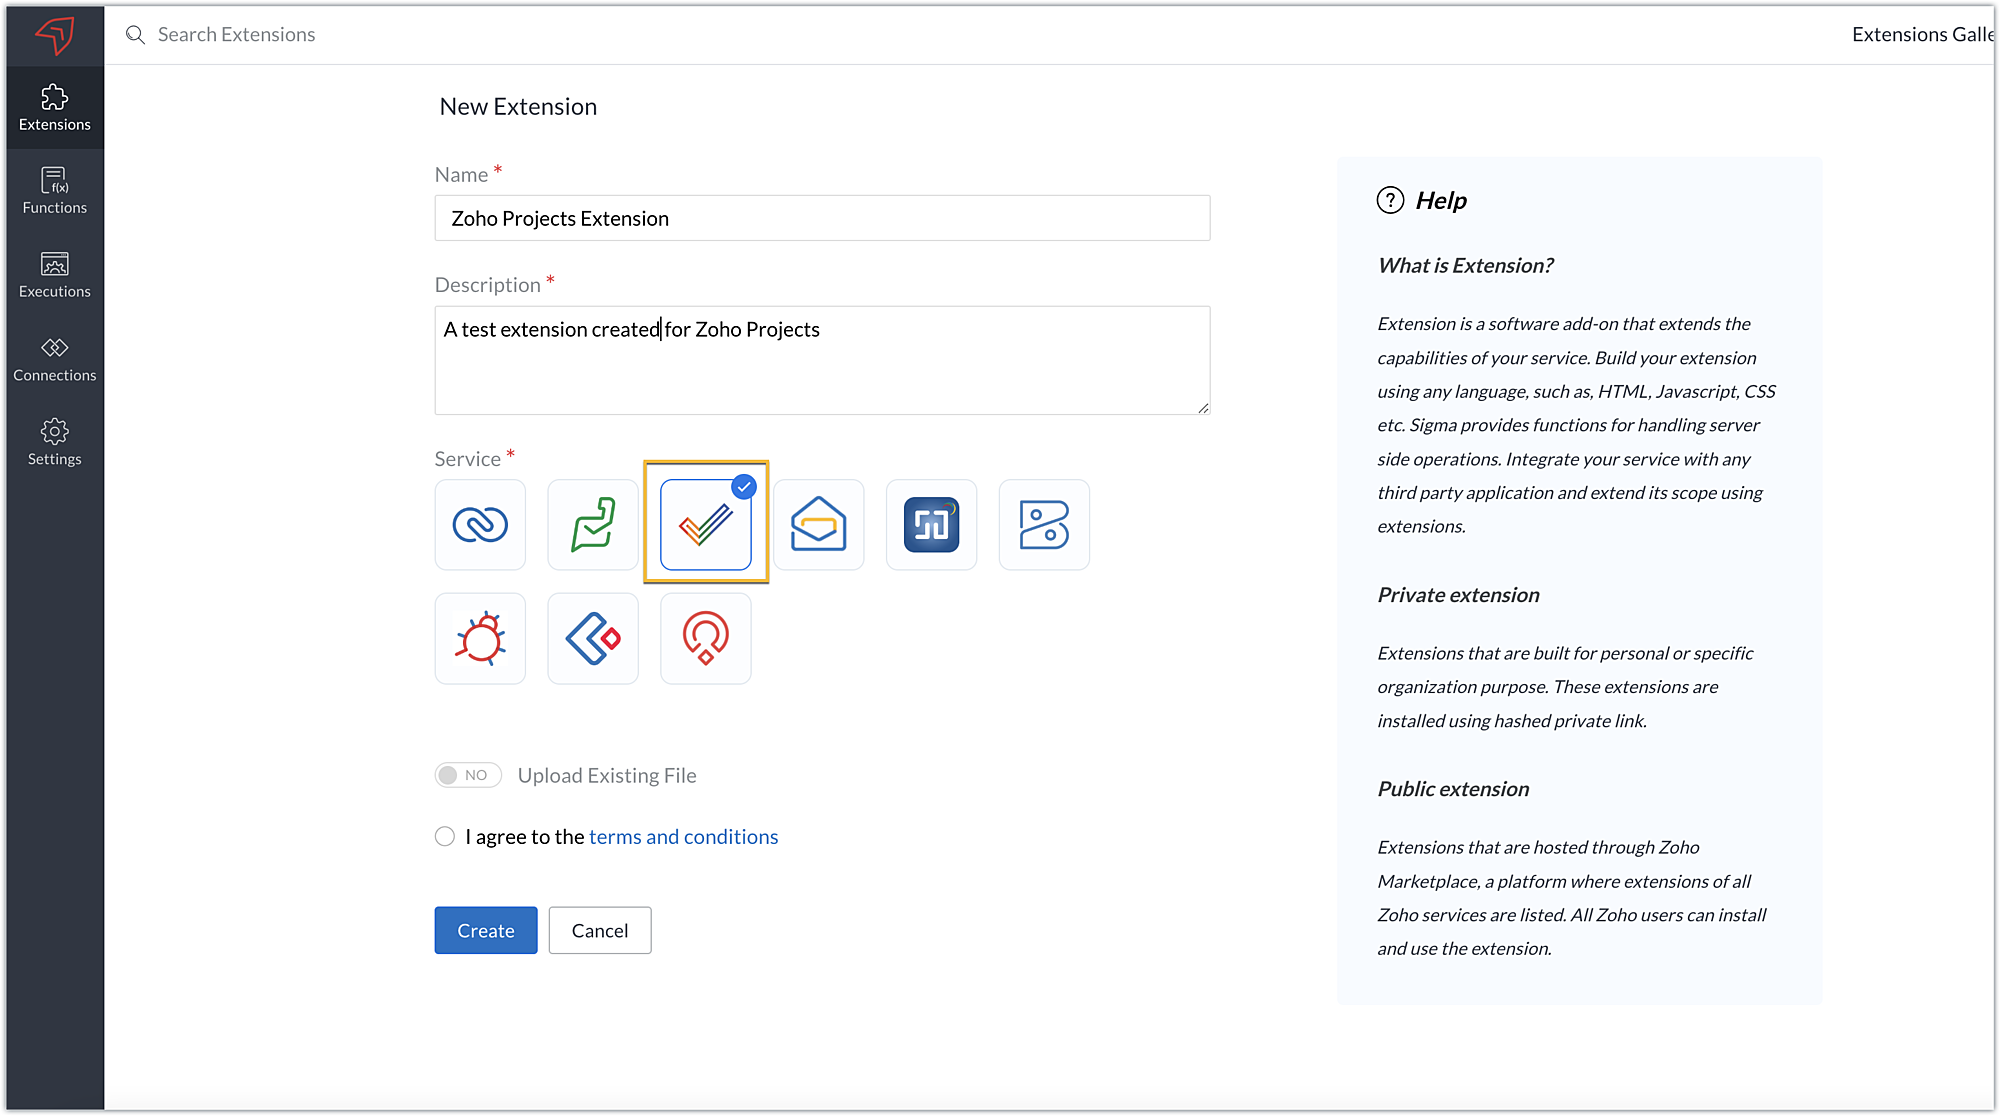
- There are two ways you can create an extension for Zoho Projects:
➤ Using the cloud editor➤ Using the command line interface (CLI)
- Toggle Upload Existing File to YES to build your extension using CLI, and NO to develop it using the cloud editor.
- In this post, we'll look at how to create an extension with the cloud editor. So toggle to NO, accept the terms and conditions, then click Create.
Note: We'll be exploring building extensions using CLI in our next post.
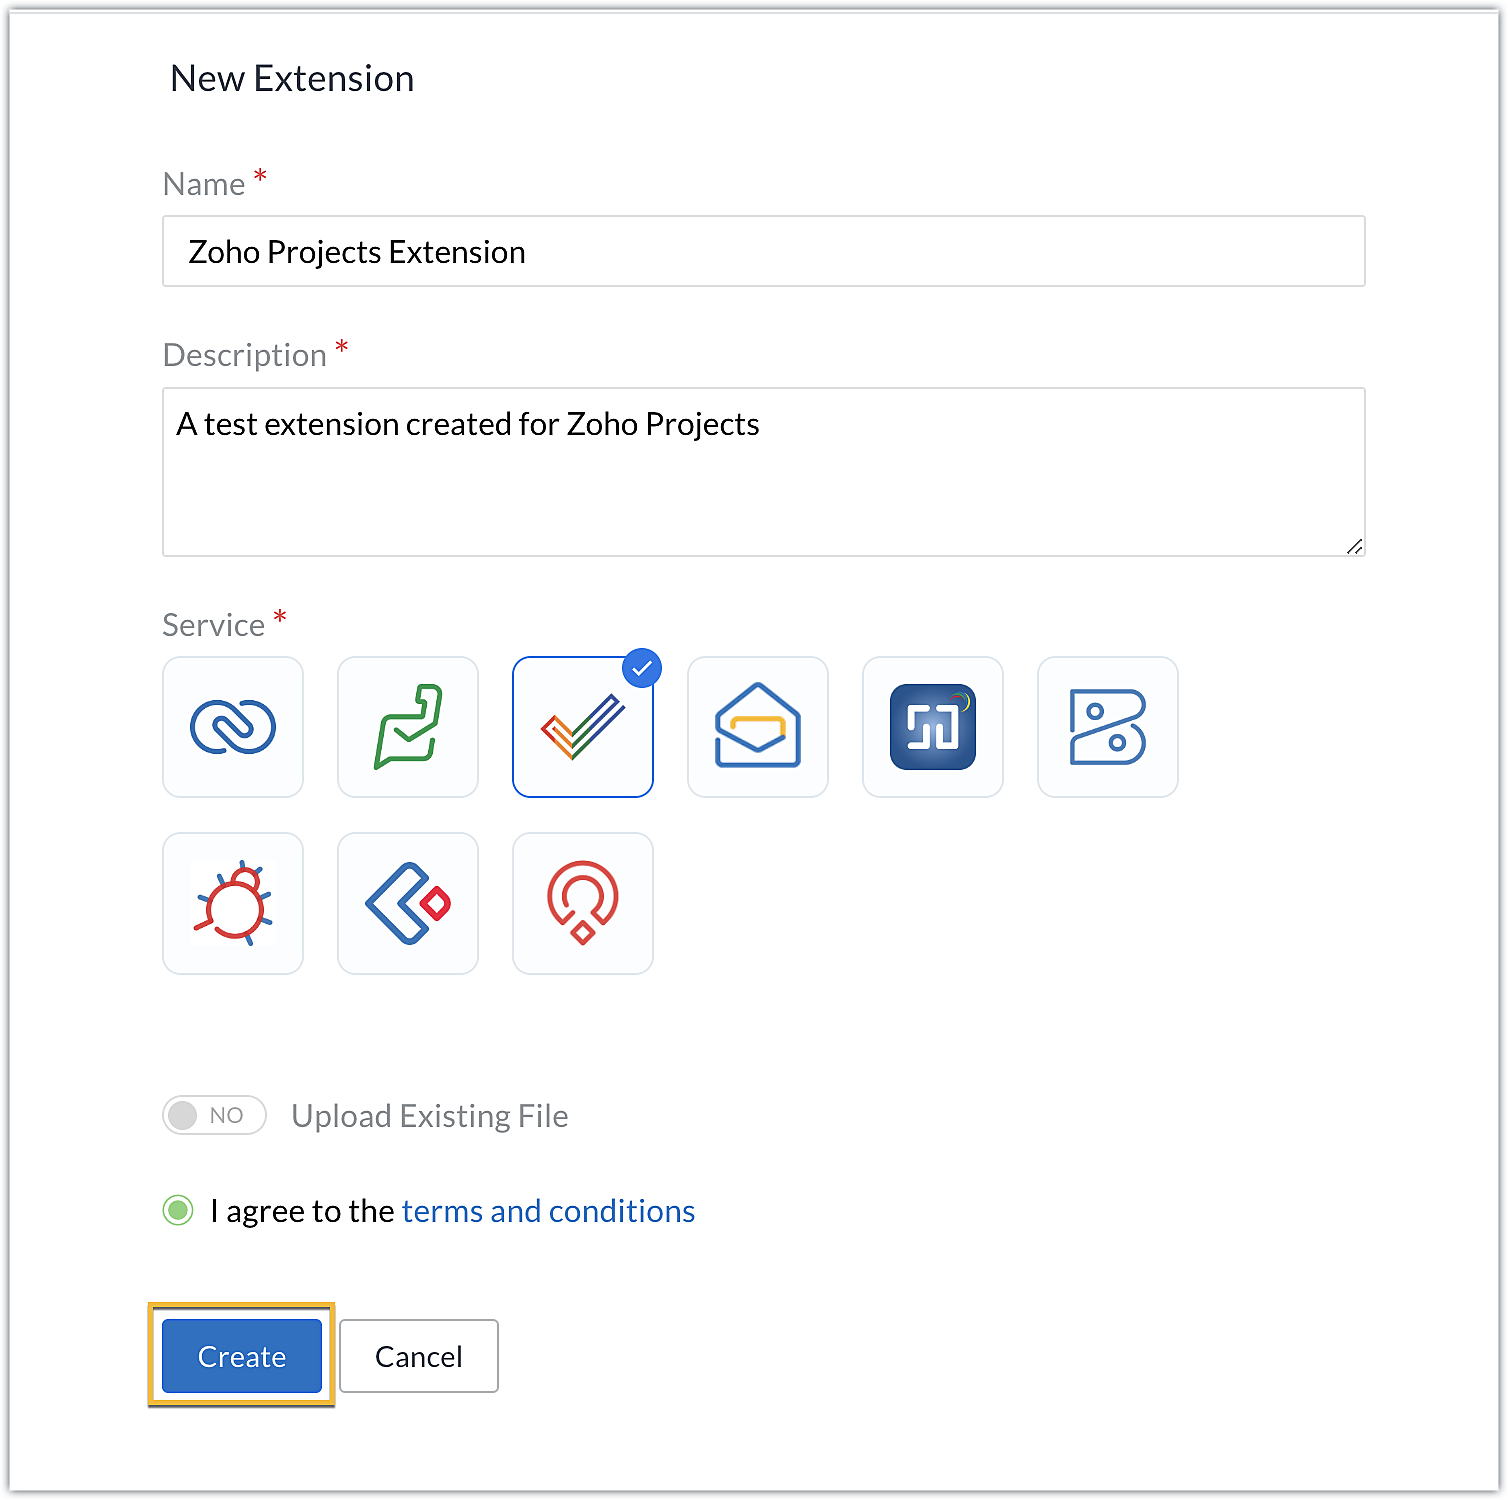
- You'll be redirected to the cloud editor for the extension you've created, where an app folder and a plugin-manifest.json file will be available by default.
- The app folder will have a defined directory structure populated automatically for the sample Zoho Projects extension. This app folder can be used to manage all of the important resources that are required for your extension.
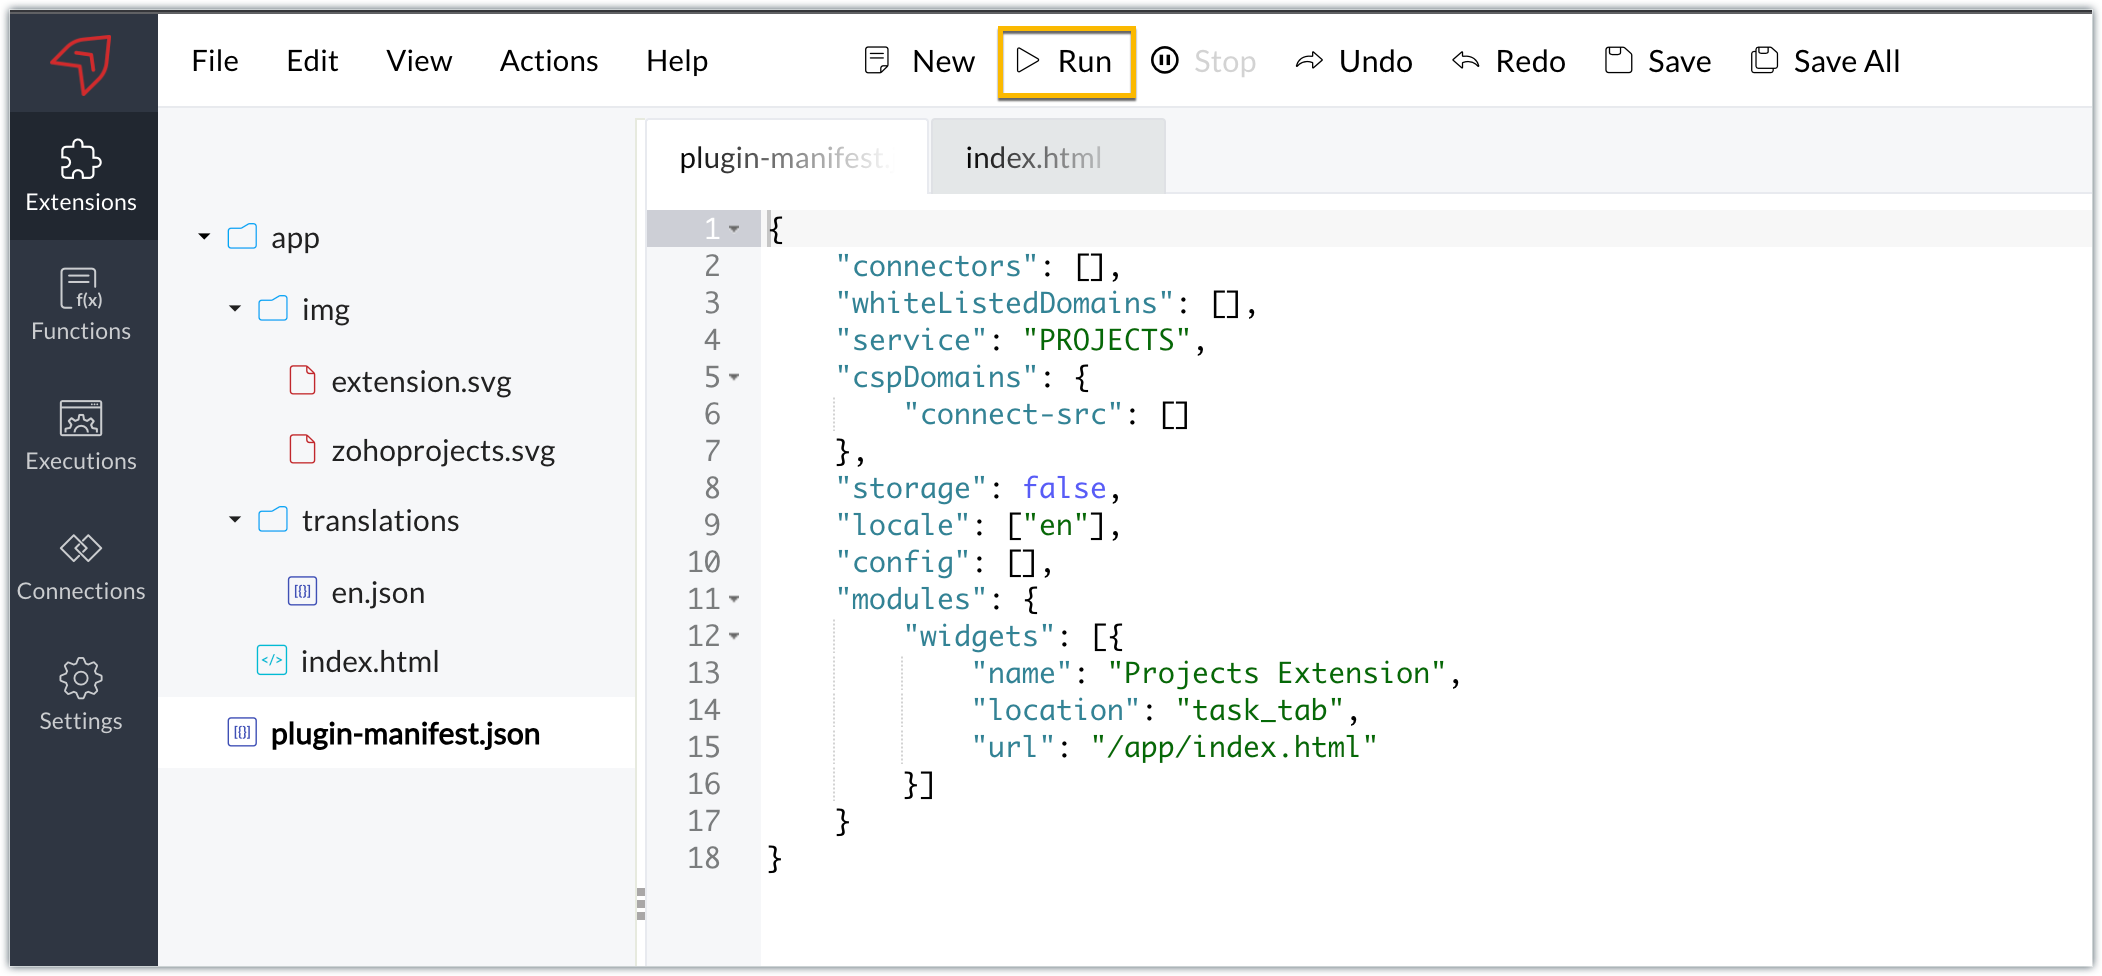
- The plugin-manifest.json will help with the configuration of your extension. It contains a set of keys and values that determine your extension's settings.
Note: We'll go over most of these keys in detail when we get into the related feature and functionality in upcoming posts.

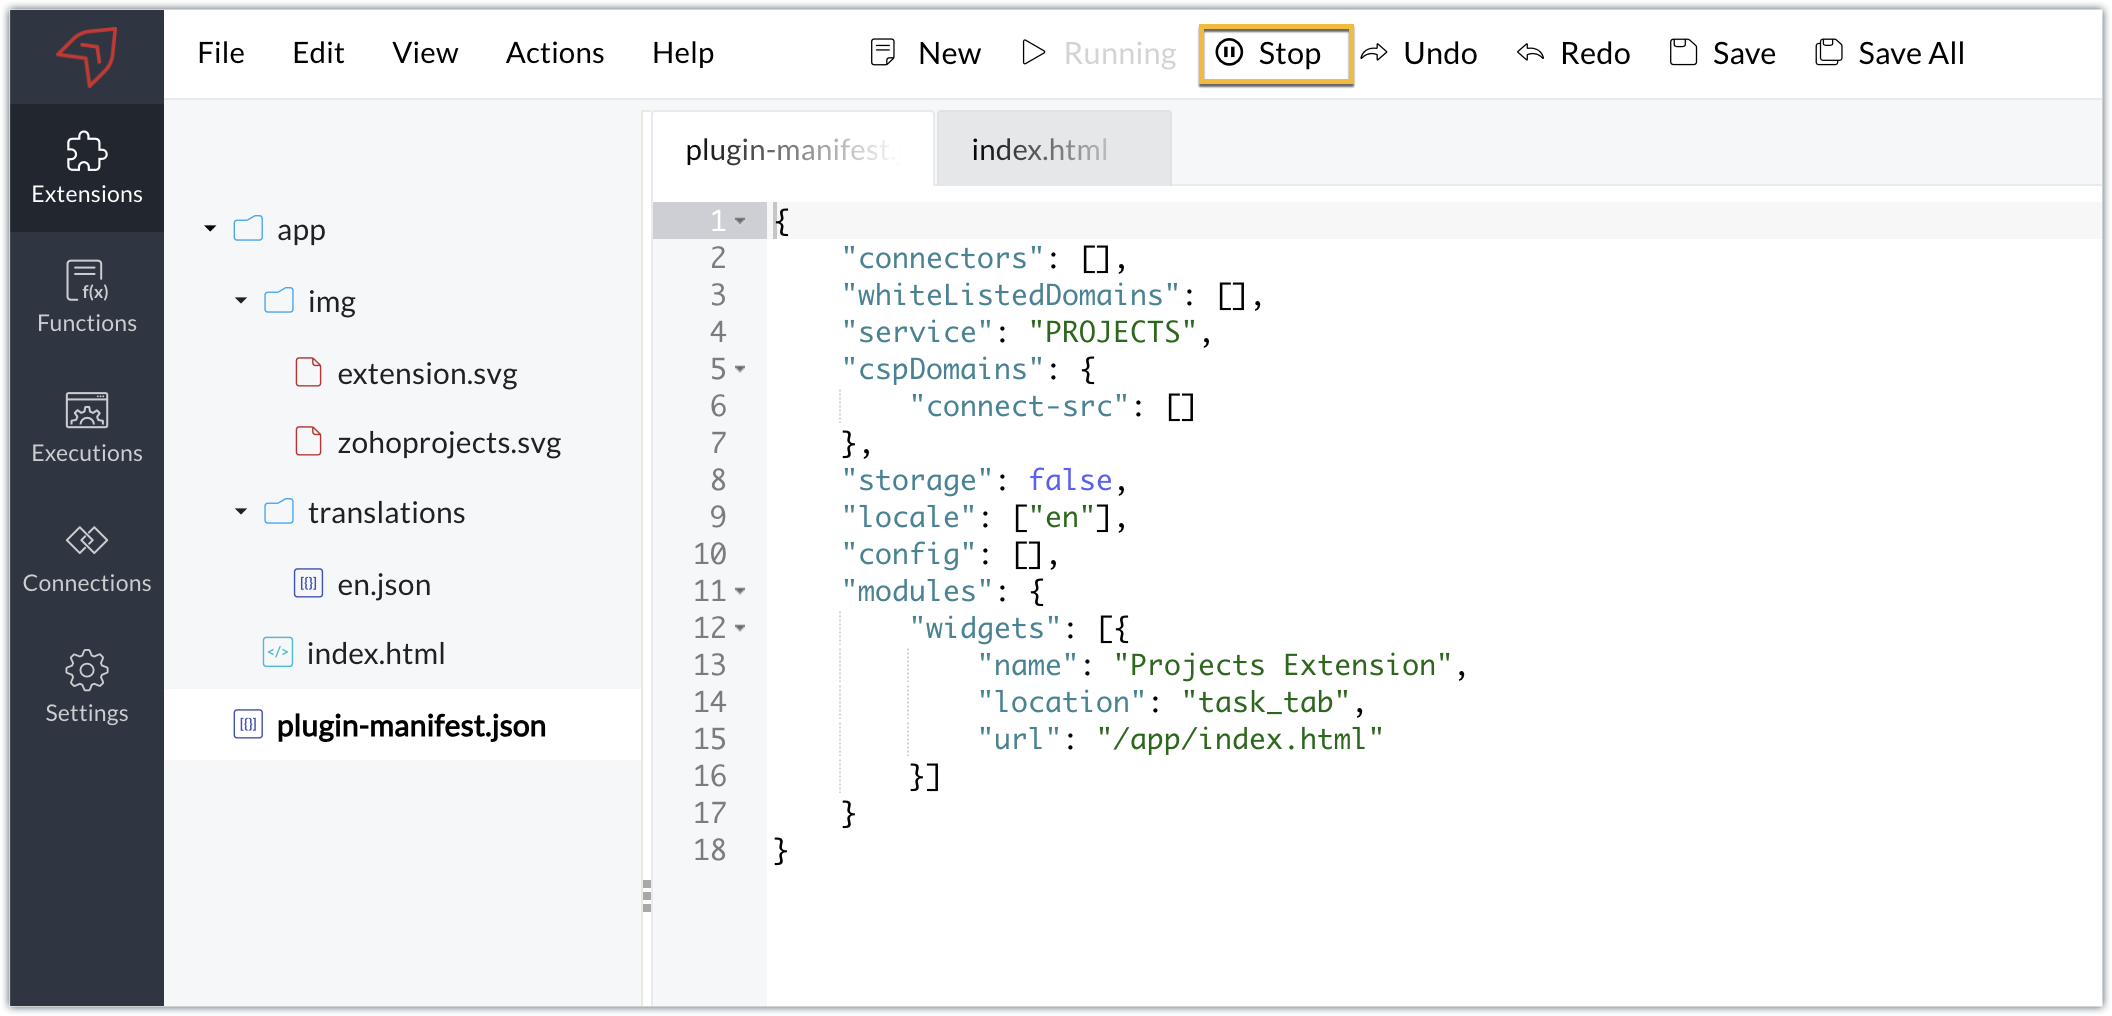
- When you examine the default plugin-manifest json file populated in the cloud editor, you'll find the widgets key being configured with these details for a default sample widget:
➤ A name key mapped with the sample widget name as "Projects Extension."➤ A location key mapped with the default location as "task_tab." This key determines the location to load thewidget. Zoho Projects supports multiple locations where you can load widgets. You can select the location based on your requirements; however, the default location is the task details tab.➤ An URL key that holds the path or location of the HTML file that will be loaded as the widget UI. By default, the path is defined as: /app/index.html.
- The cloud editor also includes a pre-populated index.html file in the app folder that will be loaded as the widget UI in the task details tab.
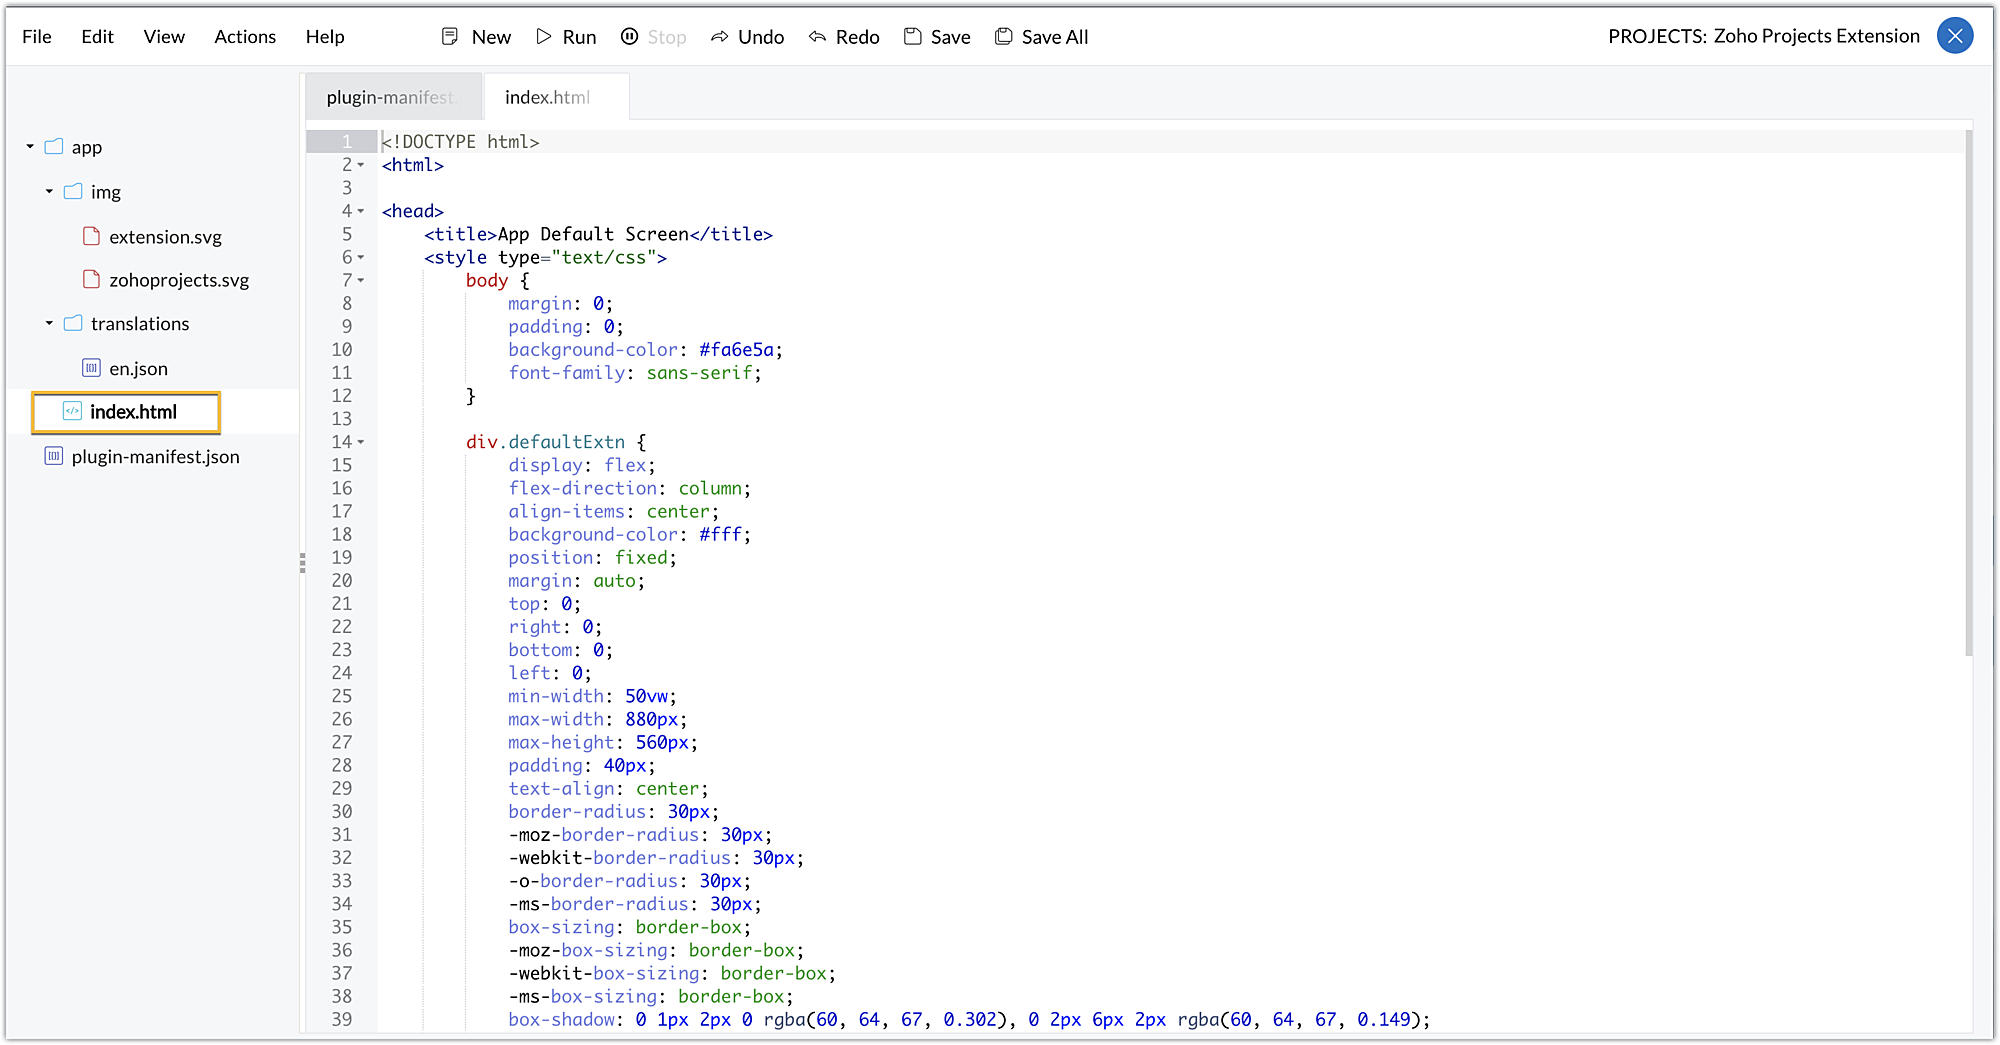
Now that we've looked at the folders and files that are created by default when an extension is created, let's now explore how you can test this extension in a testing environment.
Testing an extension using the cloud editor
- The Sigma cloud editor allows you to test your extension functionalities in a testing environment before publishing the extensions and installing them in a Zoho Projects portal.
- To test the extension, click Run in the cloud editor.
- You'll be taken directly to a specific portal in your Zoho Projects account. If you only have one portal, you'll be landing directly in that portal. If you have multiple portals, you'll be prompted to select the portal where you wish to test your extension.
Note: The extension's components (for example, widgets) can be tested in the portal by selecting the Run option; however, no instance of the component will be reflected on the portal until the extension is published and installed in that portal.

- Once you've entered the testing environment, click on a task to enter the task details page, because the extension you've created has a sample widget named Projects Extension in the task details tab.
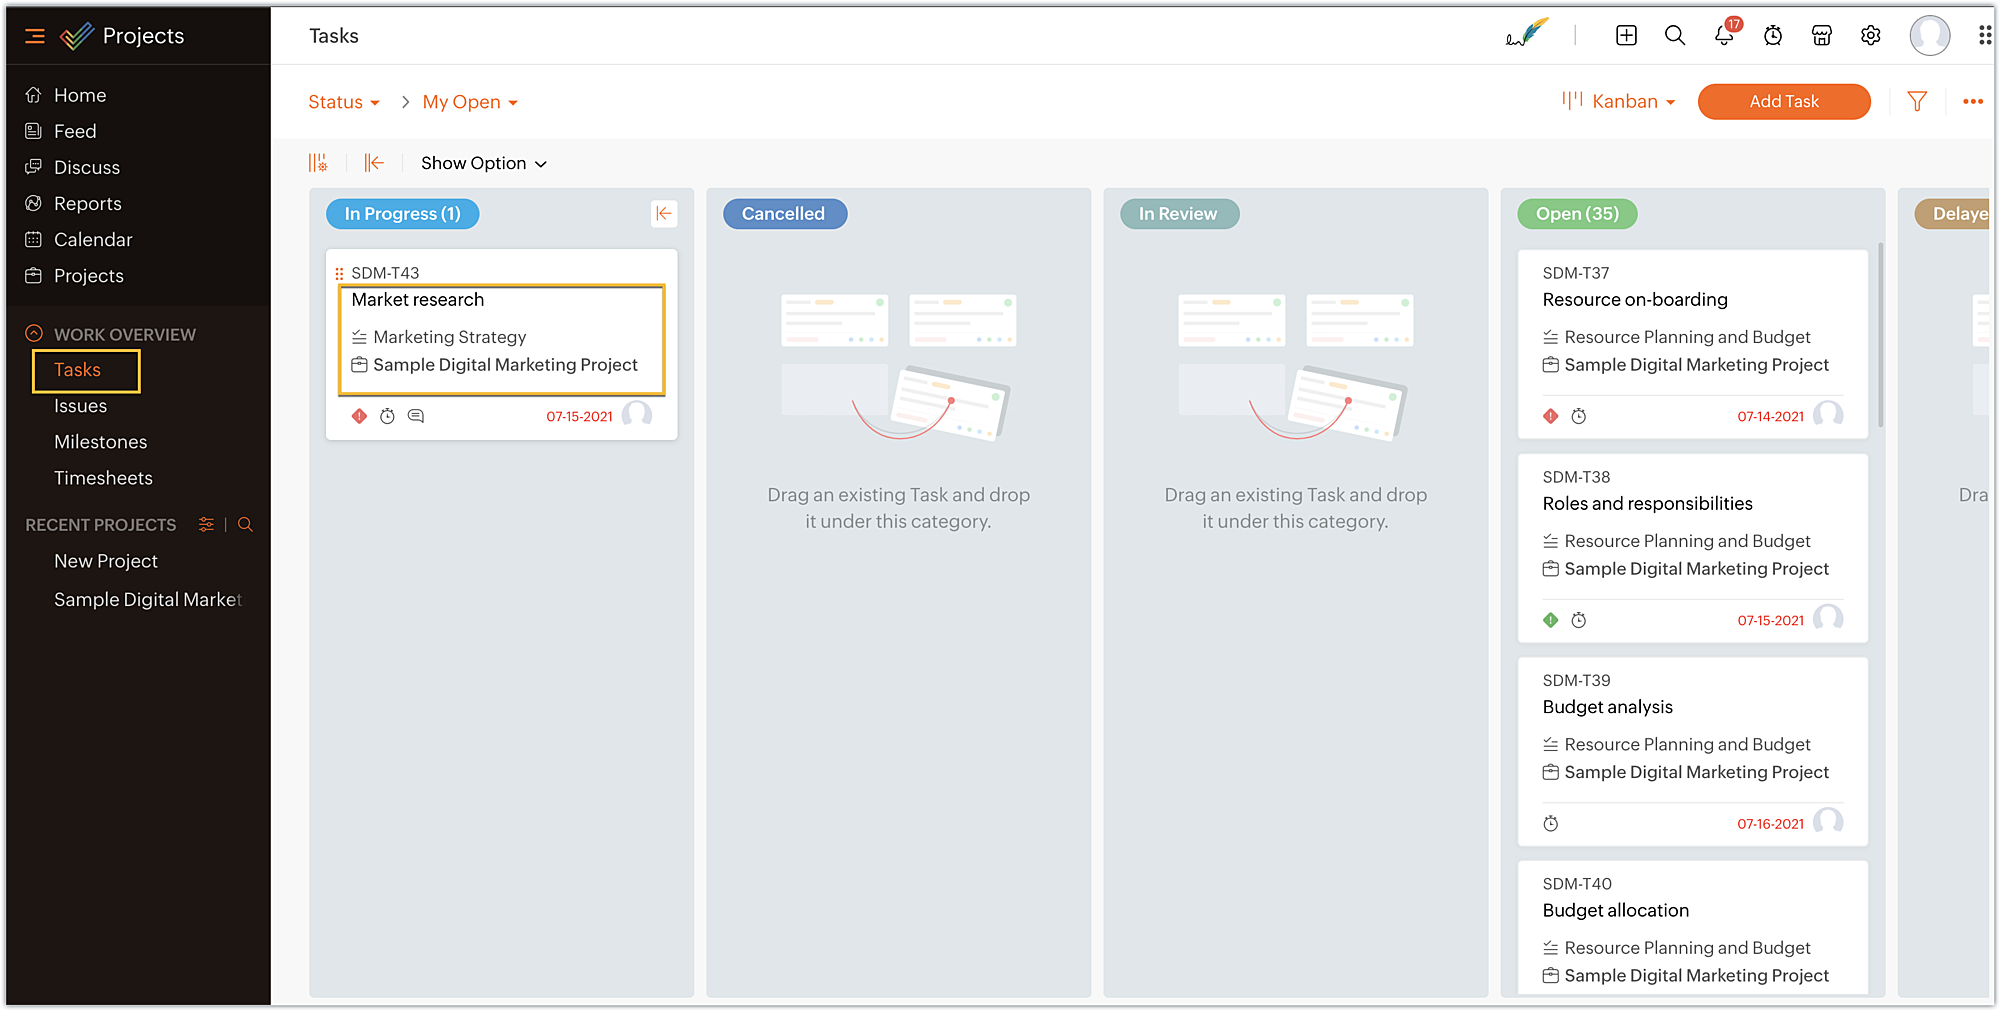
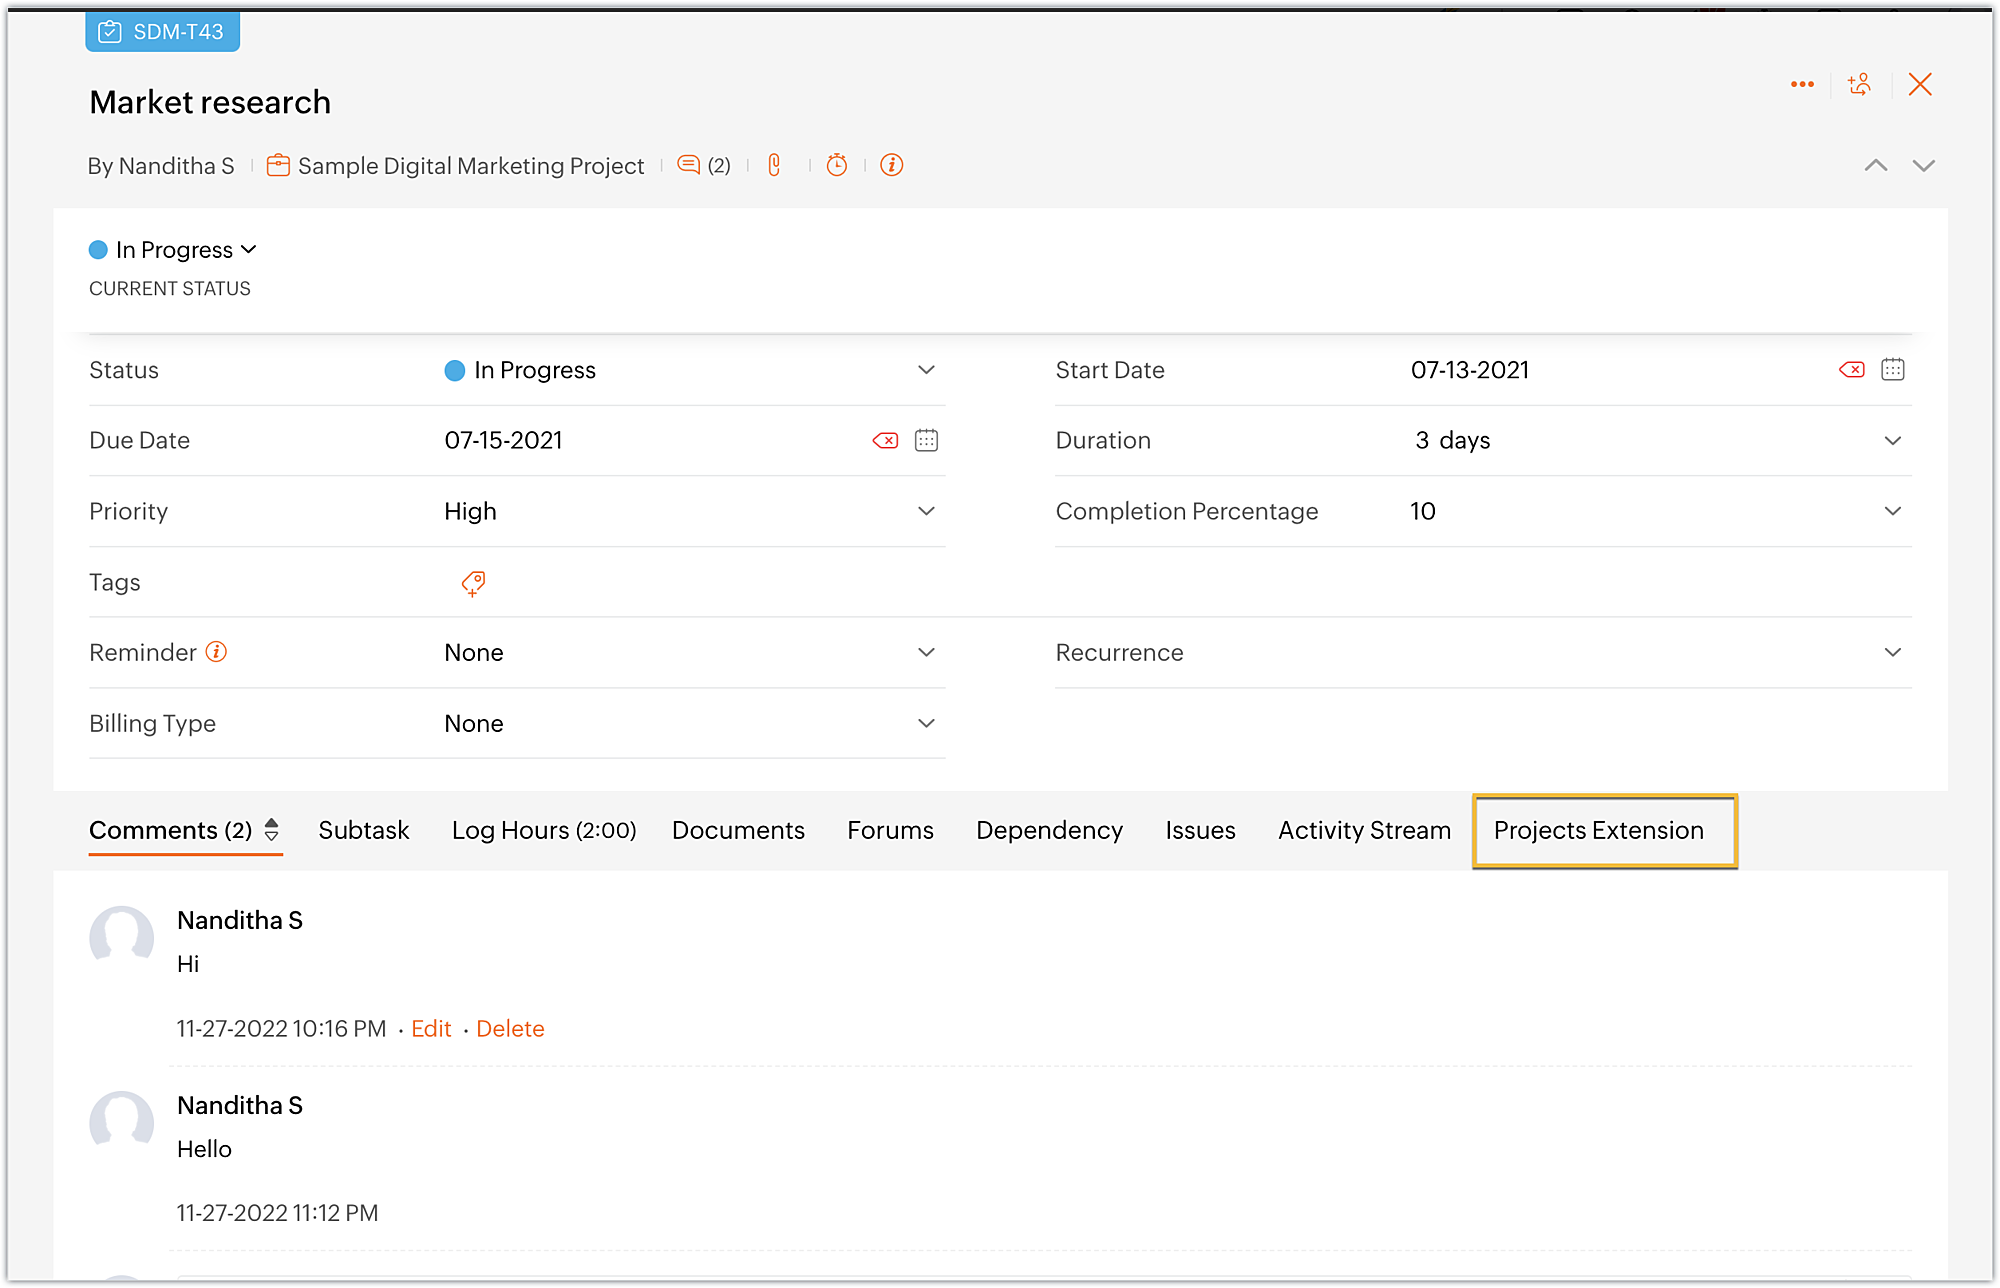
- On the task details page, you can view the widget named Projects Extensions as an individual task tab. Click on the Projects Extensions tab.
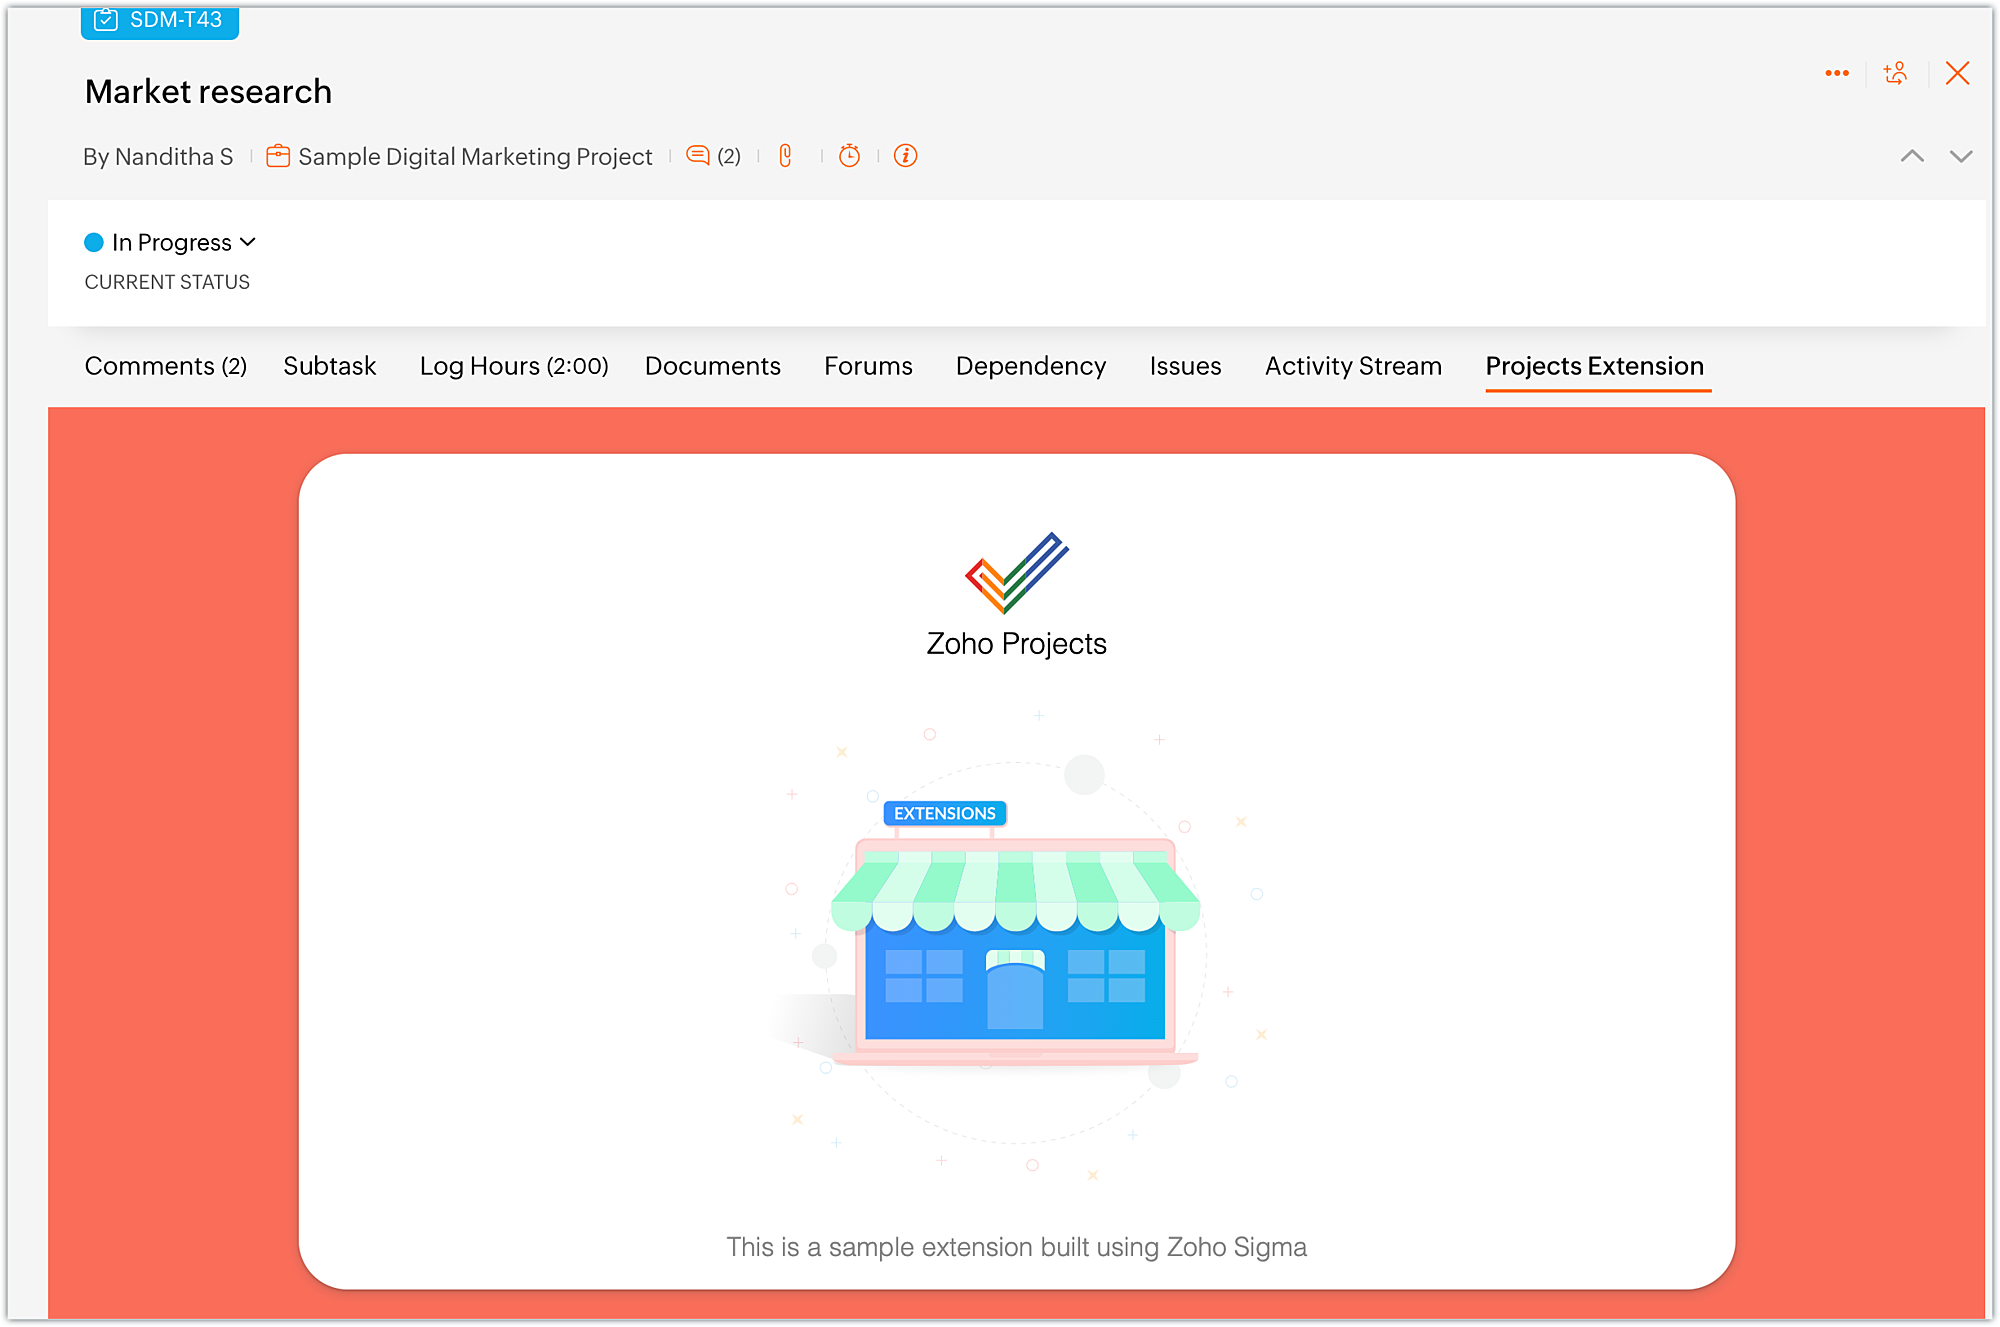
- The widget will be loaded with the UI as available in the index.html file.
- Once you are done with testing your extension functionalities, switch to the cloud editor tab and click Stop.
- In what situations can we use the Run option?
➤ To run the extension for the first time in the testing environment.➤ Whenever the plugin-manifest.json file is modified, you have to use the Run option again.Note: If you make modifications to any other files, simply refresh the extension to see the changes; there's no need to use Stop and Run again.➤ When you use the Stop option to end a test and then want to retest the extension, the Run option has to be used.
Editing an extension using cloud editor
- Whenever you want to make changes to your extension code, choose the Extensions section in the left panel of your Sigma workspace.
- Hover over the extension to which you want to make changes. Click on Edit Builder icon.

- You'll be taken to the cloud editor of that particular extension, then you can go ahead and make your edits.
- Alternatively, you can also click on the Extension Details icon.

- Then, click Edit Extension.
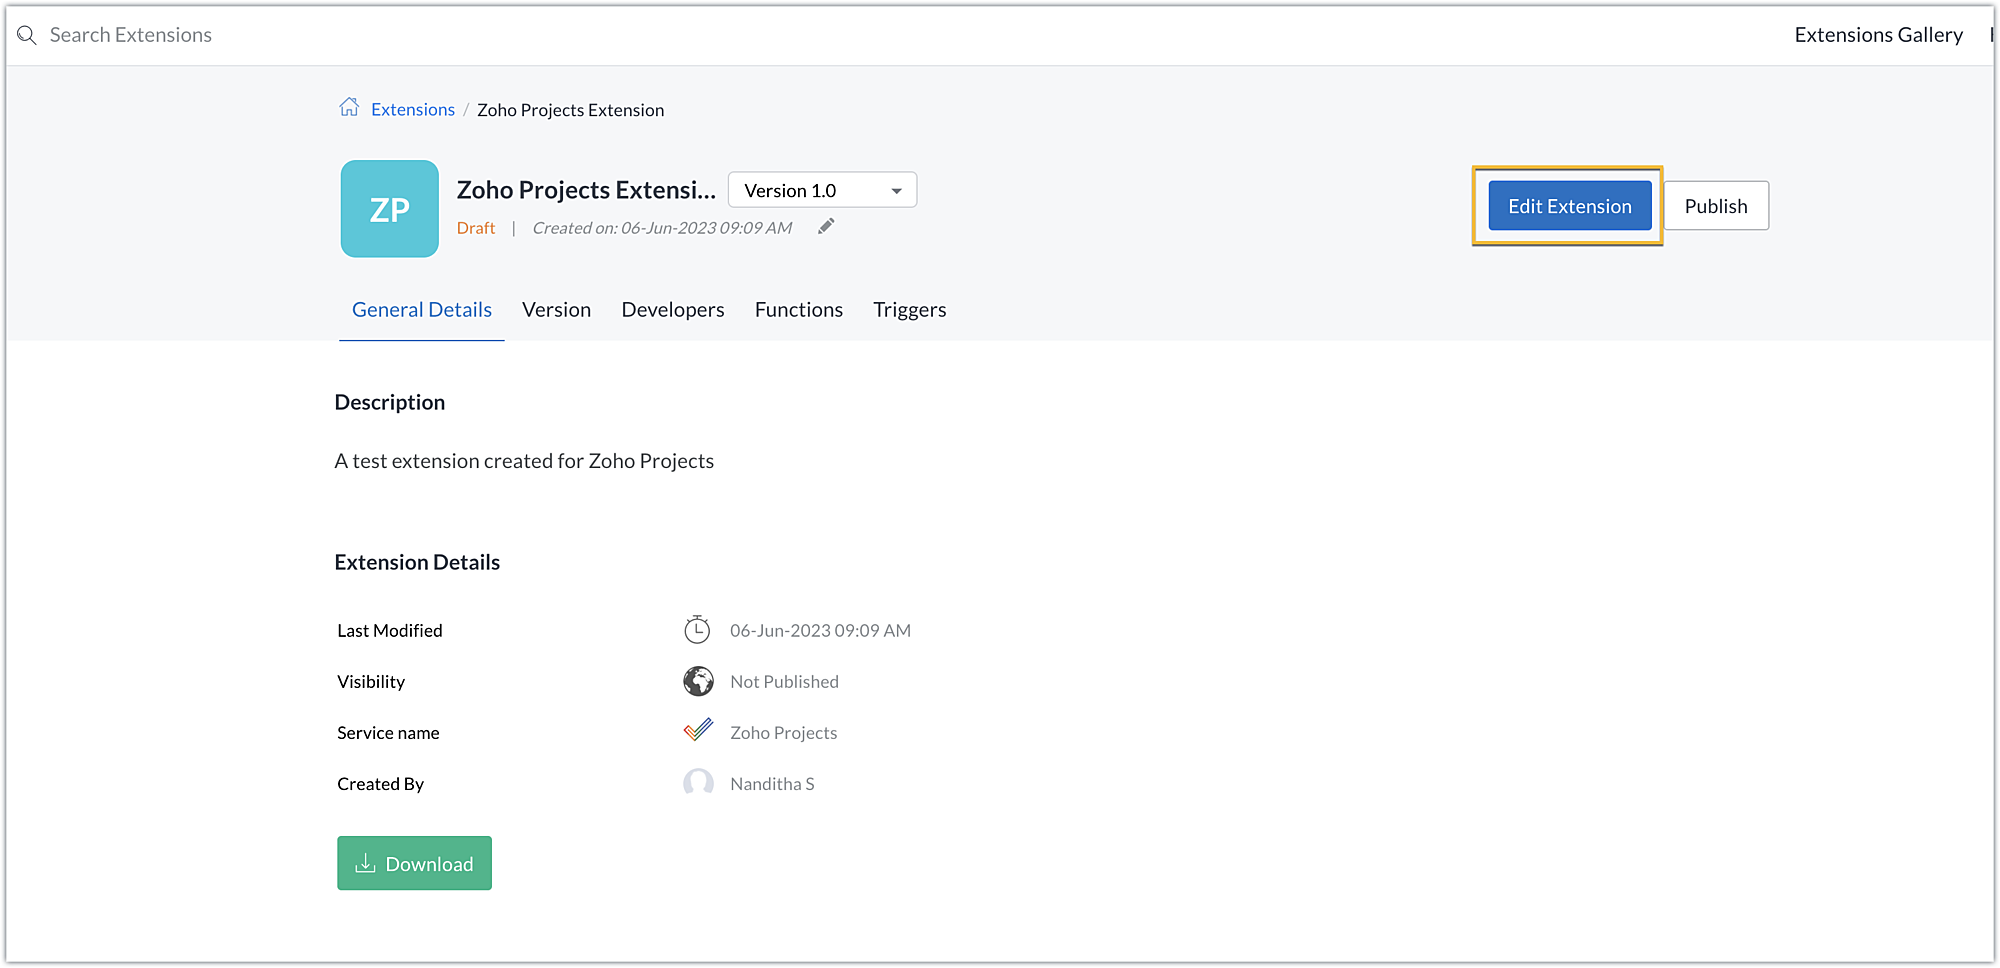
- This method will also take you to the cloud editor of the extension where you can make necessary changes.
In this post, we've covered creating an extension, testing it, and making changes to it. We hope you found this information useful. Keep following us for more information!

Sign up for a Zoho Developer account ans start developing extensions for Zoho products using Sigma.
New to Zoho Recruit?
Zoho Campaigns Resources
Topic Participants
Nanditha Somasundaram Somasundaram
Sticky Posts
Building extensions #10: Fetch customized user inputs, store them globally at the app level, and access them across entities
This data storage concept enables you to store data related to your extension for both entity properties and extension properties. In our previous piece, we looked at how to store data for entities using entity properties. In this post, we'll look atBuilding extensions #9: Store, retrieve, and access entity-specific data in widgets using data storage
Data storage - Overview Storing data related to the extension you are working on is essential. It can be saved as key-value pairs for an entity or extension, known as entity and extension properties, respectively. Data can be saved for the following entitiesBuilding extensions #7: Create custom widgets for a simplified end-user experience
Discover the benefits of using widgets! We explored the significance of widgets, prerequisites, and the availability of JS SDK methods as part of our previous post. In this post, let's go over a detailed example of using widgets along with certain ZohoBuilding extensions #6: Custom user interfaces with Widgets
Welcome to our post on Widgets for Zoho Projects! In our last post, we explored the significance of the connections feature, showed how to use it, and provided an example use case. In this article, we'll look at the importance of widgets, another featureBuilding extensions #5: Integrating applications with Zoho Projects through Connections
In our last post, we discussed the essential features that a Zoho Projects extension can provide. Starting with this post andin every subsequent post going forward, we'll go through each of those features in depth, one by one, with an example use case.
Zoho CRM Plus Resources
Zoho Books Resources
Zoho Subscriptions Resources
Zoho Projects Resources
Zoho Sprints Resources
Zoho Orchestly Resources
Zoho Creator Resources
Zoho WorkDrive Resources
Zoho CRM Resources
Get Started. Write Away!
Writer is a powerful online word processor, designed for collaborative work.
Zoho CRM コンテンツ
-
オンラインヘルプ
-
Webセミナー
-
機能活用動画
-
よくある質問
-
Ebook
-
-
Zoho Campaigns
- Zoho サービスのWebセミナー
その他のサービス コンテンツ
ご検討中の方
Recent Topics
Knowledgebase SEO
We have a custom-domain mapped help center that is not restricted via login. I have some questions: a) will a robots.txt file still allow us to control indexing? b) do we have the ability to edit the sitemap? c) do category URLs get indexed by searchBooks & Desk. Client mapping
Hi, I’ve been using Zoho Books for several years and am now looking to improve my customer service. I'm experimenting with Zoho Desk and want to sync and map my client data from Zoho Books. However, it seems that mapping requires both contacts to haveImprove WhatsApp Module in Zoho CRM
The current WhatsApp module UI in Zoho CRM feels cluttered and complex, especially when handling high volumes of conversations. It would be great to enhance the WhatsApp module UI/UX by adopting a clean and simplified interface similar to Bigin CRM’sAutomatiser la gestion des SLA dans Zoho Desk avec Zoho Contracts
Les équipes du service client s’efforcent d’assurer un support rapide, régulier et fiable pour garantir la satisfaction de chaque client. Les accords de niveau de service (SLA) permettent de clarifier les engagements en définissant les termes et conditionsSet Frozen Cells in the Report Settings
Hi, It would be nice to be able to set the frozen cells in the report Settings, and have an option if this is fixed or can be changed after loading (On the next load it still goes back to the Settings). Thanks DanCreate static subforms in Zoho CRM: streamline data entry with pre-defined values
Last modified on (9 July, 2025): This feature was available in early access and is currently being rolled out to customers in phases. Currently available for users in the the AU, CA, and SA DCs. It will be enabled for the remaining DCs in the next coupleiOS App doesn't refresh for Document Creation
Hello Zoho team, I have created a workflow to be used on a mobile iOS device which starts in Zoho Creater and ends with a murge and store function that then opens the newly created document within the Zoho Writer app. This process is working great howeverNotice: SalesIQ integration paused on Zoho Sites
I have this notice on my Zoho Sites in the SalesIQ integration setup. Can someone assist? "This integration has been temporarily paused for users. Reconnecting SalesIQ after disconnection will not be possible until we provide further updates." thankEasier onboarding for new users with stage descriptions
Greetings, I hope all of you are doing well. We're happy to announce a recent enhancement we've made to Bigin. You can now add descriptions to the stages in your pipeline. Previously, when creating a pipeline, you could only add stages. With this update,Dynamic Field Folders in OneDrive
Hi, With the 2 options today we have either a Dynamic Parent Folder and lots of attachments all in that one folder with only the ability to set the file name (Which is also not incremented so if I upload 5 photos to one field they are all named the sameIs it possible to transfer data from one related list to another within the same module ?
In the Leads module, there is an existing default Product related list that already contains data. Recently, I added a custom multi-lookup field, which created a new related list in the same Leads module. Now, I need to move the existing data from theUploading a signed template from Sign to Creator
Good day, Please help me on how to load a signed document back into Creator after the process has been completed in Sign. Below is the code that I am trying, pdfFile = response.toFile("SignedDocument_4901354000000372029.pdf"); info pdfFile; // AttachConsolidated Department-wise Payroll Cost Summary Report
Hello Zoho Payroll Team and Community, I am writing to discuss a reporting requirement regarding department-level expense tracking within Zoho Payroll. As we scale and manage salary distribution for employees across multiple departments, such as Accounts,Zoho DataPrep and File Pattern configuration
I'm using Zoho data prep to ingest data from One Drive into Zoho Analytics... The pipeline is super simple but I can't any way to get all the files that I need. Basically I need to bring all the files with a certain pattern and for that I'm using a regexChange User Role in a Form
Hi, When in a form, it would be good (And consistent) to be able to change the user role/permission like you can with Shared Reports, All Entries or the actual User itself, rather than having to delete the users permission and then add it back again withAssistance needed: Activation of a domain
Hello Zoho Support, I purchased the .com domain "primesolva.com" via Zoho 6 days ago. The domain is still pending, and I cannot access the DNS panel to add the TXT verification for domain ownership. Please confirm the registration status and help me activateOperation not permitted
I am trying to add an email address to the list of user but I am getting error Operation not permittedCannot connect to imap.zoho.eu on iOS26
Hey, I recently migrated to another iPhone and since then use iOS26. Every since then, I was not able to connect to "imap.zoho.eu" from Apple Mail. I tried deleting the account and adding it again, did not work. I tried creating an app password, didn'tRequest to Permanently Delete Email User (info@mehbobgulf.com ) from Old Organization
Please permanently delete the user email info@mehbobgulf.com It is still associated with my old Zoho organization. I cannot delete it because it shows ‘You cannot delete email. Zoho host’. I need to use this email in a new Zoho account.”Client host [89.36.170.5] blocked using Spamhaus
Hello please make make actions for delist ..... "Client host [89.36.170.5] blocked using Spamhaus"Suggestion: Option to Re-run a migration
As I'm going through a migration process, I like the IMAP migration tool, but it would be better if there were an option to re-run the same migration as configured. There's not even an option to copy/edit one that's already there. Just run if it hasn'tIssue with "Add Your Mobile Number"
Hello, I am trying to sign up for email service for a domain name, and I cannot finish the authentication. When I enter my mobile number, I receive the message "We’re unable to send OTP to this mobile number. Please contact support-as@zohocorp.com". Izoho mail non vérifié
Bonjour, Il y'a un jour que j'ai acheté un domaine et toute les tentatives pour l'associé a mon compte shopify son vaine. j'ai essayé TXT sans suite après, j'ai essayer avec CNAME sans suite. j'aurais besoin de votre assistance pour associé mon mail.Unable to send message;Reason:553 Relaying disallowed. Invalid Domain
i have facing the issue "Unable to send message;Reason:553 Relaying disallowed. Invalid Domain" if i verify domain evertthing i did but still face the same error.ZohoMail is so close to being Perfect BUT
Why don’t you have HILIGHTING???!! I've been trying to find a substitute for Edison Mail but I want & need hilighting (preferably in more than just yellow)! Is this even on your To Do list? I’m so disappointed. 🙄New Feature : Copying tickets with all the contents such as conversations/history/attachments etc
Sometimes our customers and distributors do create tickets (or send emails) which contain more than one incident in them and then also some of the further conversations which are either created by incorrect new tickets or replies to old tickets are being created as combined tickets. In such cases we require to "COPY" the contents of the tickets into separate tickets and merge them into their corresponding original tickets. The "CLONE" feature doesn't copy the contents (especially the conversationsOverride Auto Number field?
We are preparing to migrate from Salesforce. In Salesforce, we auto-generate a unique number on our Opportunities (Potentials). If the Opportunity results in a contract, we use that unique number as the Contract number. There are some situations whereHow to create one ZohoCRM organisation out of a multi-organization?
Hi, we have a multi-org including two different Zoho CRM organizations for two companies using respectively EUR and USD as default currency. I was wondering if there is any easy way to merge the two organizations into just one, so that users may accessImproved Contact Sync flow in Google Integration with Zoho CRM
Hello Everyone, Your contact sync in Google integration just got revamped! We have redesigned the sync process to give users more control over what data flows into Google and ensure that this data flows effortlessly between Zoho CRM and Google. With thisUsing a third party service provider want to move directly with Zoho
Hi good day I’m currently using Zoho but I’m using a third party service provider I want to move directly with you guys I’m using Zoho email and invoices and my domain please let me know if it’s possible to move away from the third party provider my emailRequest for Assistance Regarding Email Sending Issue (554 5.1.8 - Email Outgoing Blocked)
Dear Zoho Support Team, I hope this message finds you well. I am writing to request assistance with an issue we are currently facing regarding our Zoho Mail account. Our email account, admin@tuyensinhcanuoc.com, is encountering the following error whenZoho Mail API returns empty inbox (0 messages) but webmail shows 37 unread emails
Hello, I'm experiencing a discrepancy between Zoho Webmail and the Mail API (EU region). **Setup:** - Account: EU datacenter (mail.zoho.eu) - API: Self Client OAuth2 via api-console.zoho.eu - Scopes: ZohoMail.messages.READ, ZohoMail.messages.UPDATE, ZohoMail.folders.READ,Zoho Mail not working
Zoho Mail not workingShipStation and Zoho Inventory
Hello, I am looking to sync zoho inventory with shipstation ZOHO INVENTORY SHIP STATION Sales Order ==> create ORDERS INVOICE <== Shipments What exactly does BETA mean on the Shipstation connector? This is required for me to sign-on in the next month. Thanks in advance for your effortsAre there settings for hyperlinks?
Clicking a hyperlinked cell in Sheet creates this little pop-up with the actual hyperlink inside. Is it possible to have a 1-click link where if you click the cell it opens the link directly with no pop-up?550 5.4.6 Unusual sending activity detected. Please try after sometime
Hi, I am receiving this error message when trying to send my emails. The only reason I can think why this is happening is my previous two emails were bounced back to me due to a non working mailbox error. I have followed the online links for unblocking but it says there are no blocks on my account. How and when can I get my email working again to send emails? Thanks,E
We are trying to add our Zoho Form embed in our Elementor Page Builder. After adding Zoho Forms widget in elementor page builder it’s displaying in backend page builder but it’s giving 403 error while trying to save, as it’s not reflecting in front end.Kaizen #225 - Making Query-based Custom Related Lists Actionable with Lookups and Links
Hello everyone! Welcome back to another post in the Kaizen series! This week, we will discuss an exciting enhancement in Queries in Zoho CRM. In Kaizen #190, we discussed how Queries bridge gaps where native related lists fall short and power custom relatedAbility to Edit YouTube Video Title, Description & Thumbnail After Publishing
Hi Zoho Social Team, How are you? We would like to request an enhancement to Zoho Social that enables users to edit YouTube video details after the video has already been published. Your team confirmed that while Zoho Social currently allows editing theFormatting Problem | Export to Zoho Sheet View
When I export data to Zoho Sheet View, ID columns are automatically formatted as scientific notation. Reformatting them to text changes the actual ID values. For example, 6557000335603071 becomes 6557000335603070. I have attached screenshots showing thisNext Page


