Ring in the New Year with Guided Conversations for Smooth Offline Support
As we step into the new year, it’s time to refocus, re-energize, and gear up for fresh opportunities. But what about your customers as they begin the year with their own set of challenges or queries to resolve?
With Zoho Desk’s Guided Conversations (GC), you can ensure they’re supported seamlessly, even as your team navigates the post-holiday rush.
Zylker Techfix, a mobile gadget firm, has a busy start as its customers flood them with requests: repair appointments, service inquiries, delivery tracking, and questions about new products. By leveraging Guided Conversations, Zylker Techfix provided an efficient, self-service experience that kept customers engaged while their team prioritized high-value tasks.
Here’s why Zylker Techfix setup the Guided Conversations feature within Zoho Desk:
- Customers could effortlessly log repair or service requests.
- Delivery updates and product inquiries were instantly addressed without delays.
- Clear and reassuring messaging kept customers informed that their concerns were logged and would be prioritized.
Guided Conversations acts as a dependable, 24/7 virtual assistant, automating ticket creation while offering a personal touch. Its intuitive, drag-and-drop builder enables you to design workflows that guide customers through their questions, gather essential information, and create tickets—even when your team is unavailable.
For businesses like Zylker Techfix, GC turned the often-hectic start of the year into an opportunity to build stronger customer relationships. By ensuring requests were acknowledged and logged, customers felt valued and confident that their needs were being addressed.
As you plan for the year ahead, Guided Conversations can help you create a customer experience that’s efficient, thoughtful, and future-ready.
Guide to Set up Guided Conversations (GC) in Zoho Desk
Guide to Set up Guided Conversations (GC) in Zoho Desk
Here’s how you can easily set up Guided Conversations to create tickets when agents are unavailable/offline:
1. Go to Setup > Self-Service > Guided Conversations.
2. Select the department before creating the flow because Guided Conversations are department-specific.
Create a New Flow
3. Click on the Create Flow tab in the top-right corner.
4. Select the Web Channel.
5. Enter a Name and Description for your flow, then click Next.
6. The GC design window will appear. Below the Guided Conversation icon, click the + icon to start building your flow.
7. Drag and drop elements from the right-hand panel to create your conversation blocks.
8. Drag the Text Message Block and drop it into the flow. Type a Welcome message.
9. Enter the Name of the block and the Message you want to display to customers. This block is used to share direct information with your customers.
10. Click the + icon below the text message block and add a Question Block.
11. Use the Question blocks to collect inputs from customers based on your questions.
For example, use the following Question Blocks using the + icon to receive the information from your customers:
- Name (Text Block)
- Email (Email Block)
- Contact Number (Number Block)
- Date (Calendar Block for availability)
- Attachments (Attachment Block to receive files or images, such as screenshots).

Add Button Choice Blocks
12. Use the Button Choice Blocks to present predefined options to customers, such as a list of countries, states, or regions. This is useful for collecting specific information like location and understanding the time zone.
13. Drag the Text Question block to receive a description on the Issues submitted.
14. Create the Date and Time question block to get the customer's availability time to reconnect, if required.

To Create a Ticket
15. Now, click on the Zoho Desk blocks, click on the Create ticket.
16. Give the Block Name, choose the Department (the same department where you create this Guided Conversation), choose the layout for the Email template.
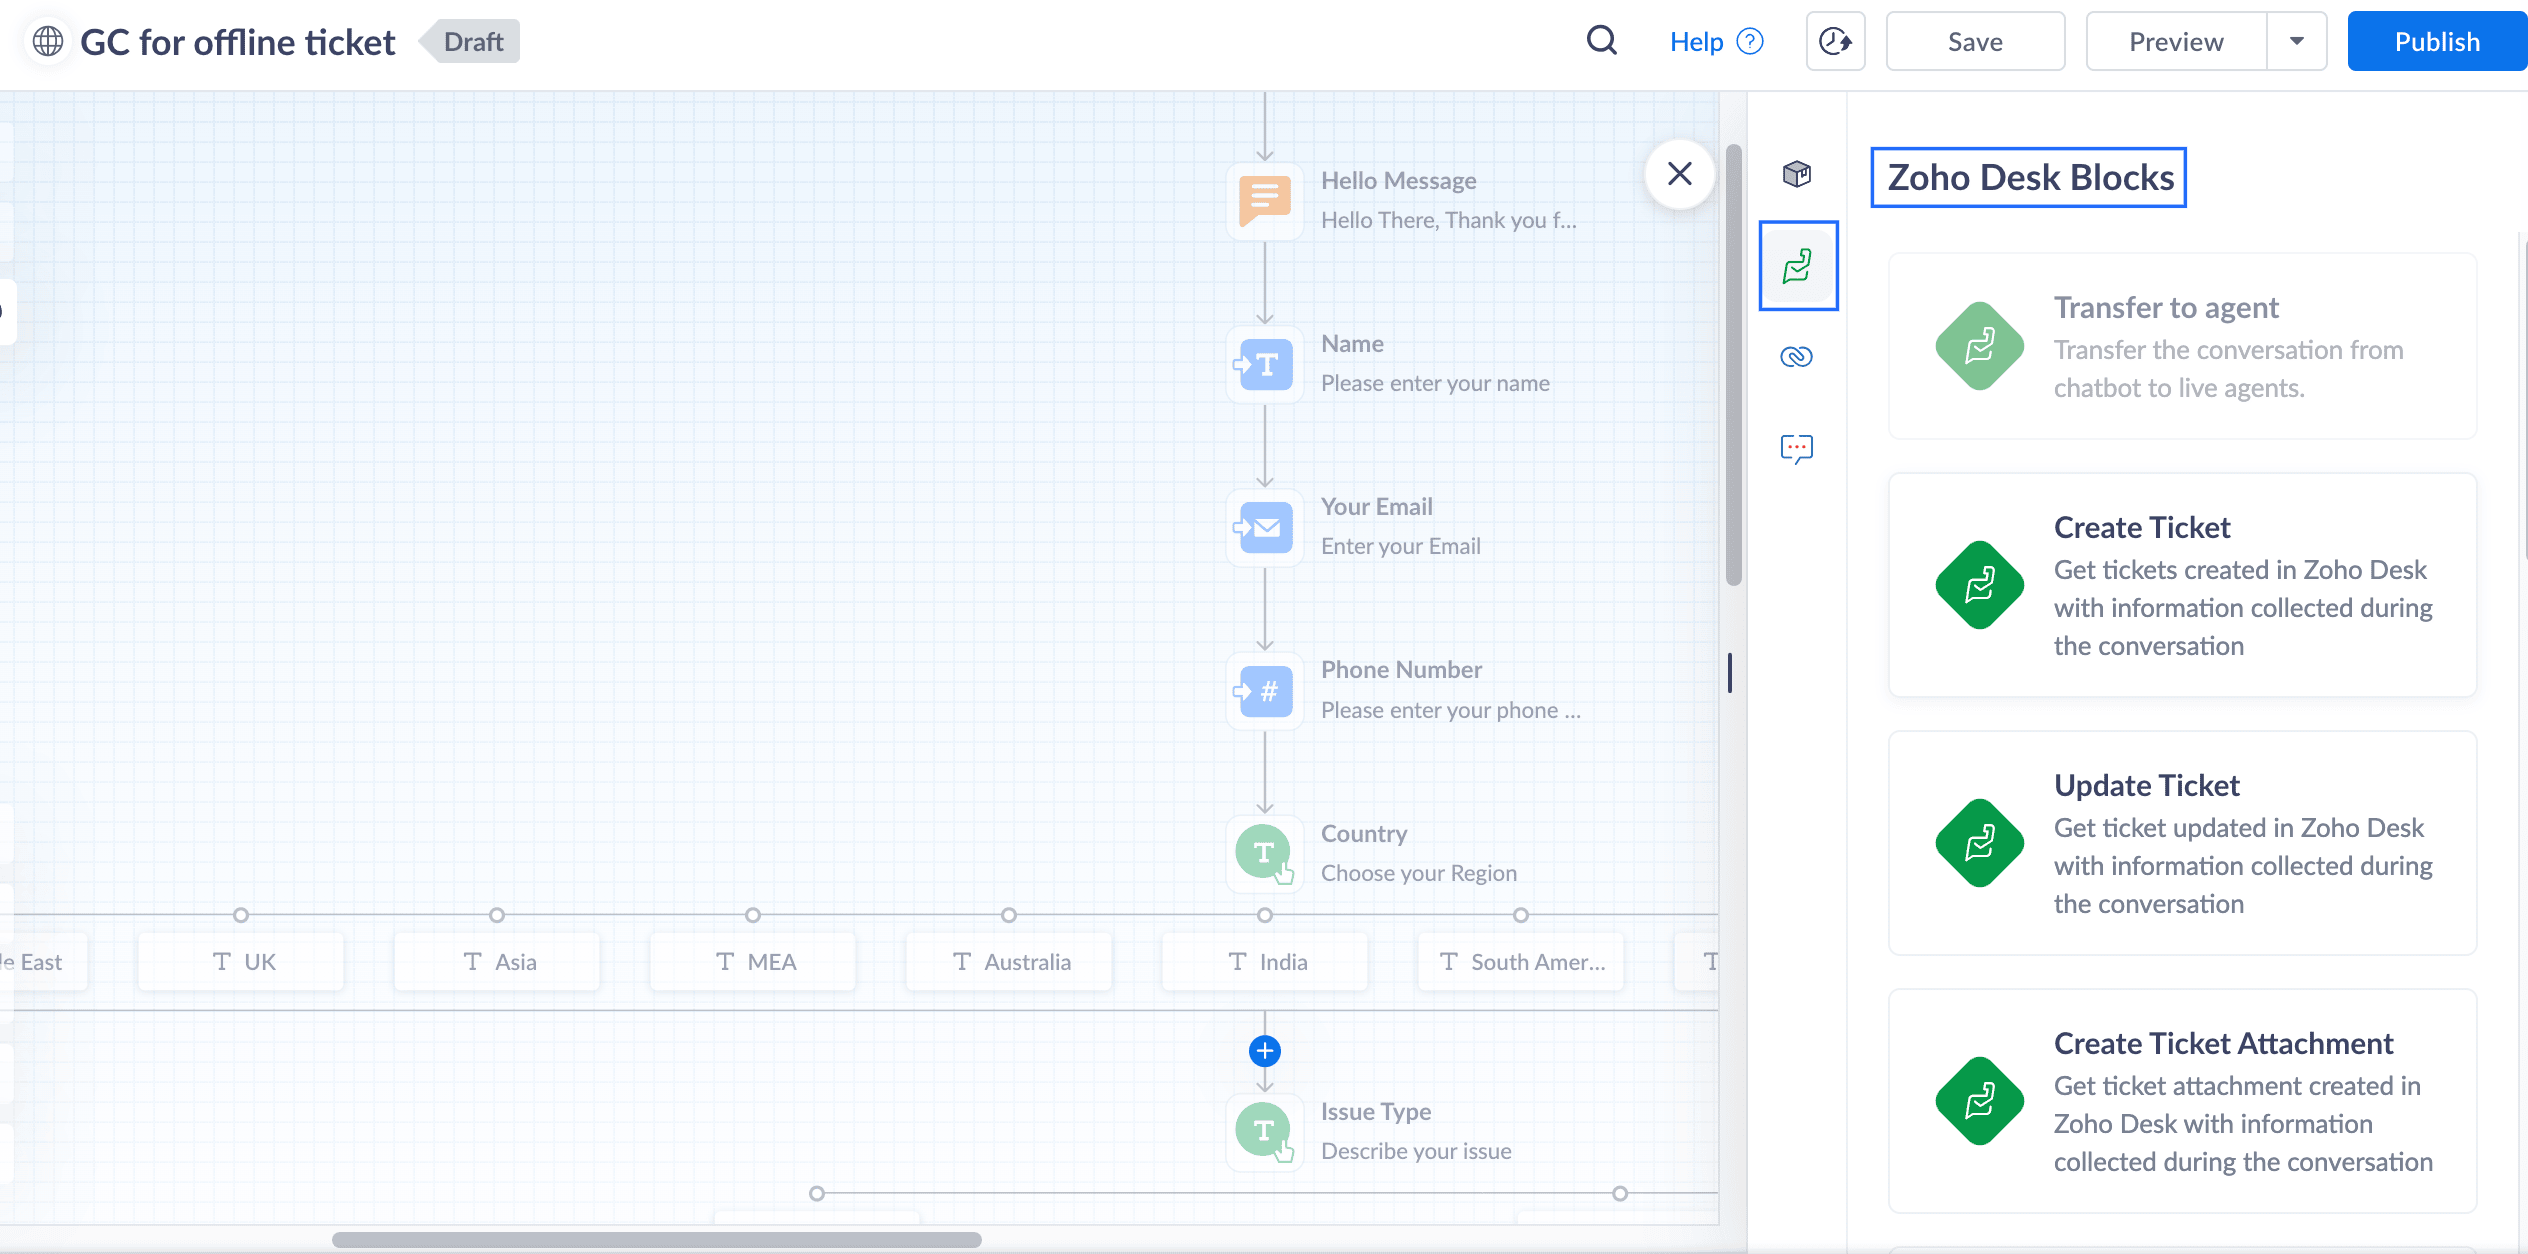

17. In the Input variable mapping, click on the gear icon, map the field variables in the Tickets layout with the Flow variables created within GC.
For example, map the Email field within Tickets to the Email block in GC, map Phone with the Phone field, map Subject with the Issue Type, and map Description with the Describe issue text block
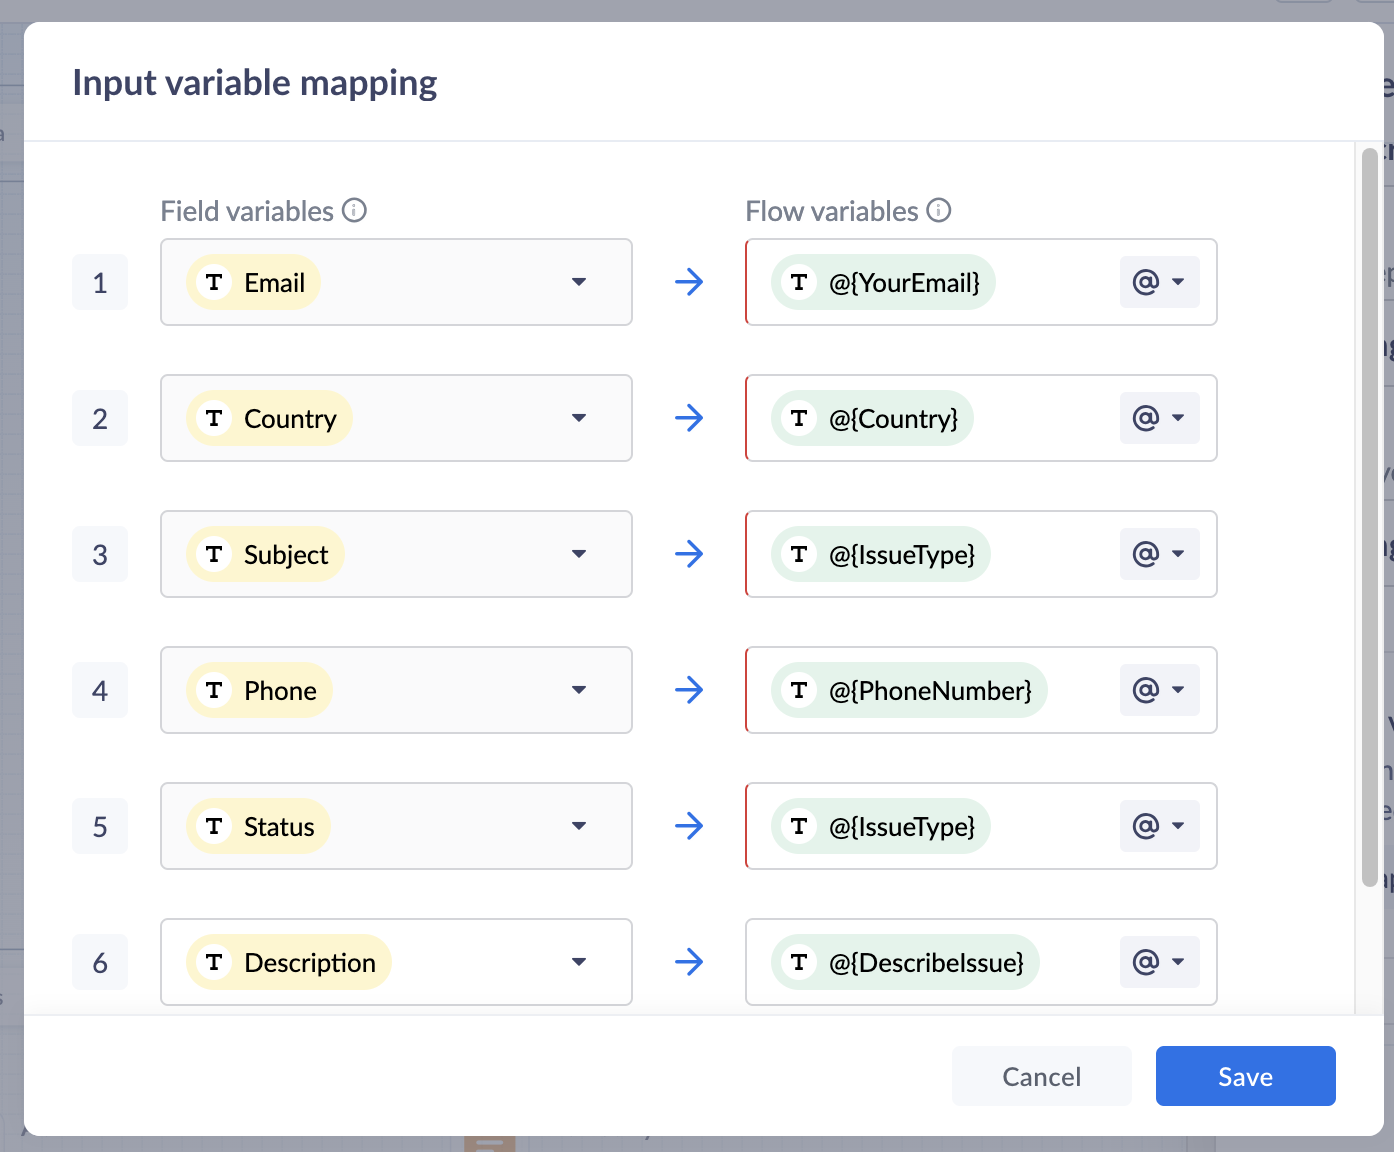

18. Click Save to save the mapping variables
19. In the Output variable mapping, click on the gear icon, map the ticket related information which you would like to share with the customers within the GC.
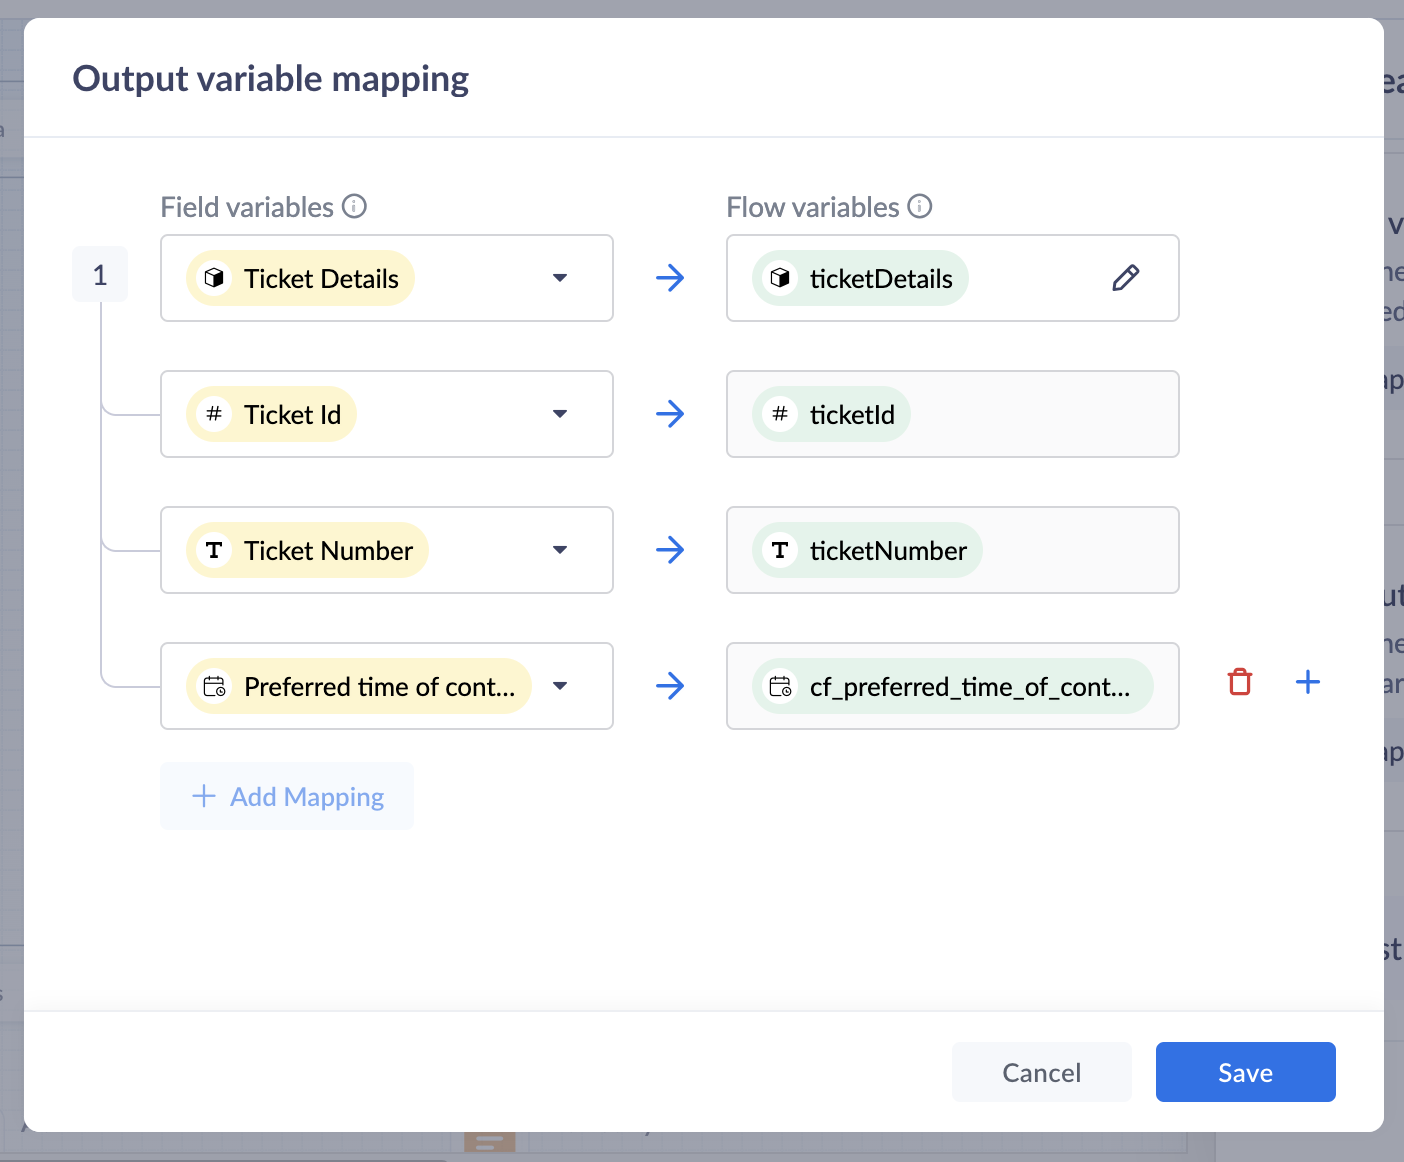

Preview and Publish
20. Once all blocks are added, click on Preview to view the flow and ensure it works based on your requirements.
21. Save your changes, and click Publish. Your Guided Conversation is ready to use!

Note: Some blocks are being developed for Instant Messaging (IM) channels and will appear faded out if you choose IM channels.
Create A GC Widget
i. Go to Setup(S) >> Self Service >> Guided Conversations >> GC widgets.ii. Click on Create GC widget. Give a Name and Description.iii. Choose the Channels. click on the drop-down arrow under Associate flows >> Add Flow >> select the Published GC.iv. Click Associate. under Access Permissions, select users based on your preferences.v. Enter your preferred welcome message that you would like to appear on your GC widget.vi. Enter End Options based on your preferences.vii. Click Save to save your GC widget.
ASAP Widget
Go to Setup (S) >> Self-Service >> ASAP >> Create New Widget.
a. Enter a Name, enable the widget launcher to show the widget on your website.b. Associate the help widget with required departments.c. Choose the required modules to associate with the widget.d. Once you are done, click on Generate.
Embed GC
You can obtain the embed code to integrate the widget into your website or Help Center, as well as the organization ID for iOS and Android SDKs.
i. Go to Setup (S) >> Self-Service >> ASAP.ii. Hover over the created ASAP widget; click on Embeddable Code.iii. Copy the web embed code for use on your website or Help Center.iv. Use the iOS ID for iOS SDK and the Android ID for Android SDK.
That’s it—your Guided Conversation is now live and ready to assist your customers!
Pro Tip
Guided Conversations can be tailored to suit a variety of scenarios, from managing customer inquiries to streamlining ticketing operations. Enhance the customer experience by customizing, editing, or updating workflows to meet their needs effortlessly.
Explore our Guided Conversation Guide and the automation with GC to ensure your customers always have the support they need.
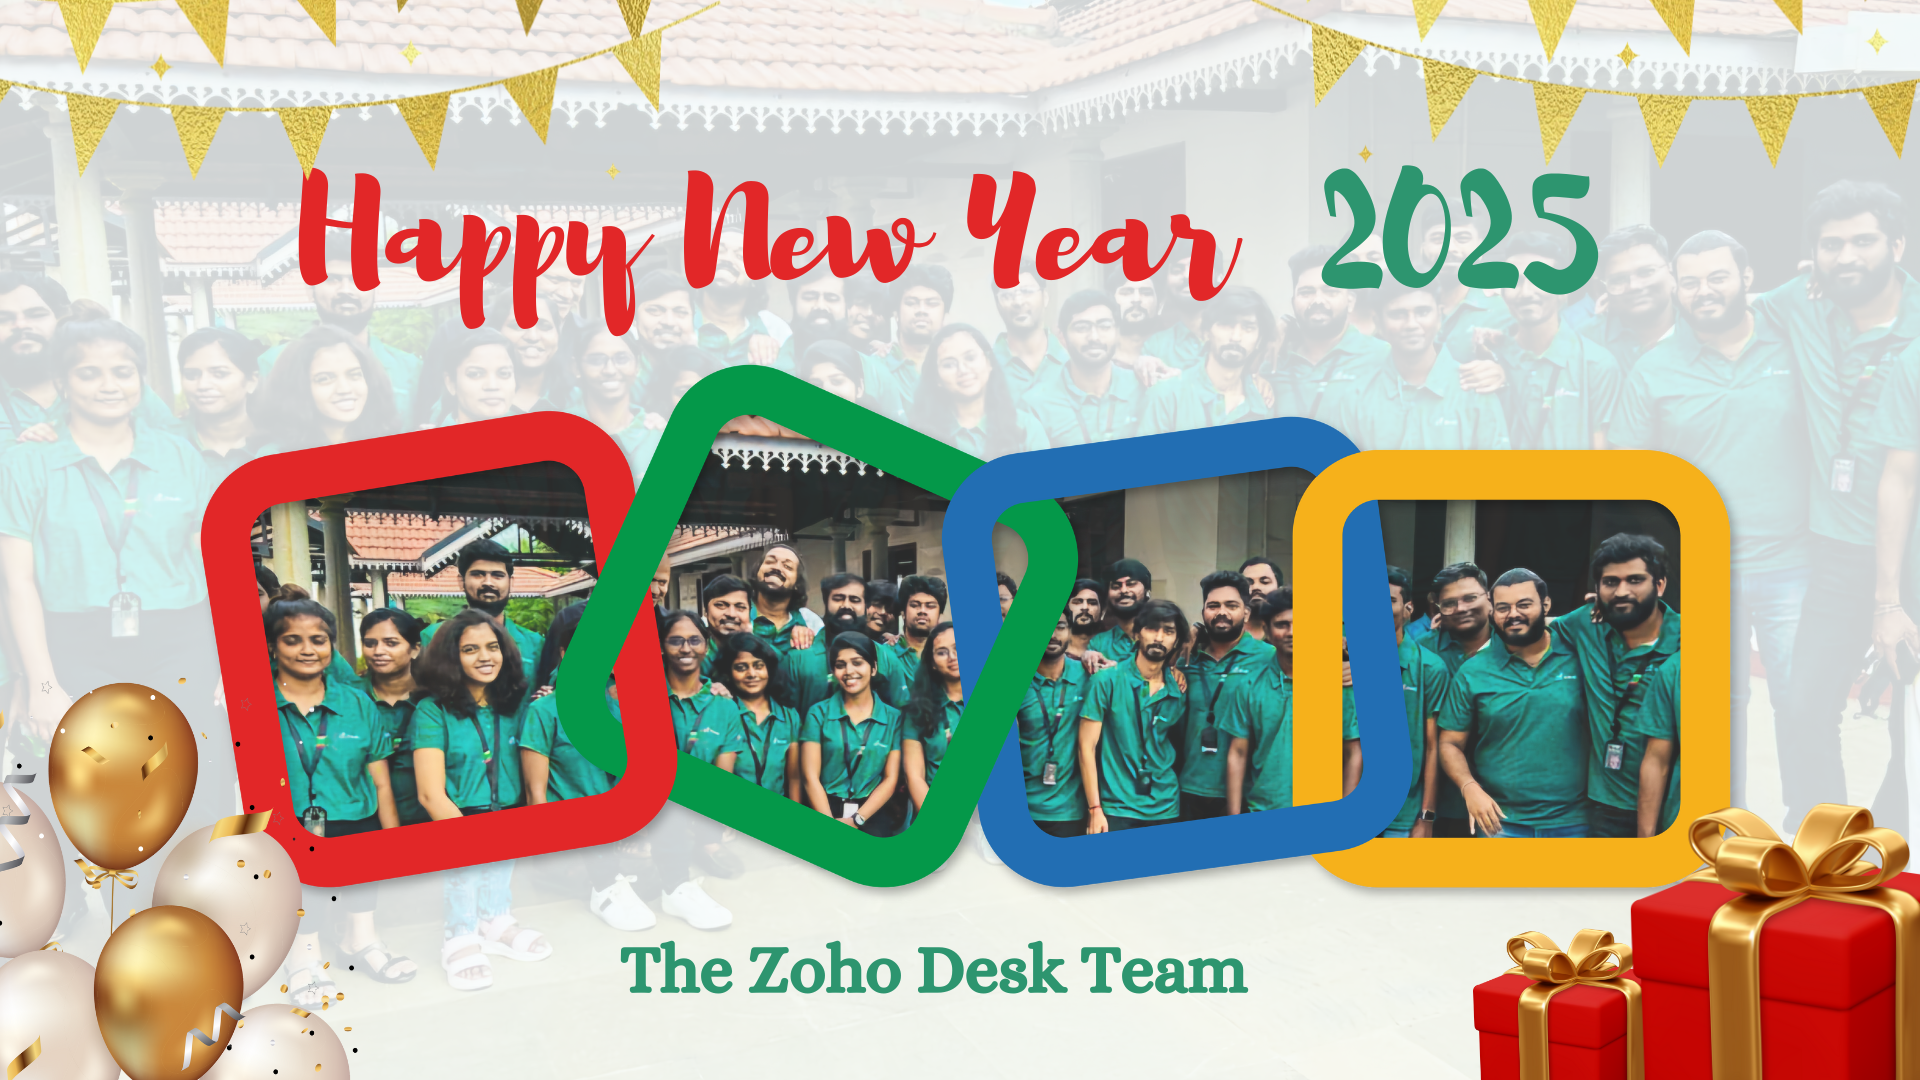
Here’s to a fantastic start to the New Year! Wishing you success and seamless experiences ahead: Happy New Year from the Zoho Desk Team! 🎉

New to Zoho Recruit?
Zoho Campaigns Resources
Topic Participants
Lydia | Zoho Desk
Sticky Posts
Register for Zoho Desk Beta Community
With the start of the year, we have decided to take a small step in making the life of our customers a little easier. We now have easy access to all our upcoming features and a faster way to request for beta access. We open betas for some of our featuresShare your Zoho Desk story with us!
Tell us how you use Zoho Desk for your business and inspire others with your story. Be it a simple workflow rule that helps you navigate complex processes or a macro that saves your team a lot of time; share it here and help the community learn and grow with shared knowledge.Tip #1: Learn to pick the right channels
Mail, live chat, telephony, social media, web forms—there are so many support channels out there. Trying to pick the right channels to offer your customers can get pretty confusing. Emails are most useful when the customer wants to put things on record. However, escalated or complicated issues should not be resolved over email because it's slow and impersonal. When you need immediate responses, live chat is more suitable. It's also quick and convenient, so it's the go-to channel for small issues.Welcome to Zoho Desk Community - Say hello here!
Hello everyone! Though we have been here for a while, it’s time to formally establish the Zoho Desk Community; we’re really happy to have you all here! This can be the place where you take a moment to introduce yourself to the rest of the community. We’d love to hear all about you, what you do, what company or industry you work for, how you use Zoho Desk and anything else that you will like to share! Here’s a little about me. I am Chinmayee. I have been associated with Zoho since 2014. I joined hereWebinar 1: Blueprint for Customer Service
With the launch of a host of new features in Zoho Desk, we thought it’ll be great to have a few webinars to help our customers make the most of them. We’re starting off with our most talked about feature, Blueprint in Zoho Desk. You can register for the Blueprint webinar here: The webinar will be delivered by our in-house product experts. This is a good opportunity to ask questions to our experts and understand how Blueprint can help you automate your service processes. We look forward to seeing
Zoho CRM Plus Resources
Zoho Books Resources
Zoho Subscriptions Resources
Zoho Projects Resources
Zoho Sprints Resources
Zoho Orchestly Resources
Zoho Creator Resources
Zoho WorkDrive Resources
Zoho CRM Resources
Get Started. Write Away!
Writer is a powerful online word processor, designed for collaborative work.
Zoho CRM コンテンツ
-
オンラインヘルプ
-
Webセミナー
-
機能活用動画
-
よくある質問
-
Ebook
-
-
Zoho Campaigns
- Zoho サービスのWebセミナー
その他のサービス コンテンツ
ご検討中の方
Recent Topics
Where is the settings option in zoho writer?
hi, my zoho writer on windows has menu fonts too large. where do i find the settings to change this option? my screen resolution is correct and other apps/softwares in windows have no issues. regardsZoom Phone SMS Integration
Requesting Zoom SMS capabilities to be integrated by Zoho CRM to capture a related SMS conversation logged to the lead, contact etc..Passing the CRM
Hi, I am hoping someone can help. I have a zoho form that has a CRM lookup field. I was hoping to send this to my publicly to clients via a text message and the form then attaches the signed form back to the custom module. This work absolutely fine whenFile emails in Shared email folder
Hi, I am unable to allow users to collaborate in Shared email folders: User 1 shares a folder let's say "SharedTopic" with full permissions Users 2 and 3 can see this folder but are unable to add emails to this folder or search in this folder. For example,No funcionan correctamente el calculo de las horas laborales para informe de tickets
Hola, estoy intentando sacar estadísticas de tiempo de primera respuesta y resolución en horario laboral de mis tickets, pero el calculo de horas en horario laboral no funciona correctamente cree los horarios con los feriados : Ajusté los acuerdos deHow create a draft via workflow?
I wish to create a workflow rule for specific emails that creates a draft response - not an automatic email reply, but just a draft with a set response ready to be verified by an agent who can then manually select recipients. Alternatively, the workflowTicket layout based on field or contact
Hi! I want to support the following use-case: we are delivering custom IT solutions to different accounts we have, thus our ticket layouts, fields and languages (priority, status field values should be Hungarian) will be different. How should I setupThis user is not allowed to add in Zoho. Please contact support-as@zohocorp.com for further details
Hi Team, when I,m trying to create a email account (imagixmidia.com.br) it's showing this error >> This user is not allowed to add in Zoho. Please contact support-as@zohocorp.com for further details plz help me thanksHow to manage task lists in Zoho Desk?
Hello, I use Zoho Desk for IT customer support. I have a list of standard operating procedures (SOPs), including SOPs for onboarding new users, offboarding users, losing a device, etc. These are lists of tasks to be performed depending on the situation.Zoho → ShipStation Integration – Sales Order–Driven Fulfilment Workflow
Hello All, I’m reaching out to explore the best way to integrate a shipping tool into our inventory which will speed our process up. We are looking to integrate ShipStation into our existing order-to-fulfilment workflow, as we’re keen to standardise onBusiness Day Logic Update: More Accurate Scheduling for Your Workflows
Hello everyone, We’re improving how business-day calculations work in workflows, especially when triggers happen on weekends. This update ensures that offsets like +0, +1, and +2 business days behave exactly as intended, giving you clearer and more predictableConvert Lead Automation Trigger
Currently, there is only a convert lead action available in workflow rules and blueprints. Also, there is a Convert Lead button available but it doesn't trigger any automations. Once the lead is converted to a Contact/Account the dataset that can be fetchedDefault Tagging on API-generated Transactions
If one assigns tags to an Item or Customer, those tags get auto-populated in each line item of an Invoice or Sales Order when one creates those documents. However, if one creates the Sales Order or Invoice via the API (either directly coding or usingUser
If user is already part of manage engine endpoint central , what hapens when i try to add them to another Zoho org / directory? Are these users added as external users?Adding a new section to the related details sidebar when creating a new ticket.
Hello, I was wondering if you can add a new section to the related details sidebar when creating a new ticket. I was wanting to have it to where it also shows the account information related to the contact chosen as well. This is the section I am referringPosibility to add Emoticons on the Email Subject of Templates
Hi I´ve tried to add Emoticons on the Subject line of Email templates, the emoticon image does show up before saving the template or if I add the Emoticon while sending an Individual email and placing it manually on the subject line. Emoticons also showDisplaying only unread tickets in ticket view
Hello, I was wondering if someone might be able to help me with this one. We use filters to display our ticket list, typically using a saved filter which displays the tickets which are overdue or due today. What I'd really like is another filter thatHolidays - Cannot Enter Two Holidays on Same Day
I have a fairly common setup, where part-time employees receive 1/2 day's pay on a holiday and full-time employees receive a full day's pay. Historically, I've been able to accommodate this by entering two separate holidays, one that covers full-timeCRM project association via deluge
I have created a workflow in my Zoho CRM for closing a deal. Part of this workflow leverages a deluge script to create a project for our delivery team. Creating the project works great however, after or during the project creation, I would like to associateHow to compare a subform lookup field that allows multiple entries when edited
I have a form with a subform with multiple fields. One of the fields is a lookup field that allows a multi select. On edit validation, I want a workflow to execute only when the entries in that subform field has changed. The old. function is not workingIs Zoho Shifts included in the Zoho One plan?
In case the answer is no: there's any plan to make it available via One? Thank youCreating a Chart from a Report
In Zoho Analytics, is it possible to create a chart from a Pivot View report? We are looking to use Zoho Analytics to replace Excel for Sales reports and would like to be able to show both the table and the chart together.Zoho Tracking Image location
So we've been having an issue with tracking email opens. Specifically in Gmail. Our emails are not that long either, maybe 4 sections of image/250 characters of text/button per section. But all my test accounts I used via Gmail we're showing opens. But then come to find out the tracking image is at the very bottom of the email. So If the message is clipped (It always just clips our social icons on the bottom) and the user doesn't click the show more button it never tracks the open. Looking at otherIs there a plan to integrate zoho voice with zoho books?
Hello, Is there a plan to integrate zoho voice with zoho books? Right now we are using the Twilio SMS integration into zoho books, but have recently decided to switch to zoho voice for calls and sms. Is there a plan to integrate zoho voice natively intoZoho Tables is now live in Australia & New Zealand!
Hey everyone! We’ve got some great news to share — Zoho Tables is now officially available in the Australian Data Center serving users across Australia and New Zealand regions! Yes, it took us a bit longer to get here, but this version of Zoho TablesDelivery and handling of documents e-stamped using Zoho Sign
Hello everyone! Zoho Sign makes it easy to pay non judicial stamp duty online and automatically attach the digitally generated e-stamp challan to electronic documents. We also manage the delivery of physical e-stamped papers. We periodically receive theseIntroducing Dedicated Modules for Plans, Addons, and Coupons in Zoho Billing
We’ve enhanced the way you manage Plans, Addons, and Coupons in Zoho Billing. Previously, all three grouped together under Subscription Items. Now, each one has its own dedicated module, giving you a cleaner and more intuitive experience. This updateSortie de Zoho TABLE ??
Bonjour, Depuis bientôt 2 ans l'application zoho table est sortie en dehors de l'UE ? Depuis un an elle est annoncée en Europe Mais en vrai, c'est pour quand exactement ??Zoho Forms API
Is there any way to get all form entry list using API? Looking forward to hear from youIssue with WhatsApp Template Approval and Marketing Message Limit in Zoho Bigin
We are facing issues while creating and using WhatsApp message templates through Zoho Bigin, and we request your clarification and support regarding the same. 1. Utility Template Approval Issue Until December, we were able to create WhatsApp templatesHow to install Widget in inventory module
Hi, I am trying to install a app into Sales Order Module related list, however there is no button allow me to do that. May I ask how to install widget to inventory module related list?Zoho Social - Feature Request - Reviewer Role
Hi Social Team, I've come across this with a couple of clients, where they need a role which can review and comment on posts but who has no access to create content. This is a kind of reviewer role. They just need to be able to see what content is scheduledZoho Social - Feature Request - Non-US Date Format
Hi Social Team, I have noticed that there is no option to change the date format from US mm/dd/yyyy to others like dd/mm/yyyy. It would be great to see this added as the platform matures. Thanks for considering this feedback.Drop Down Value
Hi, May I know why Zoho Flow treat this drop down as number and not as string. If so, how can I fetch the right value for filtering. This field is from Creator, in Creator upon checking by default it is a string since it's not a lookup field.Zoho CRM's mobile apps: A 2025 Recap
2025 marked a year of steady progress for Zoho CRM's mobile apps. We rolled out several updates and features to improve usability and make everyday CRM work a lot easier to manage. Here’s a look back at some of the key releases from 2025. Android releasesDependent / Dynamic DropDown in ZohoSheets
Has anyone figured out a way to create a Dropdown, the values of which is dependent on Values entered in the other cell ?Facebook follower count doesn't match FB Analytics
Hi all, I am wondering if anyone else has issues with follower counts for Facebook not matching FB's native analytics tool. On the Zoho dashboard, it's showing 1,007, but FB shows 1,060. All the other channels match up. Any insights are much appreciated!Unable to mass update a picklist field
Hello, I have the records within our Accounts module divided between two account types: Parent Accounts & Member Accounts. I am attempting to mass update accounts from one picklist value to the other (within other specific criteria in our custom fields)Meta and Facebook data report discrepancy
I have been currently gathering manually facebook follower data thru meta. In zoho marketing plus the social media reporting only allows for page likes, and so there is a discrepancy with the data. please the difference in files attached. Is there wayDevelop and publish a Zoho Recruit extension on the marketplace
Hi, I'd like to develop a new extension for Zoho Recruit. I've started to use Zoho Developers creating a Zoho CRM extension. But when I try to create a new extension here https://sigma.zoho.com/workspace/testtesttestest/apps/new I d'ont see the option of Zoho Recruit (only CRM, Desk, Projects...). I do see extensions for Zoho Recruit in the marketplace. How would I go about to create one if the option is not available in sigma ? Cheers, Rémi.Next Page


