Spotlight 34: Handle event engagement in one space
Having one place where you can run sessions, promote networking, and drive attention to exhibitor booths can help increase engagement at events.
In Zoho Backstage's Virtual Space, you can provide event participants with a unified experience to join sessions, participate in discussions using networking tables, and interact with exhibitors, all from one place.
Set up the Virtual Space
Every time you open a session, visit a booth, or join a networking table, you will be redirected to the Virtual Space. Once you have entered the Virtual Space through any of the above options, you can easily switch between these options inside the Virtual Space itself. Event participants also get to experience the same thing when they do this from the event microsite.
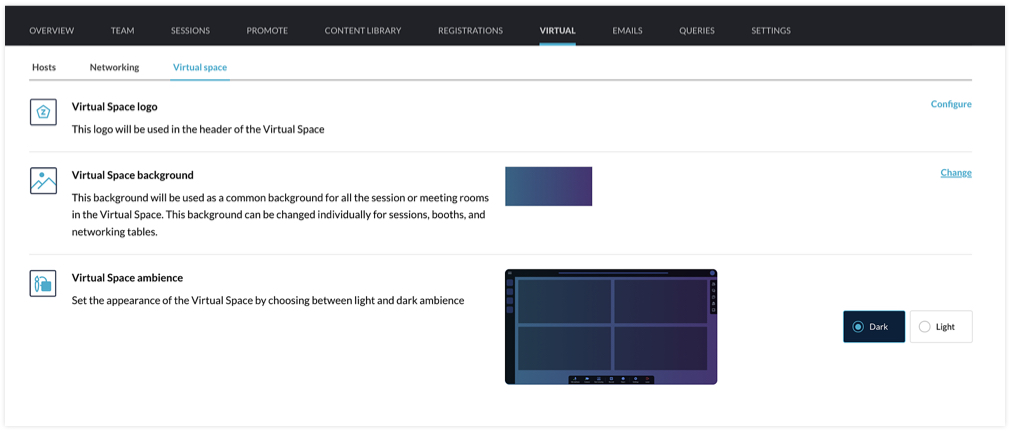
You can customize the Virtual Space to reflect your brand or event's theme by choosing a logo, a background, and the ambience. The logo you've set for the event will be chosen for the Virtual Space by default, but you can select a different one if needed. For the background, the option that you choose will be applied for all sessions, tables, and meeting rooms in exhibitor booths. You can even modify the background scheme at a granular level by selecting a different background for individual booths, sessions, or tables. The Virtual Space ambience can either be set to Dark or Light.
Set the stage for sessions
When hosting a session, you can go to the event microsite and visit the Agenda page. There you can click the Start session button. Alternatively, you can also do this from Backstage. Go to the Conduct Dashboard and click the Present sessions tab. Next, click a session in the timeline on the left and click the Start session button. You can then broadcast the session with the help of the webcasting service that you've selected.
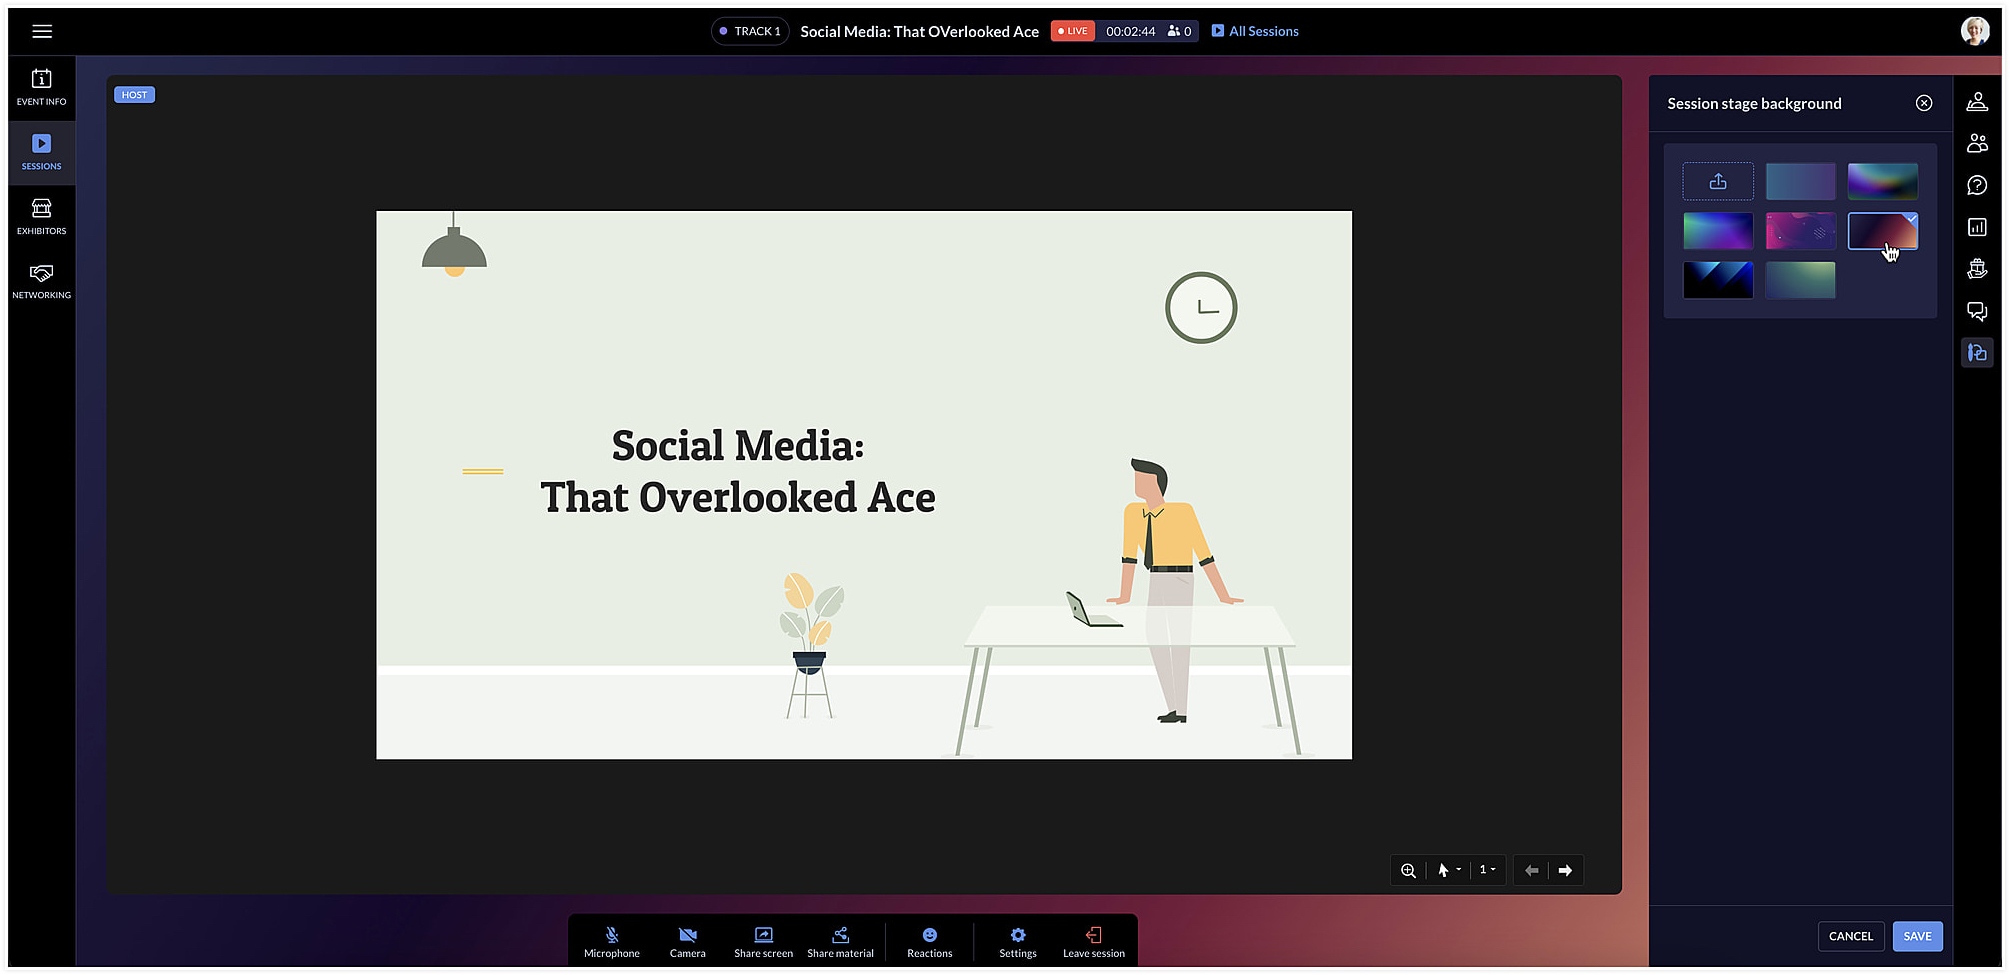
The session area will be designed based on the Virtual Space settings you've chosen. To change the background color for a specific session, click the Session stage background icon [ ] at the right and choose a background option from the list.
 ] at the right and choose a background option from the list.
Facilitate communication with networking tables
Networking tables can be an opportunity for event participants to make important connections. Think of them as similar to round table discussions that take place at a physical event. Attendees can take a seat at a virtual networking table and interact with others there. Networking tables can be used by anyone who is a part of the event such as speakers, attendees, sponsors, or event exhibitors.
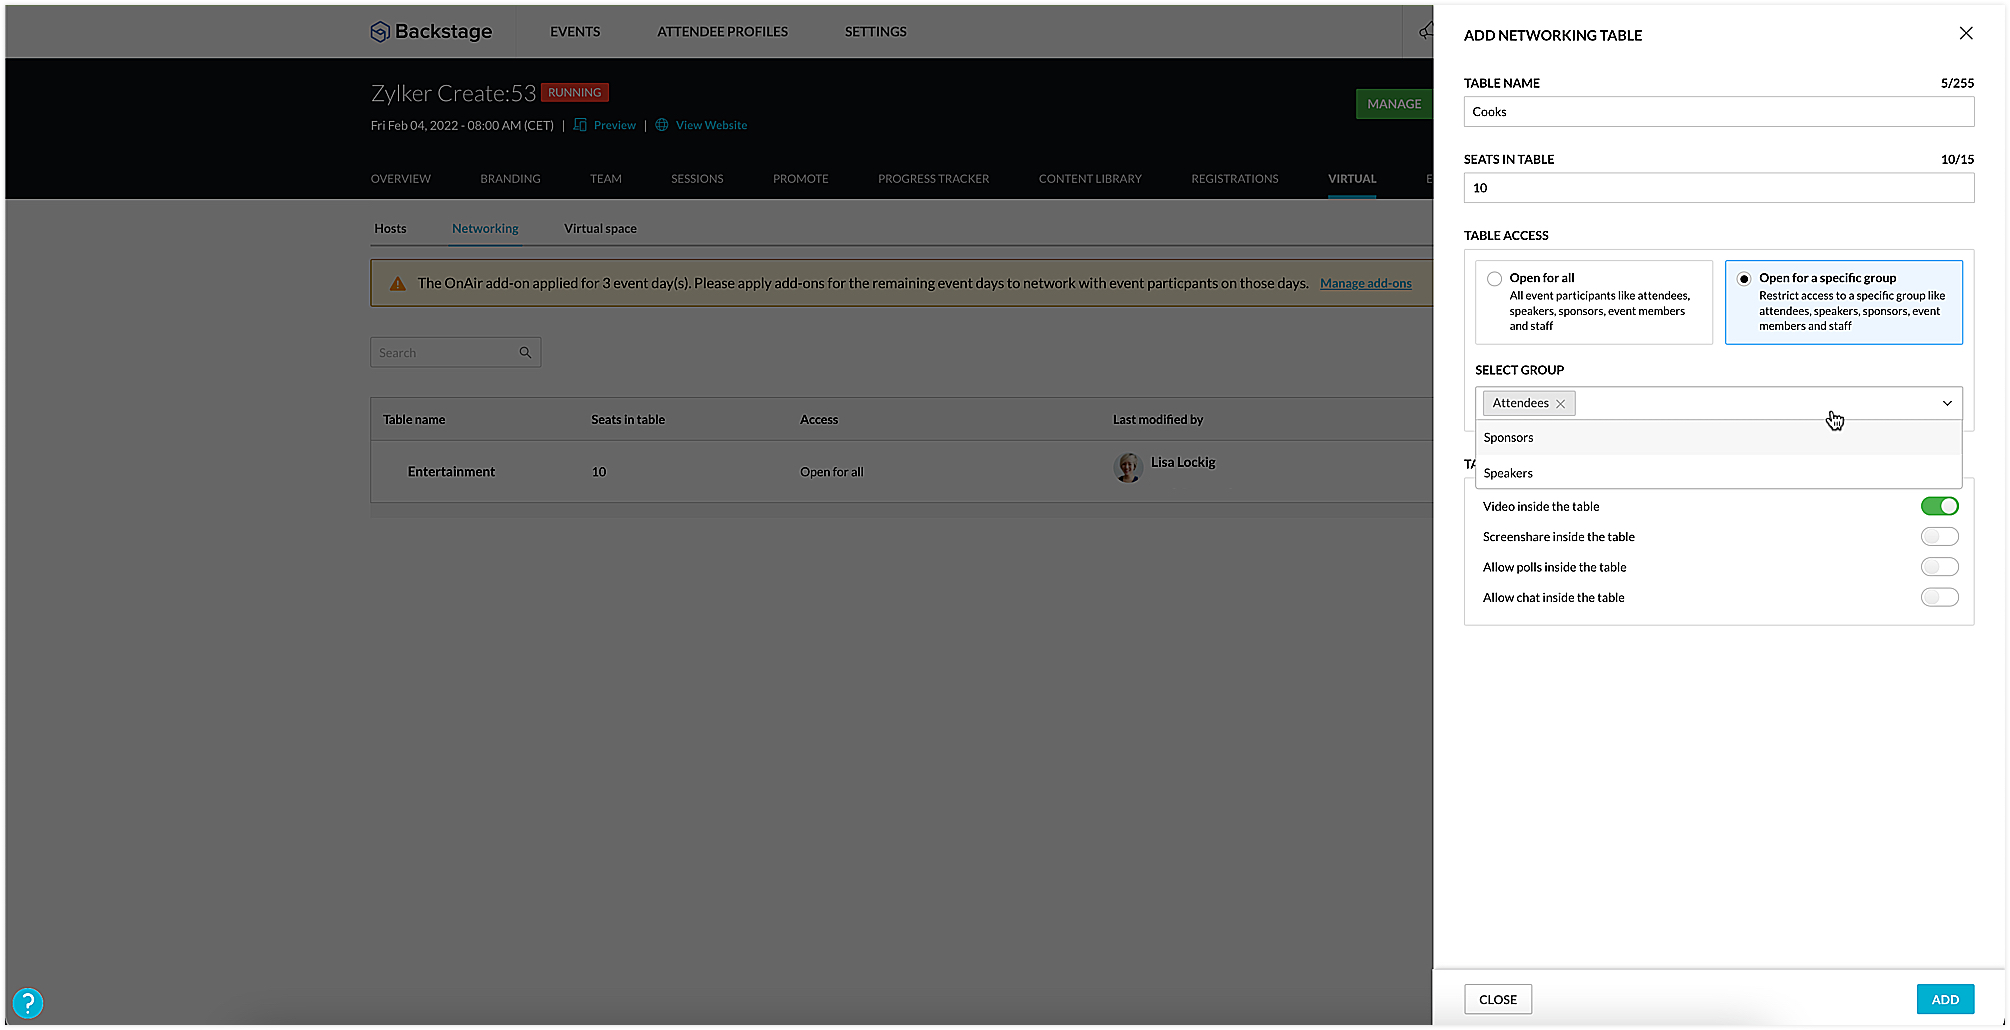
To create a networking table, go to the Manage Dashboard and click the Virtual tab, then click the Networking tab. Here you can say how many seats must be available and enable options such as chat, video stream, polls, or screen sharing for everyone at the table, if necessary. You could also choose to make tables exclusive so that they will be available only to certain participants. To do this, select the Open for a specific group radio button, and select the group you want to make them available to.
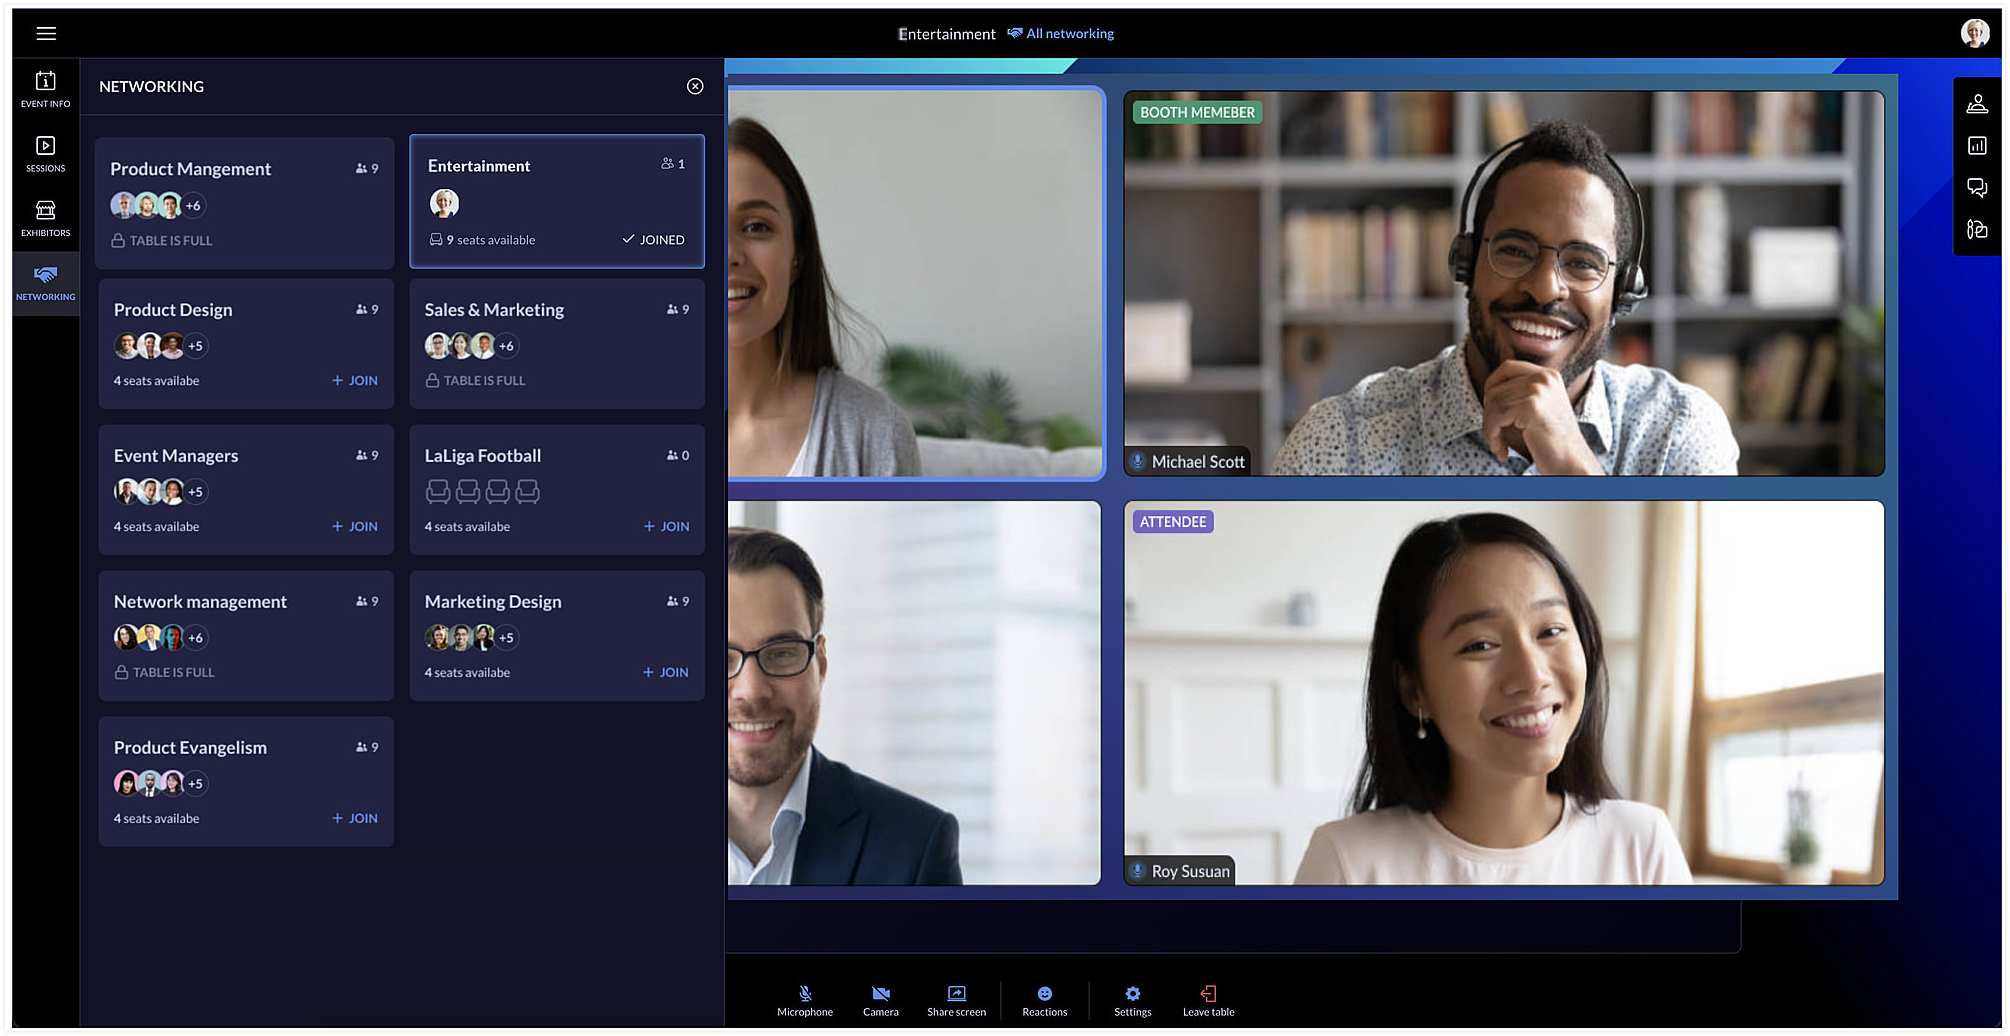
Event team members can join networking tables to take part in the discussion or just observe the conversation. Event members who join networking tables can manage ongoing interactions by muting or unmuting the mics or pausing the video stream of participants.
Each table can have a background of its own too. You can do this by clicking the Networking tab in the Virtual Space and clicking the Table background icon [ ].
].
 ].
].Showcase exhibitors to interest attendees
The Virtual Space also includes the Exhibitors tab, which lists all the exhibitors who are associated with your event. Exhibitors can send a request to the event team through the event microsite. Once the request is approved, they can conduct meetings with interested booth visitors during the virtual event.
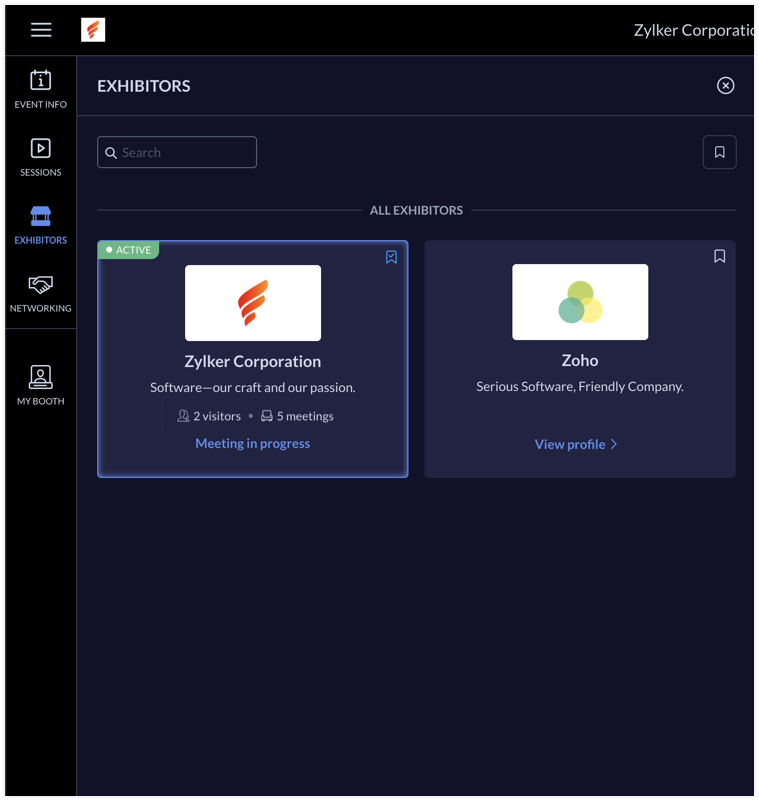
Exhibitors can use the rehearsal option before the event to practice meeting flow with test participants. During the event, the My Booth tab in the Virtual Space gives an overview of the exhibitor's information and also the members who are available in the booth. The number of ongoing meetings and visitors who are in the waiting room will be visible here. An exhibitor's booth background scheme can also be modified in the Virtual Space using the Expo meeting background icon [ ].
].
 ].
].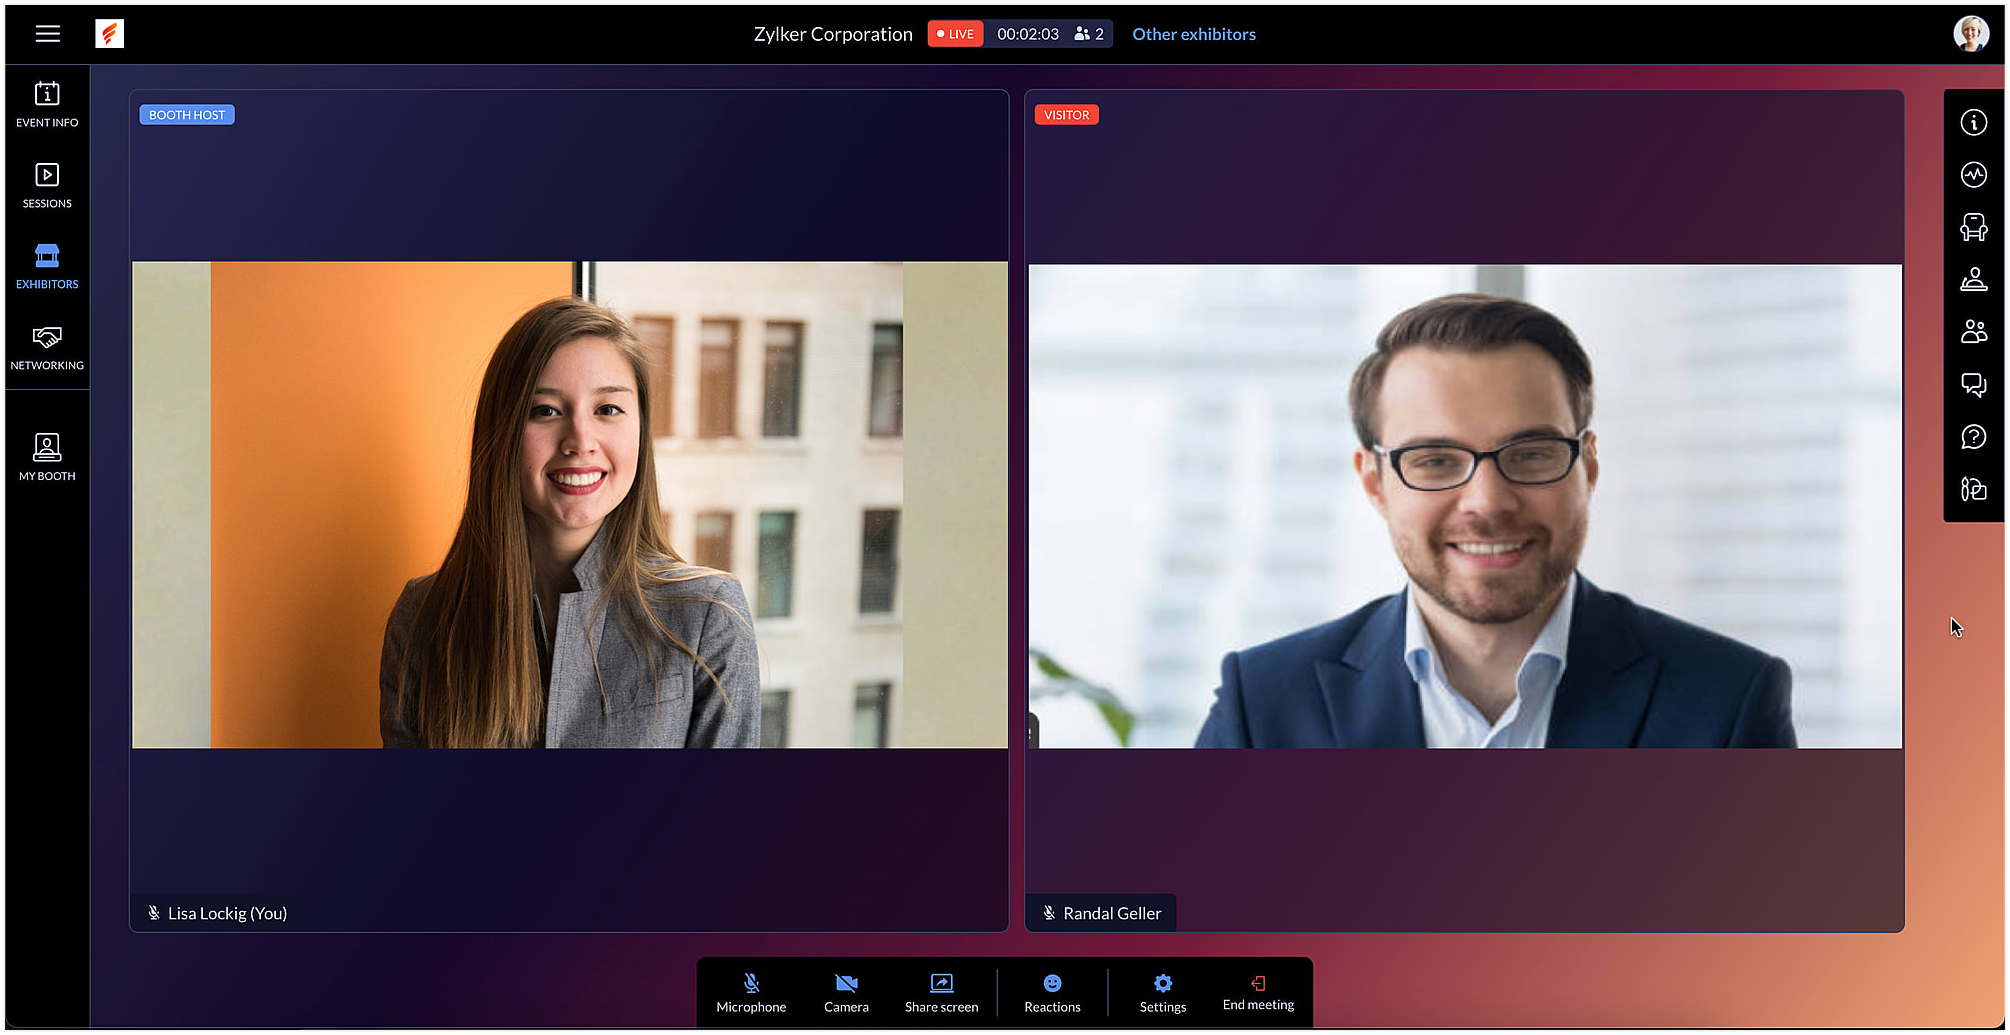
Exhibitors can also use the chat and questions option to interact with visitors when meeting with them. When viewing information for other exhibitors in the Exhibitors tab, you can do this without leaving an ongoing meeting, if you're a part of one.
After the event is over, exhibitors can export chat messages from the event microsite and, based on the permission given, they can also view and export the lead list from the Leads tab.
In Backstage, you can see an overview for details regarding exhibitors and their booths. To view this, go to the Overview tab in the Manage Dashboard and click the Exhibitors tile. Here you can keep track of booth purchases, view the sales overview for booths, and also examine analytics for meetings in booths.
Engage event participants in the Virtual Space and customize it to match your event's style. You can also start a discussion about this in our community or write to us at support@zohobackstage.com with your thoughts or questions.
Happy organizing!
New to Zoho Recruit?
Zoho Campaigns Resources
Topic Participants
Tina Samuel
Sticky Posts
Spotlight 26: Host interactive virtual sessions with Backstage OnAir
According to a recent survey by Markletic, two of the biggest challenges organizers face when hosting online events are attendee engagement and interaction. Where in-person events bank on the impact of face-to-face communication to engage attendees, virtual
Zoho CRM Plus Resources
Zoho Books Resources
Zoho Subscriptions Resources
Zoho Projects Resources
Zoho Sprints Resources
Zoho Orchestly Resources
Zoho Creator Resources
Zoho WorkDrive Resources
Zoho CRM Resources
Get Started. Write Away!
Writer is a powerful online word processor, designed for collaborative work.
Zoho CRM コンテンツ
-
オンラインヘルプ
-
Webセミナー
-
機能活用動画
-
よくある質問
-
Ebook
-
-
Zoho Campaigns
- Zoho サービスのWebセミナー
その他のサービス コンテンツ
ご検討中の方
Recent Topics
Unified customer portal login
As I'm a Zoho One subscriber I can provide my customers with portal access to many of the Zoho apps. However, the customer must have a separate login for each app, which may be difficult for them to manage and frustrating as all they understand is thatAdd Option to Mass Dispatch by User
Hello! We are using the dispatch console to dispatch service appointments to our service ressources. Right now, the process is our dispatcher verifies each ressource's route for the day and dispatches it after validation. Sadly, there doesn't seem toKaizen #157: Flyouts in Client Script
Hello everyone! Welcome back to another exciting edition of our Kaizen series, where we explore fresh insights and innovative ideas to help you discover more and expand your knowledge!In this post, we'll walk through how to display Flyouts in Client ScriptCustomize User Invites with Invitation Templates
Invitation Templates help streamline the invitation process by allowing users to create customized email formats instead of sending a one-size-fits-all email. Different invitation templates can be created for portal users and client users to align withAdmin Control Over Profile Picture Visibility in Zoho One
Hello Zoho Team, We hope you are doing well. Currently, as per Zoho’s design, each user can manage the visibility of their profile picture from their own Zoho Accounts page: accounts.zoho.com → Personal Information → Profile Picture → Profile PictureAbility to Set Client Name During Portal Invitation
Hi Zoho Team, We would like to suggest an important enhancement to the Zoho Creator Client Portal functionality. Zoho Creator recently introduced the option to set a client’s display name in the Client Portal settings, which is very helpful for creatingPublished Course Not Reflecting In Hub
Hi! I am trying to create micro-learning courses for our team to be available for self-guided learning. I have published the courses with enrollment settings open to all users of the hub, but they don't appear to be available for enrollment. Am I missingUnlock Locked Users via Zoho One Mobile App
Hello Zoho One Team, We have noticed that in the Zoho One web admin panel, we can unlock a locked user when needed. However, when using the Zoho One mobile app, there is no indication that a user is locked, nor is there an unlock button similar to whatFeature Request: Email Follow-Up Sequences Similar to Zoho CRM
I’m wondering if Zoho Recruit is planning to introduce a feature similar to the Email Automation – Follow-Up Sequences that is available in Zoho CRM. In CRM, this allows users to send a series of timed follow-up emails triggered by specific actions (forIs CRM On Premise available
Hi Zoho team, Can you please let me know that CRM Zoho is available for On Premise as well? Thanks, DevashishAccount in Quick View Filter
I have a report that I often run against a specific Account. Every time, I have to go into the edit menu and change the Advanced Filter. I would prefer to use the Quick View Filter, but it does not allow me to use the one and only field that makes anyTip #47- Stay Ahead with Automated Scheduled Reports in Zoho Assist- 'Insider Insights'
We’ve made it easier for you to stay informed, even when you’re busy managing remote sessions! With Scheduled Reports in Zoho Assist, you can now automatically receive detailed insights about your remote support and unattended access activities directlyColour Coded Flags in Tasks Module List View
I really like the colour coded flags indicating the status of the tasks assigned to a Contact/Deal in the module list view. It would be a great addition to have this feature available in the list view of activities/tasks. I understand you have the DueUPS Label size when generated via Zoho
We've integrated UPS with Zoho inventory. When creating and downloading the shipping labels they are created in a larger paper size. I'd like them to be generated to print on a 4x6 printer. Zoho have told me I need to do this within our UPS portal. UPSCredit Management: #4 Credits on Unused Period
Recall a familiar situation. You sign up for a monthly gym membership. You pay the subscription fee upfront, get motivated, and show up consistently for the first week. Then, suddenly, you get caught up in work deadlines, travel plans, or a dip in motivation.Good news! Calendar in Zoho CRM gets a face lift
Dear Customers, We are delighted to unveil the revamped calendar UI in Zoho CRM. With a complete visual overhaul aligned with CRM for Everyone, the calendar now offers a more intuitive and flexible scheduling experience. What’s new? Distinguish activitiesEmpowered Custom Views: Cross-Module Criteria Now Supported in Zoho CRM
Hello everyone, We’re excited to introduce cross-module criteria support in custom views! Custom views provide personalized perspectives on your data and that you can save for future use. You can share these views with all users or specific individualsZoho Analytics Automatically Deletes Queries and Reports When a Synced CRM Field Is Removed
We’ve encountered a serious and recurring issue that poses a massive data integrity risk for any Zoho Analytics customer using Zoho CRM integration. When a field is deleted in Zoho CRM — even an unused one — Zoho Analytics automatically deletes everyPrevent new Record Association
Hello all, We have a small sales organization therefore, it's helpful for everyone on the sales team to be able to view the full list of accounts to assist in preventing duplicate accounts from being created. However we want to prevent people from creatingZoho Analytics & SQL Server - Live connect
Below are the steps I did Created a fresh database and table in my own virtual server Created a new data source connection with live connect I was able to select the tables and created the data source successfully I am getting the error when I try toNeed a way to secure Prefill URLs in Zoho Forms (hide or encrypt prefilled values)
Hi everyone, I often use Zoho Forms with prefilled URLs to simplify the user experience — for example: https://forms.zohopublic.com/.../form?Name=David&Amount=300 However, the problem is that all prefilled values are visible and editable in the link.How to sync from Zoho Projects into an existing Sprint in Zoho Sprints?
Hi I have managed to integrate Zoho Projects with Zoho Sprints and I can see that the integration works as a project was created in Zoho Sprints. But, what I would like to do is to sync into an existing Zoho Sprints project. Is there a way to make thatExperience effortless record management in CRM For Everyone with the all-new Grid View!
Hello Everyone, Hope you are well! As part of our ongoing series of feature announcements for Zoho CRM For Everyone, we’re excited to bring you another type of module view : Grid View. In addition to Kanban view, List view, Canvas view, Chart view andWhat's New in Zoho Analytics - October 2025
Hello Users! We're are back with a fresh set of updates and enhancements to make data analysis faster and more insightful. Take a quick look at what’s new and see how these updates can power up your reports and dashboards. Explore What's New! ExtremeTip of the Week #73– Automate workflow with Make integration.
Make is a no-code workflow automation platform designed to connect your favorite apps and automate repetitive tasks across services. By integrating Make with Zoho TeamInbox, you can streamline everyday inbox management and save valuable time. With thisViewing attachments
I'm using a Web Form integrated in my web site to collect Leads several info, including a image upload. In order to to approve each lead, we have to view the image uploaded. Unfortunately, in the Leads view, the Attachments can only be downloaded, notHow to Export PDF with a custom Template
I need to export Sales Order with a Custom Template I have created How can I do it? I see an API to export the PDF but how can I choose which template to choose to generate the PDFKaizen #89 - Color Coding using Client Script
Hello everyone! Welcome back to another exciting Kaizen post. Today let us see how you can apply color codes to the List and Detail Pages of Zoho CRM using Client Script. Need for color code in Zoho CRM When you mark things with different colors as aInstant Sync of Zoho CRM Data?
With how valuable Zoho Analytics is to actually creating data driven dashboards/reports, we are surprised that there is no instant or near instant sync between Zoho CRM and Zoho Analytics. Waiting 3 hours is okay for most of our reports, but there areIs it possibly to directly set the tax amount on order instead of indirectly via tax rates?
We own an eCommerce application and want to funnel submitted orders from that system into Zoho. We're already calculating tax in our application and just need a way to set it in Zoho. We tried to use Zoho's tax objects for tax by setting the rates toMulti-Page Forms in Zoho Creator!
Let’s make long applications easier to handle by dividing them into pages, adding a progress bar, and guiding users step by step through complex data entry. This would be a total game-changer for the user experience and could significantly boost completionZoho account sign in with passkey
Hello, I am trying to sign in using passkey, but the option doesn't show up in the web and is disabled in Oneauth on mobile, saying the admin has restricted the use. On the Admin page in Security MFA I can find no option for passkey. Help would be greatlyNouveauté dans Zoho Writer - Création de documents et de modèles assistée par l'IA
Zia, l’assistant IA de Zoho Writer, soutient les utilisateurs dans l’amélioration de leur écriture et la création de contenus : correction orthographique et grammaticale en temps réel, suggestions adaptées au contexte, détection du plagiat, révisionsRescheduled US meetups: Zoho Desk user meetups are coming to seven U.S. cities in October and November, 2025
Hello to our Zoho Desk users in the United States, We're excited to share the revised dates for the upcoming Zoho User Groups happening across the US this summer. Our product experts are heading to seven cities throughout the country, and for the firstChecklists as templates
Is it possible to save checklists as templates to reuse them in other tasks? Example: I have a web project. I maintain individual web URLs as tasks. Within the tasks the same checklist should be used again and again: - Page created in CMS - PropertiesSend mass email using my secondary email
Hello, When I send an email to just one person from Zoho CRM, a complete email editor appears, where I can choose which of my email addresses I want to use in the From field. When I send a mass email, there is not such option. I can only select the emailAdd the same FROM email to multiple department
Hi, We have several agents who work with multiple departments and we'd like to be able to select their names on the FROM field (sender), but apparently it's not possible to add a FROM address to multiple departments. Is there any way around this? Thanks.ZOHO TEAM INBOX Calendar Integration
The Problem: Clients send meeting invitations to our TeamInbox address. TeamInbox receives these invites, but we cannot accept them. We do not use individual inboxes for transparency purposes. Ideal Solution: A way to accept calendar invites sent to ourNeed Help Mapping GST Registration Number Field Between Zoho Books & Zoho CRM + Slow Sync Issues
am facing an issue with field mapping between Zoho Books and Zoho CRM. I want to map the GST Registration Number field from the Customer module in Zoho Books to a custom GST field inside the Accounts module in Zoho CRM. However, I am getting a warningUnearned / Deferred Revenue Automatic Calculation for Subscriptions
As a SaaS business, we have multiple active subscriptions with varying dates and amounts. Is there a way to have a monthly automatic calculation for all of them that debits or credits the unearned revenue and revenue accounts accordingly? Alternatively,Next Page


