Tip #7: Customize the appointment confirmation page
A confirmation page plays a crucial role in creating the first impression, as that's where customers land when booking with you. It shows your brand identity, engages your audience, and drives more conversions. Yet, this section is often overlooked when establishing an online scheduling process. That's why Zoho Bookings makes it simple to create your own confirmation page.
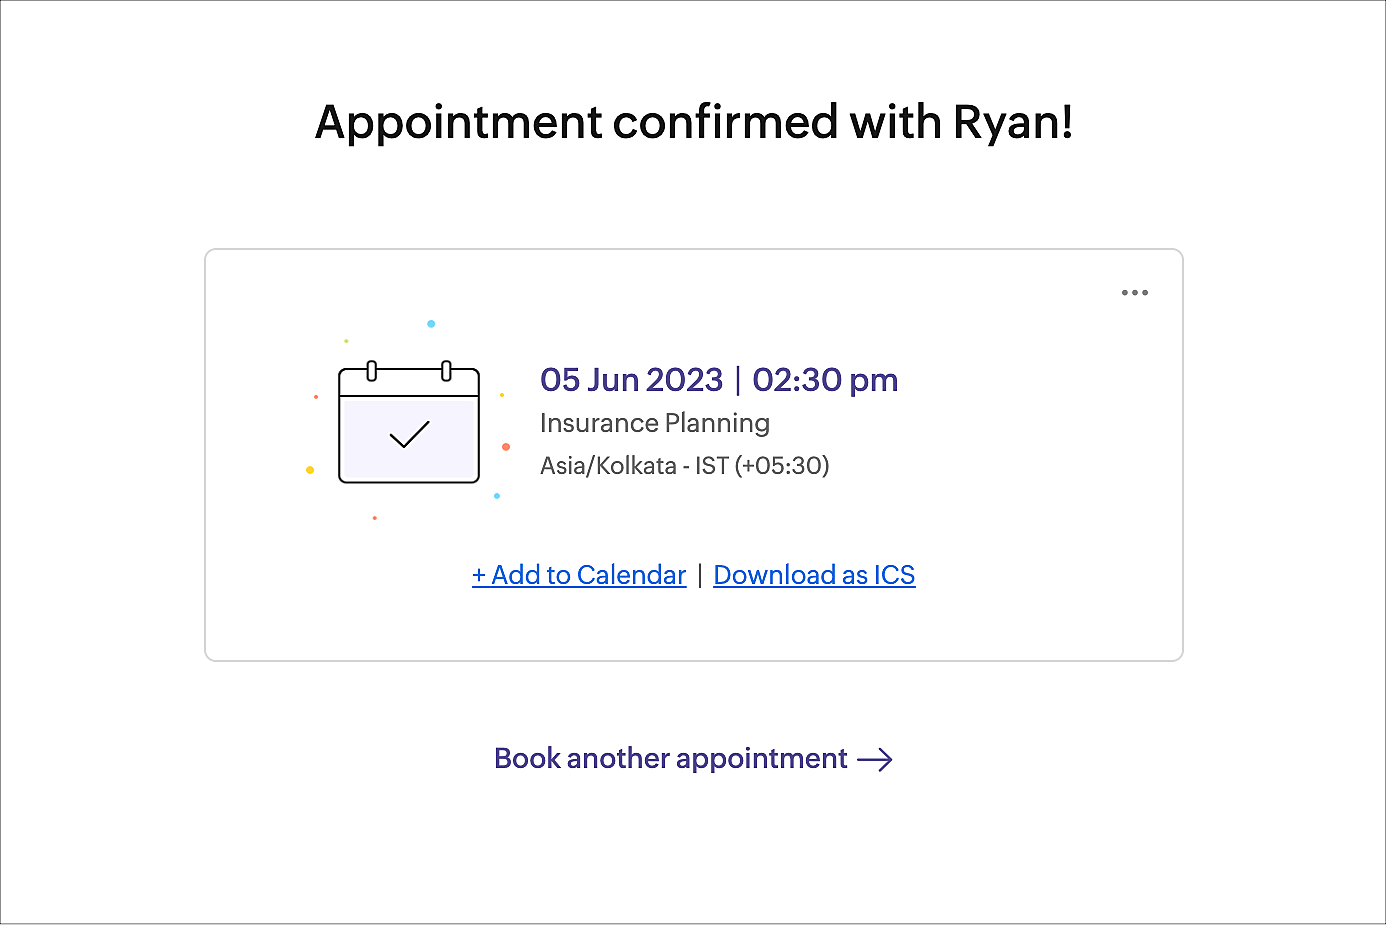
After booking an appointment, the customer will see a confirmation page. This is the default confirmation page of Zoho Bookings.
If you'd like, you can redirect the customer to your website instead. You can also get the customer and appointment details through the URL and utilize it to enhance the user experience.
Redirecting to your webpage offers many advantages.
➤ Better branding: Gain better control over the page design and give the customer a more cohesive navigation experience.
➤ Cross-promotion: Promote other services and encourage the user sign up for your newsletter or promotional emails to improve revenue.
- ➤ Additional information: Show additional details than that of the existing confirmation page and customize according to your need.
Use case
Jacob is a financial advisor in Zylker Consultations. Whenever a customer books a Medical Insurance Planning session with him, he wants the customer to explore other services related to it (say, life insurance or car insurance). So, he sets the confirmation page so that it lands on his site's insurance page. This way, he attracts more business by offering special discounts for further bookings.
Please note that each service can have different confirmation pages.
To customize the confirmation page for a service
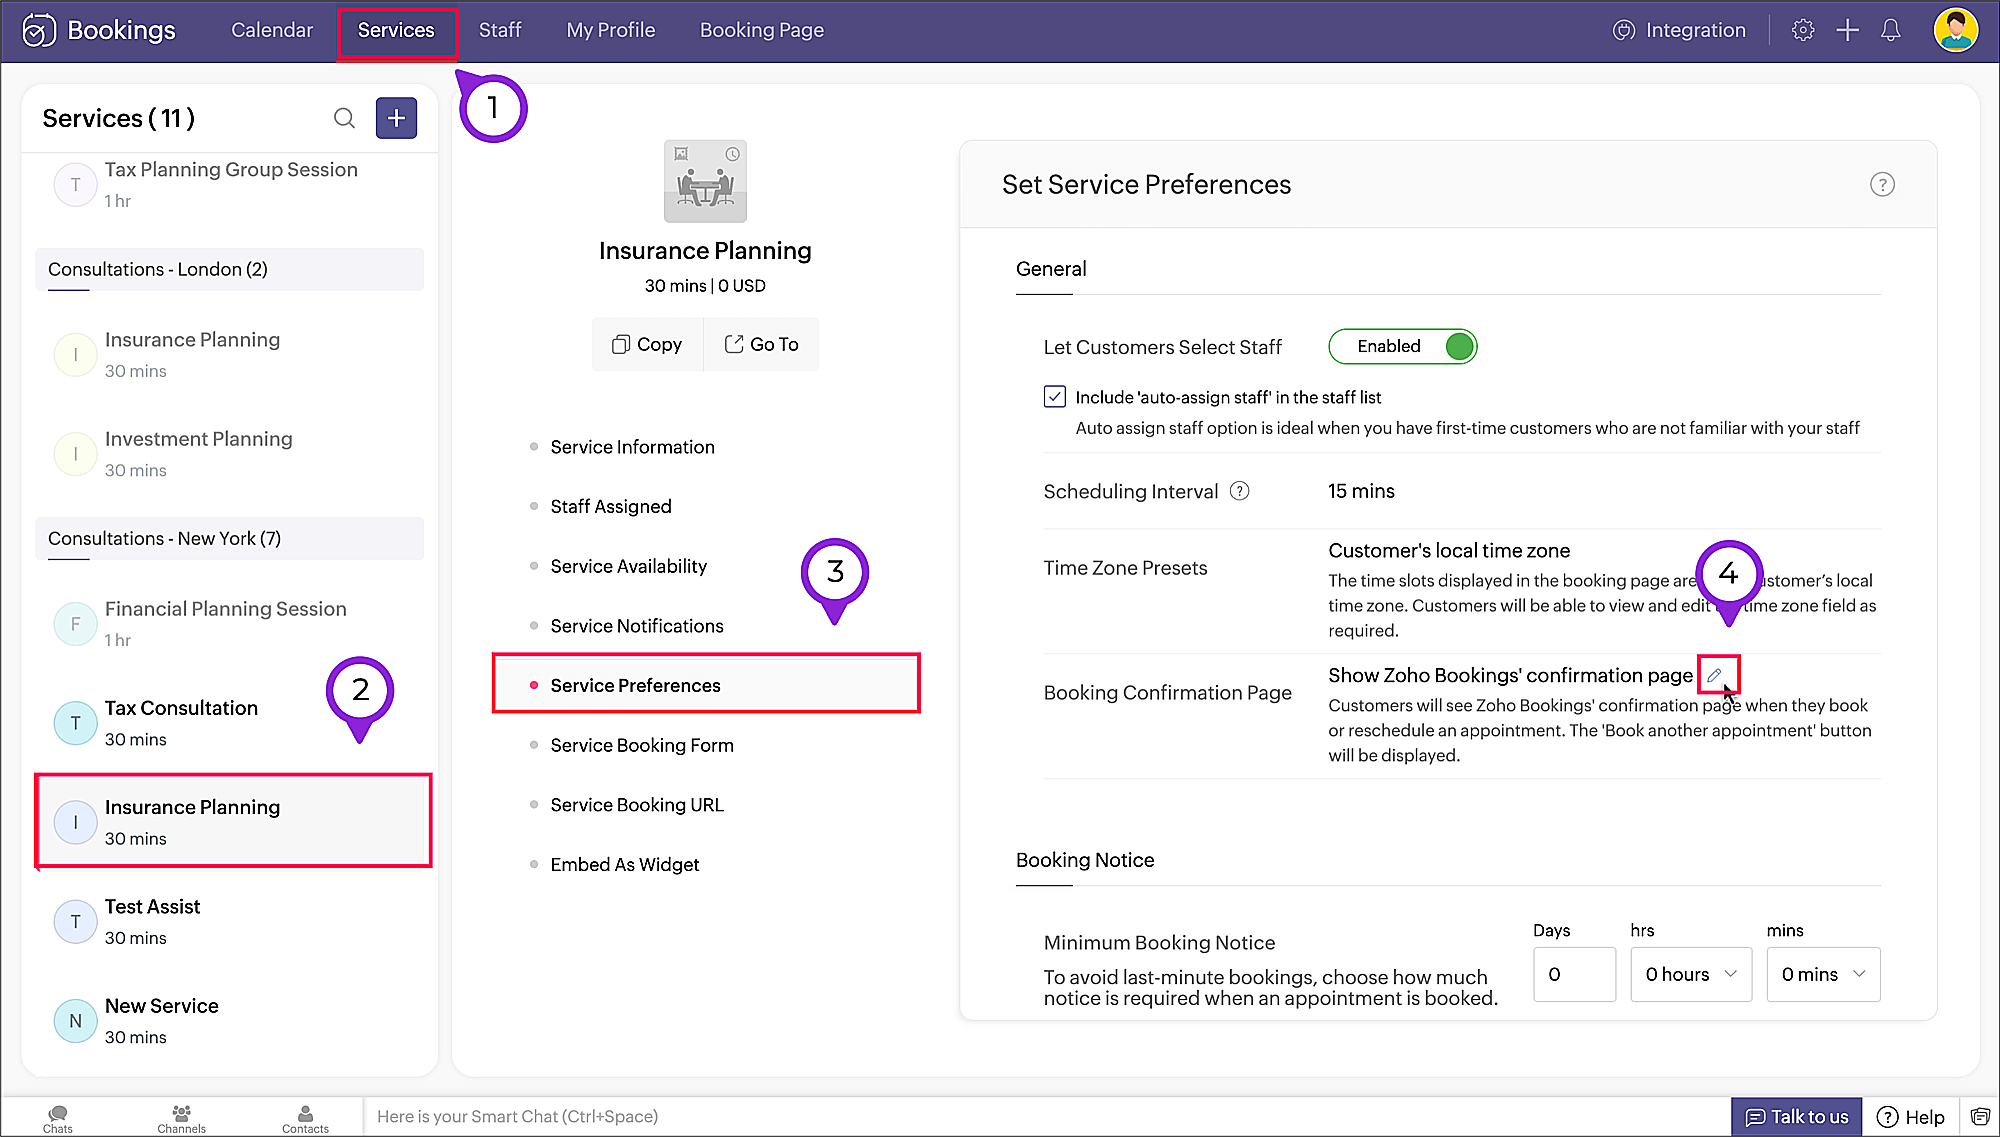
Navigate to Services > (Select the required service) > Service Preferences.
Under General, click the edit icon next to the option Booking Confirmation Page.
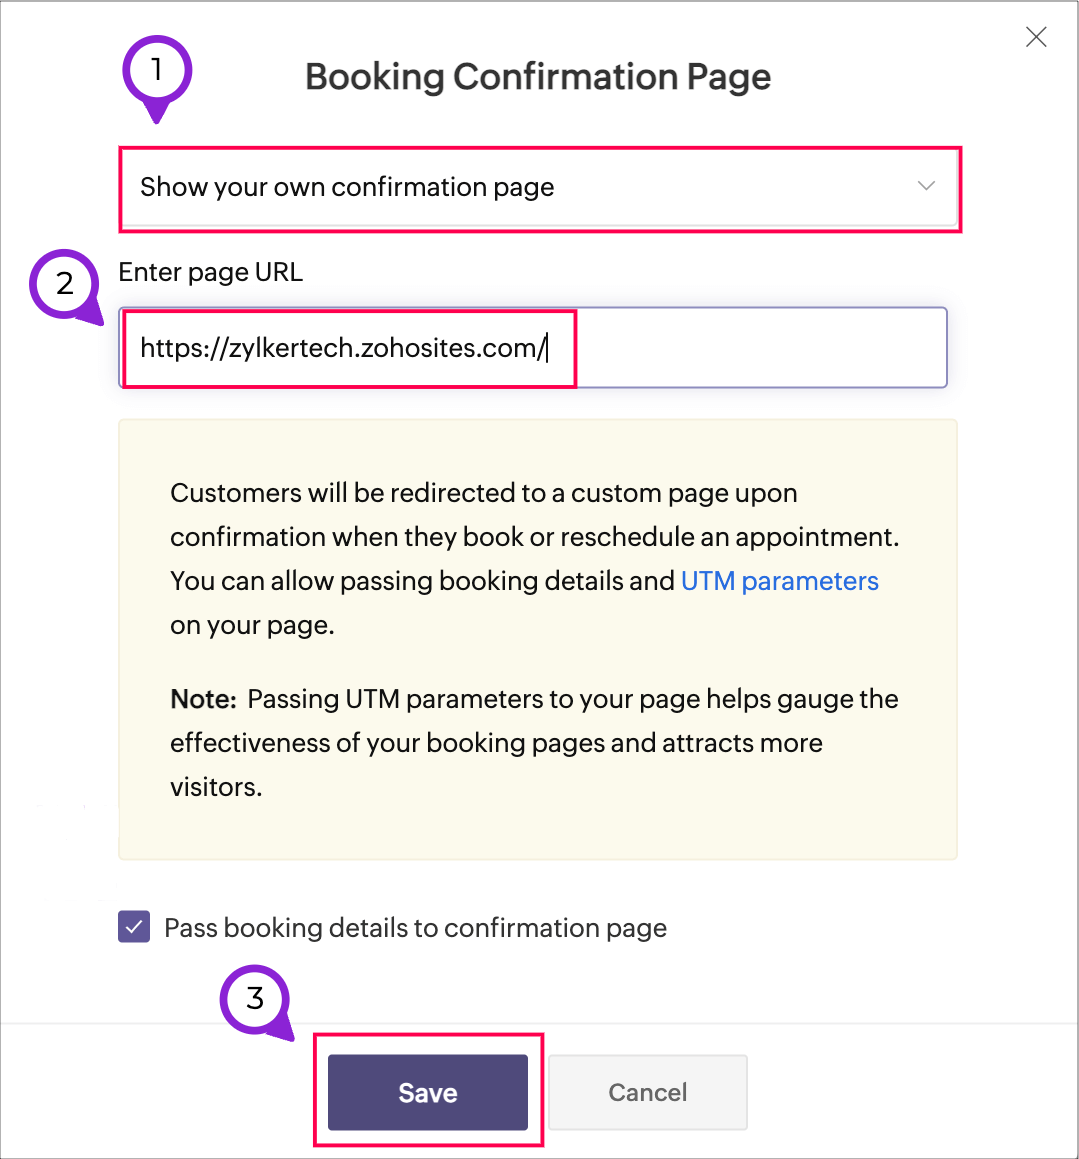
A pop-up appears. From the dropdown, select Show your own confirmation page.
In the Enter page URL textbox, enter the url of your preferred confirmation webpage.
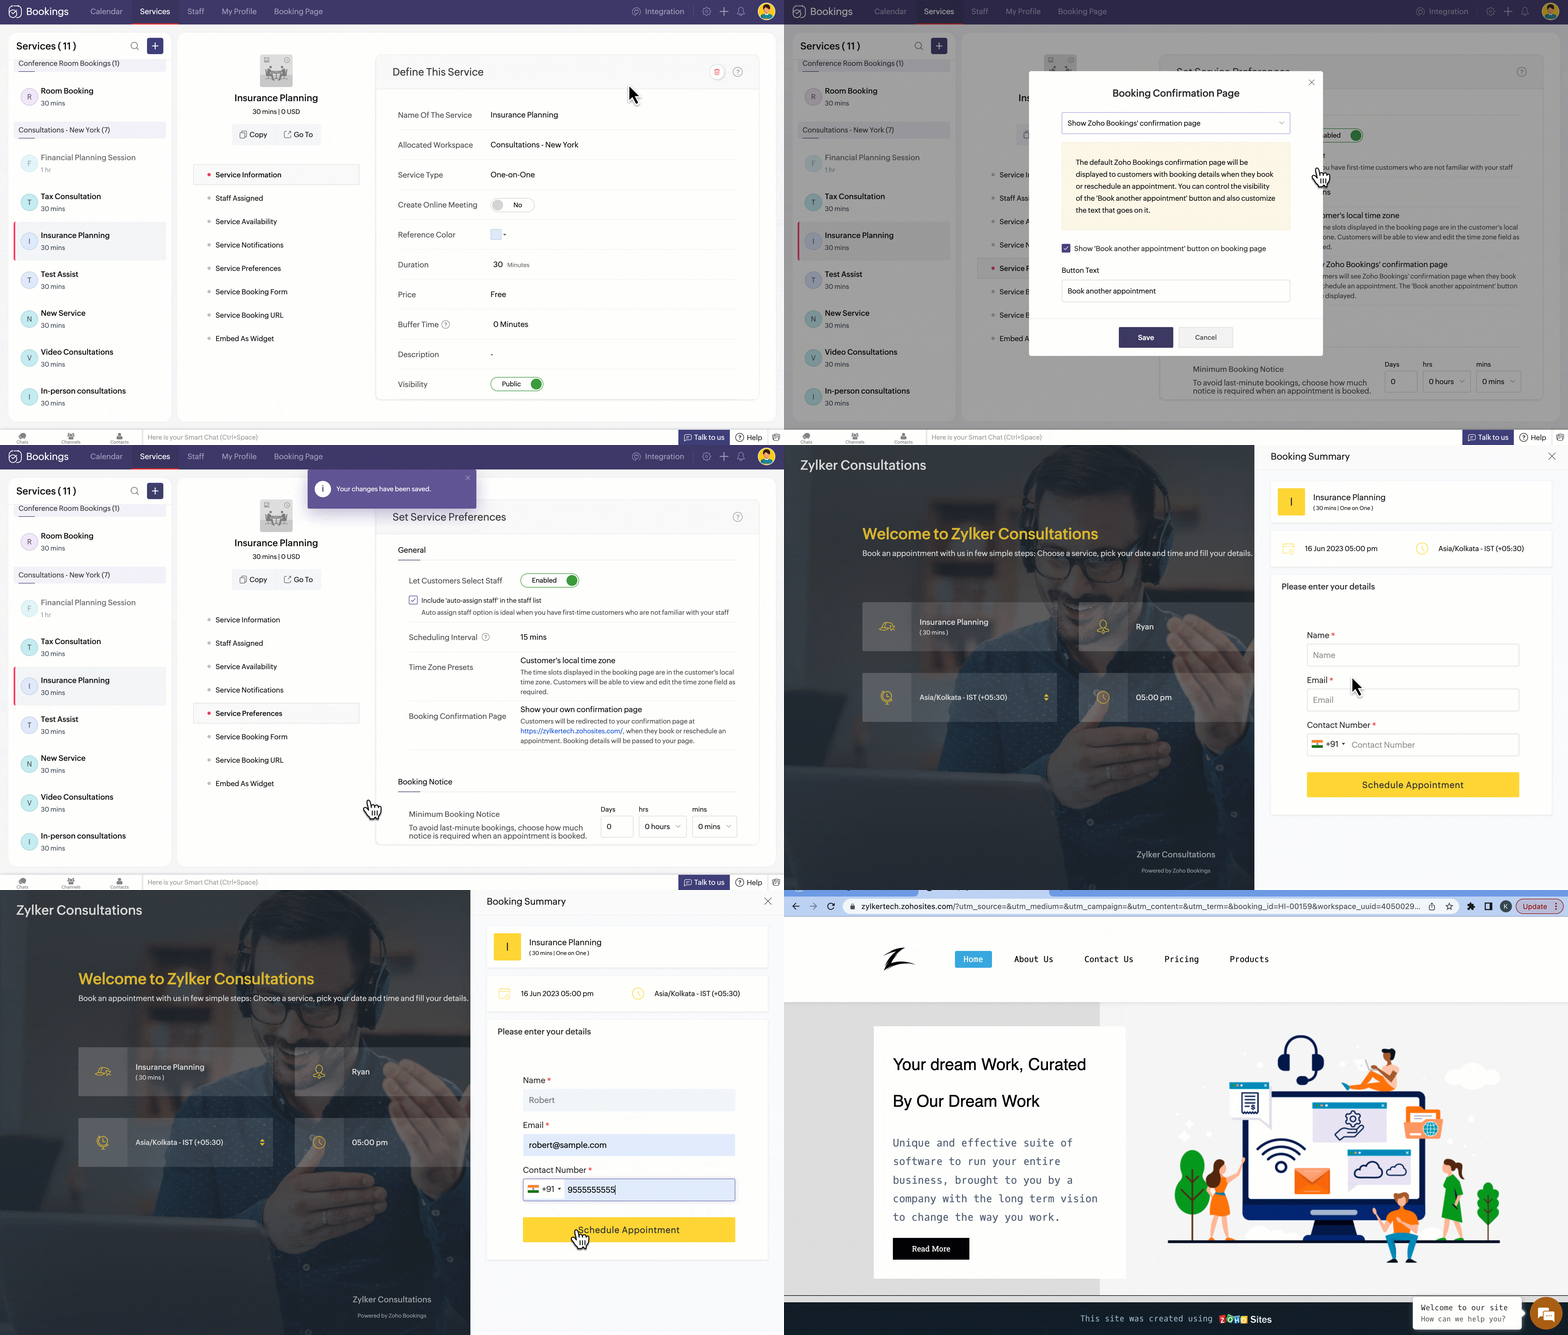
The appointment details are included in the URL and can be used to show customer or service details on your website. This is useful if, for instance, you'd like to retrieve the customer's age range and show them relevant services.
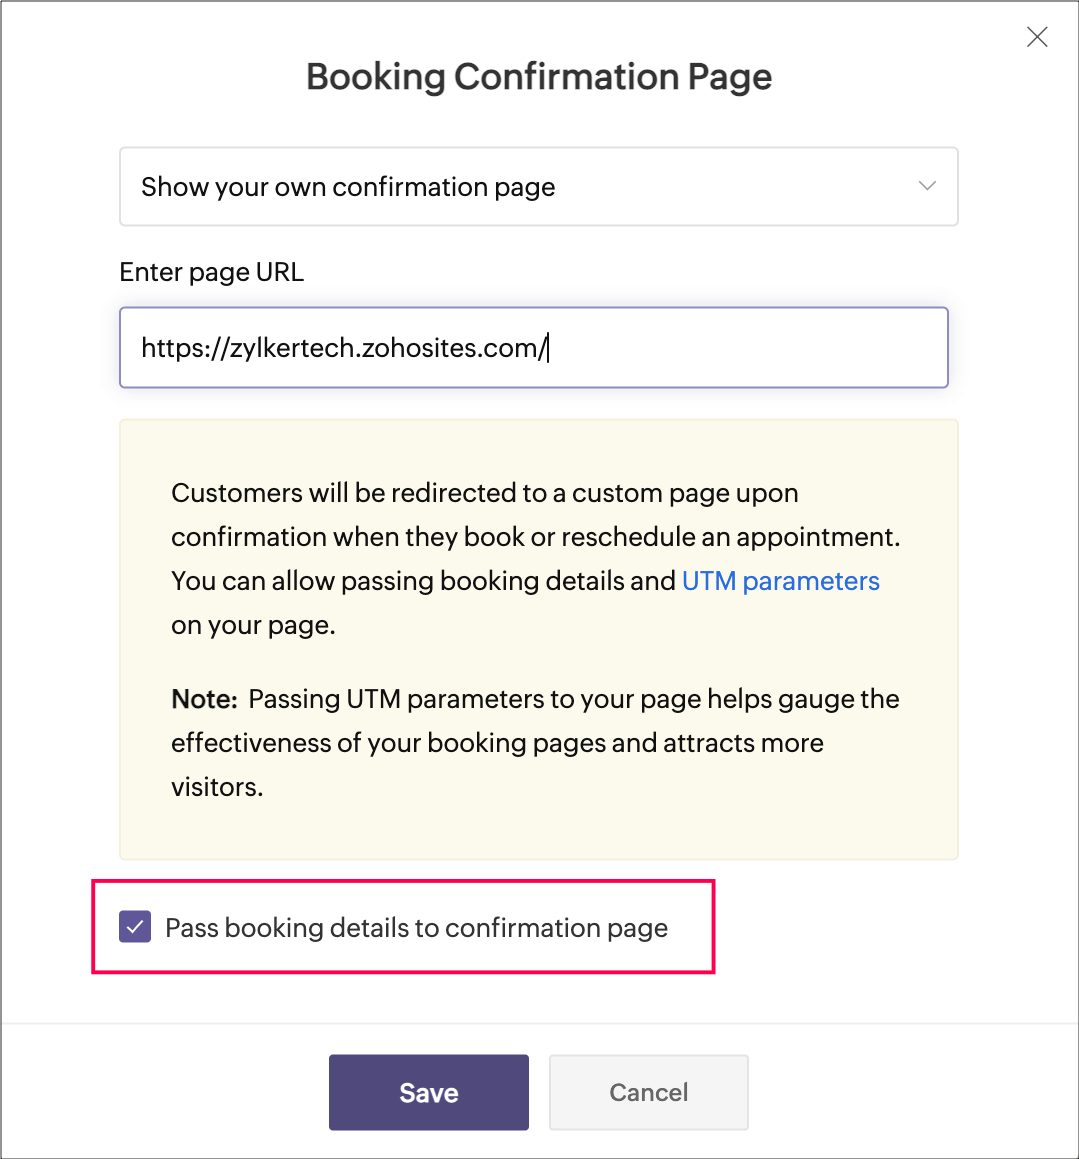
Below is the list of parameters that are passed.
Booking details
1. booking_id=<value>
2. workspace_uuid=<value>
3. workspace_name=<value>
4. assigned_to=<value> (staff or resource name)
5. service_uuid=<value>
6. service_name=<value>
7. booking_start_time=<value> (represented in ISO 8061 format in customer timezone)
8. booking_end_time=<value> (represented in ISO 8061 format in customer timezone)
9. booking_cost=<value>
10. booking_cost_paid=<value>
11. booking_currency=<value>
Customer details
12. customer_name=<value>
13. customer_first_name =<value> (if applicable)
14. customer_last_name=<value> (if applicable)
15. customer_contact_no=<value>
16. customer_email=<value>
Custom fields
17. customer_<custom_field_name>=<value>
You can fetch these values and use them on your confirmation page as you wish.
In the above case, you can fetch the customer name (Robert) and the service he booked (Insurance Planning) from the URL. This can be used to display the confirmation message of your choice ("Hey Robert! Thanks for booking the Insurance Planning consultation.").
This custom confirmation page can also be set at the workspace level. Refer to the help articles below for more info.
Workspace Preferences - Confirmation Page
Service Preferences - Confirmation Page
Hope you find this tip helpful. Let us know in the comments if you have any questions.
Stay tuned and happy scheduling!
Zoho Campaigns Resources
Topic Participants
Praveena Chandran
Total BusinessWare
Akshara Amarnath
Ward van de Oudeweetering
Sticky Posts
Tip #13: Identify where your bookings come from with Source Tracking
Source tracking is the practice of identifying where your bookings originated. This is important, because online bookings come from a wide variety of sources like social media platforms, your website, email and ad campaigns, partner websites, organicTip #17: How to mandate partial payment for your appointments
When you require partial payments during the booking process, customers can only schedule with you after paying a certain amount in advance. This deposit acts as a commitment between both parties. Apart from that, it has many more advantages. BenefitsTip #18: Organize a group workshop in a few steps
It's the season for workshops—they're everywhere, catering to diverse interests and needs. Whether for more professional goals like leadership development or creative endeavors like painting, there's an abundance of workshops offered every day. A schedulerTip #16: Custom labels for staff, service, and resources
Every industry uses its own jargon. Take healthcare, for example; when you visit a doctor, it's not just an appointment, it's a consultation. The people who provide consultations are the providers. Similarly, in the tranquil world of a spa, a massageTip #15: Customize service prices for each staff member
It's common practice for a service to be priced differently based on the staff member providing it. For example, an experienced hair stylist may charge more for a haircut compared to the other stylists. This pricing strategy allows businesses to charge
Zoho CRM Plus Resources
Zoho Books Resources
Zoho Subscriptions Resources
Zoho Projects Resources
Zoho Sprints Resources
Zoho Orchestly Resources
Zoho Creator Resources
Zoho WorkDrive Resources
Zoho CRM Resources
Get Started. Write Away!
Writer is a powerful online word processor, designed for collaborative work.
-
オンラインヘルプ
-
Webセミナー
-
機能活用動画
-
よくある質問
-
Ebook
-
-
Zoho Campaigns
- Zoho サービスのWebセミナー
その他のサービス コンテンツ
ご検討中の方
Recent Topics
Deluge Events/search API works in user environment but not in sandbox – why?
I am creating an Extension for Zoho CRM using Zoho Sigma Platform I’m using the following Deluge code to search Events in Zoho CRM based on Start_DateTime: criteria = "(Start_DateTime:greater_than:2025-12-20T00:00:00+00:00)"; url = "crm/v8/Events/search?criteria="Work Type - Limitation
Hello, I'm setting up work types and have noticed, a limitation on the parts area to 10 lines. Can this be increased to 20 or greater? In addition to this, when I attempt to add the work type to a work order, the correct labour hours doesn't flow through.Cliq iOS can't see shared screen
Hello, I had this morning a video call with a colleague. She is using Cliq Desktop MacOS and wanted to share her screen with me. I'm on iPad. I noticed, while she shared her screen, I could only see her video, but not the shared screen... Does Cliq iOS is able to display shared screen, or is it somewhere else to be found ? RegardsEnsure Consistent Service Delivery with Comprehensive Job Sheets
We are elated to announce that one of the most requested features is now live: Job Sheets. They are customizable, reusable forms that serve as a checklist for the services that technicians need to carry out and as a tool for data collection. While onBulk Schedule for Posting TikTok
Hallo, We have a client whose business is a social media agency specifically TikTok. Currently they are handling 30 TikTok accounts from. I think zoho Social can handle it with Agency License + with Add on 10 Brands. Their concern is related to postingWhat are Zoho Meeting capabilities included in Zoho Workplace Standard?
I am evaluating using Zoho Meeting for my organization, but it is not clear what Zoho Meeting capabilities are already included in Zoho Workplace Standard. - Are meeting recordings included in Workplace Standard? - Can we invite external meeting participantsCreate static subforms in Zoho CRM: streamline data entry with pre-defined values
Last modified on (9 July, 2025): This feature was available in early access and is currently being rolled out to customers in phases. Currently available for users in the the AU, CA, and SA DCs. It will be enabled for the remaining DCs in the next coupleModule Customisation - Lookup function not available
Good evening, Within my business, I can have multiple customers, who have multiple mobile assets. When I set these assets up, I enter information such as vehicle registration, Vehicle identification number (VIN), Unit number, YOM, in addition to others.How can I get the participant list of a reoccurring meeting afterwards?
I'm trying to use the Meeting Participant Report from the API docs but when I call it on a reoccurring meeting it returns that there are no participants because it thinks I'm talking about the meeting in the future. Is there a way to use webhooks or someFunction #50: Send Mass emails to your customers
Hello everyone, and welcome back to our series! We have reached a milestone of 50 Functions, which means that we have automated 50 different tasks in Zoho Books. Every Friday, we have shared a nifty function aimed at either automating a task or streamliningFull Hebrew Language Support for Client-Side Zoho Assist Interface
Dear Zoho Assist Team, We would like to request an enhancement to Zoho Assist's client-side interface to support full Hebrew language customization, including all popups, notifications, and session-related messages. Current Limitation The Join page allowsAdd Hebrew & RTL Support to Feedback Widget
Hello Zoho Desk Team, How are you? We are using Zoho Desk and would like to utilize the Feedback Widget. While Zoho Desk itself supports Hebrew and RTL, the Feedback Widget unfortunately does not. We kindly request that Hebrew and full RTL support beZoho Books Sandbox environment
Hello. Is there a free sandbox environment for the developers using Zoho Books API? I am working on the Zoho Books add-on and currently not ready to buy a premium service - maybe later when my add-on will start to bring money. Right now I just need aMerge Tickets Directly from Contact Page in Zoho Desk
Dear Zoho Desk Support Team, We are writing to request a new feature that would allow users to easily merge tickets directly from the contact page in Zoho Desk. Currently, the only option to merge tickets is from the Tickets list view page, which canDifferent languages for users
Hello, Do you plan to enable individual users to select their languages for interface? Currently language can be changed for everyone - it looks like a settings for a whole portal, which is not good when you are working internationally. Best regards,Pipeline.Company Name field shows up as numbers! [Bigin Developer Console > Component > URL]
Hi there, I am setting up to invoke URL to send infromation zoho bigin > zoho forms with company name pre-fill in the form. however when I use : ${Pipelines.Company Name} field it shows up as a string of number instead of words. Help.Kaizen #222 - Client Script Support for Notes Related List
Hello everyone! Welcome to another week of Kaizen. The final Kaizen post of the year 2025 is here! With the new Client Script support for the Notes Related List, you can validate, enrich, and manage notes across modules. In this post, we’ll explore how2025年 Zoho コミュニティ 活動の振り返り 🎉
ユーザーの皆さん、こんにちは!コミュニティチームの中野です。 2025年も多くの学びと出会いがあったZoho コミュニティ。 本記事では今年の活動を振り返りながら、フォーラムの投稿・参加者の皆さん・イベントのハイライトをご紹介していきます。 目次 フォーラム:注目の投稿 フォーラム:多くの貢献をしてくださった方々 ユーザー交流会振り返り ワークアウト振り返り その他のトピックス 1. フォーラム:注目の投稿 本フォーラムでは様々な議論と知識の共有が行われました。 ユーザーの皆さんが日々の業務で直面する課題を投稿し、経験豊富なユーザーさん達が実践的な解決策を提供してくださいました。Customer Management: #3 Giving Customers Control & Privilege
Rio, the founder of RenoTech Solutions, a fast-growing digital service company, found itself juggling a dozen different services for its clients. They handled one-time setup fees, recurring monthly invoices, and custom milestone-based billing for projects.Can I use a Standalone CRM Function as the Callback URL For Async Export Data API?
I am creating an export job using this API https://www.zoho.com/analytics/api/v2/bulk-api/export-data-async/create-export/view-id.html There is a "callbackUrl" key in the CONFIG object. I tried copying the URL for a standalone function in CRM which canBooks Api: listing expenses created after certain dates
Is there any parameter I can add to the List Expenses endpoint that will let me look up expenses by when they were created?Ability to Set Text Direction for Individual Cells in Zoho Sheet
Dear Zoho Sheet Team, We hope you are doing well. We would like to request an enhancement in Zoho Sheet that allows users to set the text direction (right-to-left or left-to-right) for individual cells, similar to what is available in Google Sheets. UseAdd RTL (Right-to-Left) Text Direction Support Across All Zoho Learn Editing Interfaces
Hi Zoho Learn Team, Hope you're doing well. We would like to request an important enhancement to Zoho Learn regarding support for right-to-left (RTL) languages such as Hebrew and Arabic. 🔹 Current Issue While the Knowledge Base Article editor providesAdd Hebrew Support for Meeting Transcripts Provided by ZIA in Zoho Cliq
Hi Zoho Cliq Team, Hope you're doing well. We would like to request the addition of Hebrew language support for the Meeting Transcript and Summary feature in Zoho Cliq. Currently the transcript and summary feature is available for recorded meetings andRemote Control Functionality During Screen Sharing in Zoho Cliq
Hello Zoho Cliq Team, We would like to request the addition of remote control functionality during screen sharing sessions in Zoho Cliq. Currently, while screen sharing in Cliq is very useful, it lacks the ability for another participant to take controlReal-Time Screen Annotation During Zoho Cliq Screen Sharing
Hi Zoho Support Team, Hope you're doing well. We’d like to request the addition of real-time screen annotation tools during screen sharing sessions in Zoho Cliq video calls. 🔍 What We're Looking For: The ability for the presenter—and optionally, otherCentralized Organization Information Management in Zoho One
Dear Zoho One Support, I'm writing to propose a feature that would significantly improve the user experience and streamline data management within Zoho One. Current Challenge: Currently, managing organization information across various Zoho One apps requiresEnhance Zoho One Conditional Assignment to Fully Reassign App Settings When Changing Departments
Hi Zoho Team, We’d like to submit a feature request regarding the current behavior of Zoho One’s conditional assignment logic when moving a user between departments. 🔧 Current Limitation As it stands, Zoho One’s conditional assignment does not removeAdd RTL and Hebrew Support for Candidate Portal (and Other Zoho Recruit Portals)
Dear Zoho Recruit Team, I hope you're doing well. We would like to request the ability to set the Candidate Portal to be Right-to-Left (RTL) and in Hebrew, similar to the existing functionality for the Career Site. Currently, when we set the Career SiteSupport for Custom Fonts in Zoho Recruit Career Site and Candidate Portal
Dear Zoho Recruit Team, I hope you're doing well. We would like to request the ability to use custom fonts in the Zoho Recruit Career Site and Candidate Portal. Currently only the default fonts (Roboto, Lato, and Montserrat) are available. While theseAbility to Filter Alias Mailboxes in Zoho Recruit
Dear Zoho Recruit Team, I hope you are doing well. We would like to request a feature enhancement regarding the handling of alias mailboxes in Zoho Recruit. Currently, when we connect an alias mailbox (e.g., jobs@domain.com) from our Zoho One accountAutomatic Department and Employee Sync Between Zoho One and Zoho People
Dear Zoho Support, I'm writing to propose a valuable feature request that would streamline data management and improve user experience within the Zoho ecosystem: automatic synchronization between departments and employees in Zoho One and Zoho People.Add Attachment Support to Zoho Flow Mailhook / Email Trigger Module
Dear Zoho Support Team, We hope you are well. We would like to kindly request a feature enhancement for the Mailhook module in Zoho Flow. Currently, the email trigger in Zoho Flow provides access to the message body, subject, from address, and to address,Prefered Bin Missing in android APP
Andoroid app dosent show preferred bin in the picklist. The workaround support reccomend is to use the computre to create the picklist. it shuld be information to be shown aas basic for the pciker.Open Sans Font in Zoho Books is not Open Sans.
Font choice in customising PDF Templates is very limited, we cannot upload custom fonts, and to make things worse, the font names are not accurate. I selected Open Sans, and thought the system was bugging, but no, Open Sans is not Open Sans. The realFunction #1: Convert an accepted Estimate to Sales Order automatically in Zoho Books
As you’re aware, Zoho Books provides a default option to have the estimates automatically converted to invoices once your customer accepts them. Many of you wanted a similar option for sales orders, so here’s a workflow that converts accepted estimatesWrite-Off multiple invoices and tax calculation
Good evening, I have many invoices which are long overdue and I do not expect them to be paid. I believe I should write them off. I did some tests and I have some questions: - I cannot find a way to write off several invoices together. How can I do that,Reusable Jira Connection for Multiple Zoho Projects Imports
Hello Zoho Projects Team, We would like to raise a concern and submit a feature request regarding the Jira → Zoho Projects migration process, specifically around how Jira connections are handled. Current Behavior: When setting up a Jira connection forZoho invoice doesn't support Arabic language
I added a clause in the terms & conditions section in Arabic but it doesn't appear when I sent or print it.Recurring Invoice Placeholder Not Updating Billing Period
Hi, I’m using Zoho Invoice Free and want the billing period to update automatically in recurring invoices. In Item Description I tried: Billing Period: %(m-6)% %(y)% to %(m-1)% %(y)% but even if the invoice date is in 2026, it still shows the period basedNext Page


