Managing applications

What does this page cover
This page focuses on managing an application and basic operations like editing, duplicating, and deleting the app, and guides on the Application Summary, where you centrally manage important app configurations.
Within the Application Summary, you can edit, duplicate, delete your application or manage:
- Application name and logo
- Application URL
- User sign-in options
- Environments
- Users and portals
- Mobile app
This page is designed to help you efficiently control and maintain your application’s core aspects in one place.
The App Summary page becomes available once you create a new application. Please refer to the relevant documentation to learn how to create new applications or configure application settings.

Availability
- Applications can be managed in the all plans of Creator.
- Applications can be managed by the super admin and admins.
- Developers can manage the basic details of applications.
- Super admins and admins can add, remove, and manage applications in environments, while developers can access and publish applications in environments based on their permission.
1. App actions
1.1. Editing an Application
In Zoho Creator, editing an application lets you develop it by adding or updating forms, reports, and workflows, and refining your app's behavior and access through settings. If the app is not yet added to an environment, you can edit it directly in the builder. Once the app is enabled in an environment, edits should be managed within development environment to ensure controlled deployment.
- For non-environment applications, click Edit in the bottom-right corner of the application card.
- For environment-enabled applications, open the Environment dropdown located at the bottom-right corner of the application card, then select Edit.
1.2.Settings
Application settings let you configure user permissions, portal user permissions, localization, contextual messages, record templates, schema builder, application IDE, widgets and variables.
To open settings, navigate to the edit mode of the application, and select Settings in the top pane next to Workflows.
Alternatively, for non-environment applications, access Settings from the More menu located next to the Edit button in the application card.

You'll be redirected to the application settings page. Learn how to configure these settings.
1.3. Environment
Environments provide a structured framework for developing, testing, and deploying application changes within Zoho Creator. Following an SDLC approach, they support phased development by allowing you to create, test, and deploy application versions in a sequential order. Each version can be validated in a controlled space before being published to users, ensuring consistent and managed releases. Learn more about environments.
- For non-environment applications, select Add to Environment under the More menu to enable environment management. Learn how to add an application to environments.
- For environment-enabled applications, use the Environment dropdown in the bottom-right corner of the application card to view and manage options specific to each environment, including accessing and settings, along with editing in the development stage. Select Open Environments to navigate to the environments dashboard.
1.4. Duplicate Application
Duplicate helps create an exact copy of the selected application's latest. The copy will include the structure, workflows, and settings of the application. The reports and configured connections will not be duplicated, ensuring that your original data remains unchanged and secure.
When you duplicate an app, the latest version’s configuration is copied, environment-specific settings and data are not included, ensuring your original environments remain intact.
- Navigate to the application you want to duplicate.
- Select the Meatball menu (three dots).
- Choose Duplicate.
- Enter the new application name.
- Select Duplicate to complete the process.
The new application will be created and listed under Solutions.
1.5. Enable / Disable Application
This option allows you to manage the application's availability.
When the application is disabled:
- Users cannot access the application and will receive an error message.
- Editing the application is unavailable until it is re-enabled.
Follow the steps below to enable or disable an application
- Navigate to the application and select the Meatball menu.
- Select Enable or Disable
- Confirm Enable or Disable
1.6. Delete Application
Deleting an app will permanently remove it and associated data across all environments. Make sure to backup necessary data before deletion.
- Navigate to the application and Select the Meatball menu.
- Select Delete.
- A popup will be displayed requesting confirmation to delete the application. Confirm deletion by selecting Delete.
2. Summary
The application summary is a centralized space where you can manage key app configurations and actions, including: changing the app logo and name, updating the app URL, configuring user sign-in options, duplicating or deleting the app, managing environments, users, portals, and mobile apps.
2.1. Navigate to Application Summary
Follow the steps below to customize the available options using the Summary page:
- Navigate to the application.
- Click the Meatball menu and select Summary to access customization options.
The application summary will be displayed.
Alternatively, navigate to the edit mode of the application and select the Summary icon in the top panel.
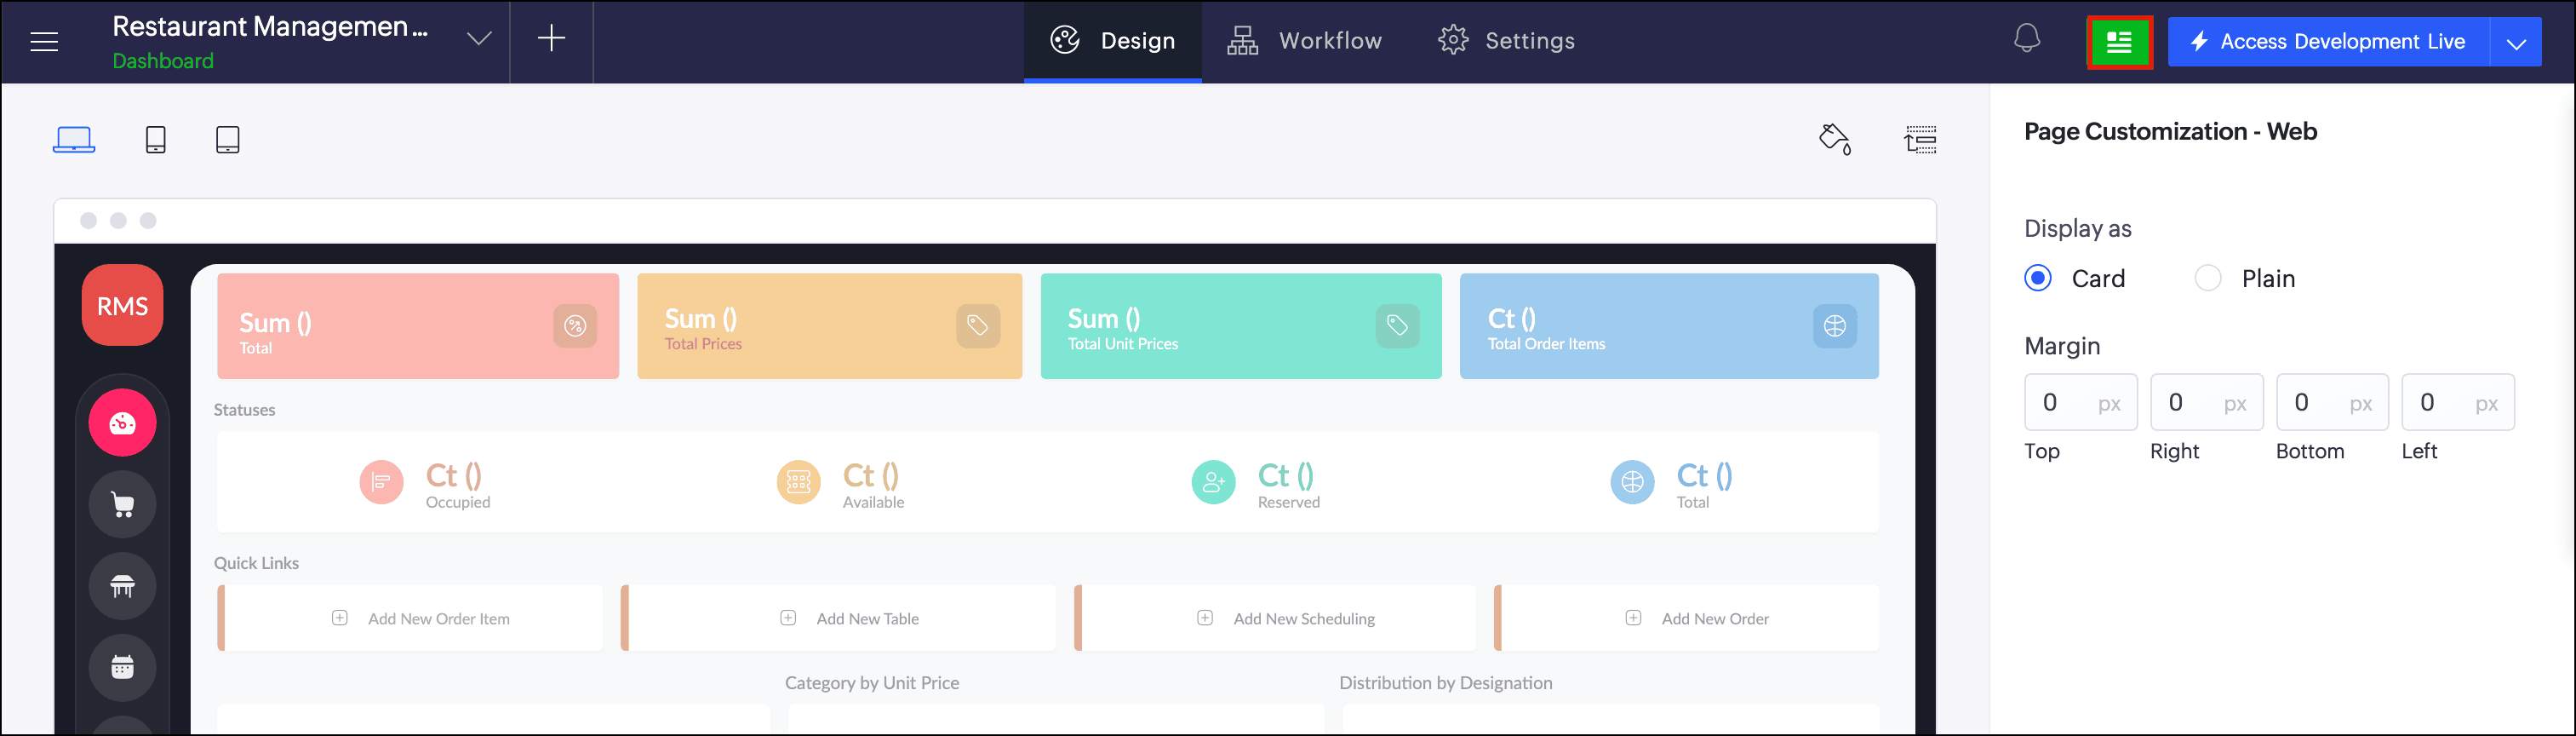
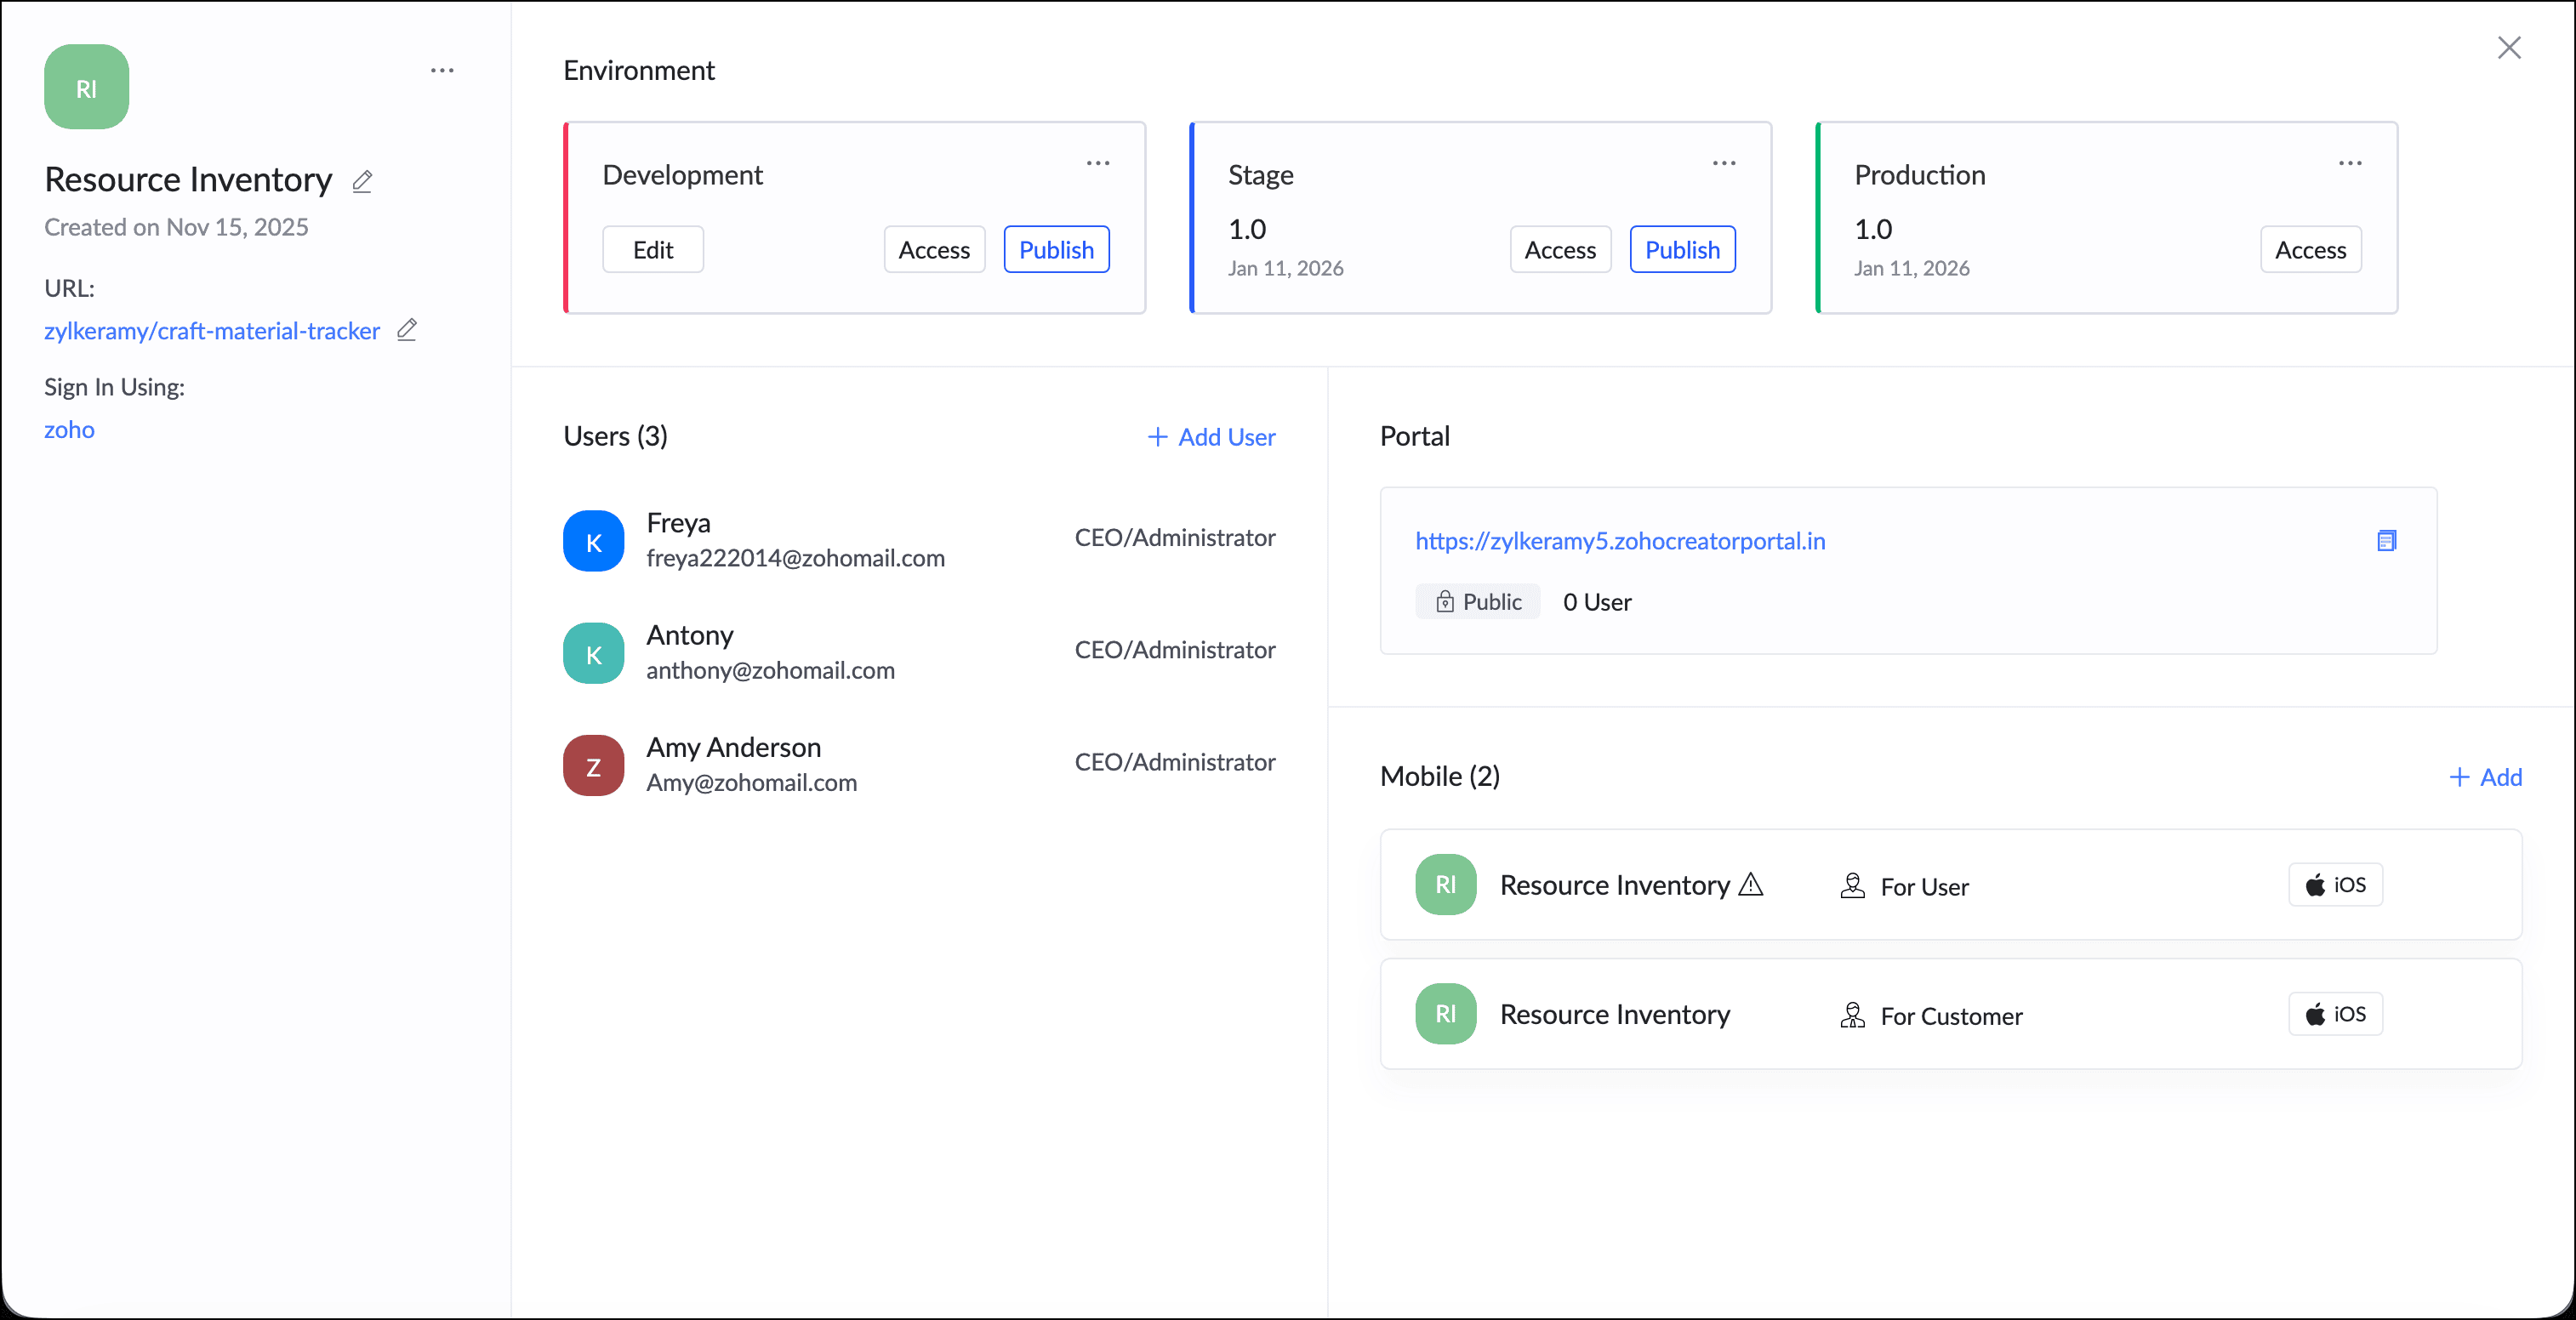
2.2. Application Summary dashboard
The Application Summary dashboard provides access to all application edit and management options.
1. Application Overview: Edit application details and actions.
1.1. Logo: Edit the application logo.1.2. Application Name: Edit the name of the application.1.3. Application URL: Edit the application URL used to access it.1.4. Sign In Using: Edit the authentication method used to sign in to the application.1.5. Duplicate: Create a duplicate of the application with the same configuration in the meatball menu.1.6. Delete: Delete the application permanently in the meatball menu.Note: Changes made to the app name and logo will be reflected immediately, even if environment is enabled for the app.
2. Environment: Add your application to environments, then develop, test, and deploy application changes to your users.
3. Users: Add new users to your application, or manage existing users by editing their access levels, assigning roles, and configuring permissions. Only Super Admins and Admins can configure permissions. Learn the types of users in Creator
4. Portal: Create a new portal for external user access, or edit and configure settings for existing portals including authentication, and access controls.
5. Mobile: Add a new mobile app or access details for existing apps including target users (application users or external users) and platform (iOS or Android).
2.3. Working with Application Summary
2.3.1. Logo
The application logo serves as the visual identity of your app and is prominently displayed throughout the Zoho Creator interface. This logo will appear to all users who access the application, provided you have chosen the application logo in your themes. Customizing your logo helps reinforce your brand and creates a consistent user experience.
To customize your application logo, hover over the current logo and click the Pen icon. Choose from the options below to personalize your logo, then select Apply once you're done.
Option | Description | Details | Navigation |
Preset | Choose from a wide range of professionally designed icons. | Icons are categorized by industry and use case for easy browsing. | Under All |
Custom - Text | Create a text-based logo using your application’s initials or abbreviation. | Limited to 3 characters for a simple, clean design. | Under Custom, select Text in the radio button |
Custom - Upload | Upload your own image file to use as the application logo. | Recommended formats: PNG or JPG; ideal size: 512x512 px for clarity. | Under Custom, select Upload in the radio button |
Color Customization | Adjust background and foreground colors of preset or text logos. | Located on the right side of the pane with live preview. | In the right pane, select the color Hex code after choosing a preset or text logo. |
Preset Colors | Select from preset colors or enter a Hex code for fine-tuning. | Quick selection with brand consistency. | In the right pane, select the color Hex code after choosing a preset or text logo. |
Color Palette | Access a full color palette and use the color picker tool. | Offers flexibility for precise color matching. | Select More colors under Preset Colors |
Hex Code | Input an exact Hex color code. | Ensures perfect alignment with brand colors. | Below the color palette under More colors. |
2.3.2. Name & URL
The Name & URL section lets you control how your application is identified and accessed. The application name defines how the app appears across the Zoho Creator interface, while the application URL determines the web address users use to open the app.
Application URLs follow this format by default: https://creatorapp.zoho.com/<namespace>/<app_name>
In this structure, the namespace and app name are customizable. The base URL depends on your data center (DC) and cannot be modified by the user.
 Note: Changes made to the app name and logo will be reflected immediately, even if environment is enabled for the app.
- Select the Edit icon next to your application name or URL.
- Enter the new name or URL for your application.
- Select Save.
Updating the URL changes how users access the application, so be sure to update any bookmarks, shared links, or integrations that depend on the existing URL.
2.3.3. Created On
The Created On section displays the date on which the application was created. This value is system-generated and provided for reference, and it cannot be modified.
2.3.4. Sign In options
The Sign-in Options section lets you configure user sign in modes. You can choose one or more supported sign-in methods to provide a secure and seamless login experience. Zoho authentication is included by default. The currently configured sign-in method is displayed here and can be updated at any time.
- Select the current Sign-in option to modify.
- Select from the available options:
- Zoho
- Google Apps
- Yahoo
- Depending on the selected option, additional configurations may be available. You can choose to display federated sign-in options on the login page, enable the Zoho signup link for new users, or restrict access to users from a specific domain when using Google Apps authentication.
- Select Add to implement changes.
2.3.5. Environments in Application Summary
The Environment section in the Application Summary allows you to enable and manage environments for your application, helping you control how changes are developed, tested, and deployed.
Follow the steps below to add your application to an environment:
- Select Add to Environment under the Environment section.
- Click Enable to deploy the applications in environment.
- Once enabled, you can start working with your app in the development environment.
If environments are already enabled for your app, all three environments will appear in the application summary. Each environment is shown as a card with its current version and configuration controls. Learn how to add an application to environments
2.3.6. Users in Application Summary
The Users section lets you control who can access your application and what level of access they have.
Follow the steps below to add/manage Users
- Select +Add User under the Users section.
- Enter the required details, including the email address, user type, role, and permissions.
- Once added, you can view and manage users in the application.
Learn how to add a user to an application
2.3.7. Portals in Application Summary
The Portal section allows you to create and manage portals that provide external users with controlled access to your application.
To add a portal:
- Select Create New under the Portal section.
- Read and agree to the terms of use.
- The application will be preselected, select Portal URL, Portal Type, Default Permission and other configurations. Learn how to set up a portal
- Once configured, you can view and manage the portal in the application summary.
Learn more about portals
2.3.8. Manage Rebranded Mobile Apps in Application Summary
The Mobile section enables you to add and manage your rebranded mobile application.
To add a Mobile App:
- Select Create New under the Mobile section.
- Select the application, then choose the Application Type, platform, and software development kit (SDK).
- Click Next and fill in the required details.
- Refer to this document for further guidance on mobile app configuration.
Once created, the app will appear in the application summary under the Mobile section.
3. Points to note
- Deleting an app permanently deletes all data across environments; there is no undo option. Make sure to back up before deleting.
- If an application in environment is dependent on another application's components, it cannot be duplicated.
- Changing sign in login options affects user sign-in methods immediately; communicate changes to your users.
- Changing the URL affects how users access the app; update all bookmarks and integrations accordingly.
- Duplicated apps appear under Solutions. Application duplication does not include data from forms, reports, or workflows.
- When an app is disabled, users will not be able accessible and instead they will be able to view an error page.
- Admins/Developers cannot configure or test features in a disabled application.