Plug Sample #10 - Simplify Ticket Management (Zoho Desk) with Chatbots
Hi everyone!
We're here with another simple yet effective plug for your chatbot to integrate with Zoho Desk.
When a customer reports an issue/request during chat, it's logged as a ticket on Desk. When they return for updates, you end up searching through past tickets, reading conversations, and updating them manually. Imagine if your bot could automate this, retrieving ticket details and providing updates effortlessly.
Are you new to SalesIQ? Wondering what plugs and bots are?
SalesIQ offers chatbots to automate customer interactions. Using the Codeless bot builder, you can build chatbots by using cards in the bot-builder gallery. However, at times, businesses would require unique actions from the bot and for those instances, we have plugs. With plugs, you can create any specific action and bring it as a card inside the codeless bot builder, like the rest of the cards.
In this post, we will learn how to create a plug and list the customer's recent support tickets from Zoho desk.
How does this Plug work?
- The bot will get the email address of the visitor (Email card).
- Next, the bot will search and get a list of tickets associated with the respective email from Desk (Plug 1).
- Then, this ticket list will be displayed to the visitor (Single choice card).
- When the visitor selects one of the displayed tickets, the bot will fetch the neccessary ticket details. (Plug 2)
- And these details will be displayed to the visitor (Any response/input card).
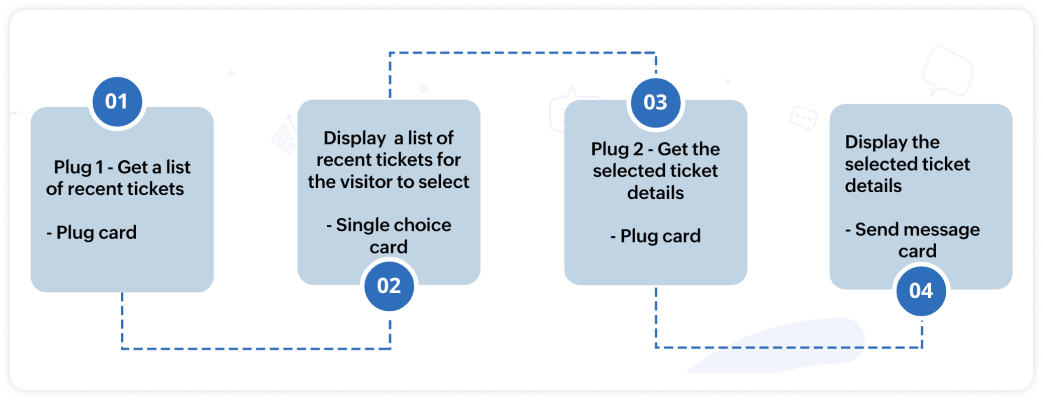

Note:
- There are two plugs involved in this process, one is to display the ticket list and another is to display the ticket details.
- In this post, we will look at the plug to display the ticket list.
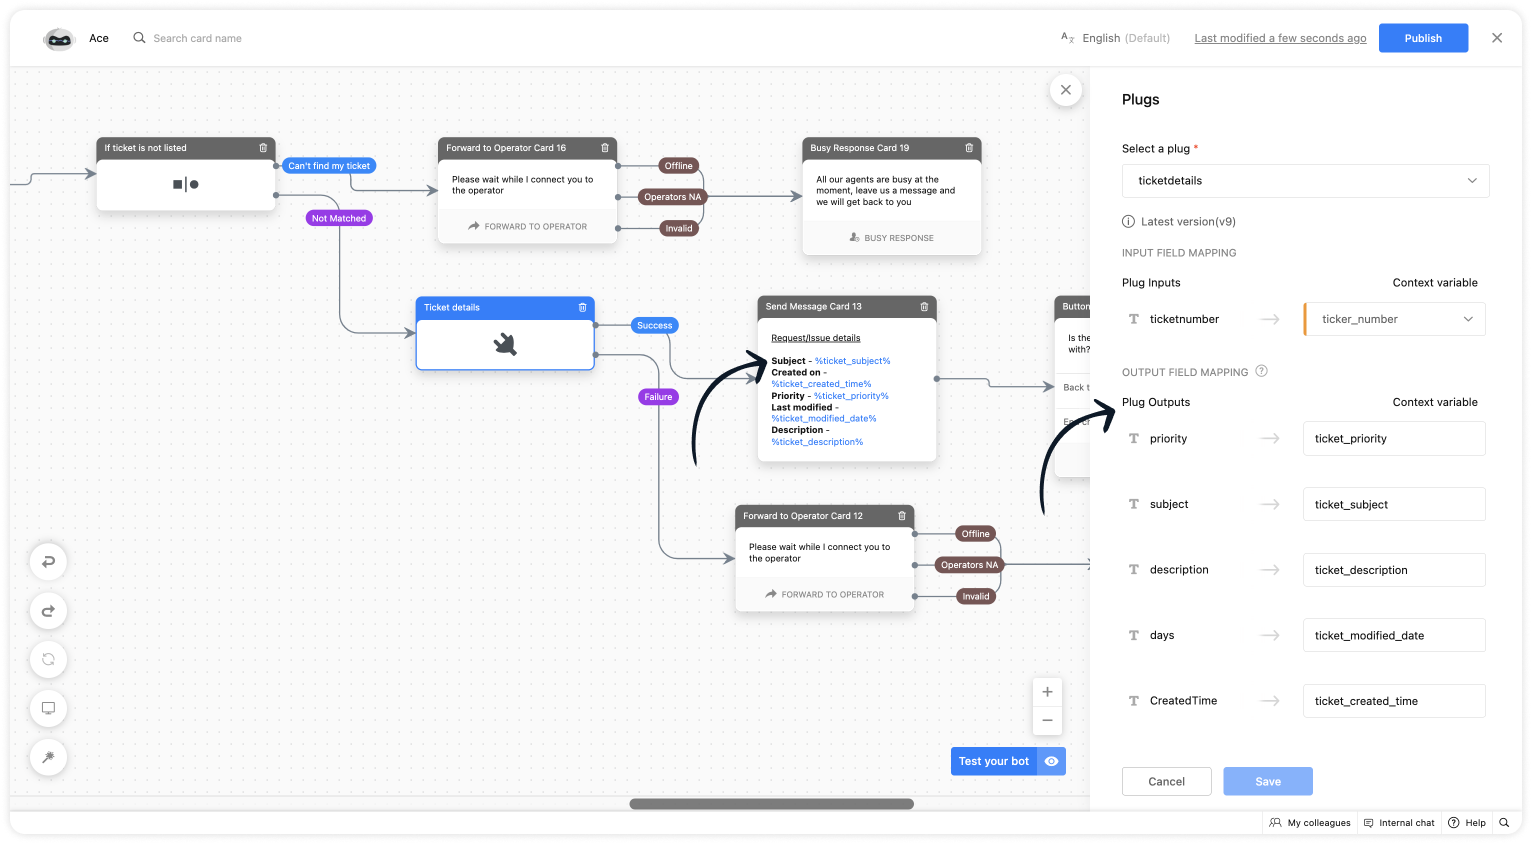
- The plug sample to display the ticket details is already available, click here to know more.
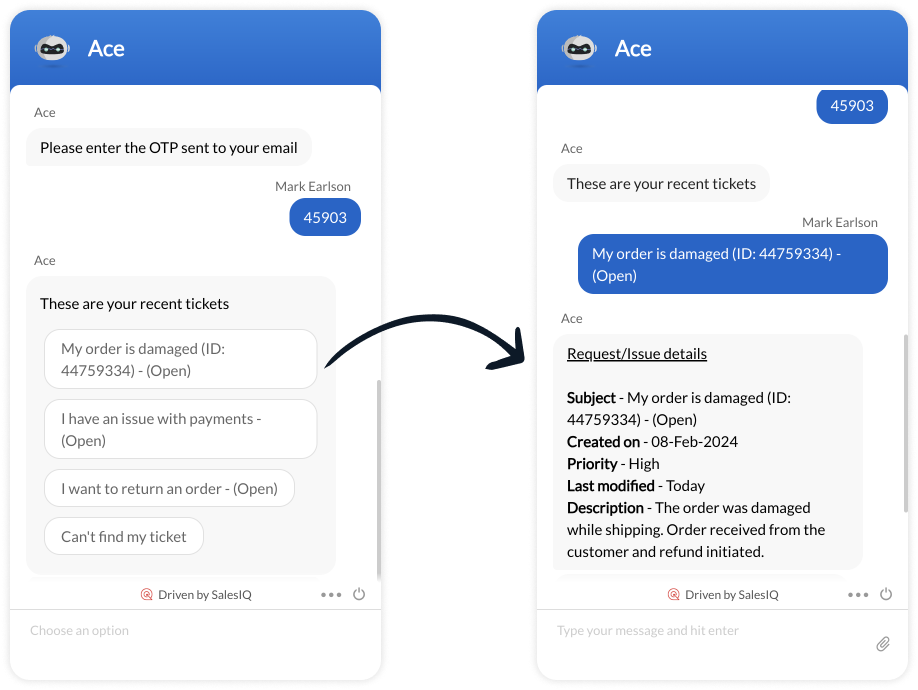
Plug output
How to build this Plug?
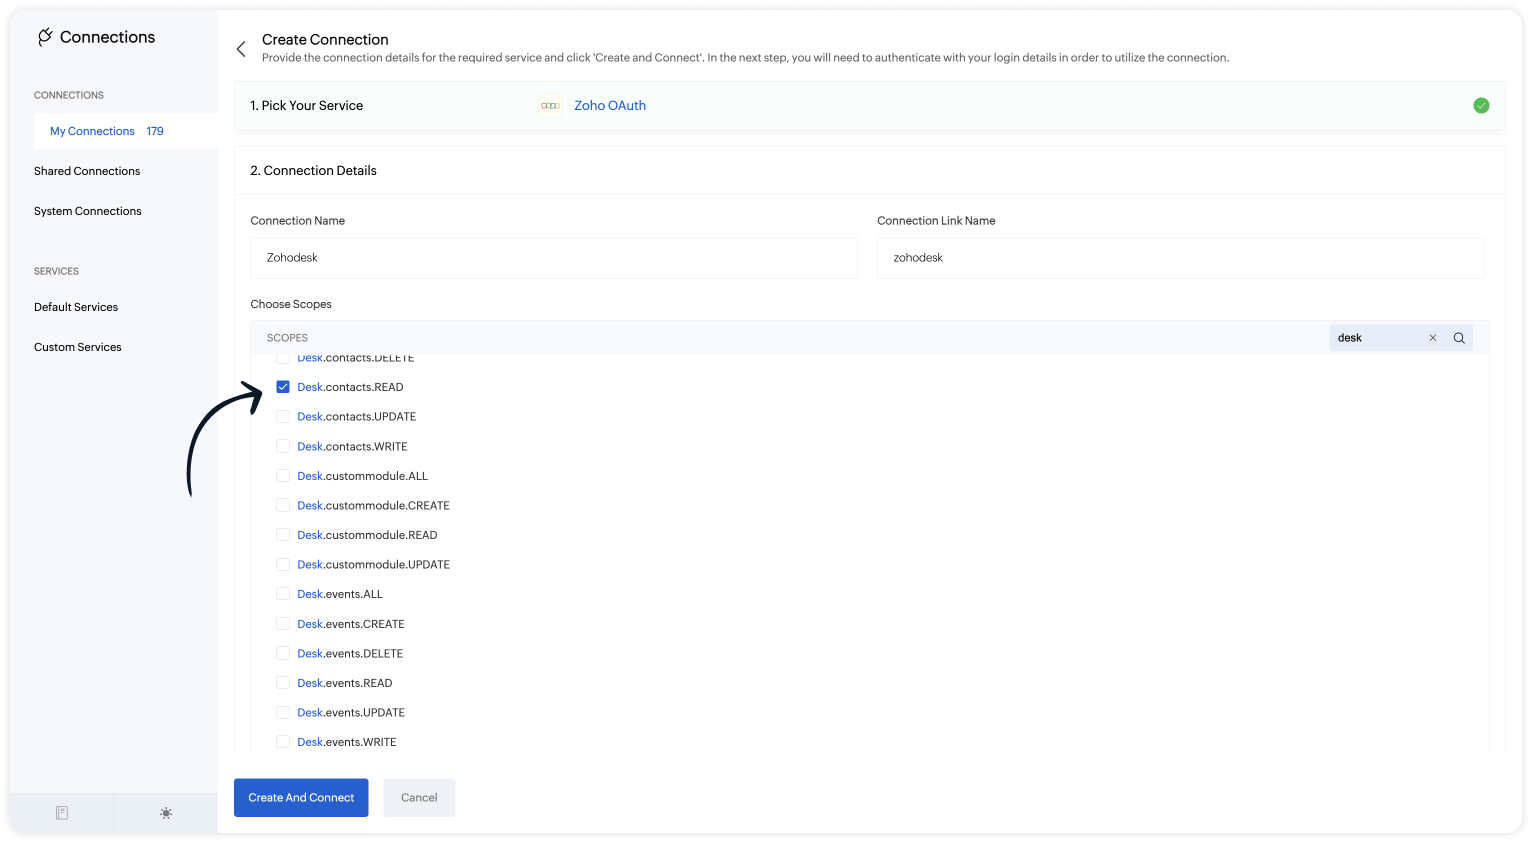
Step 1 - Create connection with Zoho Desk
- On your SalesIQ dashboard, navigate to Settings > Developers > Plugs > click on Add.
- Provide your plug a name, and description, select the Platform as SalesIQ Scripts, and finally, click on Connection to your left bottom. You will be redirected to the connection interface.
- Click on Create connection at the top right corner.
- Under Default connection, select Zoho OAuth service.
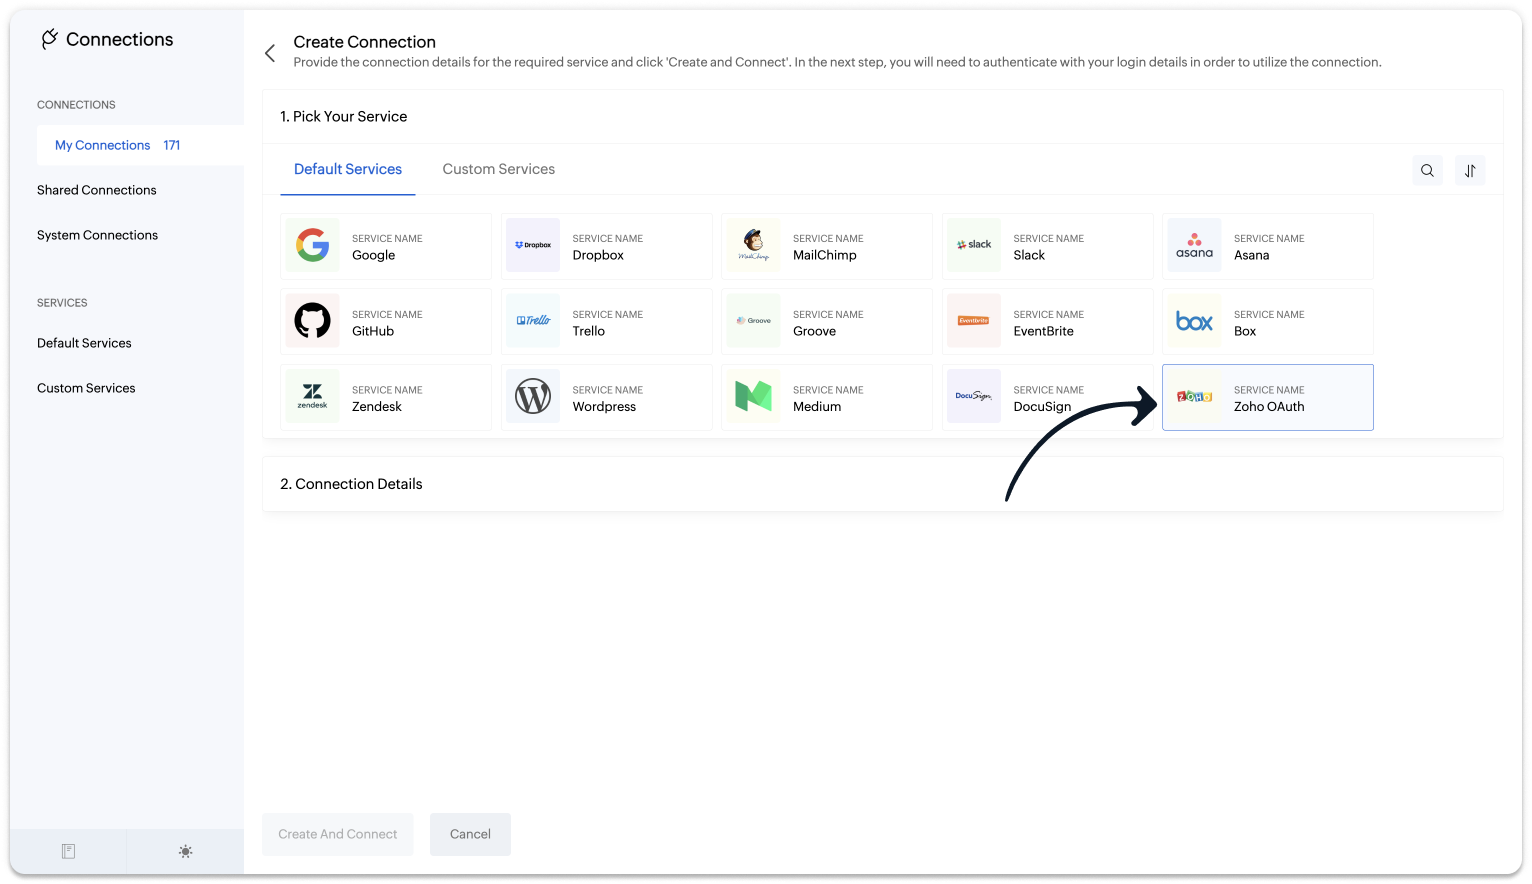
- Provide your connection name, connection link name, and choose the scopes below.
- Desk.search.READ
- Desk.contacts.READ
- Desk.tickets.READ
 Note: The Connection Link Name will be used in the scripts to invoke URL tasks.
- Click on Create And Connect to connect Zoho SalesIQ and Zoho Desk.
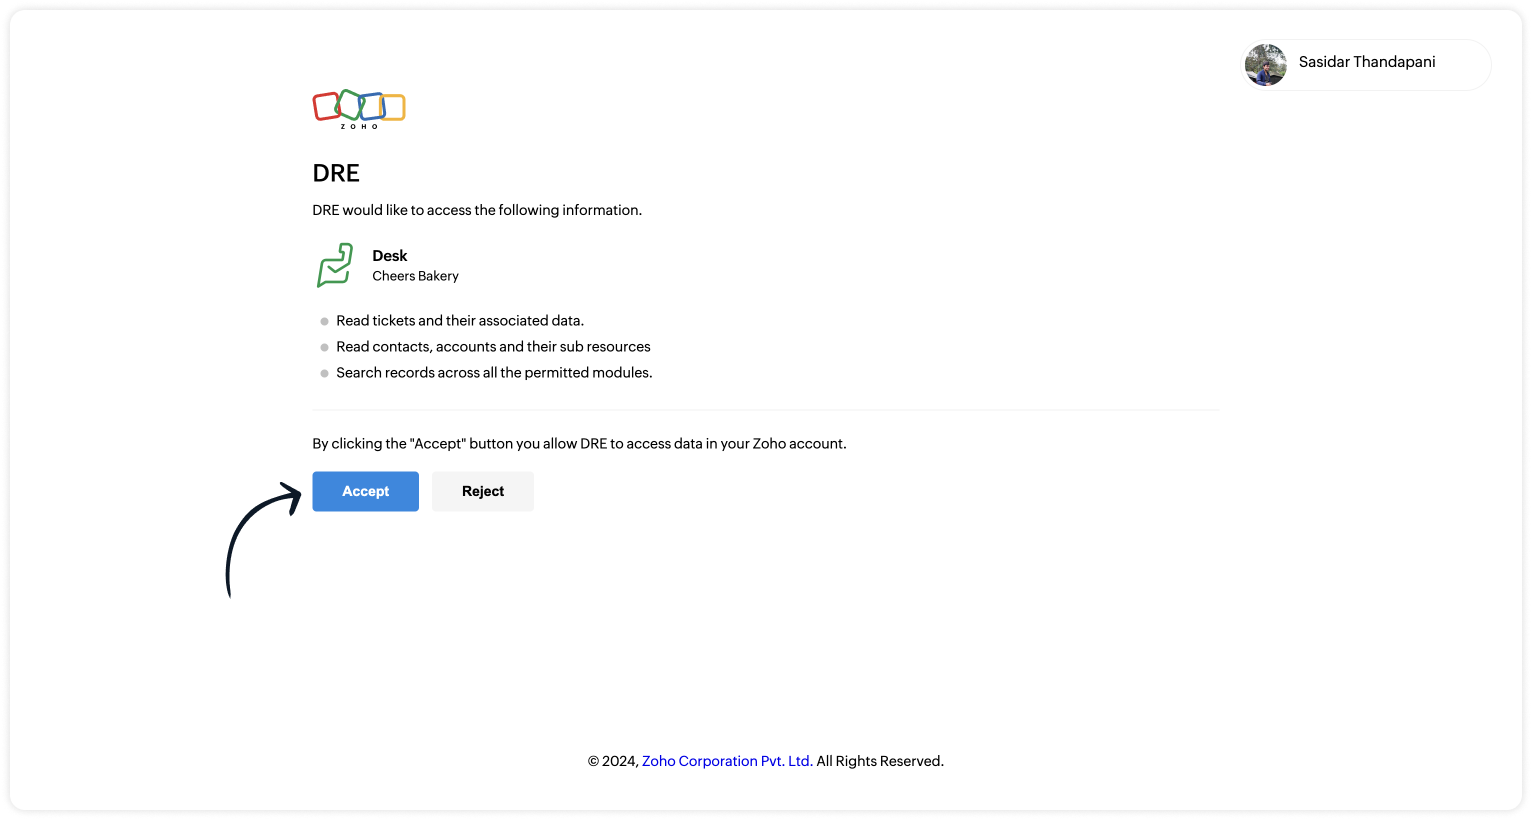
- Upon successful authentication, Zoho SalesIQ will be connected with Zoho Desk.
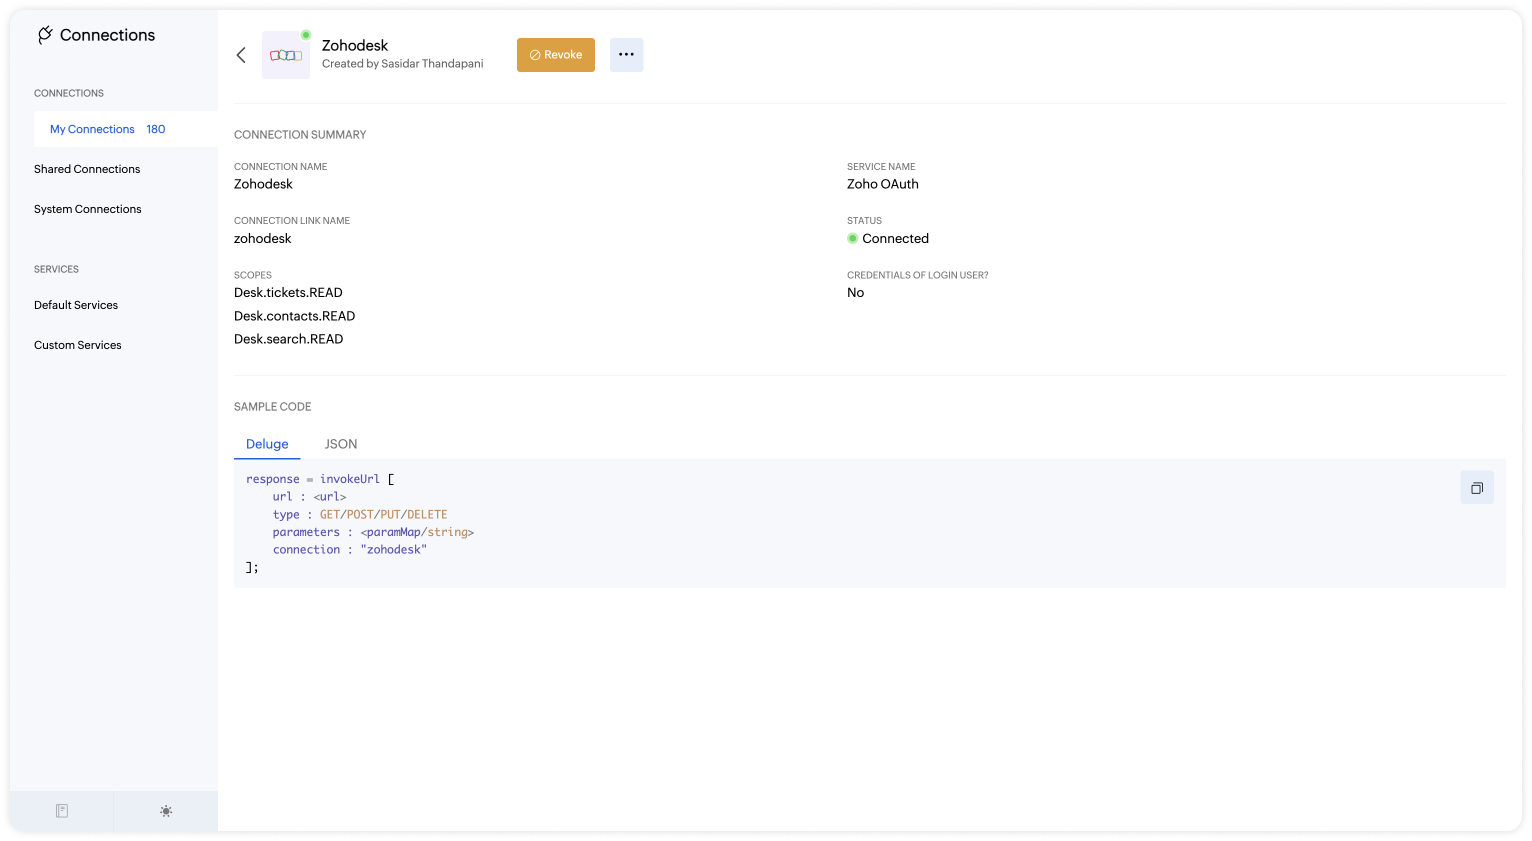
- The connection is successfully established.
Step 2 - Build the Plug
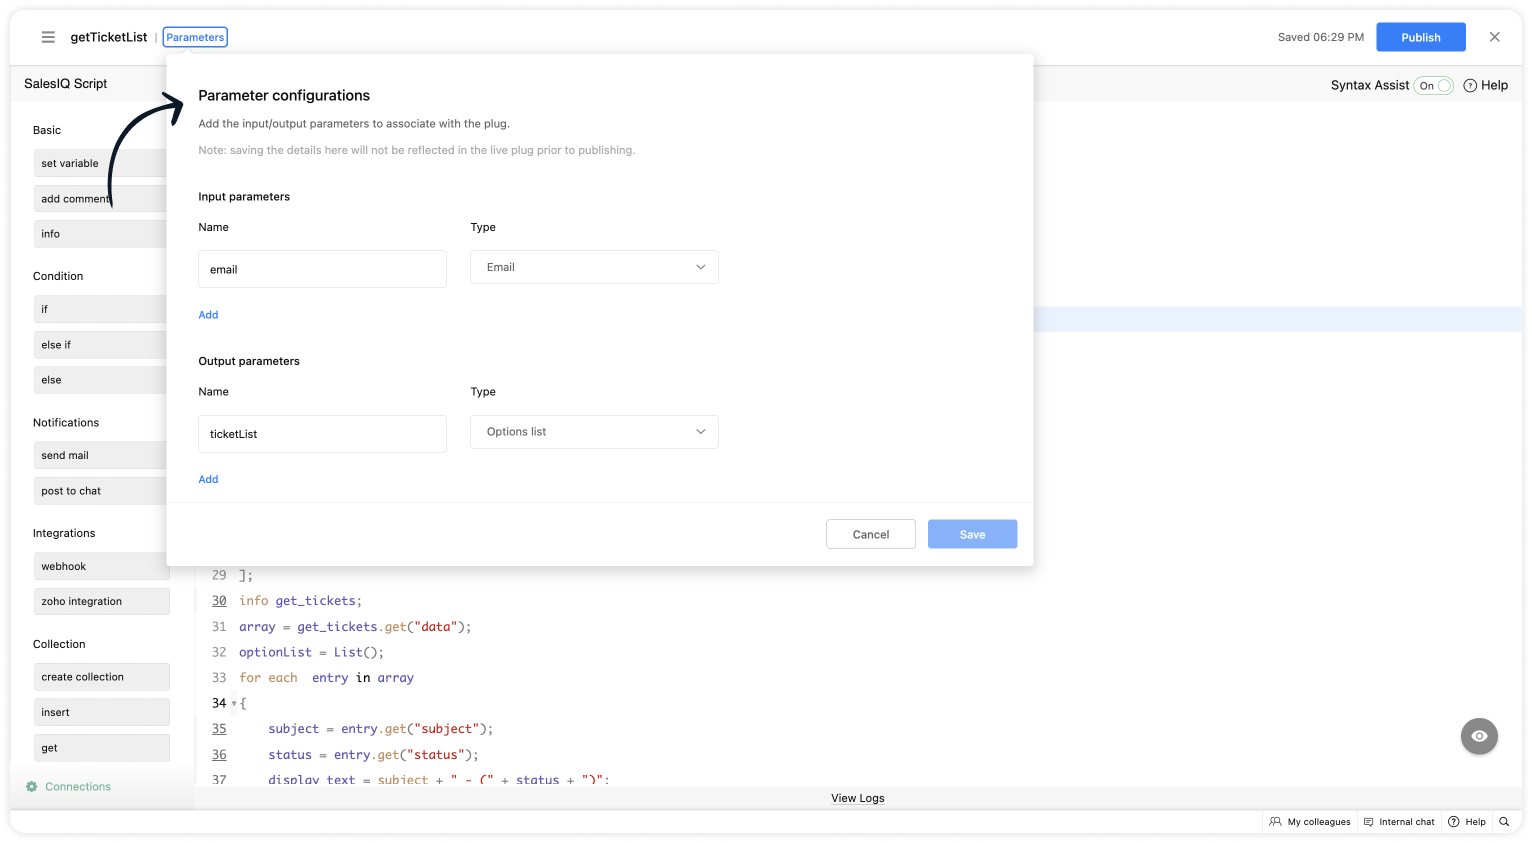
As we have created a connection between SalesIQ and Desk successfully, it's time to build the plug. The first step in building the plug is defining the parameters.
Input Parameters
- Name : email | Type : Email
Output Parameters
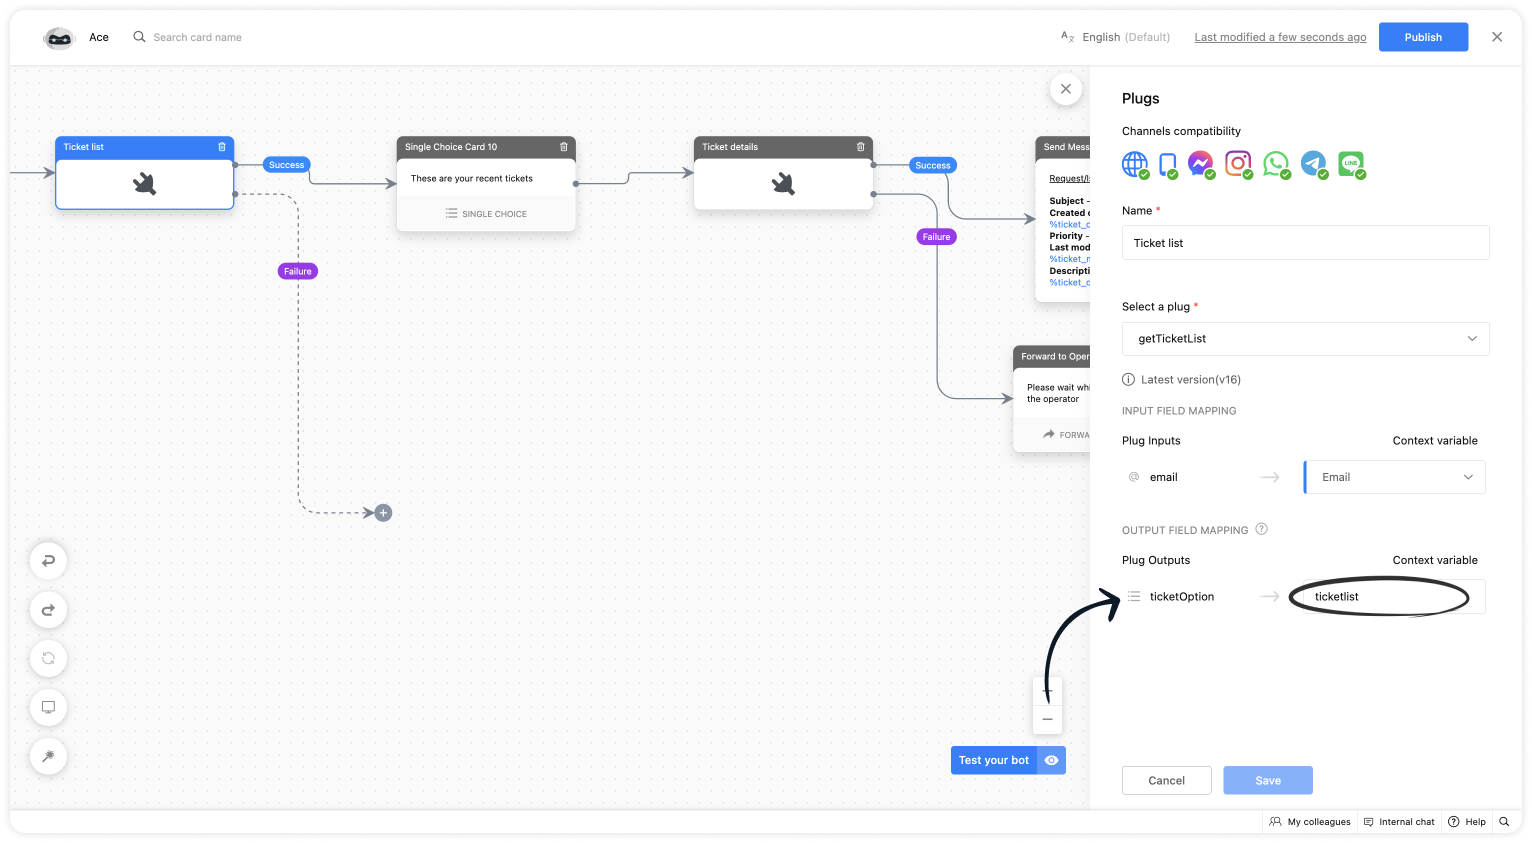
- Name : ticketList | Type : Option List
Script to get the list of tickets
- Copy the code below and paste it into your plug builder. Then, make the following changes.
- In line #8, get your Desk org ID (Settings > Developer Space > API > Scroll down to find the "OrgId").
- if(session.containsKey("email"))
- {
- email = session.get("email").get("value");
- }
- // Getting the contact ID from the email - https://desk.zoho.com/DeskAPIDocument#Search#Search_SearchContacts
- url = "https://desk.zoho.com/api/v1/contacts/search?email=" + email;
- header = Map();
- header.put("orgId","012345");
- //Change your org ID (Settings > Developer Space > API > Scroll down > "OrgId")
- getcontact = invokeurl
- [
- url :url
- type :GET
- headers:header
- connection:"zohodesk3"
- ];
- info getcontact;
- contact_id = getcontact.get("data").getJSON("id");
- info contact_id;
- url_ticket = "https://desk.zoho.com/api/v1/contacts/" + contact_id + "/tickets?sortBy=-createdTime&limit=3";
- // Get associate ticket of a contact - https://desk.zoho.com/DeskAPIDocument#Contacts#Contacts_ListContactsByIds
- get_tickets = invokeurl
- [
- url :url_ticket
- type :GET
- headers:header
- connection:"zohodesk3"
- ];
- info get_tickets;
- array = get_tickets.get("data");
- optionList = List();
- for each entry in array
- {
- subject = entry.get("subject");
- status = entry.get("status");
- display_text = subject + " - (" + status + ")";
- ticketNumber = entry.get("ticketNumber");
- optionList.add({"id":ticketNumber,"text":display_text});
- }
- response = Map();
- response.put("ticketList",optionList);
- return response;
- Then, click Save, preview the plug and Publish it.
Step 3 - Adding the plug to the Codeless bot builder
- Navigate to Settings > Bot > Add, provide the necessary information, and select Codeless Bot as the bot platform. You can also open an existing bot.
- Click on Plugs under Action cards, select the plug you have created and provide the input values for the parameters defined in the plug builder.
- Choose the %visitor.email% variable for the name.
- Provide a variable name for the ticket list.
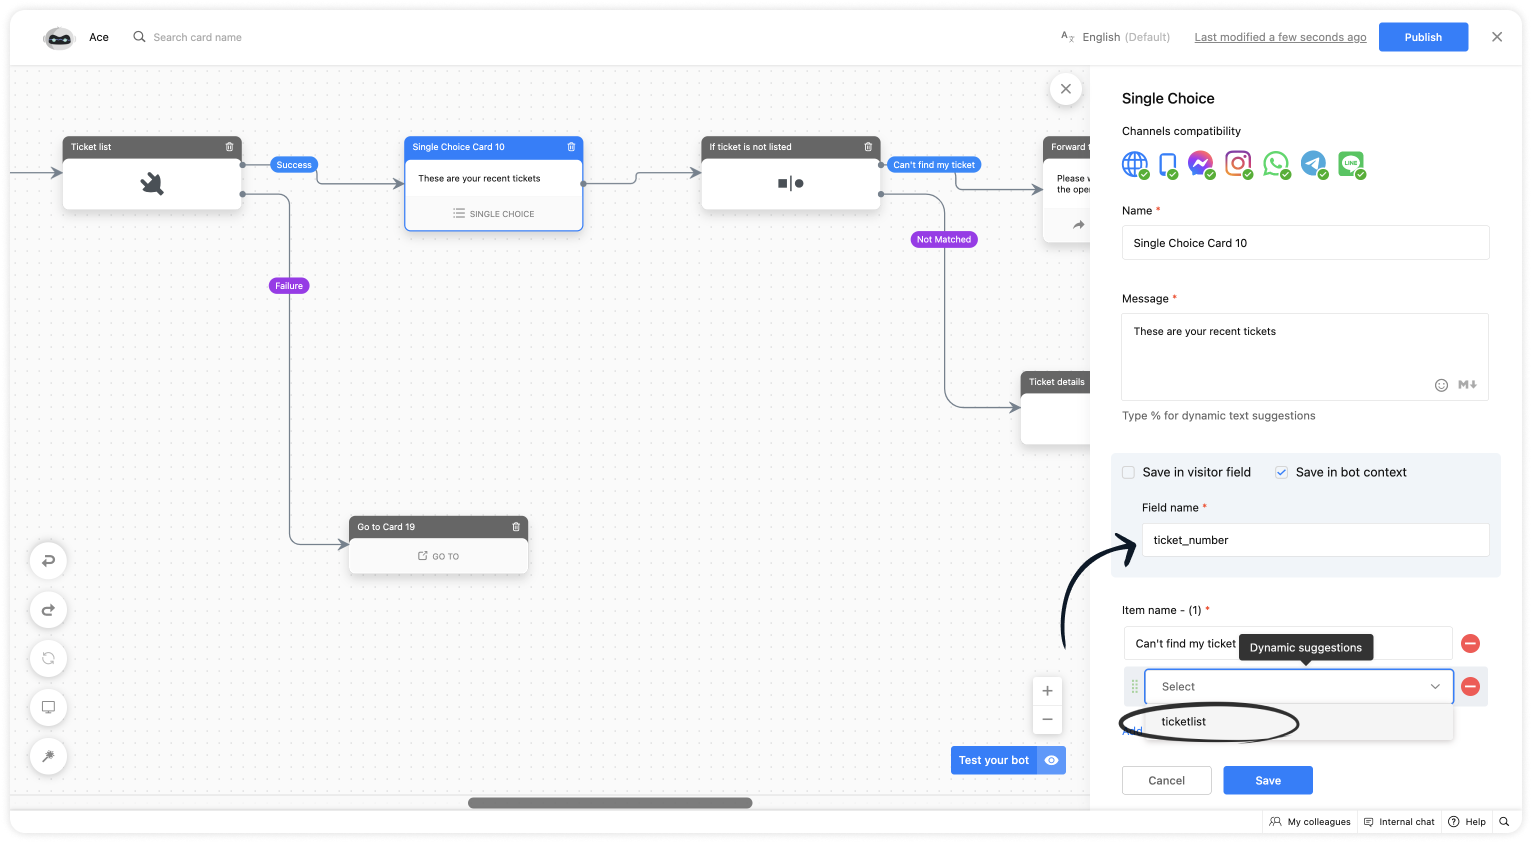
- Use a single choice card, click on Save in bot context, give a variable name and select the context variable under dynamic suggestion.
- Then, use this plug to show the ticket details.
I hope this was helpful. Please feel free to comment if you have any questions. I'll be happy to help you.
Related links:
- Plug guides
- Codeless bot guide
- Plugs for OTP verification.
- Plug to create a lead in Zoho CRM.
- Plug for getting the status of the ticket in Zoho Desk
- Plug to schedule appointments in Zoho Bookings
- Plug to read and write data in Google Sheet
- Plug to integrate bot with OpenAI
- Plug to track ecommerce orders from Zoho Commerce
- Zobot troubleshooting page
Best regards
Sasidar Thandapani