IMPORTANT: This is the help page of the latest version of Zoho Campaigns.
Click here to access the corresponding help page if you're still in the older version.
A list, or mailing list, is a collection of contacts grouped together under a common name. The contacts in a list can share similar interests or be completely different; what matters is that they're organized under one roof for a purpose you define.
You can create and manage all your lists from the Lists section inside the Audience module.
Here's a practical example: Say you're importing 1,000 contacts into Zoho Campaigns and want to send them all a welcome campaign. During the import, you can associate these contacts to a list so that when you're setting up the campaign, you simply pick that list as the recipient. You can also select multiple lists as recipients if needed.
Within Lists, you can create, edit, and delete lists. You can also assign topics to list contacts, export them, set default signup forms, and check list overview statistics. Lists can also be used as triggers for workflow automation.
Availability
Who can create lists?
Lists can be created by users having the below roles:
● Admin
● WorkSpace Admin
● Manager
● Any custom role having the Create permission for lists.
How do you create lists?
Creating your first list
To create the first list:
From the Navigation Toolbar to the left, click Audience and click Lists.
Specify the name in the List Name field and a few words about it in the Description field.
Click Create List to create your first list.
Creating lists
The steps are only different for creating the first list. After that, subsequent lists will follow the same navigation steps below:
From the Navigation Toolbar to the left, click Audience and click Lists.
Click the New List button at the top-right, specify the name and description for the list and click Save.
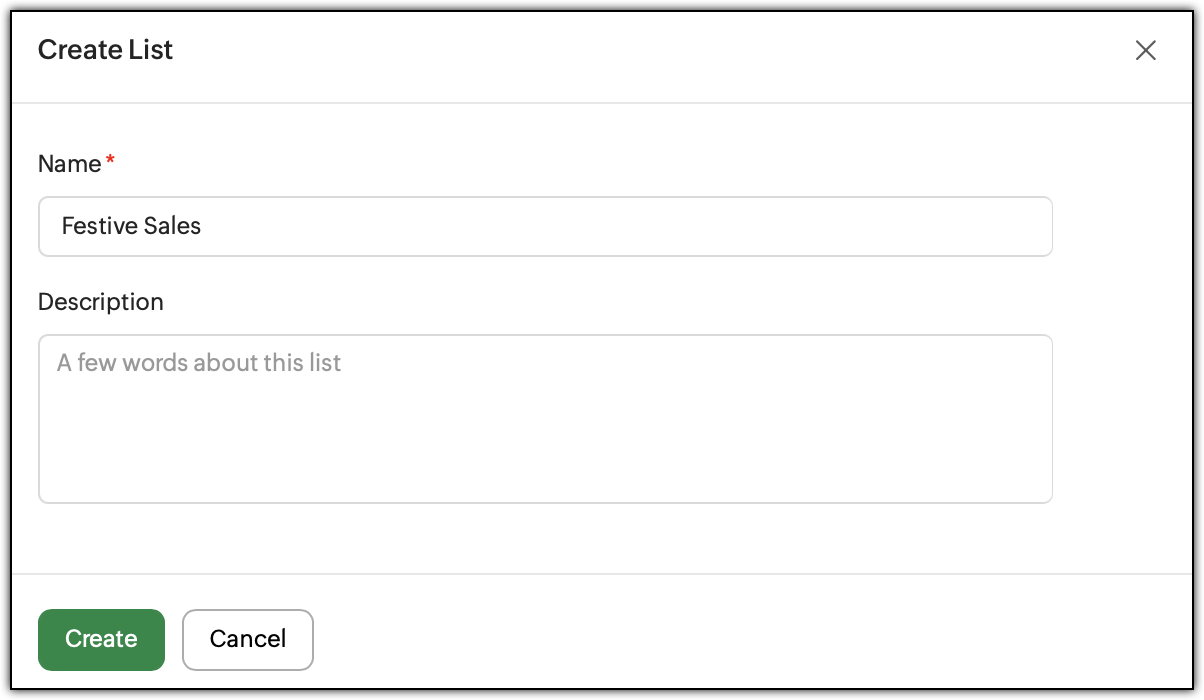 Creating subsequent lists after the first list
After creating a list, you'll see a screen for adding contacts to it. There are different ways to add new contacts or existing contacts to a list. The three ways shown include: ● Manually
● Import from Zoho CRM
● Signup Form
We'll look at each of them in detail along with other methods.
Manually
The first method is to add new or existing contacts manually. Click the Add Contacts drop-down button to reveal three options –
New Contact(s)
Add using Filter
Import from File
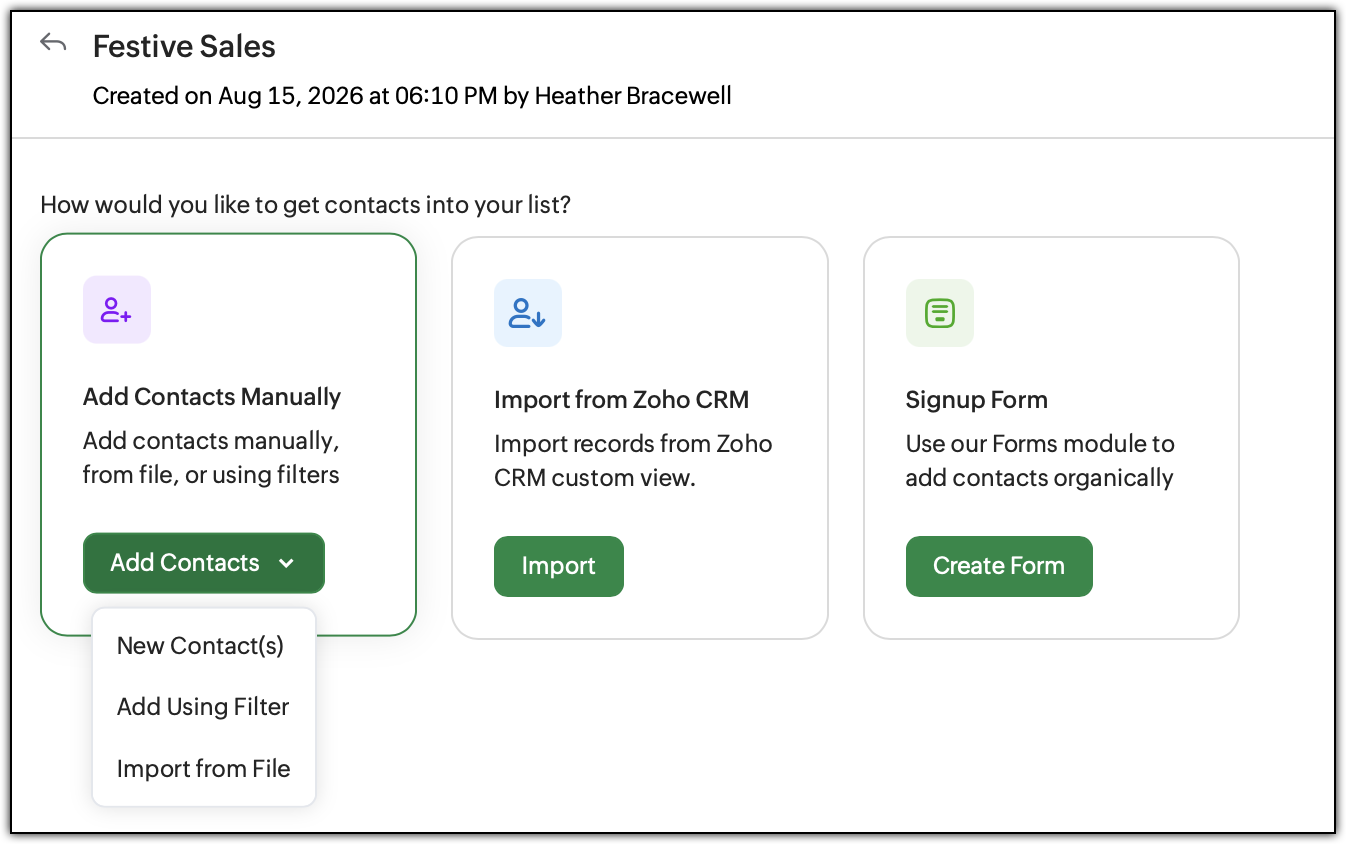 Various ways to add contacts to a list
Let's look at how each option works.
This option can be used if you want to add 20 contacts at a time to this list. To add new contacts manually to a list:
Click the Add Contacts drop-down and click New Contact(s) option. This will take you to the contact creation screen where you can specify basic details like email, mobile, first name, last name, country, and so on.
Click Add to create these contacts and add them to this list; they will also be present in the Contacts section.
You can use this option to add existing contacts in your Zoho Campaigns organization to the list. Not only that, if you have a similar set of contacts, this option will be useful to filter that set only and add them to a list. A temporary segmentation of contacts is done to filter and add them to a list. To do this:
Click the Add Contacts drop-down and click Add using Filter option.
The page that appears will be same as when you create a segment from scratch. Choose the common fields by which you want to filter the contacts. If needed, include multiple groups using the Add a Group option. Click the Preview Contacts button at the bottom to display a slide-in window where you can view and search the contacts captured by the filter.
Click Add Contacts to add these existing contacts to the list.
Notes:
● Only a temporary segment is used to filter the contacts.
● No segment will be created in Segments module when you use this option.
● Once the contacts are added, you cannot revisit, reuse, or repurpose this filter in future.
This option is useful if you want to add thousands of contacts to a list. To do this:
Click the Add Contacts drop-down and click Import from File option.
Use the Upload File button or drag-drop the file. Supported formats: .csv and .xlsx
Choose how you want to handle duplicate contacts and click Continue.
Notes:
● The list name can have a maximum of 70 characters.
● List's description can be a maximum of 300 characters.
● There's no limit to the:
○ number of lists you can create
○ number of lists you can associate to a contact
○ number of lists you can associate at a time to multiple contacts
● You cannot associate lists to unsubscribed contacts.
Import from Zoho CRM
Zoho CRM is our Customer Relationship Management software. Using the 'Sync from Zoho CRM' option, you can sync your contacts from Zoho CRM to a list in Zoho Campaigns. It's useful for when you want to send campaigns from Zoho Campaigns for these Zoho CRM contacts.
Synced contacts are treated as new contacts and also accessible inside the Contacts module in Zoho Campaigns.
You'll see different navigation steps depending on if you've done the integration.
If Zoho CRM is integrated
If you've integrated Zoho CRM and Zoho Campaigns before using the Sync from Zoho CRM option, here are the steps:
After creating the list, click the Sync from Zoho CRM button.
In the slide-in window that appears, choose the Zoho CRM Module (example: Contacts) and the Zoho CRM View you wish to sync.
Click the Sync button to sync contacts from Zoho CRM to this list.
If Zoho CRM isn't integrated
If you have not integrated Zoho CRM and Zoho Campaigns before using the Sync from Zoho CRM option, you have to first integrate the two apps:
After creating the list, click the Sync from Zoho CRM button.
Once integration is done, you can come back to this list, click the Sync from Zoho CRM button.
In the slide-in window that appears, choose the Zoho CRM Module (example: Contacts) and the Zoho CRM View you wish to sync.
Click the Sync button to sync contacts from Zoho CRM to this list.
Note:
The different methods of adding contacts to a list, such as via import, filters, manual addition, or from Zoho CRM can be repeated. You can access all these options under the Import Contacts drop-down, present at the top-right, inside the detailed view page of a list. Signup forms are one of the best ways to bring contacts in organically to Zoho Campaigns. This option can be used to add new contacts to your list by creating a signup form and embedding it in your website. Whenever people visit your site and signup with this form, they'll be added as contacts automatically in Zoho Campaigns under this list.
Here's how you can do this:
After creating the list, click the Create Form button.
In the signup form creation page, ensure that the correct list is chosen in the Mailing List field.
Fill other details such as Topics, choose the template and customize it. Launch the form once everything's ready. Please refer this detailed guide from creation to launch of a signup form. Click the Form Code tab to get its code. You can choose between different types of code (IFrame, Raw HTML, No CSS) and embed it in your website.
Feature | Manually | Sync from Zoho CRM | Signup Form |
Primary Use Case | Adding small groups (up to 20), filtering existing contacts, or bulk importing from files. | Bringing in leads or contacts directly from your CRM for email marketing. | Organic growth by allowing website visitors to subscribe themselves. |
Contact Type | New contacts (via manual entry/import) or existing contacts (via filters). | Treated as new contacts in Campaigns; also added to "Contacts" section. | New contacts added automatically upon form submission. |
Prerequisites | A file (.csv or .xlsx) for bulk imports. | Active integration between Zoho Campaigns and Zoho CRM. | A website or landing page to embed the form code. |
Capacity/Scale | High: Supports high volume via file import. | High: Based on CRM modules and views. | Continuous: Adds contacts as they sign up. |
Effort Level | Periodic: Requires manual upload or entry. | Automated: Once synced, data flows from CRM. | Set-and-forget: Automated once the form is embedded. |
Key Tools | Import tool, Filter tool, or manual data entry screen. | Zoho CRM Sync slide-in (Module and View selection). | Signup form builder and embed code (IFrame, HTML, etc.). |
Here are a couple of methods of adding existing contacts to a list:
In the contacts list view page. This method can be used if you want to add multiple contacts to a list or multiple lists. In a contact's detail view page. This method is useful for when you want to associate a list or multiple lists for a single contact.
Note: In both the list view and detailed view methods, you can add contacts to multiple lists.
1. From the contacts list view page
To add contacts to lists from the contacts list view page:
From the Navigation Toolbar to the left, click Audience and click Contacts to access the list view page.
Click the checkbox to the left of contacts' email to select them.
Click the Actions button that appears at the top and click Add to Lists from the list of options.
Search for the lists, select them using the checkbox and click Save.
● If you want to create a new list instead, type the name in the text box and click Create. Select this list, and click Save.
2. From a contact's detailed view page
To associate lists in a contact's detailed view page:
From the Navigation Toolbar to the left, click Audience and click Contacts to access the list view page.
Click a contact to access its detailed view page.
Click the Associations tab, then click the Lists sub-tab.
Click the Associate List
button.
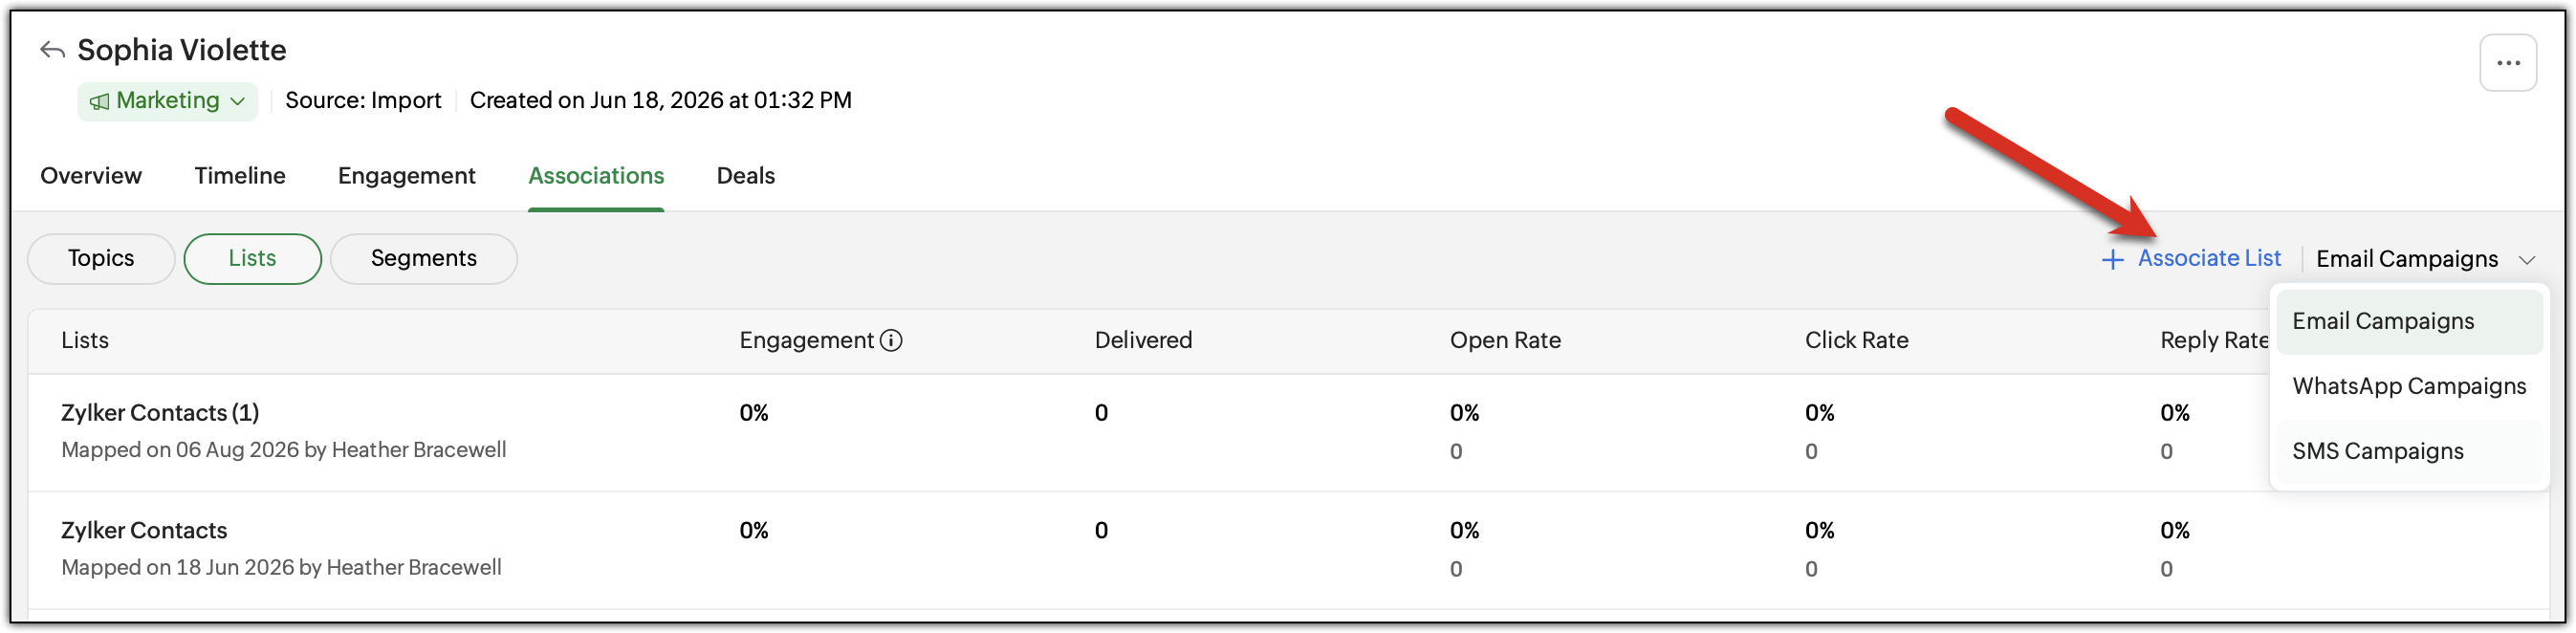 Viewing existing and associating new lists to a contact.
Search for the lists, select them using the checkbox and click Save.
● If you want to create a new list instead, type the name in the text box and click Create. Select this list, then click Save.
Detailed view page of a list
After adding contacts, you'll be present in the detailed view page of the list. On this page, you can view various details of a list, perform actions on it and its contacts, and many more. We'll look at each functionality in detail.
How to access
You'll open the detailed view page of a list by going to Audience -> Lists -> and clicking a list.
What does the detailed view page contain?
The detailed view can be unofficially split into four sections for a better understanding:
List Details
Adding Contacts
More Actions
The four tabs.
1. List Details
This section, present at the top-left, displays basic details of a list including:
● List name
● List description (hover over the info icon next to list name)
● List creation date and time
● User who created the list
Even though you would have added contacts using various methods right after you created a list, if you want to add more contacts later, you can do so by using the Import Contacts button and selecting from the drop-down options beside it.
How to access:
Navigate to Audience -> Lists.
Click a list and click Import Contacts at the top-right corner.
Alternatively, click the drop-down beside it and choose any of the below mentiond options.
Options
Here are the options you can use to continue adding contacts to a list at any given time:
● Import Contacts. You can upload a file consisting of thousands of contacts to a list. ● Add New Contacts. Manually add 20 contacts at a time to a list.
3. More Actions
This section comprises options that are useful for performing various operations on your list.
How to access: Navigate to Audience -> Lists. Click a list, then click the More Actions (3-dotted) button at the top-right corner.
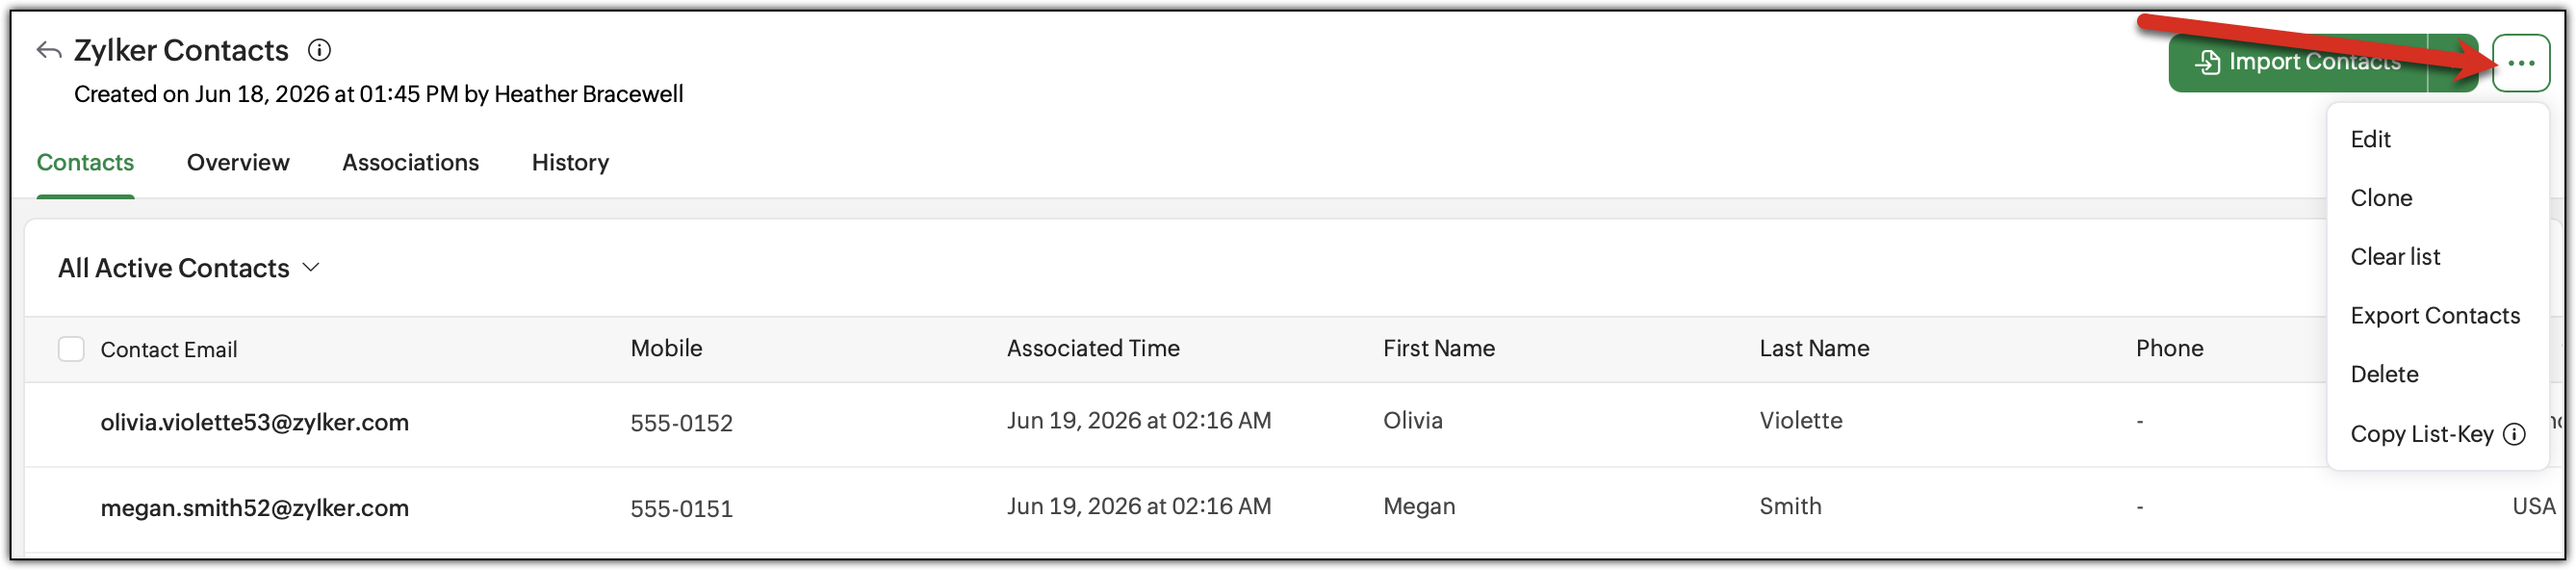 More Actions button of a list's detail view page.
The following options are available:
● Edit
● Clone
● Clear List
● Export Contacts
● Clear
● Copy List Key
Let's look at the functionality of each option.
Edit
To edit the name and description of the list, you can use this option.
Navigate to Audience -> Lists.
Click a list, then click the More Actions (3-dotted) button at the top-right corner.
Click Edit List.
Change the list name or description and click Save.
Clone
Cloning a list will create an exact copy of your existing list. Only the list will be cloned as a new one, contacts present in the list won't be cloned into the new list.
To clone the list:
- Navigate to Audience -> Lists.
- Click a list, then click the More Actions (3-dotted) button at the top-right corner.
- Click Clone. The list will be cloned, and you'll be taken to the new list.
Clear List
This option is used to clear or remove the contacts alone so you end up with a clean list.
To clear the contacts from a list:
Navigate to Audience -> Lists.
Click a list, then click the More Actions (3-dotted) button at the top-right corner.
Click Clear List.
Click Clear Contacts.
Notes:
● Clear
list just clears the contacts from that particular list. If these
contacts are present in other lists, they will remain there.
● Clearing
a list will not delete the contacts from your Zoho Campaigns
organization itself. You can access these contacts anytime under
Contacts.
You can use this option to export the contacts of a particular list.
Use case: If you want to change the field value of a particular field, say, Country, for around 100 contacts of this list you can:
Perform an export -> make changes in the file -> perform an import into this list -> choose the duplicate preference as Overwrite Contacts to update the field value of these contacts.
To export the contacts of a list:
Navigate to Audience -> Lists.
Click a list, then click the More Actions (3-dotted) button at the top-right corner.
Click Export Contacts.
In the slide-in window, specify the File Name, choose its extension (between CSV, TSV, XLSX, JSON), select the fields you want to export, and choose whether to password protect your file.
Click Export.
Note: If you choose Yes for password protecting the export file, the default password is used. It is a system generated password and comprises the first four characters of your Zoho Accounts email address and last four digits of your user ID.
Example: Let's say the email is patricia@zylker.com and user ID is 567891011. Default password would be patr1011.
Using this password is limited to the current file you're exporting; it cannot be opened if incorrect password is used.
Your Zoho Accounts email address and user ID can be found by simply clicking the profile picture at the top-right of your Zoho Campaigns organization.
Delete
This option is used for deleting the list itself. But there's another important option that you should be aware of. As deletion is an irreversible process in Zoho Campaigns, we suggest you proceed with caution.
To delete the list:
Navigate to Audience -> Lists.
Click a list, then click the More Actions (3-dotted) button at the top-right corner.
Click Delete.
In the pop-up that appears, you will see the Remove contacts associated with this list from the organization checkbox.
If this checkbox is not ticked, only the list will be deleted. Contacts will remain intact.
If this checkbox is ticked, both the list and the contacts will be deleted from your Zoho Campaigns organization. If these contacts belonged to other lists, they'll be deleted from those lists as well.
Click Delete List.
Notes:
● Once a list is deleted, you can't retrieve it. You have to create it again.
Difference between Clear List and Delete List
| Clear List | Delete List |
What it does | Removes contacts from the list | Deletes the list itself |
Effect on the list | List remains, contacts are removed | List is permanently deleted |
Effect on contacts in other lists | Contacts remain in other lists | Contacts remain in other lists unless the removal checkbox is ticked |
Effect on contacts in the organization | Contacts remain accessible under Contacts section | Contacts remain in the organization unless the removal checkbox is ticked |
Reversible | Yes | No |
Additional option | None | Option to also remove all associated contacts from the organization entirely |
Copy List Key
List Key is an unique key used to identify to which list contacts need to be added using APIs. The Subscribe API makes use of list key as a parameter.
Using this option, you can copy the list key of a particular list to use it in APIs. To do so:
Navigate to Audience -> Lists.
Click a list, then click the More Actions (3-dotted) button at the top-right corner.
Click Copy List Key. The key will be copied.
 Note: We suggest not to expose the list key. Use it in Zoho Campaigns APIs but that's about it.
4. The four tabs
● Overview
● Contacts
● Associations
● History
Let's look at each tab in detail.
The Overview tab
Overview tab displays essential statistics of a list in multiple cards. You can get a quick summary of the list by going through this tab. You can filter the stats using date-based filters and types of campaigns.
This is the tab you'll visit by default whenever you click a list to view its details.
Below are the cards you'll see:
● Contacts Distribution. Shows how contacts are distributed in the list. You can view a percentage increase or decrease in the number of contacts beside each metric. It includes metrics:
○ Total Contacts - Number of contacts in a list
○ Marketing - Number and percentage of marketing contacts
○ Non-Marketing - Number and percentage of non-marketing contacts
● Contacts Engagement Stats. Displays the percentage and number of contacts engaged with campaigns for the last 30 days only (date filter isn't applicable). It includes:
○ Active Contacts - Contacts that have interacted with a campaign in the last 30 days.
○ New Contacts - New contacts created in your Zoho Campaigns organization in the last 30 days that got added to the list.
● Engagement Summary. Displays various email metrics with respect to a list. You can filter to view similar metrics for SMS and WhatsApp Campaigns. Metrics shown include:
○ Sent - Number of campaigns sent for number of contacts
○ Delivery Rate - Number and percentage of contacts to which campaigns got delivered
○ Open Rate - Number and percentage of contacts who opened delivered campaigns
○ Click Rate - Number and percentage of contacts who clicked at least one link in the opened campaigns
○ CTOR - Click-to-Open-Ratio: Percentage indicating ratio between the total clicks made compared to the total opened campaigns
○ Unsubscribes - Number and percentage of contacts unsubscribed from the campaigns sent with this list
○ Hard Bounces - number and percentage of contacts that suffered a hard bounce leading to a permanent failure in delivery.
○ Soft Bounces - Number and percentage of contacts for whom soft bounces occurred. Retries will happen.
○ Spam - Number and percentage of contacts who marked your campaigns as spam.
○ Engagement Rate - Percentage of contacts actively engaging with your campaigns sent with this list
● List Growth by Time. Displays a graph on how your list has grown over a period of time. Plotted between Date-Time (X) and Contacts (Y) for total, marketing, and non-marketing contacts.
● Contacts by Source. Pie chart of percentages of top five sources from which contacts were added to this list such as Import, Manual, X, Wistia, and many more.
● Contacts by Email Client. Pie chart of percentages of top five email clients used by your contacts to open campaigns. Example: Zoho Mail, Gmail, Yahoo, and Outlook.
● Usage Stats. Shows a pie chart of percentages of where the list is used in your Zoho Campaigns organization such as Email, SMS, WhatsApp, and Workflow.
● Top Five Campaigns. Displays data of the top five performing email campaigns, SMS campaigns, or WhatsApp campaigns based on their engagement rate. Use the filter at the far right of this card to switch between the three types of campaigns.
● Location Breakdown. A world map showing from which countries your contacts are from for this list. This data is derived based on the Country and City data provided for your contacts. You can filter this map to specific country or state.
○ Country Performance: Opens & Clicks - Displays the top five performing countries of contacts based on opens and clicks tracked in your campaigns.
Contacts tab shows the contacts present in your list. This tab will look exactly like the contacts list view page. Not only that, almost all the functionalities and bulk actions you can perform in the contacts list view page can be done in this tab, too.
There's one important column present in this tab called the Associated Time, which tells you the date and time a particular contact got added to this list.
By default, you'll see the All Active Contacts view. Click this view at the top-left to change to view only the Marketing or Non-Marketing contacts of this list.
Bulk actions can be performed on the contacts in this list by:
Navigate to Audience -> Lists.
Click a list to access its detailed view. Click the Contacts tab.
To perform bulk actions, you need to choose from three options for selecting contacts:
Select specific contacts - Click the checkbox to the left of their email address to select those contacts only.
Select all contacts in a page - Click the checkbox next to the Contact Email column to select all the contacts in a page. Maximum 200 contacts can be selected.
Select all contacts in the list - Click the checkbox next to the Contact Email column, and click the Select All option to select more than 200 contacts in the list.
Once you've selected the contacts, click the Actions drop-down option to view all the bulk actions on contacts you can perform. Choose the desired one and proceed updating the contacts. The actions include: ● Change Subscription Type - Change the subscription type of the selected contacts in this list.
● Assign Tags - Assign tags to the contacts
● Remove Tags - Remove the assigned tags from the contacts
● Add to Lists - Add the contacts to other lists
● Remove from Lists - Remove contacts from this and other lists
● Assign Topics - Assign topics to the contacts
● Remove Topics - Remove the assigned topics
● Export Contacts - Export the selected contacts of this list
● Mass Update - Bulk or mass update a particular field of the selected contacts
Note: Under the Overview and Contacts tabs, you may see the "Contacts Syncing" banner at the top. This appears when you're adding a huge volume of contacts to the list. They will be added in the background, it'll take some time. For more information, access the History tab.
The Associations tab
The Associations tab displays various modules as sub-tabs to which the list is associated. The sub-tabs include:
● Email
● SMS
● WhatsApp
● Workflow
● Signup Form
Under these sub-tabs, you can find the list of campaigns, workflows, and signup forms along with their details.
You can filter the date-range at the far-right. By default the last 90 days data will be displayed. If needed, you can choose a custom range or the entire duration. Entire duration will display all the data right from when you created your Zoho Campaigns organization till the present date.
How to access:
Navigate to Audience -> Lists
Click a list, then click the Associations tab
Click through the sub-tabs to view the details of each module.
Clicking a campaign, workflow, or a signup form from these sub-tabs will display their details in a slide-in window and you can go to that particular record where you can do further operations on it.
Info displayed by each sub-tab:
Each sub-tab displays details and metrics related to their module for the particular list you're accessing.
● The Email sub-tab displays metrics such as Sent, Delivered, Opened, Clicked, and CTOR.
● The SMS sub-tab displays data such as Sent, Delivered, and Clicked.
● The WhatsApp sub-tab shows metrics including Sent, Delivered, Read, Clicked, Replied, and Unsubscribed.
● The Workflow sub-tab shows the workflow name and the date on which it was created.
The History tab
History tab displays information regarding how the contacts were added to the list.
How to access:
- Navigate to Audience -> Lists
Click a list, then click the History tab -> click through the sub-tabs to view the details of each module.
You'll see the below columns in this tab:
● Added On: The date on which the contacts were added using a particular method.
● Method: Method by which contacts were added to the list. Hovering over a method will display its details. Methods can be:
○ Filter - Contacts added via the Add using Filter option.
○ Import - Contacts imported via the Import from File option.
○ CRM View - Contacts synced using the Sync from Zoho CRM option.
● Status: Indicates whether the contacts have been added to the list or not. Values include:
○ Completed
○ In-Progress
● Added By: The user in your Zoho Campaigns organization who added these contacts to the list.
● Total Contacts: Number of contacts captured by the filter, present in the import file, or to be synced from Zoho CRM.
● Associated: Number of contacts associated to this list. Both Total Contacts and Associated need not be the same.
● Skipped: Number of contacts skipped because they may already be present in a list, skipped during import due to errors, and skipped when synced from Zoho CRM if they already exist.
Here's an example on how the numbers are calculated: You have a list named Gmail Contacts, in which there are already 10 contacts present. You want to add more to it and use the Add Using Filter option. The filter captures 510 contacts (including the ones already in the list) and you add them. Since there are 10 already, here's how data is displayed:
○ Total Contacts will show 500.
○ Associated will show 500 (not 510).
○ Skipped will show 10 because these are already in the list.
List view page for lists
The list view page for the Lists module can be accessed simply by going to Audience -> Lists.
Similar to the list view page of contacts, this page displays the basic details of every list you've created in your Zoho Campaigns organization.
Let's explore what you can find and do on this page.
What you can find in the list view page
You can find:
● Lists along with their details such as:
○ List Name - Name of the list
○ Contacts - Number of contacts in the list
○ Unsubscribes - Number of contacts unsubscribed after being added to the list
○ Last Updated On - Date and time at which the list was last updated
○ Updated By - The user of your Zoho Campaigns organization who did the last update.
These columns can be sorted in ascending or descending order when you click their names.
● The folder option at the top-right corner.
● Filter icon beside the folder option.
● And the New List button to create new lists (after the first list is created).
● The More Actions (3-dotted) button at the top-left corner, next to the All Lists view.
● The More Actions (3-dotted) button to the right of each list.
Now, let's look at the operations you can perform in the list view page.
How do you create a new list from the list view page?
Navigate to Audience -> Lists.
Click the New List button at the top-right corner.
Specify the List Name and Description for the list and click Create.
How are folders used and how can you create one?
When you access the list view page, you can view the folder option at the top-right corner. By default, you'll see All Folders and Unclassified.
If you have similar type of lists, you can have them in a single folder and access them without interruptions from other lists. Let's say you have separate lists for Gmail contacts, Yahoomail contacts, Outlook contacts, and Zoho Mail contacts. You can create a folder called 'Email Client Lists' and move these four lists here for ease of access.
How do you create a folder and move lists?
To create a new folder:
Navigate to Audience -> Lists.
Select the lists using checkbox present to the left of each list.
Click the Move to Folder
option at the top.
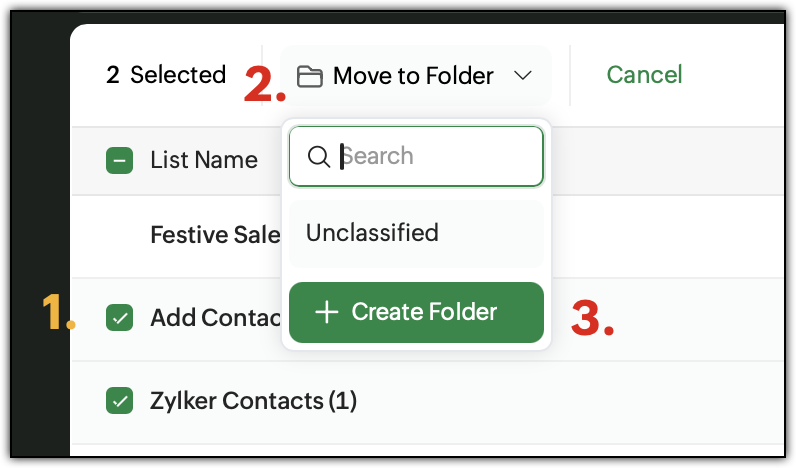 Audience -> Lists -> select the lists -> follow steps.
Type the folder name and click the Create button that appears. The folder will be created and the lists will be moved into it.
Notes:
● The folder name can be a maximum of 70 characters.
● You can create any number of folders.
● You can move any number of lists to a folder.
How do you navigate between folders?
If you want to move from one folder to another, simply click the All Folders or the folder name at the top-right in the list view page, and click the folder name to move to.
How do you edit or delete a folder?
To edit or delete a folder:
Navigate to Audience -> Lists.
Select the lists using checkbox present to the left of each list.
Click the Move to Folder option at the top.
Hover over a folder, then click the More Actions (3-dotted) button. Choose from the following options:
Edit - Edit the folder name and click Save.
Delete - Delete the folder. Click Delete in the pop-up that appears. Only the folder will be deleted, lists will remain intact and be moved to the Unclassified folder.
What is the difference between All Folders and Unclassified folder?
Both All Folders and Unclassified are default folders. They cannot be edited or deleted.
The All Folders folder displays lists present in all the folders including the Unclassified folder whereas the Unclassified folder displays only the lists that aren't present in any folder. If a list is present in a particular folder, it'll show up in the All Folders but not in Unclassified.
Similarly, if a list is not present in any folder, it will be displayed in All Folders as well as the Unclassified folder.
| All Folders | Unclassified |
Type | Default folder | Default folder |
Can be edited or deleted | No | No |
What it shows | Lists from all folders, including Unclassified | Only lists not assigned to any folder |
List assigned to a folder | Visible | Not visible |
List not assigned to any folder | Visible | Visible |
How can you filter lists?
If you want to narrow down a particular list or similar lists, you can use the filter option. To do so:
Navigate to Audience -> Lists.
Click the Filter icon at the top-right corner.
Select a criteria from the available ones, such as Name, Contact Size, Created By, and many more.
Specify the value or condition based on the criteria you choose and click Apply.
To go back to the list view page, click the 'x' button beside the filter at top-right corner.
What is a custom view and how do you create it?
Custom views can be used to have particular lists in a separate view so you can access them easily. Unlike folders, where you just move lists to specific folders, you can provide specific criteria while creating a custom view to make it more granular and customized.
How do you create a custom view?
To create a custom view:
Navigate to Audience -> Lists.
Click the More Actions (3-dotted) button at the top left, next to the All Lists view.
Click the Create Custom View option.
Specify the View Name.
Select a criteria from the available ones such as Name, Contact Size, Created By, and many more.
Specify the value or condition based on the criteria you choose and click Create View.
The lists will be populated into this view based on your criteria and the custom view should also appear at the top next to the All Lists view.
Notes:
● The custom view name can be a maximum of 70 characters.
● You can create any number of custom views.
To perform actions in a custom view:
Navigate to Audience -> Lists.
Click the More Actions button beside the All Lists or the custom view.
You'll see the custom views you've created here. Hover over a custom view and click the More Actions button.
The actions you can perform include:
Pin View - Pin a view at the top so you can access it easily.
Edit - Modify the view name and criteria. Once changes are made, click the Update View button.
Clone - Clone an existing view.
Example: If you have a view with a complex criteria and want to create a similar view but change only a single criteria, you can simply clone the existing view, edit the cloned view, and change the criteria. Ensure that you change the cloned view's name.
Delete - Delete a custom view. Click the Delete button in the pop-up that appears. Once deleted, the view cannot be retrieved.
Unpin View - Appears only for a pinned view. To unpin a view from the top bar.
What actions can be performed on a list on the list view page?
You can perform various actions on a list on the list view page such as:
● Clone - Clone an existing list.
● Export - Export the contacts of a list. In the slide-in window that appears, specify the file name, extension, choose the fields to be exported, and click Export.
● Clear List - Clear the contacts of a list.
● Delete List - Delete a list.
Use cases
Here are some use cases for creating lists:
- Onboarding new customers - When a new customer signs up or makes their first purchase, you can add them to a "New Customers" list. This lets you send them a dedicated onboarding campaign introducing your product, getting started tips, or a welcome offer without including your existing customers in that send.
- Separating contacts by region or country - If your business operates across multiple regions, you can maintain separate lists for each location. This makes it straightforward to send region-specific campaigns, such as local promotions, event invites, or announcements that are only relevant to a particular geography.
- Managing contacts from a specific lead source - Say you collected 500 contacts at a trade show or through a particular landing page. Grouping them into their own list lets you send a campaign that speaks directly to how they found you, which is more relevant than sending them a generic newsletter alongside your broader contact base.
- Organizing contacts by product line - If your business sells across multiple product categories, you can maintain a list per category. Customers who bought or showed interest in a specific product line go into the corresponding list, so your campaigns stay focused and relevant to what they actually care about.

 Prerequisite: You need to integrate Zoho Campaigns and Zoho CRM.