Google Tag Manager Configuration with Google Analytics 4 Property
Installing Google Tag Manager in your form
To install Google Tag Manager in your form,
- In your Google Tag Manager account, go to Workspace and copy the container ID(GTM-XXXXXX) on the top of the window.
- In your form builder, navigate to the Share tab > Google Tag Manager & Custom Tracking.
- Click Google Tag Manager and click Configure.
- Paste the Container ID.
- Enter an alternate name for your form in Form Alias to identify it in Google Tag Manager.
- Under Allowed GTM Tags, you can select which GTM Tags are permitted.
- Limited Google Tags restricts you to a specific set, including Google Analytics Settings (legacy), Google tag, Google Analytics 4 Event, Google Ads Conversion Tracking Tag, Conversion Linker, Auto-Event Variable, Constant, Custom Event, URL, Lookup Table.
- All Google Tags allows the use of any tags categorized under Google classes. For example- Element Visibility Listener, Timer Listener, Enhance Conversions. Learn more about tags permitted under Google Classes
- Under Configure Events, select the form events from the following for which you want to push the event details to Google Tag Manager:
- Form View : You can push an event when a respondent views your form.
- Page View : If you have a multiple-page form, you can push an event when a respondent visits the selected pages. Enter an alias name for the selected pages to identify them in Google Tag Manager.
- Onclick Fields : You can push an event when a respondent clicks the selected fields in your form. Enter an alias name for the selected fields to identify them in Google Tag Manager.
- Review Form : You can push an event when a respondent reviews the form.
- Save Form : You can push an event when a respondent saves your form.
- Submit Form : You can push an event when a respondent submits your form.
- Form View : You can push an event when a respondent views your form.
- You can view the list of variables that will be pushed with each event by clicking Variables.
Click Save.
Learn more about the considerations before you install Google Tag Manager.
Configuring Google Tag Manager
To track the selected Zoho Forms events in Google Analytics using Google Tag Manager, follow the steps below:
Configuring Custom Event Trigger
| Event | Event Name |
| Form View | zf_formview |
| Page View | zf_pageview |
| Onclick Fields | zf_onclickfield |
| Review Form | zf_reviewform |
| Save Form | zf_saveform |
| Submit Form | zf_submitform |
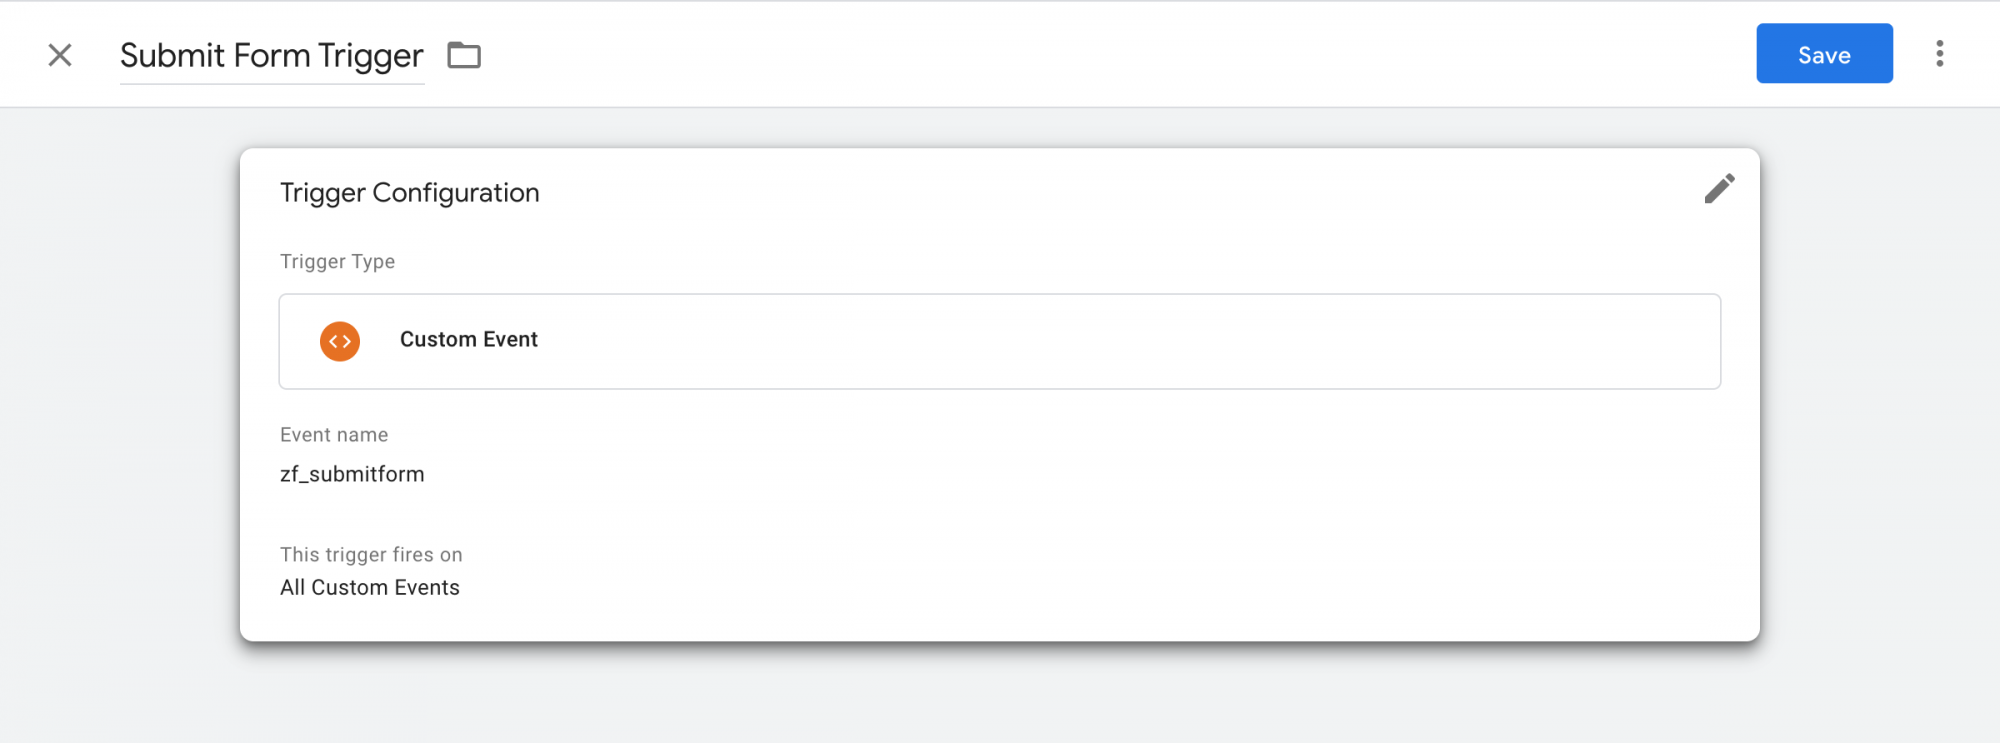
To configure a custom event trigger for the above events,
- In Google Tag Manager, click Triggers from the left menu and click New.
- Enter a name for the event (For example: Submit Form Trigger).
- Click Trigger Configuration and choose the Custom Event trigger type.
- Enter the Event Name as given in the above table for the event that you wish to track. To track all the supported custom events in Zoho Forms, you can enter zf_* and select Use regex matching to allow the field to handle regular expressions.
- Click Save.
Creating Data Layer Variables
When an event is triggered, a set of data regarding the event is sent from the form to Google Tag Manager. In order to capture this data on Google Tag Manager's end, data layer variables will have to be created. Data Layer is a virtual layer of your form that temporarily holds the data generated when a respondent interacts with your form.
- zf_category : This indicates that the data is being pushed from Zoho Forms. This will always be set as Zoho Forms.
- zf_action : Action that takes place in your form
- zf_formname : Name of the form
- zf_field : Field alias name of a field on being clicked
- zf_page : Field alias name of a page on being viewed
To create a Data Layer variable in Google Tag Manager,
In Google Tag Manager, click Variables from the left menu.
Under User-Defined Variables, click New.
Enter a name for the variable.
Click Variable Configuration and select Data Layer Variable.
Under Data Layer Variable Name, enter the name of the variable as given in the above list (For example: zf_formname) and click Save.
Repeat the above steps to create all the Data Layer variables that you wish to push to Google Tag Manager.New variables may be added at the request of users.
Creating a Google Tag
- In your Google Analytics account, go to Admin > Data Streams. Click the stream that you have created and copy the MEASUREMENT ID in the top-right corner of the pop-up.

- Now, in your Google Tag Manager container, click Tags from the left menu and click New.
- Enter a suitable name for the tag (For example: Google Tag).
- Click Tag Configuration and select Google Tag.
- Under Tag ID, paste the ID that you have copied in step 1.
- Under Triggering, select All Pages and click Save.
Creating a Google Analytics 4 Event Tag
- Click New to create another tag. Click Tag Configuration and select Google Analytics : GA4 Event.
- Enter the Measurement ID copied from Google Analytics.
- Enter an Event Name.
- Under Event Parameters, click Add Parameter and select the data layer variables that you have created under Value. Give the suitable Parameter Name. Click Add Parameter to add more event parameters.
- Under Triggering, select the Custom Event trigger that you have created.
- Click Save.
Tracking events when form is embedded in Website
If your form's iframe is embedded in a website, and you have configured to track events in both your website and form using Google Tag Manager, you must configure certain additional settings.
When your Form and Website have different domains
- While configuring the Google Analytics : Google Tag, click Configuration Settings.
- Enter the Configuration Parameter as cookie_flags and Value asmax-age=7200;secure;samesite=none;Partitioned;
 Note: If your website and the embedded form have different domains and you wish to capture a visitor's event flow in Google Analytics in a single session, you must create a custom domain for your form to have the same domain as the website.
When your Form and Website have the same domain
For example, if your form is in the domain forms.zylker.com and you have embedded it on your website which is in the same domain zylker.com, and you have configured to track events in both your website and form using Google Tag Manager, ensure that you use the same Google Analytics Property across the website and the embedded form. No other configurations are required.
Preview and Publish
Once you have configured and saved all your tags, you can click Preview in the top-right corner of Google Tag Manager to test and debug your configuration using the steps here if you are facing issues in tracking.
Click Submit in the top-right corner to publish and push the changes to Zoho Forms.
Note:
- Google Tag Manager can be configured only in our paid plans.
- Configuring Google Tag Manager is not supported for forms with the Payment field.
- You can track form events only in Google Analytics using Google Tag Manager.