Configuring Workflow Rules
A workflow rule consists of the following elements:
- Basic Details - Specify details on the record type for which the rule applies, rule name, description.
- Rule Trigger - Specify when the rule should be triggered for a record and based on what. There are three options:
- Execute based on a record's action - Rules can be triggered when records are:
- Created
- Created or Edited
- Edited, i.e. any field in the record gets modified, specific fields get modified, or any field in a section gets modified
- When a record is deleted.
- Execute based on a date field's value - For all the records matching the rule criteria, rule will be triggered either monthly or yearly based on the value of the date field that is selected.
- Execute based on a the record's score - Rules can be triggered when the score of a record is either increased, decreased or updated.
- Execute based on recommendation - Rules can be triggered on, after or before the day of recommendation.
- Note(s): When note(s) is/are created, created/modified, modified, deleted.
- Execute based on a record's action - Rules can be triggered when records are:
- Workflow Condition - You can create multiple conditions in a workflow rule. Each condition consists of two elements. One is specifying which records should be triggered i.e. all records or the records that match the criteria. Another is adding the criteria based on which it should be triggered. When there are multiple conditions, records will be validated against the criteria mentioned in each condition and when it meets a criteria, the other conditions that follow will be ignored for validation. The following options help you define the records that are to be triggered.
- All records that match the criteria - Rule will be triggered for the records that meet the criteria.
- All records - Rule will be triggered for all the records.
- Records that do not meet any of the above conditions - Instead of All Records , this option will be available from the second condition onwards.
- All records that match the criteria - Rule will be triggered for the records that meet the criteria.
- Actions - Specify the action to be automated for records that meet the set criteria.
- Instant Actions - Add email notifications, tasks, field updates, webhooks, custom functions, create record, and send notifications via Cliq, Slack or Cisco Webex that will be triggered immediately when the rule is executed. On Edit or Field Update actions, you can also convert Leads, Quotes or Sales Orders.
- Scheduled Actions - Add email notifications, tasks, field updates, webhooks, custom functions, and send notifications via Cliq, Slack or Cisco that will be scheduled and triggered based on a specified time.
- Instant Actions - Add email notifications, tasks, field updates, webhooks, custom functions, create record, and send notifications via Cliq, Slack or Cisco Webex that will be triggered immediately when the rule is executed. On Edit or Field Update actions, you can also convert Leads, Quotes or Sales Orders.
Create Workflow Rules in Zoho CRM
The steps to create a workflow rule are divided into 4 parts.
Part 1 - Enter the basic details of the rule
- Go to Setup > Automation > Workflow Rules .
- In the Workflow Rules page, click Create Rule .
- In the Create New Rule pop-up, do the following:
- Select the Module to which the rule applies from the drop-down list.
- Enter the Rule Name and Description .
- Select the Module to which the rule applies from the drop-down list.
- Click Next .
Part 2 - Specify the rule trigger
There are three options based on which the rule will be triggered for a record that meets the rule criteria. One of these options need to be selected when you create a workflow rule and you cannot change it later by editing the rule. They are:
- A Record Action - Rules can be triggered when records are created, edited, created/edited, deleted, or a specific field or section is updated.
- A Date Field's Value - Rules can be triggered on a particular date by choosing the Date field option.
- A Score Value - Rules can be triggered when the score of a record is either increased, decreased or updated.
- Day of recommendation - Rules can be triggered before, after or on the day of recommendation.
- Note(s) - Rules can be triggered when note(s) is/are created, created/modified, modified, deleted.
Execute Based on Record Action
When new leads are created in Zoho CRM you may want to send an email automatically or a series of emails at set intervals. You may also want to create tasks for these new leads. Also, sometimes when specific fields are updated, you may want to trigger a workflow. This execution option lets you specify an action (Create, Edit, Delete, etc.) based on which workflow rules will be triggered.
For Edit , Create or Edit actions, an option to recur the workflow is provided. You can check Repeat this workflow every time a record is edited , if you want the rule to recur.
- Select one of the following:
- Create : Executes the rule when records are created.
- Create or Edit : Executes the rule when records are created or edited.
- Edit : Executes the rule when existing records are modified. Choose from the below option.
- Any field gets modified: Executes the rule when any existing record is modified.
- Specific field(s) gets modified: Executes the rule when the values of the specified fields are modified in a record. A maximum of 5 criteria can be added.
- Choose the field name from the drop downs.
- Choose the criteria of the value of the updated field, for example the Account Name, or the Probability.
- Choose the value of the updated field, for example probability is modified to a value greater than 50.
- Click the All/Any link to toggle the options.
- Any field in specific section(s) get modified: Executes the rule when any field in the specific section(s) of the selected layout(s) is/are modified.
- Delete: Executes the rule when certain records are deleted. Only Email Notifications, Webhook and Functions can be associated with such a rule. The action includes:
- Deleting a record from the Details Page.
- Deleting from the List View (One by one or in bulk).
- Using the Mass Delete feature.
- Deleting from a record's Related List. For example, deleting a contact under an Account.
- Click Next .
- Create : Executes the rule when records are created.

- You can create workflow rules based on sections only for:
Modules - Leads, Contacts, Accounts, Deals, and custom modules.
Layouts - System, and custom layouts.
Sections - System, and custom sections. - If a section is associated with a workflow rule, to delete the section from the specific layout, you need to delete the workflow rule first.
- If a field in the specified section contains Multiselect lookup fields, Image, or File upload fields, changes made to those fields will not trigger the rule.
Execute Based on Date or Date Time Field's Value
You may want to get an email reminder a week before a deal's expected closing date, or may want to send an email to the customers reminding them of the monthly rentals or subscription renewals. In these cases, it is not necessary that the records should be created or edited for the rule to get triggered. It is plainly based on the value in the date fields. This execution option lets you pick a date field from a record and allows you to define the day for the rule to be triggered.
Please note, with this option, a maximum of 5000 records will be triggered every 10 minutes. If there are more than 5000 records in a 10 minutes period, the remaining records will be executed in the next 10 minutes.
- Enter the following to specify when you want the rule to be triggered.
- Based on which Date/Time field this rule should execute: Choose one of the options from Created Time, Modified Time, Last Activity Time and Unsubscribed Time.
- Define execution date: Specify the number of Days, Weeks, or Months after which workflow should be executed.
- Execution time: Choose to execute at the same time of the activity or enter a time of your choice.
- Select the Once , Every Month or Every Year from the Recur drop-down list.
- Click Next .
Execute Based on Record's Score
Rules can be triggered when the score of a record is either increased, decreased or updated. For example, leads from the service industry are your prime prospects and you want to prioritize them based on the scores. You may want to closely follow-up with the leads that have a score of 10 or more. In such cases, you can create a workflow rule based on scores. When the score of a lead is updated and if the score is 10 or more, a task can be created to prioritize and follow-up on the lead immediately.
- Choose either Increase , Decrease or Updated to specify when you want the rule to be triggered.
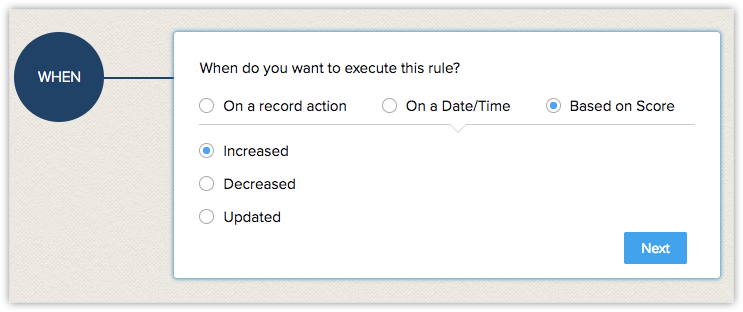
- Click Next .
- Specify the Condition when the rule should be executed.
- Click Next .


- The execution order of the automation are: Assignment rule > Review process > Scoring Rules > Workflow Rule > Approval Process > Blueprint > Scoring Rules > CommandCenter . Scoring rule occurs twice in the loop to ensure the score is updated upon execution of actions.
- The execution of actions will take place in the following order: Field update > Tags > Email Notification > Task > Slack notification , Cliq notification , Webhook , Custom function , Custom action , Create record (Executes in parallel) > Convert .
- Rules created for the same module will be executed in a chronological order. If you would like to alter the order of execution, you can reorder the rules. Click here to know about reordering.
- Not all actions are performed in this order. In order to improve the performance, we have offloaded certain actions. That is, certain actions will happen in parallel not sequentially.
- Action taking place in parallel: Alert, task, webhook, function, create record, and Cliq/Slack notification.
- Actions taking place in sequence: Field update, tags, and convert.
- Workflow rules executes an action the minute it gets trigerred. When huge volume of records — that satisfy the trigger condition enter the system, Workflow might require sometime to process their actions, one after the other.
- Workflow execution based on scores is available in all the Paid editions .
- Notifications via Cliq, Slack, and Cisco can be triggered through instant and scheduled actions.
Execute Based on Recommendation


- A workflow can be created only for the target module, that is the module where your customers are or to whom the recommendation applies.
- Recommendations that are shown for a product or deal that is already purchased or associated with the contact, are applicable for the Workflow. That is, if the contact has purchased a laptop then Zia will recommend the same product again; for this recommendation you can create a workflow.
- Go to Setup > Automation > Workflow rules .
- Click Create .
Only the target modules or the ones for which recommendation is suggested will be available. - In When do you want to execute the rule? select Based on recommendation .
- In Execute , select the number of days and before/after/on from the drop-down list.
- Click Next .
- In Would you like to add some additional conditions to this rule? select Yes or No .
If you select Ye s, enter the desired workflow conditions. - Click Done .
- Select an Instant or Scheduled action .
- Click Save .
Execute Based on Notes
- On the dropdown for when to execute the workflow rule, select Record Notes .
- Select what action performed on notes should trigger the workflow rule:
- Note Added: When a new note is created, the workflow will be triggered.
- Note added or modified: When a new note is adde or an existing note is modified, workflow can be triggered.
- Note modified: When an existing note is modified, workflow can be triggered.
- Note deleted: When an existing note is deleted, workflow can be triggered.
- Created by
- Created time
- Modified by
- Modified time
- Note content
- Note owner
- Note title
Execute Based on Competitors
Additionally, insights from competitor mentions aid in identifying competitive advantages and areas for improvement. Companies can leverage this information for targeted customer engagement, offering promotions to encourage exploration of new features or services.
- On the dropdown for when to execute the workflow rule, select Competitors.
- Click Next.
- Select the condition on which the rule should be triggered. You can select whether the rule should be triggered for all records in the module, or specific records meeting certain conditions.
- You can choose all competitors mentioned or add more conditions to choose which competitors mentioned will match the trigger condition. Here is the list of competitor attributes considered for creating workflow rules:
- Negative competitors
- Neutral competitors
- Overall competitors
- Positive competitors
- Click Done.

Part 3 - Create a workflow condition
Multiple conditions in a workflow rule help you address cases where you have clearly defined action items for the records that met the specified criteria and the ones that do not.

Example : In a deal follow-up scenario, you may have the following requirements which can be best configured with Workflow conditions.
| Workflow Conditions | Records that match the criteria: Deal Amount is >= USD 6000, Campaign Source is Trade Show | Records that match the criteria: Deal Amount is >= USD 2000, Campaign Source is Trade Show | Records that do not match any of the criteria: |
| Action 1 | Send an email to the Sales Manager about the big deal. | Assign a task to the record owner to close the deal in a week's time. | Assign a task to the record owner to close the deal in a week's time and also to provide a 15-day trial. |
| Action 2 | Assign a task to the record owner to cross check the discount guidelines and the final discount value. | - | Update the field value as Eligible , for the field - 15 Day Trial . |
- Choose one of the following:
- Records Matching the Conditions - Rule will be triggered only for those records that match the given criteria.
- All Records - Rule will be triggered for all the records.
- Records that do not meet any of the above conditions - Instead of AllRecords , this option will be available from the second condition onwards.
- Records Matching the Conditions - Rule will be triggered only for those records that match the given criteria.
- Specify the criteria.
You can click the Add icon to add multiple criteria.You can specify Tags as part of workflow criteria.When you add more than one criterion, you will get an option to Edit the criteria pattern .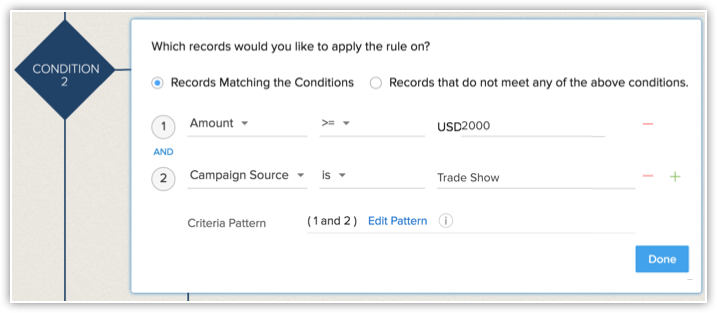
- Click Next and add instant actions or scheduled actions.
- Click the Add another condition link to add another workflow condition and repeat the steps mentioned above.Please note that this option will be available only when at least one action (instant or scheduled) is added to the condition.
Edit Criteria Patterns
Criteria Pattern Editor in the custom list view helps you to develop the advanced filters using simple logical operators like and / or .

- You can specify a maximum of 25 criteria for a list view.
- If you are associating a convert action (an instant action) to the rule, specifying the criteria is mandatory.
- Maximum 5 lookup fields can be added in the criteria.
To edit criteria patterns
- Go to Setup > Automation > Workflow Rules .
- In the Workflow Rules page, click on a workflow rule.
- In the Edit Rule page, review your existing criteria and click the Change Pattern link.
- In Pattern Editor box, modify filters and click the Save link.
Example :
You would like to trigger a workflow rule for all the potentials whose Type is New Business, Stage is Need Analysis or Qualification, and Amount is above $50000.
Type is New Business; Stage is Need Analysis or Qualification; and Amount > $50000 .
You can create this criteria easily using the Criteria option given below:

The criteria pattern will be automatically set as:

Since the criteria pattern does not match the requirement, you can edit it as:

- Round brackets: ( )
- and / or operators
- Criteria Row Number
Part 4 - Associate instant and scheduled actions
A workflow rule is meaningful only if an action is associated to it. These actions include email notifications, tasks, field updates, webhooks, custom functions, activities - tasks, meetings and calls, and create record. Except create record, all the other actions are grouped under the Actions (under Automations) that can either be Instant or Scheduled . These actions once created, can be associated with many rules.
- In the Actions section of the workflow rule, do the following:
- Instant Actions - Click to associate instant actions that are triggered instantly when the workflow rule is triggered. You can also create one and associate it to the rule.
- Scheduled Actions - Click to associate scheduled actions that will be triggered at a specified time once the rule is triggered. A maximum of 5 scheduled actions can be created.
- Instant Actions - Click to associate instant actions that are triggered instantly when the workflow rule is triggered. You can also create one and associate it to the rule.
- Click Save .Note that you cannot save a rule without creating either an instant or a scheduled action.
Associate Actions to Rules
Add Instant Actions
Instant action includes email notifications, tasks, meetings, calls, field updates, webhooks, custom functions, and record creation that are triggered immediately when the rule is executed. There are two options to associate these actions.
- Create email notifications, tasks, meetings, calls, field updates, tags, webhooks, custom functions or record and associate them to the rule. You can also create an action to convert leads, quotes or sales orders.
- Select existing email notifications, tasks, field updates, webhooks or custom functions to associate to the rule.
To associate an instant action
If you are creating a workflow rule, directly go to step 4
- Go to Setup > Automation > Workflow Rules.
- In the Workflow Rules page, click on the rule for which you want to create an action.
- Click Edit to modify the rule settings.
- Under a Condition , click Instant Action/Action link and select the action from the drop-down list.
- In the pop-up, select the actions that are listed or click New [Action] to create one and then associate.
- Click Associate .

- For a workflow rule, all the actions (email notifications, tasks, field updates, tags, webhooks, and functions) will not be listed. If the rule is for Leads, only the actions created for Leads will be available for association.
- If the records are deleted via Workflow, you cannot retrieve their information using get API as the record is already deleted.
- Edit or delete triggers do not function when records are auto-merged. These triggers will work if records are merged manually.
- Only one set of instant action can be created with email notifications, tasks, meetings, calls, etc., associated to it.
- You can associate a maximum of 5 email notifications, 5 tasks, 5 field updates, 1 custom function, 1 webhook, and 1 create record to the instant action.
Record Creation as Instant and Scheduled Action
 Available for Professional and above edition only.
 - You can create a deal if the contact status is changed to interested.
- You can create a case a day after the customer inquiry is made.
While configuring the rule you must:
Select the module and layout to which the new record will be added.
Select the owner of the record. You can either select the logged in user (the person who creates the workflow rule) or any other CRM user.
Similarly, you can select a reference user . That is, any user lookup field that you have added in the layout. For instance, if the Contacts module has a user lookup for Accounts and Vendors , then you can select a user from these lookup modules as the record owner. You can even select a user from the custom user field (only single user field can be used) as a record owner, but it should be a single user field.
Enter the values for fields like record name, amount etc. The values that you enter here will be pre-populated for the record that is created. By default, the mandatory fields (both standard and custom fields) from the layout will be displayed here, you can also add the additional fields present in the layout and enter a value. You can either enter the values or use merge fields. For example, the email field values can be entered using the merge fields.


- You can create only one record create action/condition.
- When you add more fields to a create record action page, the newly added field will become mandatory.
To set up record creation
- Go to Setup > Automation > Workflow rules .
- Create a rule and define the rule execution.
- Only On a record action or On a Date/Time can be selected.
- Click Next and define the condition.
- In Instant Action , select Create a record and choose the module.
- Select the layout from the drop-down list.
- In Record Owner , select Users or Reference from the drop-down list.
Select the appropriate user field, if you choose the reference option. - Enter values for the other fields.
Click Add more fields to invoke additional fields and values from the record layout. - Click Save .
Adding Tags for convert instant action
- In Instant Action , select Convert from the drop-down list.
- In the Convert popup , do the following:
- In Convert leads to check all or either of the following: Contact, Account, and Deal .
- Choose an owner of new records if needed
- In Carry over tags to check all or either of the following: accounts, contacts, and deal.
- Click Done .
Create Activities as instant record actions
To create meetings as an instant workflow action
- Under Instant Actions , select Activities > Add Meeting.
- In the Add Meeting page, perform the following:
- Enter the title for the meeting.
- In the From field, Select the desired time and interval to schedule the meeting.
- Enter the duration and select the duration parameters - Minutes or Hour(s).
- Select All day check box, of the meeting is going to last the whole day.
- In the Host field , Associate or refer a user to host the meeting.
- To provide further instruction if the host becomes unavailable, select the If the host is Unavailable check box and either create a task or assign the meeting record owner .
- Click Save .
- Click on Add more fields button after the step 2f.
- Select the desired field you want to include in the meeting invite.
You can add participants, location, Contact Name, Participant Reminder, and Meeting Agenda.
To schedule a call as an instant workflow action
- Under Instant Actions , select Activities > Schedule a Call.
- In the Schedule a Call page,
- Under Call Information section, specify the following call details.
- Call Start Time and interval to schedule the call.
- Call Owner
- Under Purpose Of Outgoing Call
- Select a reason from the picklist as the Call Purpose.
- Describe the Call Agenda.
- By clicking on the Add more fields, you can add additional information like Contact Name and Subject to be used in the call schedule email.
- Click Save.

Adding more fields to a meeting and call layout, makes those mandatory and you cannot save the action unless you associate a field and a value to it.
Scheduling a call as an instant action will be displayed only for rules created for Leads and Contacts modules.
Add Scheduled Actions
Scheduled actions include email notifications, tasks, field updates, webhooks, and functions that are triggered on a specified time after the rule is executed. You can schedule the actions to be triggered based on the Rule Trigger Time . You can see the list of scheduled actions in a record's details page under Timeline > Upcoming Actions .
There are two options to associate these actions:
- Create email notifications, tasks, field updates, webhooks, functions or create record and associate them to the rule.
- Select existing email notifications, tasks, field updates, webhooks or functions to associate to the rule.
To add scheduled actions
If you are creating a workflow rule, directly go to step 4
- Go to Setup > Automation > Workflow Rules.
- In the Workflow Rules page, click on the rule for which you want to create an action.
- Click Edit to modify the rule settings.
- Under a Condition , click Scheduled Action/Action link.
- In the pop-up, select Hours , Days , or Minutes and specify the value.
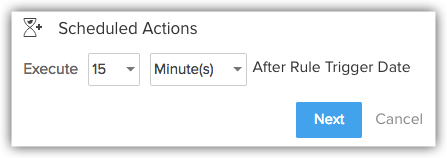
- Click Next .
- Click Action link and select the action from the drop-down list.
- In the pop-up, select the actions that are listed or click New [Action] to create one and then associate.
- Click Associate .
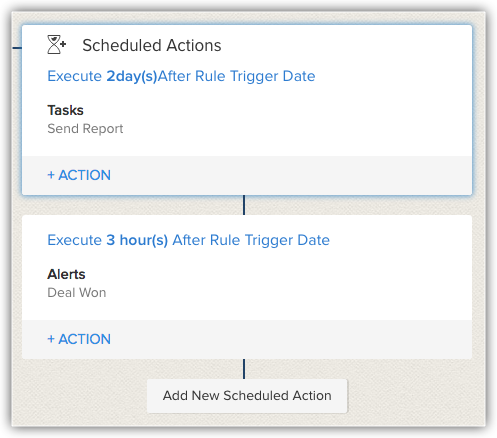
Add Custom Actions
Custom actions let you create tailored actions and associate them with the desired workflow rules. Sometimes you may need to create actions other than the default one's available in Zoho CRM, in such cases you can use the Zoho Developer Space. and create your own actions.
Let's consider a few scenarios where custom actions can be helpful:
- Say a user does not want to receive further promotional emails of a particular product, so you check the Email opt out option in CRM. You can write a custom action that will mark an unsubscribe option in MailChimp automatically so you don't have to update in both places.
- Say a deal has been under negotiation for a long time and recently it was rejected as the client was not satisfied with the final amount. So, you change the deal status in CRM to closed lost. Now, instead of updating the status in Zendesk again you can simply write a custom that will update the account information in Zendesk.
- Imagine you have to send the shipping details of products to your customers, who have booked the products online. You can use custom action and associate it with the workflow to send out SMS notifications automatically.

- For a workflow rule, all the actions (email notifications, tasks, field updates, webhooks and custom functions) will not be listed. If the rule is for Leads, only the actions created for Leads will be available for association.
- You can create a maximum of 5 scheduled actions for a workflow rule.
- Each Scheduled Action can have a maximum of 5 email notifications, 5 tasks, 5 field updates, 5 custom functions and 5 webhooks.
- If the Email Opt Out option is enabled, emails will not be sent to the customers.
- For the Workflow Management feature, the Organization's Time Zone will be considered for calculating a day. In the absence of the time zone being defined, the Super Administrator's Time Zone will be considered.
- There can be a delay of few minutes for the scheduled actions to be triggered.
- When email notifications reach the limit for the day, any remaining emails to be sent the same day will not be sent.
- If the Execution Time that is calculated is a time in the past, then the action will be triggered immediately. There can be a delay of few minutes for the scheduled actions to be triggered.
- The scheduled actions for a records will be listed under Upcoming Actions in the Records Details Page.
- When you choose Email Notifications, if you are in the Enterprise Edition, you will also find an option to send the email at Zia's suggested time for this workflow rule. When you select this option, the emails that are sent via this workflow rule are sent to the recipients based on their respective best time to contact suggestion by Zia.
- For each action, you can associate a maximum of 5 email notifications, 5 tasks, and 5 field updates.
- You can associate up to 6 (1 Instant Action and 5 Scheduled Actions) custom functions per workflow rule. Similarly, you can associate up to 6 (1 Instant Action and 5 Scheduled Actions) webhooks per workflow rule.
- A maximum of 5 Scheduled Actions (that includes email notifications, tasks, field updates, webhooks and custom functions) can be created for a rule.

Notes on Per Day Limits
- Free and Starter Editions - (No. of Users * 50) or 5000, whichever is lower, will be taken as the maximum limit per day for emails to be sent using email notifications.
- Standard Edition - (No. of Users * 100) or 5000, whichever is lower, will be taken as the maximum limit per day for emails to be sent using email notifications.
- Professional Edition - (No. of Users * 200) or 10,000, whichever is lower, will be taken as the maximum limit per day for emails to be sent using email notifications.
- Enterprise Edition - (No. of Users * 500) or 25,000, whichever is lower, will be taken as the maximum limit per day for emails to be sent using email notifications.
- The Super Administrator of your CRM account will be notified if the email notifications limit is exceeded for the day.
- The per day limits (for e.g.: email limit) is calculated based on PST.
- Limits for Custom Functions:
- Calls per Day - 20000 calls/day or 200 calls per user license for the organization (whichever is lower)
- Integration Tasks - 25000 Zoho API calls/day using deluge.
- Get Data - 25000 calls/day
- Post Data - 25000 calls/day
- Send Email - 1000 emails/day
- Calls per Day - 20000 calls/day or 200 calls per user license for the organization (whichever is lower)
- Limits for Webhooks:
- Professional Edition - 10000 calls/day or 100 calls/user license (whichever is lower).
- Enterprise Edition - 25000 calls/day or 500 calls/user license (whichever is lower).
- Professional Edition - 10000 calls/day or 100 calls/user license (whichever is lower).
Instances when the scheduled actions will be rescheduled:
- The Execution Criteria for the Rule is either Edit or Create or Edit . When the rule criteria is satisfied for a record, the instant actions are triggered and scheduled actions are scheduled for the record.If a user edits the record and the rule criteria is not fulfilled, then the scheduled actions scheduled earlier will be deleted. If the record is edited again and the criteria is satisfied, then the scheduled actions will be rescheduled.
- For Scheduled Actions, the Execution Time can also be based on the custom Date & Time field. When a rule criteria is satisfied for a record, the instant actions are triggered and scheduled actions are scheduled for the record.If a user edits the record to change the value of the date & time field, the scheduled actions will be rescheduled as per the new date & time value.
Instances when scheduled actions will be deleted or not be rescheduled:
- The Execution Criteria for the Rule is either Edit or Create or Edit . When the rule criteria is satisfied for a record, the instant actions are triggered and scheduled actions are scheduled for the record.If a user edits the record but the rule criteria is not fulfilled, then the scheduled actions will not be scheduled again.
- When the Enterprise Edition is downgraded to the Free Edition, all the scheduled actions that are scheduled for the record will be deleted.
- When records are deleted, all the scheduled actions scheduled to the record will also be deleted. If the deleted records are restored, the scheduled actions will not be rescheduled.
Instances when the Scheduled actions will not be executed:
- When an event is canceled, all the scheduled actions scheduled for the event will not be executed.
- When a lead is converted, all the scheduled actions scheduled for the record will not be executed.
Points to remember
- When the Change Pattern box is being used to edit, you cannot add or delete a criteria row under the Specify Criteria section.
- The operator precedence will not be taken into account if you do not specify brackets. For example, if you specify the criteria as 1 or 2 and 3 , it will be considered as ((1 or 2) and 3)
- You can change the and or or of the criteria rows and it will be updated in the Editor below.
- You can change the and or or condition in the pattern and it will be updated in the rows above.
- If you specify 1 and 2 and save it, on editing the view the pattern will be shown as (1 and 2) . For (1 and 2) or 3 the pattern will be shown as ( (1 and 2) or 3 )
- If you add more rows in the editor and delete one by one there will be additional brackets displayed in the pattern. For example if there are 4 rows added and you delete the 3rd row, the criteria pattern will be as ( ( ( ( 1 and 2 ) ) ) or 3 ) . If the first row is deleted then it will be shown as ( ( ( ( 1 ) ) ) or 2 ) . However, on saving the criteria, it will change as ( 1 or 2 ) .
- Make sure that you do not use the following as they are invalid: () , (and) , (or) .
- If the brackets do not match it will be treated as invalid.
- There will an error message, if the number of rows and the numbers given in the pattern do not match and also, if there are any numbers missed in the pattern.
- In case the final brackets are missing, there will be a difference in the Criteria Patterns Editor and its view mode.
Your Criteria Pattern in Editor Your Criteria Pattern in View Mode ( 1 and 2 ) or ( 3 and 4 ) (( 1 and 2 ) or ( 3 and 4 )) 1 and 2 and 3 and 4 (1 and 2 and 3 and 4 ) ( 1 or 2 ) and ( 3 or 4 ) ( ( 1 or 2 ) and ( 3 or 4 ) )
- To address workflow triggers in loops when a record is edited, the following case will take place:
Suppose, Workflow A triggers on edit of a contact and Workflow B on edit of a deal, then whenever a contact is edited Workflow 1 will trigger. In case, WF 1 is triggered such that a loop occurs then you can expect the following result: - If Workflow A updates the same contact thru the Workflow functions action, then Workflow A will be triggered again for that contact. As it will be considered as edit of contact, the loop will be stopped once the same workflow has been executed twice.
- If the Workflow A functions action edits a deal, then Workflow B will be triggered for the deal. If the Workflow B, triggers an edit on the same contact, then Workflow A will be triggered for the contact as this will be considered as edit of the contact. After executing workflows 3 times (WF A - WF B - WF A) the loop will be closed.
Lock Workflow Rules
When you want to make sure that no one edits a workflow rule unless absolutely necessary, you can lock the rule. When a rule is locked, it cannot be edited. One has to unlock the rule in order to edit it again. A locked rule sends out the message to fellow administrators that it is not meant to be edited unless absolutely required. A workflow rule can be locked after it has been created.
To lock a workflow rule
- Go to Setup > Automation > Workflow Rules.
- From the Workflow Rules list view under the Rules tab, click the rule that you wish to lock.
- In the selected workflow rule details page, click the Lock icon next to the rule name.
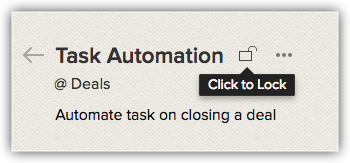
- In Lock Rule , enter the reason for locking the rule. This message will be displayed to fellow administrators who try to unlock the rule for editing.
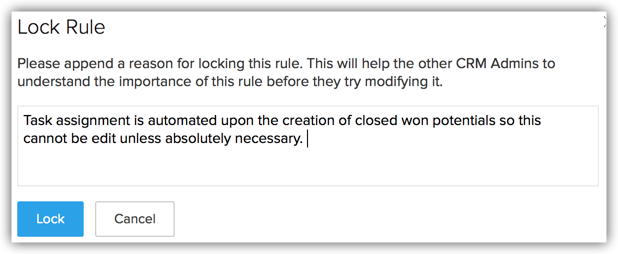
- Click Lock .

- Only Administrators can lock/unlock a workflow rule. This option is available so that other users are not able to edit or delete the rule. If required others can clone the workflow rule.
- A rule can be unlocked by following the same procedure. In a workflow rule's details page, you can click the Unlock icon and proceed to edit the rule.-A locked rule cannot be edited by other users. If required, they can clone the rule to create another.
- The actions such as, email notifications, field updates, tasks, etc. associated to a locked rule is also locked and cannot be edited or deleted by users.
- For a rule to be triggered using the Field Update option, both the rule criteria and the execution criteria must be true.
- If your Zoho CRM account is downgraded or the subscription expired, the workflow rules will be disabled. If you renew the subscription, you will need to manually enable the rules.
- When the Delete option is selected as the execution criteria, a workflow rule will not be triggered if records are deleted from the Recycle Bin.
- You can configure and associate only email notifications, functions, and webhooks to a workflow rule with the execution criteria as Delete .
- Workflow Rules will be triggered when records are modified using Mass Update, Macros and when ownership of records are changed. Rules are also triggered when tasks are created through Macro.
- When you configure a workflow rule for the Events module, you will see another rule trigger called Cancel .
- The Cancel trigger can be chosen when you want to configure a workflow action on the cancellation of an event.
- When you configure a workflow rule for the Visits module, you will see only the Create rule trigger. The other rule triggers like Edit , Field Update , etc. are not available for the Visits module.
- When Workflow Actions are configured on creation of Visits , those actions will be executed for the leads/contacts associated with the Visit and not for the Visit itself. For example, when email notifications are configured for the visit, the emails are sent to the leads/contacts associated with the visit. Similarly a task created on the creation of the visit is assigned to the record owner of the associated lead/contact.
Use List View & Summary View
There are two views for workflow rules that are created - the List View and the Summary View . By default, you will see the list view, which is a list of all the workflow rules for All modules/Selected module.
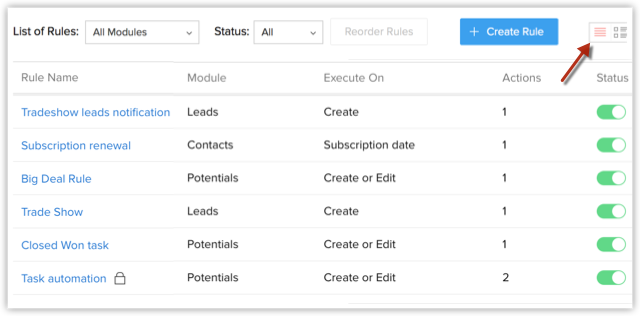
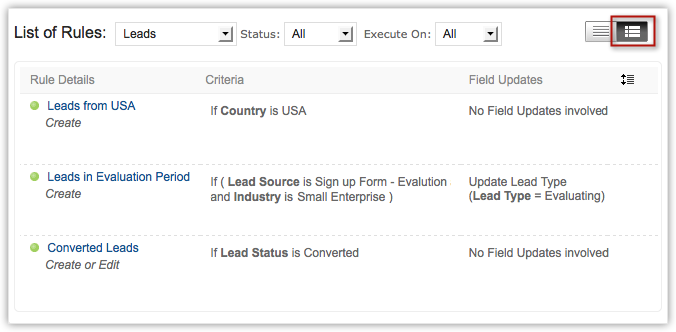
The Summary view lists out the Criteria and Field Updates associated to the rules that will help you get a clear picture of all the rules and where they are used to avoid any confusion.

- You need to select a module to check the summary view. This view is not available when you select the "All Modules" option.
- The Summary View is available only for the workflow rules and not for the email notifications, tasks and field updates.
- In the List View you can reorder the rules to change the sequence in which the rules need to be executed. The Reorder option will be available only after you select a module from the drop-down list.
To use summary view
- Go to Setup > Automation > Workflow Rules .
- In the Workflow Rules page, select a module from the drop-down list.
- Click Summary View icon.All the rules for the selected module will be listed along with the Criteria and the associated Field Updates. You can click the Show More link to see the other items associated to the rule.
To reorder the workflow rules
- Go to Setup > Automation > Workflow Rules .
- In the Workflow Rules page, select a module from the drop-down list.Make sure you have selected the List View and not the Summary View.
- Click Reorder Rules .
- Drag and drop the rules in the order that you require.
View Workflow Usage
You can see insights on the usage of your workflow rules that have the action to send email notifications associated to them. Based on the open rate of the email template associated with your workflow rules, the best performing workflow rules are listed for every week.
To track the workflow usage,
- Go to Setup > Automation > Workflow Rules.
- In the Workflow Rules page, click the Usage tab.
- In the Usage page, you will be able to:
- View the list of top performing workflow rules by email open rate for the last 7 days.
- Track the open rate of each email template via the respective workflow rule along with the overall open rate.
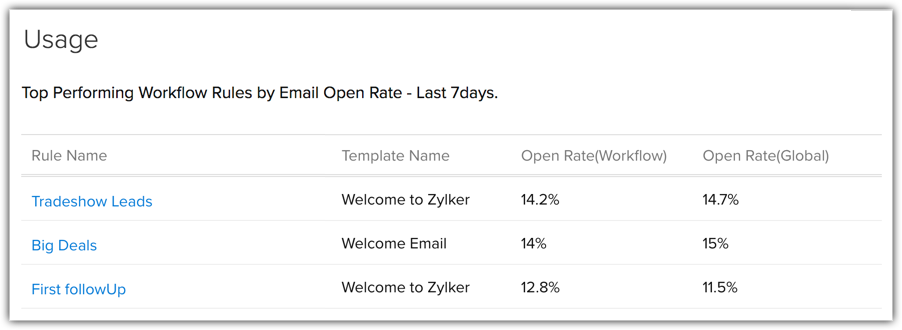
- Click open the rules to see more elaborate details on usage.
Delete Workflow Rules
You can also delete the workflow rules from the list view and also while viewing the rule. When you delete a workflow rule, all the scheduled actions for the records will also be deleted.
To delete workflow rules
- Go to Setup > Automation > Workflow Rules .
- In the Workflow Rules page, move you mouse pointer to the rule you want to delete and click the Delete icon.Alternatively, click on the rule that you to delete. In the rule details page, click the more options button and then click Delete .
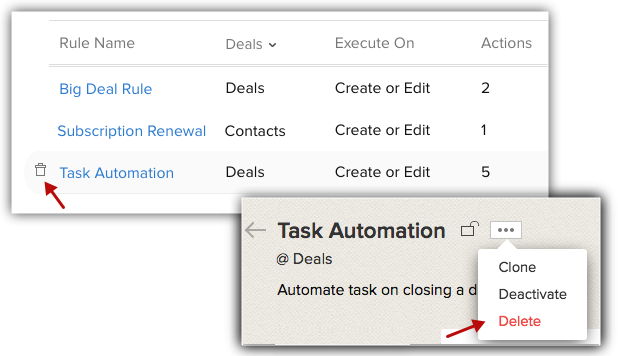


- In the audit log you can view details of each and every update that is made in the workflow. See Also Audit Log .

Troubleshooting Tips
Zoho CRM Training Programs
Learn how to use the best tools for sales force automation and better customer engagement from Zoho's implementation specialists.
Zoho DataPrep Personalized Demo
If you'd like a personalized walk-through of our data preparation tool, please request a demo and we'll be happy to show you how to get the best out of Zoho DataPrep.
You are currently viewing the help pages of Qntrl’s earlier version. Click here to view our latest version—Qntrl 3.0's help articles.
Zoho Sheet Resources
Zoho Forms Resources
Zoho Sign Resources
Zoho TeamInbox Resources
Zoho DataPrep Resources
Related Articles
Workflow Report
Workflow rules play a crucial role in simplifying your business processes by automating various tasks. By defining specific conditions, you can determine whether a rule should be applied or not to the records in your system. This automation helps in ...FAQs: Workflow Rules
What is a workflow rule? Workflow rules in Zoho CRM are designed to enhance productivity of the users and reduce manual work by automating routine activities in a business process. They allow you to create rules that can trigger different action ...Workflow Scenarios
Workflow rules help automate several sales processes in your business. Following are a couple of scenarios that demonstrate the use of workflow rules in Zoho CRM. Create a workflow rule to automate task assignment Let's say you want a task to be ...Workflow for Emails
Configuring workflow rules makes it easier to manage daily activities as a lot of work gets automated. For example, every time a contact enters CRM a task is automatically assigned to the sales rep to call them and gather details, two days after the ...Workflow for Calls
Have questions on using workflow rules in CRM? Join this exclusive Ask-Me-Anything session on CRM Workflow Rules and seek answers to your queries from our panel of product experts. Register Now Workflow rules for calls allow you to perform certain ...


