Trigger pipeline using Webhooks
Zoho DataPrep allows you to trigger your pipeline using Webhooks. A webhook is a user-defined HTTP callback that is triggered when a particular event occurs at the source site. When the event occurs, the source site makes an HTTP request to the URL specified.
In simple words, webhook is used to trigger your pipeline in DataPrep using real-time events from an external application.
In simple words, webhook is used to trigger your pipeline in DataPrep using real-time events from an external application.
To trigger a pipeline using webhooks
1. Create a pipeline from the Home Page, Pipelines tab, or Workspaces tab. You can bring your data from 50+sources.
2. On the Pipeline Builder page, once you have completed creating your data flow and applying the necessary transforms in your stages, you can export your data to one or more destinations.
3. Once you have finished creating your entire pipeline,
2. On the Pipeline Builder page, once you have completed creating your data flow and applying the necessary transforms in your stages, you can export your data to one or more destinations.
3. Once you have finished creating your entire pipeline,

Pro Tip: You may want to try dry run your pipeline using the Run button. Each run is saved as a job.
When a pipeline run is executed, the data fetched from your data sources will be prepared using the series of transforms you have applied in each of the stages, and then data will be exported to your destination. This complete process is captured in the job history. Once you ensure manual run works, choose the Draft option and mark your pipeline as ready. You can then set up webhooks to trigger your pipeline.
 Note: Only one run type can be setup in a pipeline at any given time. You need to set is as Webhooks under the Run dropdown to trigger your pipeline using Webhooks.
Webhooks configuration
4. Click the Schedule drop-down icon and click the Webhooks option.
Webhook Settings
Stop export if data has invalid values : Enabling this will stop the export when your data still has invalid values.
Order exports
This option determines in what order the data has to be exported to destinations when you have configured multiple destinations.
If not enabled, export will run in the default order.
If not enabled, export will run in the default order.
Note: This option will be visible only if you have added more than one destination in your pipeline.
To rearrange the order of your export destinations
1) Click the Order exports toggle.
2) You can drag and drop to change the order of the destinations and then click Save.
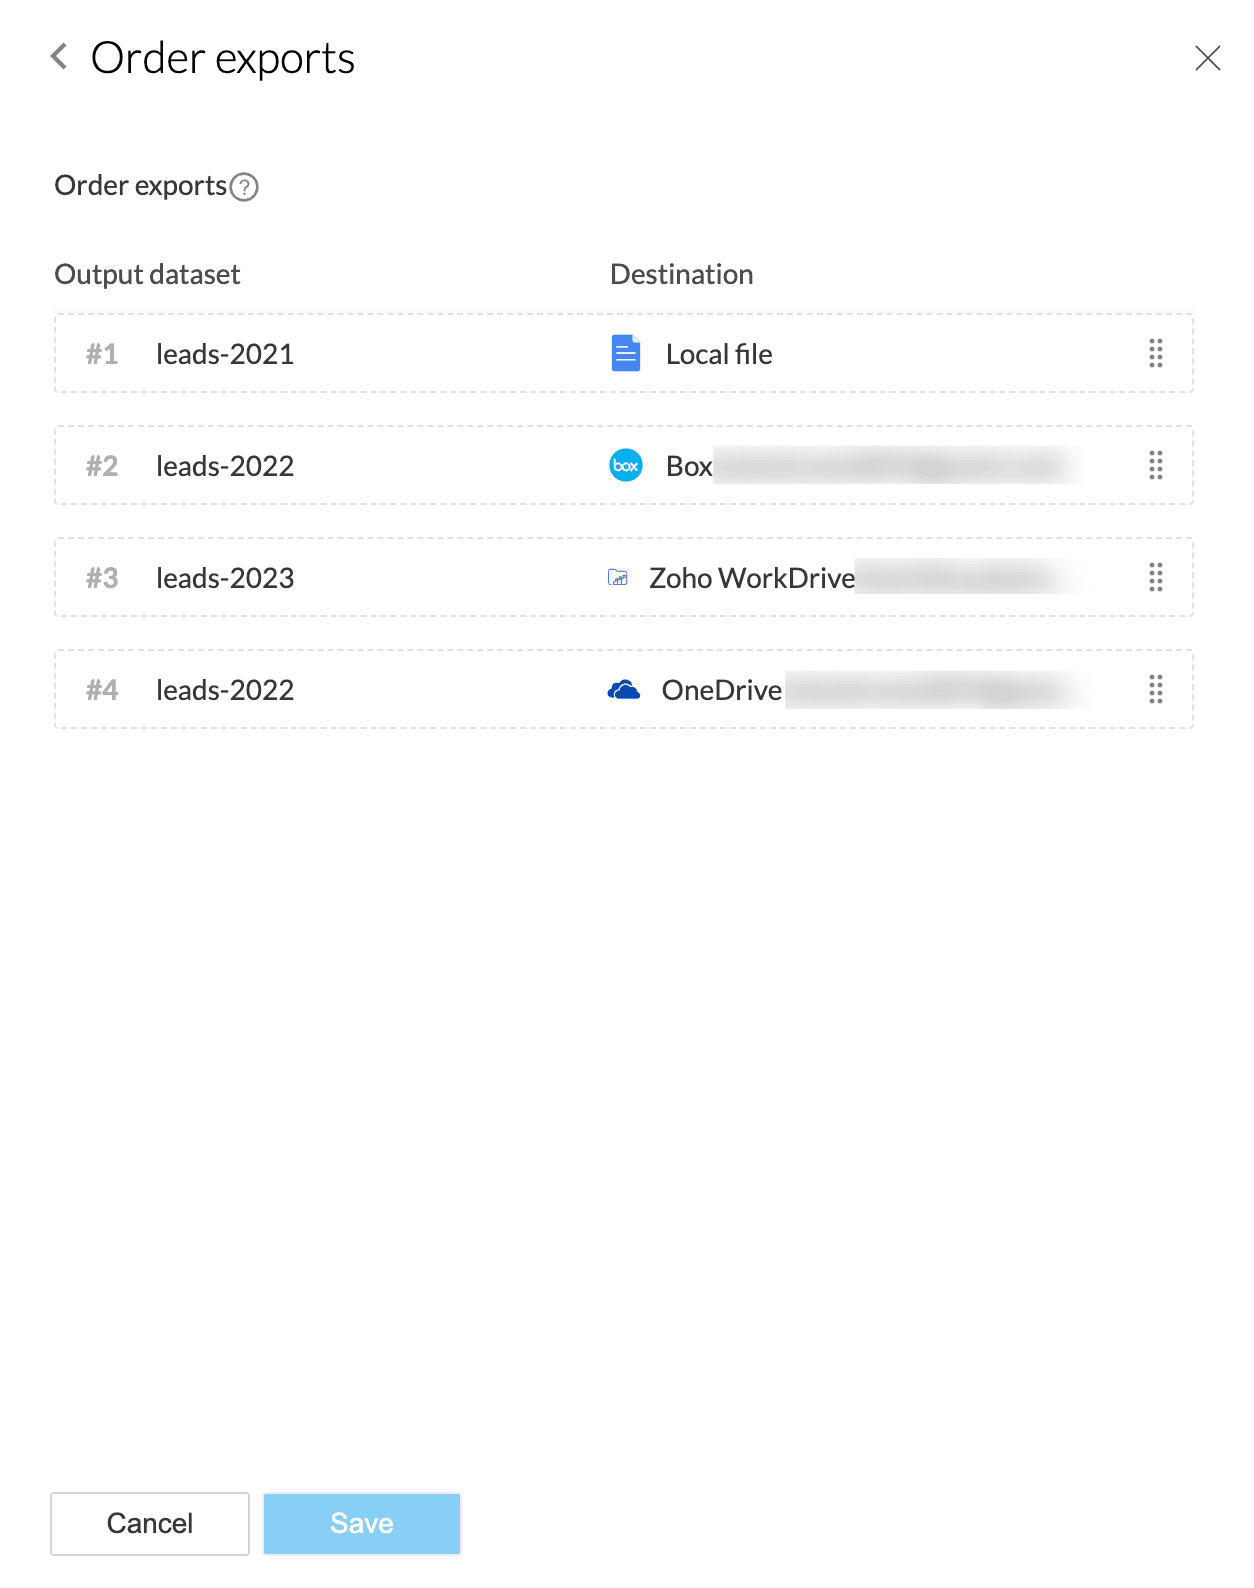
Note: Click the Edit order link if you want to rearrange the order again.Notify others on failure
This option lets you notify multiple users when a pipeline fails. When you enable the toggle, you will see the Select users option. This will show you a list of all active users in your organization. You can select the users that you would like to notify in case of a pipeline failure.

Note: The above selected users shall be notified only if they have enabled the pipeline failure notifications in the Notification settings.
Import configuration
5. While configuring the Webhooks, the import configuration needs to be mandatorily setup for all the sources. Without setting up the import configuration, the Webhooks configuration cannot be saved.
Click the Edit here link to set the import configuration.
The import configuration is different for different sources. Click here to know more about how to set up import configuration for various sources.
6. After you configure the webhooks configuration, click Save.
How does Webhook work?
7. When a webhook is enabled in DataPrep, it generates a unique URL that waits for incoming HTTP requests. When a request is received, this webhook is set up to trigger a specified pipeline.
In the external service, configure the event that should trigger the webhook.
For example, an event could be creating a new record, modifying an existing record, uploading a file, and so on. Then, using the API request below, set up a webhook run that sends an HTTP request to the webhook URL if a specific event occurs.
Create a Webhooks Run
Use this API to trigger a webhooks run.
POST https://{{api_base_url}}/portals/{{portalname}}/pipelines/{{pipeline_id}}/webhook_run
Note: Rest APIs are available for US, IN, JP, EU, CA, SA and AU DCs.
Api_base_url for US = www.zohoapis.com/dataprep/v1
Api_base_url for US = www.zohoapis.com/dataprep/v1
Api_base_url for AU = www.zohoapis.com.au/dataprep/v1
Api_base_url for IN = www.zohoapis.in/dataprep/v1
Api_base_url for JP = www.zohoapis.jp/dataprep/v1
Api_base_url for CA = www.zohoapis.ca/dataprep/v1
Api_base_url for EU = www.zohoapis.eu/dataprep/v1
Api_base_url for SA = www.zohoapis.sa/dataprep/v1
Path parameters
|
Parameters
|
Type
|
Description
|
|
{{portalName}}
|
string
|
|
|
{{pipeline_id}}
|
integer
|
|
Headers
|
Key
|
Value
|
|
Accept
|
V3+json
|
Service name : zohodataprep
Scopes : zohodataprep.dataprepapi.CREATE, zohodataprep.dataprepapi.UPDATE, zohodataprep.dataprepapi.DELETE, zohodataprep.dataprepapi.READ
Note: This webhook-based pipeline run can be triggered only 4 (four) times in an hour. Please find the REST API documentation for more coverage on the APIs in detail.
When an event happens (for example, a new file is added), the external service sends an HTTP request to the webhook URL. This request is received by DataPrep's webhook, which then runs the associated pipeline.
8. The webhook serves just as a signal to initiate the pipeline. Each webhook run is saved as a job. When a pipeline is run, the data will be fetched from your data sources, prepared using the series of transforms you have applied in each of the stages, and then data will be exported to your destination at regular intervals. This complete process is captured in the job history.
9. To go to the jobs list of a particular pipeline, go to the
10. Click the required job ID in the Jobs history page to navigate to the Job summary of a particular job.
The Job summary shows the history of a job executed in a pipeline flow. Click here to know more.
Note: Every job that has been run is saved under the Jobs history, so you can view the status of every pipeline run later under the Jobs page.11. When the Webhook run is completed, the data prepared in your pipeline will be exported to the configured destinations.
Note: If you make any further changes to the pipeline, the changes are saved as a draft version. Choose the Draft option and mark your pipeline as ready for the changes to reflect in the Webhooks run.Once Webhooks is set, you can choose to Edit or Remove using the Webhooks Active option in the pipeline builder.
SEE ALSO