Create workflows between Zoho Directory and other apps using Zoho Flow
What is Zoho Flow?
Zoho Flow is an integration platform that connects cloud applications. It helps you set up workflows to automate information exchange among apps. A trigger and one or more actions combine to form a flow. The triggers initiate the flow, then its actions are carried out. A planned event or a data update may serve as the trigger. For instance, you can design a flow that, every time a new entry is made in Zoho Forms, it creates or updates a contact in Zoho CRM.
Triggers and actions available for Zoho Directory in Zoho Flow
Triggers
A trigger initiates a flow. It is activated for all users by default or can be activated for specific users who meet the filter criteria.
User created
Triggers a flow when a user is created in Zoho Directory.
User updated
Triggers a flow when the user's personal details gets updated in Zoho Directory.
User added to group
Triggers a flow when a user is added to a group in Zoho Directory.
User Activated
Triggers a flow when the admin activates a user in Zoho Directory.
User deactivated
Triggers a flow when the admin deactivates a user from Zoho Directory.
Actions
For any action you choose, Organization ID which will be auto-filled with the grant of necessary permissions for the action.
Create a user
Creates an account for a new user in Zoho Directory. Required details: Organization ID, First Name and User ID, along with personal details.
Update a user
Updates the personal details of a user in Zoho Directory. Required details: Organization ID and User ID with personal details.
Fetch a user
Retrieves the personal details of an existing user in Zoho Directory. Required details: Organization ID and the User ID or email address of the user.
Add a user to group
Adds a user to a group in Zoho Directory. Required details: Organization ID, User ID, Group ID of the group, and the role (Member/Moderator/Follower) the user should have in the group.
Activate a user
Activates a user to an organization in Zoho Directory. Required details: Organization ID and the User ID of the user.
Deactivate user
Deactivates a user from an organization in Zoho Directory. Required details: Organization ID and the User ID of the user.
Automate your flows between Zoho Directory and other apps using Zoho Flow:
Ensure you have any one of the following roles in your Zoho Directory organization for creating the workflow:
- Organization Owner
- Organization Admin
- Custom role with the permission to perform the event mentioned in the trigger or action.
Assign application
- Sign in to Zoho Directory and click Admin Panel in the left menu.
- Go to the Applications tab.
- Search and add the Zoho Flow app.
- Click Assign users and assign users who have the above privileges.
Create a flow
- In a new tab, open Zoho Flow.
- In the My Flows section, click Create Flow (top-right) or the + button in the left panel.
- Enter Flow Name and description (optional).
- Click Create to open the Flow Builder screen. You can take a look through the Getting Started screen or skip it.
- In the Builder screen, under App, click Configure.
- Search and select the required application. Click Next.
- Choose a trigger from the list of triggers, then click Next.
- Click Connect to create a connection between Zoho Flow and the application you have selected. If there are existing connections, you can choose your preferred connection. Or you can also choose to create a new one by clicking New Connection. Once a connection is created, it can be used for various workflows in your organization.
- Click +New, then enter Connection Name.
- Choose your preference:
- All triggers and actions: The workflow created by this connection can execute all triggers and actions.
- Only specific triggers and actions: The workflow created by this connection can execute only the selected triggers and actions.
- Click Authorize. A new browser window will open where you can review the access permissions.
- Click Accept. Once the connection is established, proceed to choose the required organization.
- Click Done. Now you have configured the trigger for the flow.
- On the left panel, find the app you want to integrate (e.g., Zoho CRM, Zoho Cliq, Zoho Directory, etc.,).
- Drag and drop an Action from the app (e.g., Create Contact, Send Message). Or you can drag and drop an element from LOGIC from the available types- Flow Control, Notification, and Custom Functions. To know more about LOGIC
- Connect the app by granting the necessary permission if asked. Click the edit icon of the action.
- In the configuration screen, you can choose how to provide its value for each field:
- Select from list: You can select a specific data from the drop-down list. For example, to provide value for User ID field, select a user's id from the list and the flow uses that data for further executions.
- Insert App Data: Use dynamic data from the trigger or previous actions. Select the Use a Custom Value for a field, then select the placeholder of Custom Value for field. From the Insert variables section select the appropriate string. The variable is pasted in the placeholder starting with $ symbol (e.g., ${trigger.user.id}
- Enter custom value: Type a fixed value that remains the same for all executions. Select the Use a Custom Value for a field. Below appears a new field named Custom Value for User ID, then enter the value.

Test and Debug
- Click the Test & Debug icon in the top-right corner to ensure everything works correctly.
- When ready, turn on the flow using the toggle switch at the top-right corner.
View Task History of executions
You can track and review the status of all executed tasks of your workflows.
- Click History next to Builder.
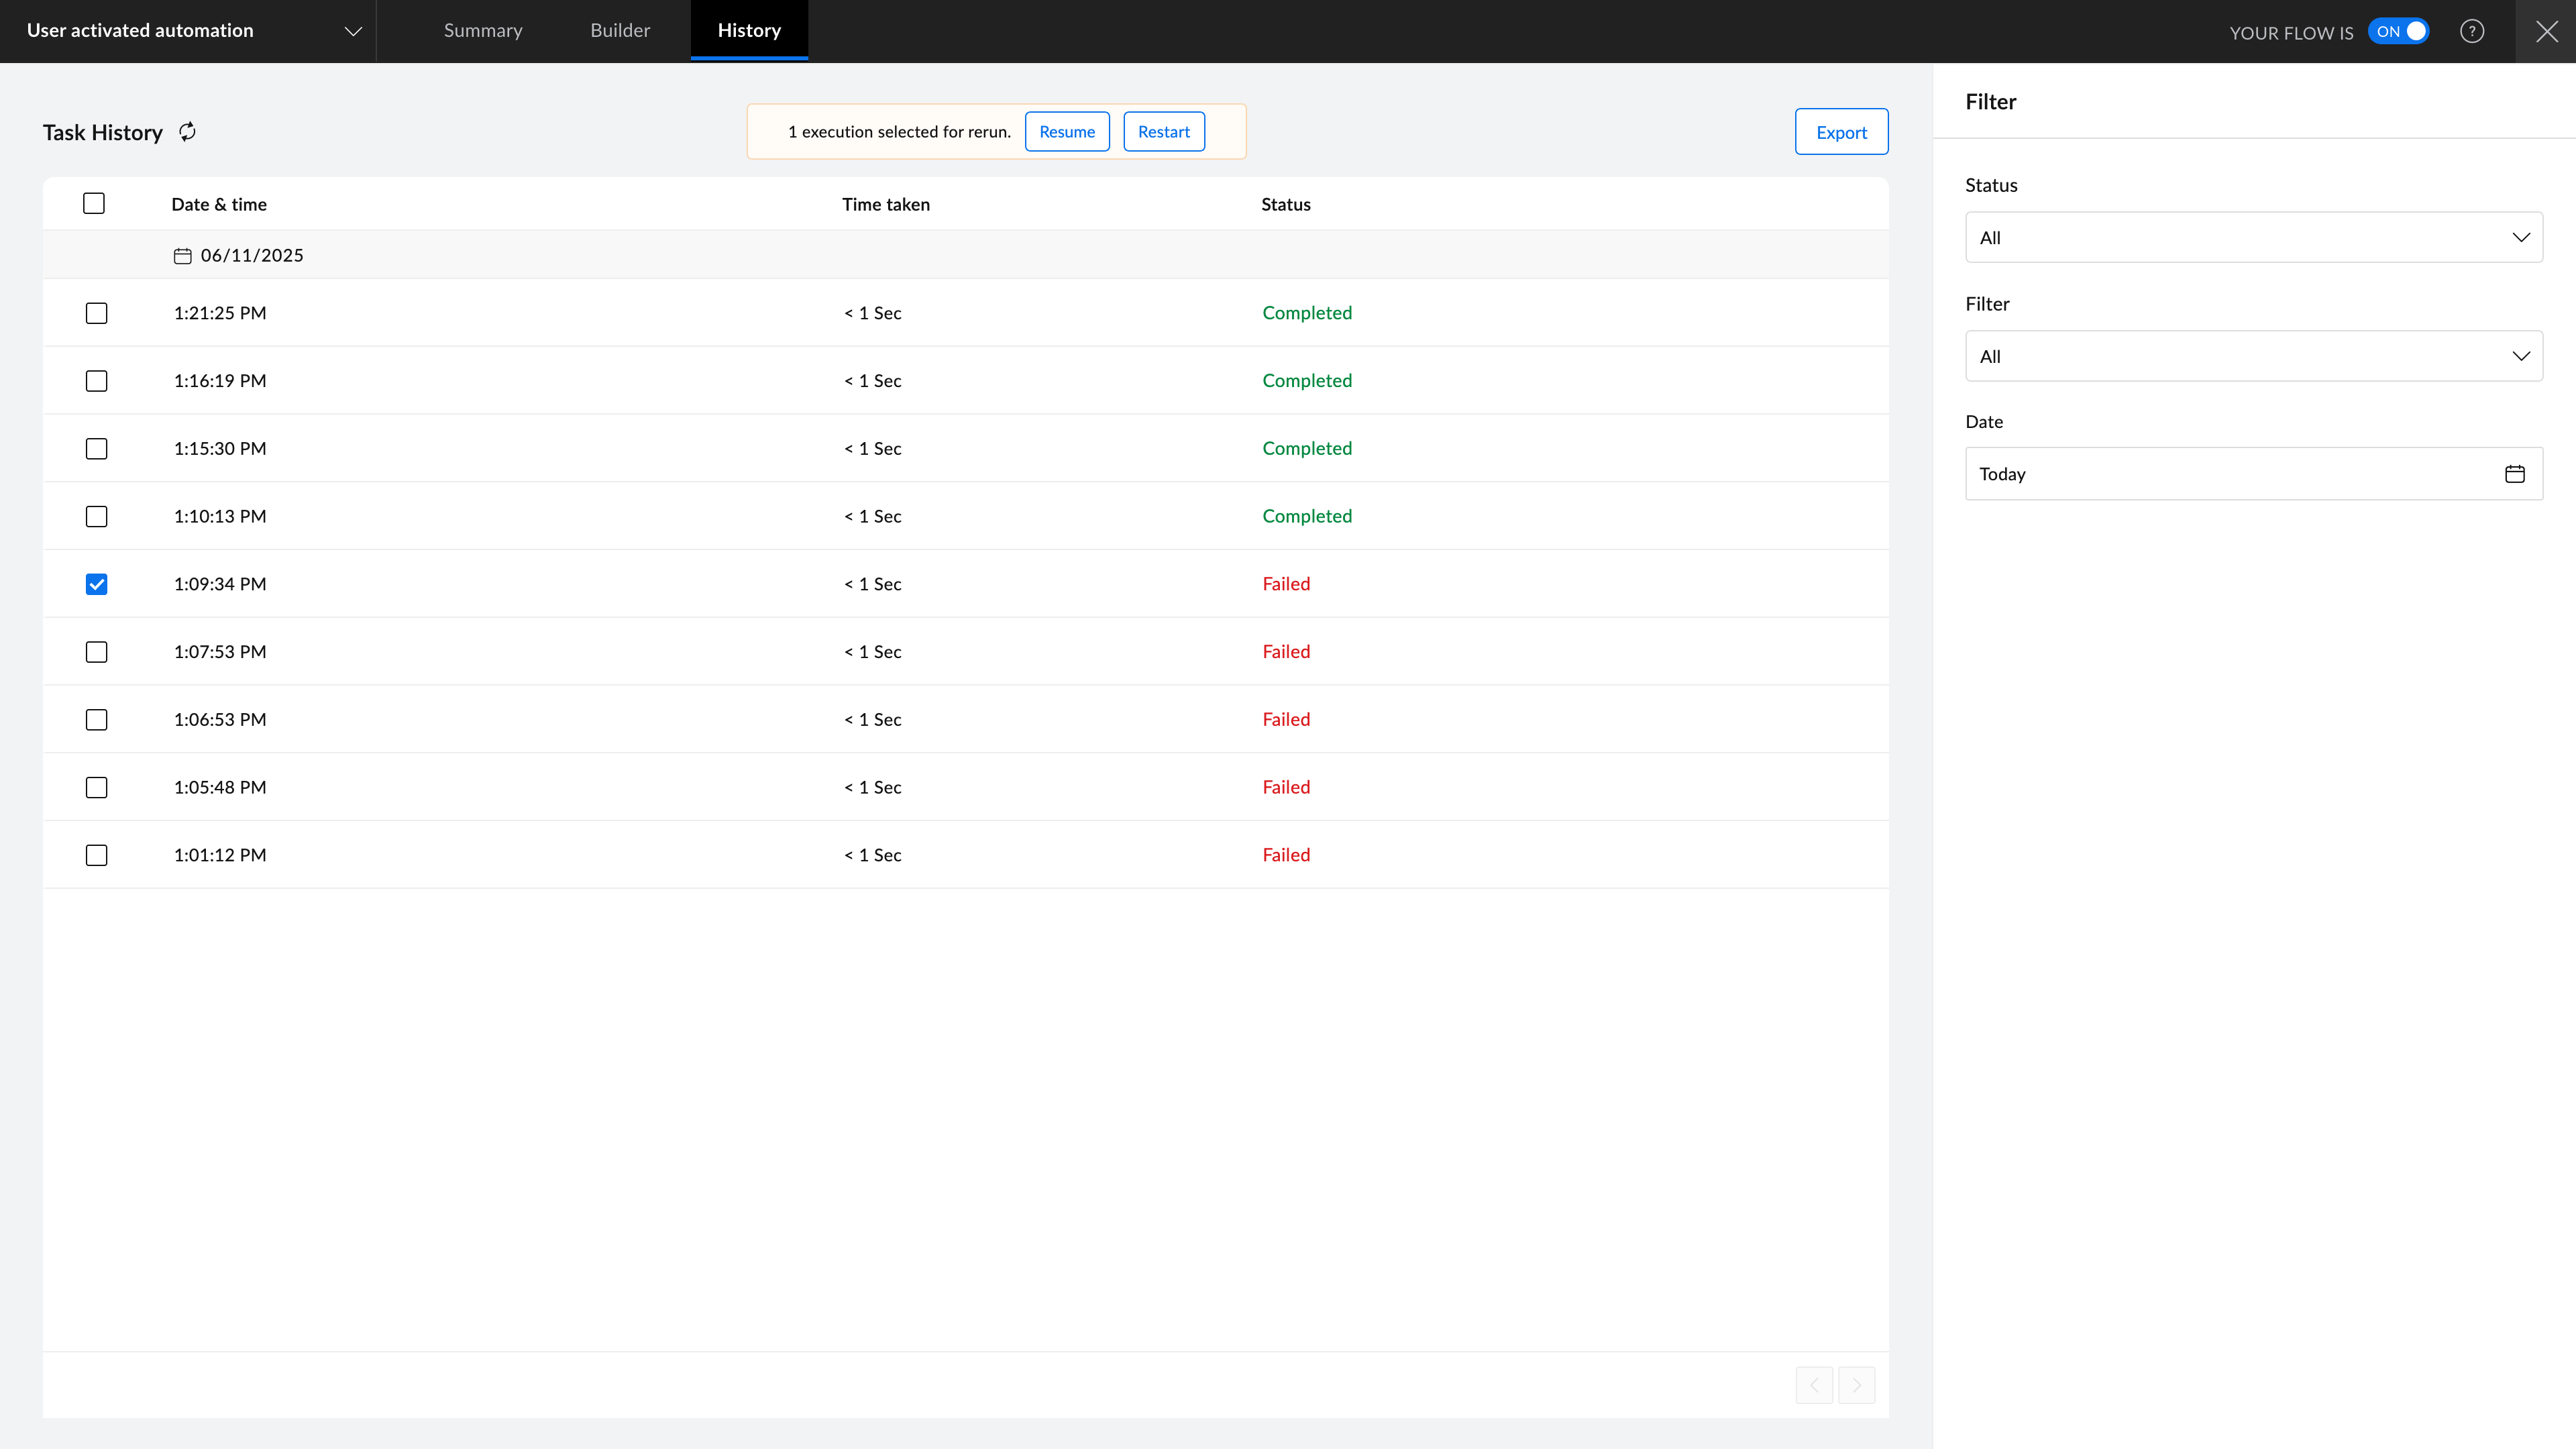
- In the history screen, you can view all the tasks, their execution date, time taken for each execution, and their status:
- Completed: The workflow execution is successful.
- Failed: The workflow execution has failed due to an error.
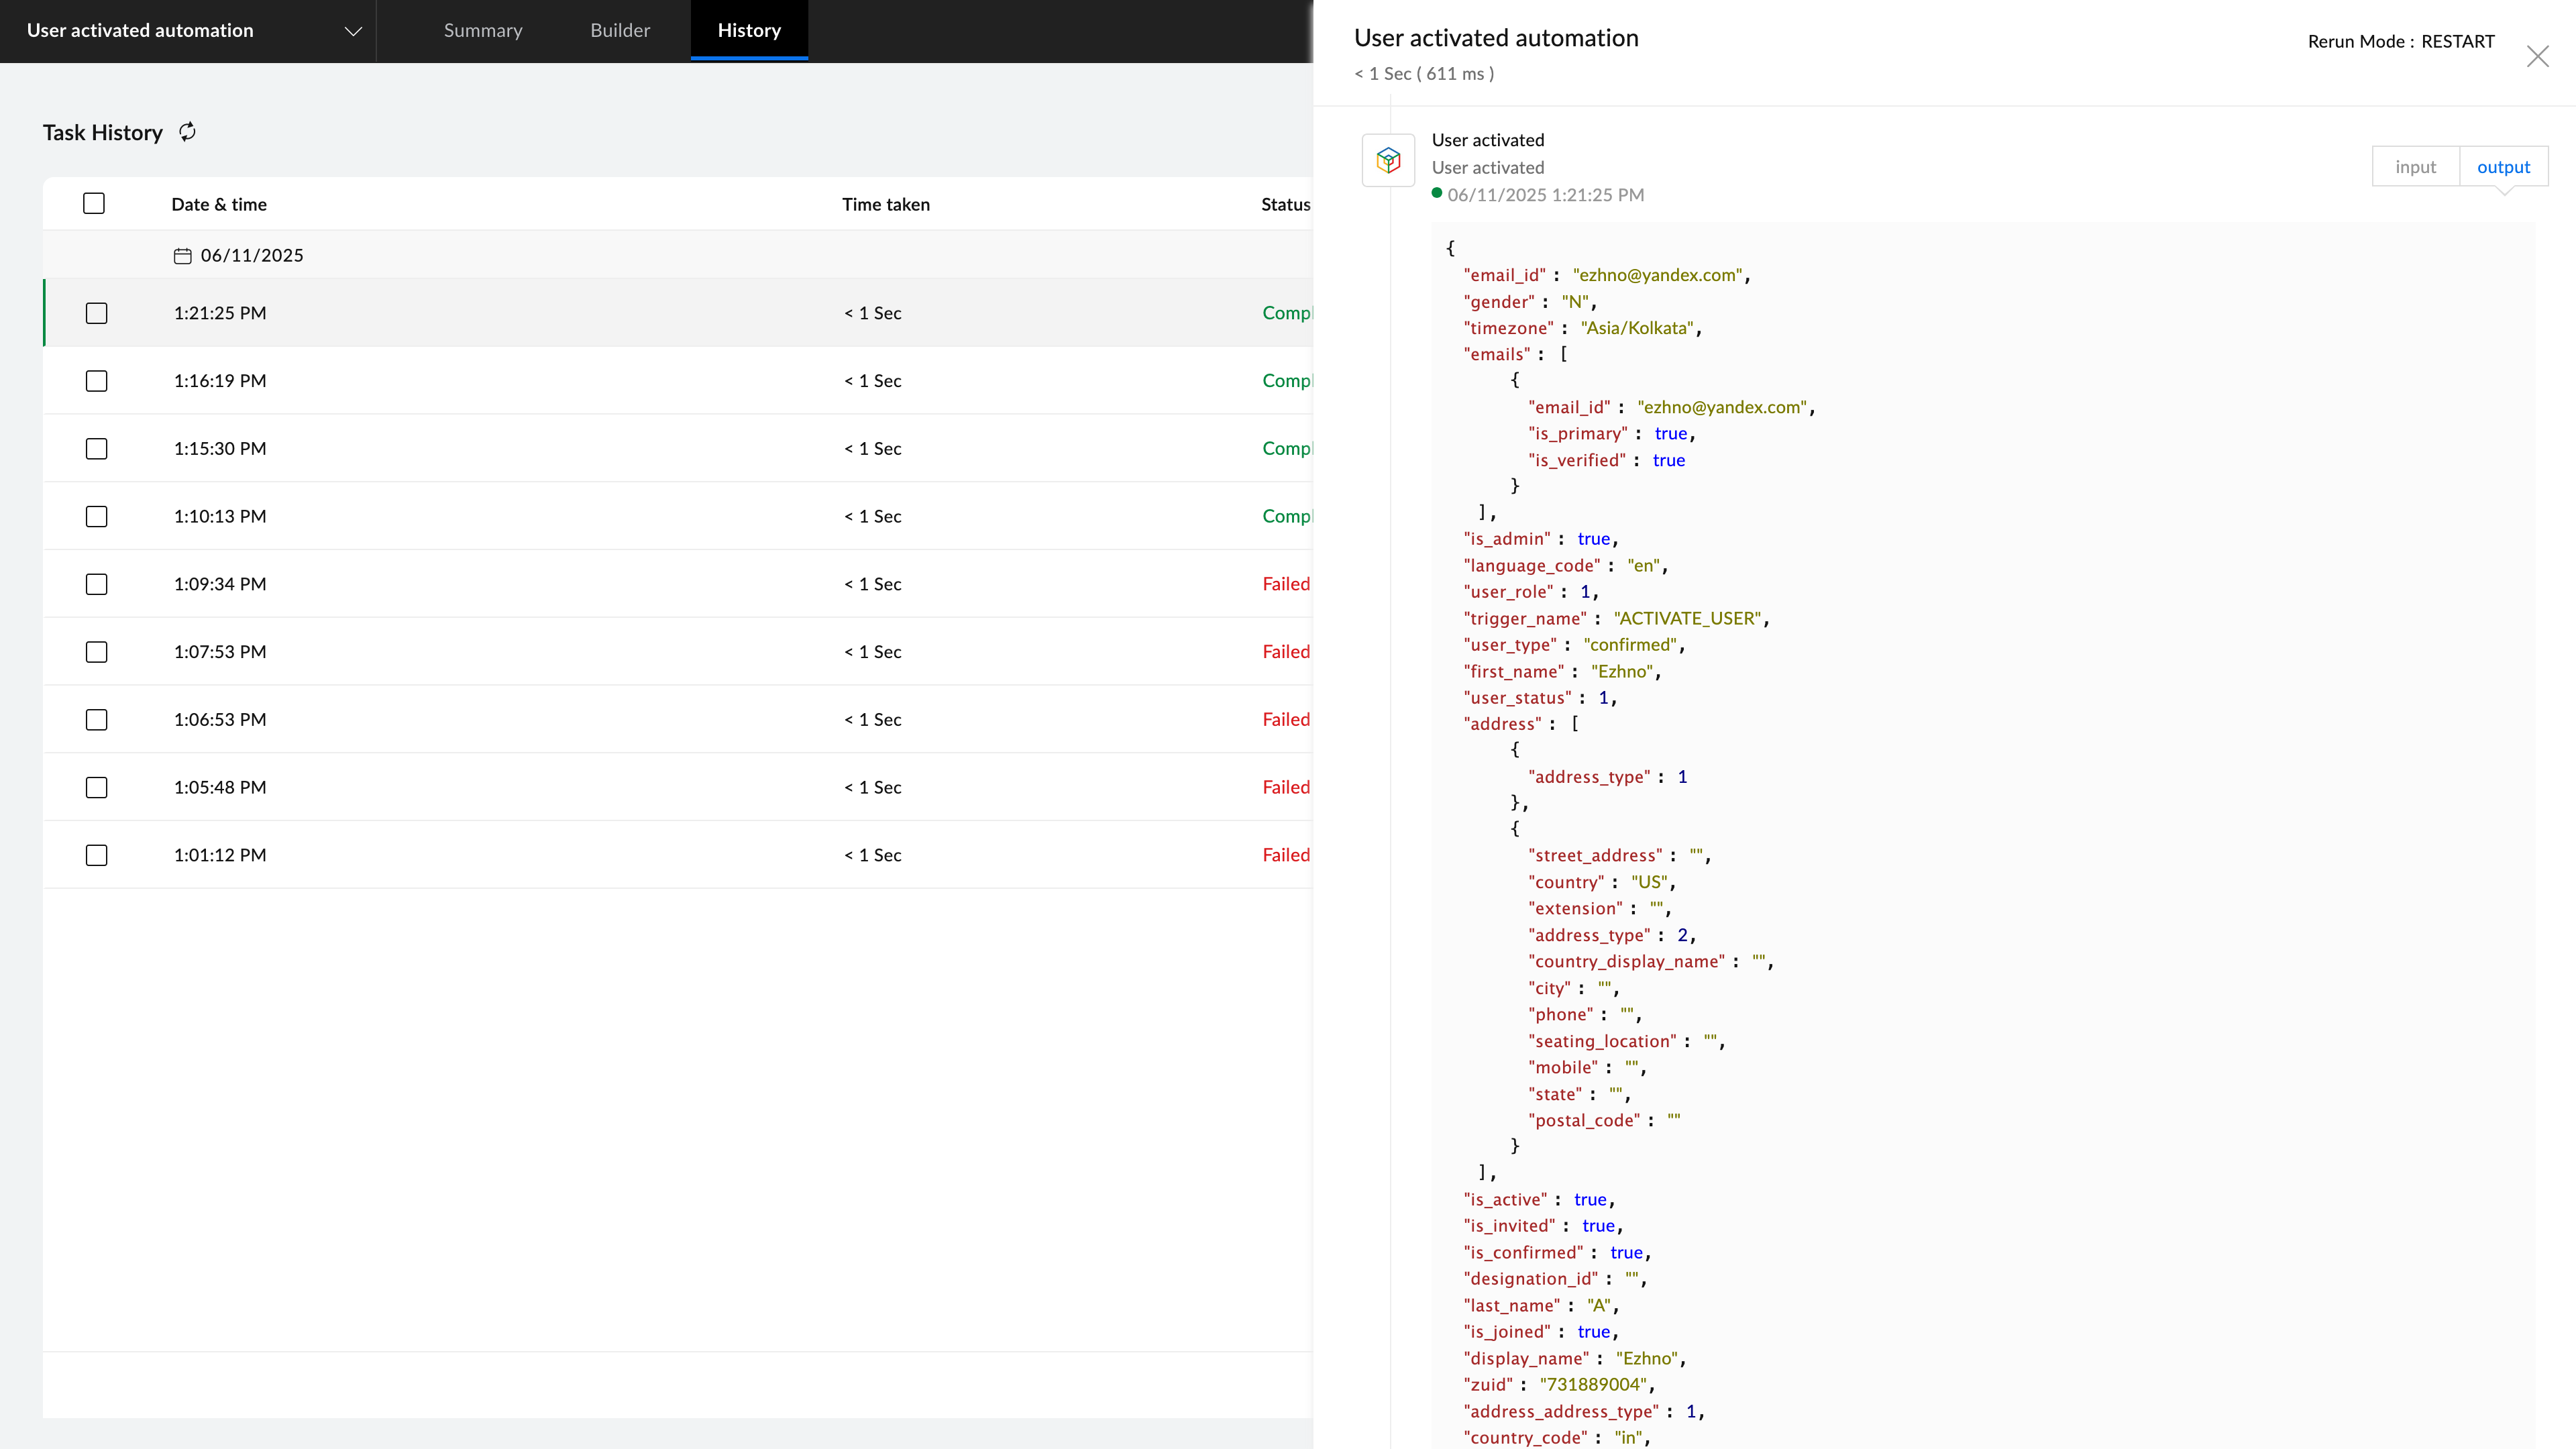
- Select the execution to view more details. Click Input at the top-right corner to view the data that is processed. Click Output at the top-right corner to view the output data. You will find the errors that caused the failure in the execution. Select the executions that have failed, then click Resume to continue the execution of the workflow from where it stopped or failed, or click Restart to rerun the workflow from the beginning.
Example Flow
Flow 1:
Creating a workflow for when a "User activated" trigger is initiated it results in adding that user to a particular group.
- In the My Flow section, click Create Flow on the top-right or + on the left panel.
- Add Name and Description. Click Create.
- In the Builder screen, under the App panel, click Configure to set up the trigger.
- Search for and select Zoho Directory.
- Select User Activated trigger and click Next.
- Click Connect, then enter the connection name and click Authorize.
- Click Accept, then click Done.
- Choose Add user to group action from Zoho Directory on the left panel and drop it under the trigger.
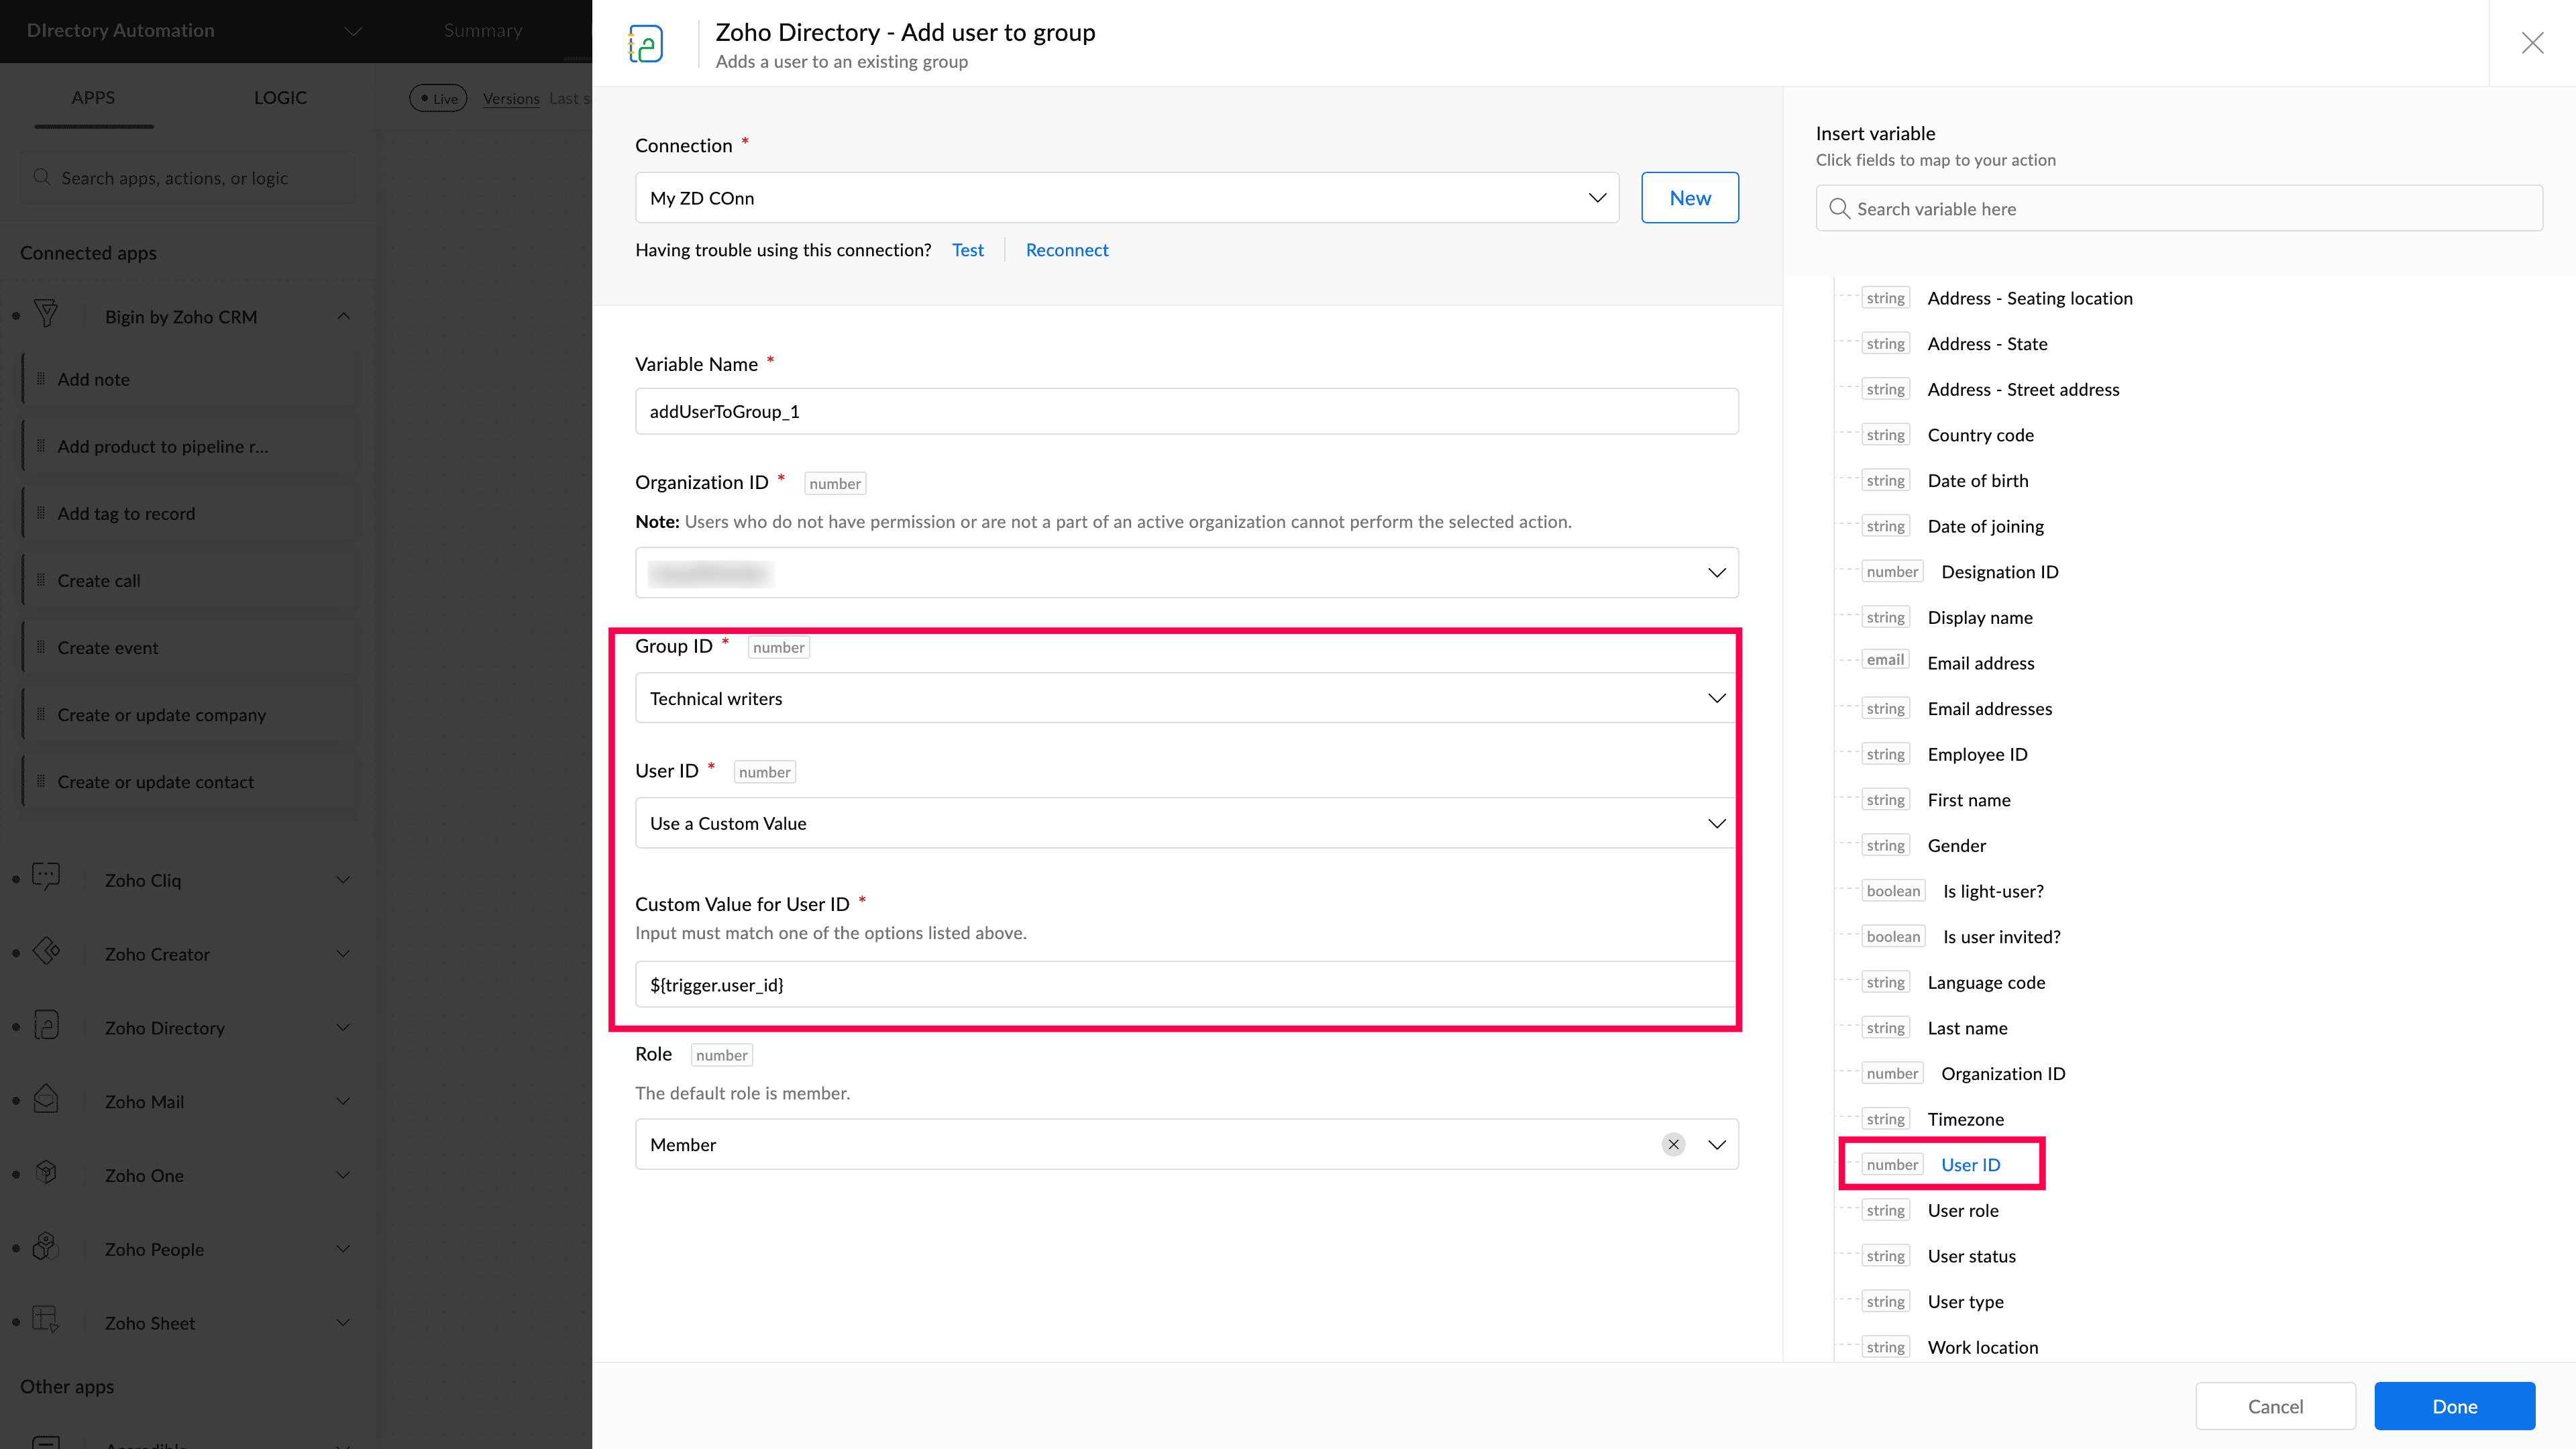
- Click the edit icon.
- Click New, then enter Connection Name.
- Click Authorize.
- Then select the Group ID that the user will be added to. Then choose the User ID or click Use a Custom Value to enter a value of your choice.
- Click Done.
- Click Test & Debug icon at the top-right to ensure everything works correctly.
- Once testing is successful, toggle the switch at the top-right to turn on the workflow.
- Click History near the Builder to view all past workflow executions.

Note: The value you enter in Custom Value fields should be support by the respective actions or it may result an error.
Flow 2:
Creating a workflow for when a new entry is made in User Profile form created using Zoho Form, this results in the creation of a new user in Zoho Directory and also notifies the user about it.
- In the My Flows section, click Create Flow in the top-right corner or the + button in the left panel.
- Enter a Flow Name and description (optional) and click Create.
- In the builder screen, under App, click Configure.
- Search for and select "Zoho Form". Click Next.
- Choose Entry submitted-New Version trigger, then click Next.
- Click Connect. If there are existing connections, you can choose your preferred connection. Or click New Connection. Once a connection is created, it can be used for various flows in your organization.
- Enter Connection Name, then click Authorize. A new browser window will open where you can review the access permissions, then click Accept.
- Select the form to be used, then click Done. Now you have configured the trigger for the flow.
- On the left panel, search for Zoho Directory.
- Drag and drop the Create User action. Connect the Zoho Directory app by authorizing necessary permissions. Click on the edit icon, then map the required fields using app data from the trigger.
- Click LOGIC on the left panel.
- Under Notifications, drag and drop Send Email below the Create User action. Enter the To and From addresses, then draft the email to be sent to the user. You can use required fields using app data from the trigger and actions in the workflow.
- Pick and place the action Message as bot on chat as an error action for Create User. Then connect the Cliq app by authorizing necessary permissions. Map the required fields using app data from the trigger and the actions in this workflow.Note: Whenever you make changes to actions, click Apply Changes in the top, then click Apply to keep your changes applied to your workflow.
- Click the Test & Debug icon at the top-right to ensure everything works correctly.
- Once testing is successful, toggle the switch at the top-right to turn on the workflow.
- Click History near the Builder to view all past workflow executions.