Timesheet Service for Employees
What is the "Timesheet" user service?
The "Timesheet" user service refers to the Timesheet tab accessed through the left bar in Zoho People. Zoho People's Timesheet lets you add jobs and track time spent on various jobs and associated projects. Essentially, using timesheets, you can create time logs for the work you have done in your organization, for which you will be compensated (typical use case).
Glossary of timesheet-related terms

What is the use of timesheet tracking?
The timesheet feature in Zoho People helps track employee work hours, project time, and task progress to ensure efficient time management and accurate billing.
What is meant by "jobs" in Zoho People?
A job is a task or work that is self-assigned or assigned to an employee by your organization that the employee is expected to work towards. Goals can be associated with jobs, and jobs can be associated with projects.
What is a "project"?
Projects are assignments that employees work on.
What is meant by "clients" in Zoho People?
Clients are customers for whom jobs are performed by employees in the organization. Projects are associated with clients and jobs are done on projects for clients.
What is a "work item"?
A work item is an activity or a subtask relating to a particular job.
A work item is an activity or a subtask relating to a particular job.
What is meant by "time logs"?
Time spent on each job activity (work item) recorded by an employee is called time logs. It is used for recording the time duration of the task.
Time spent on each job activity (work item) recorded by an employee is called time logs. It is used for recording the time duration of the task.
What is meant by "timesheet"?
A timesheet is a group or a summary of time logs. It is generated and sent for the approval process.
A timesheet is a group or a summary of time logs. It is generated and sent for the approval process.
How to navigate to Timesheet user service?
Simply click on the Timesheet icon in the left bar in Zoho People.
Add jobs to log time
To log time, jobs must first be added. To add a job:
- Go to Timesheet > My Data > Jobs tab and click Add Job
(You have options to add jobs for self (Employee option), Department and Division) - Select the corresponding project (project can be created by yourself or your employer). Enter the job details as per your requirements. Details can include start date (skip end date if its an ongoing job), hours, rate per hour, billable status, and work items if applicable.
- Finally click Submit

Jobs can also be added directly from the Timesheet > My Data > Projects tab, click Add Job option within the corresponding project.
You can also add Jobs from Timesheet > My Data > Time Logs > "Select Job" drop-down and select Add Job.
Jobs can also be imported and exported. These options are available from the more option (three dots ellipses icon)
View and add time logs (time logging)
There are two views available, namely "List View" and "Calendar View". Switch between the available views from Timesheet > My Data > Time Logs and click the corresponding view icons.
From the Time Logs tab, you have options to log time manually or using the timer, change views, apply a filter, import or export time logs, and more.
When using the Calendar View you can directly click on the "+" icon that appears when hovering pointer over a data to directly add a time log.
Adding a timelog
- From Timesheet > My Data > Time Logs click Log Time.
- Select the client, project, and job. Enter the work item name.
- Enter the time log date. When entering hours, you can choose between Total Hours, Start and End time or use the Timer option if you have used the automatic timer to mark time on that particular day.
- Click Submit
Submitting Daily, Weekly, Semi Monthly, Monthly logs
- From Timesheet > My Data > Time Logs open the "Log Time" drop-down and choose the corresponding option based on the time period you are submitting the time log for.
- Use the drop-down to select Client, Project and Job.
- Enter work item details, select the billable status, and enter the worked hours for the corresponding time period.
- Click Submit
You have options to clone an added timelog (navigate to the time-period you have submitted a time log for, and click Clone) You can also add additional rows using the Add Row option.

Options such as "Total Hours", "Start and End time" availability depends on your organization's preferences.
Your organizations might use an approval process to verify and approve the submitted timelogs.
Your organizations might use an approval process to verify and approve the submitted timelogs.
Log time using the timer (automatic method)
- Go to Timesheet > My Data > Time Logs and simply start the timer after selecting the corresponding project.
- Once initiated, you will have options to stop timer, edit, add a note. (hover pointer over the time log entry).
- If you wish to submit the automatically logged time, click on log time option and select the "Timer" option within the "Hours" option.
Editing or deleting a time log
- Go to Timesheet > My Data > Time Logs
- Hover pointer over an existing time log entry to view options to edit and delete.
- Use the corresponding icon to perform the desired action.
Creating and Submitting Timesheets
A timesheet is a group or a summary of time logs. It is generated and sent for the approval process. Timesheets will only include timelogs that were not previously submitted individually.
Follow these steps to submit timesheets:
- Timesheets can be submitted by navigating to Timesheet (user service) > My Data > Timesheets and clicking on the Create Timesheet button.
- In the Create Timesheet screen, select the following:
Period - Time frame of time logs to be fetched. (Custom Period is also supported, where user can input a date range with a maximum span of 31 days).
Clients - Select the associated clients to fetch time logs submitted under each client.
Projects - Select the associated projects to fetch time logs submitted under each project.
Jobs - Select the associated jobs to fetch time logs submitted under each project.
Billable Status - Choose between fetching billable, non-billable or both. - Click Next
- A detailed report will appear. It will include a list of all the time logs, billable hours, total hours, payable hours, rate per hour, and total amount. User can also add a description, related attachments.
- Click Send for Approval. (you can select Save as Draft if you wish to submit later).
The timesheet is now created and sent for approval.

Alternative Method for Submitting Timesheets
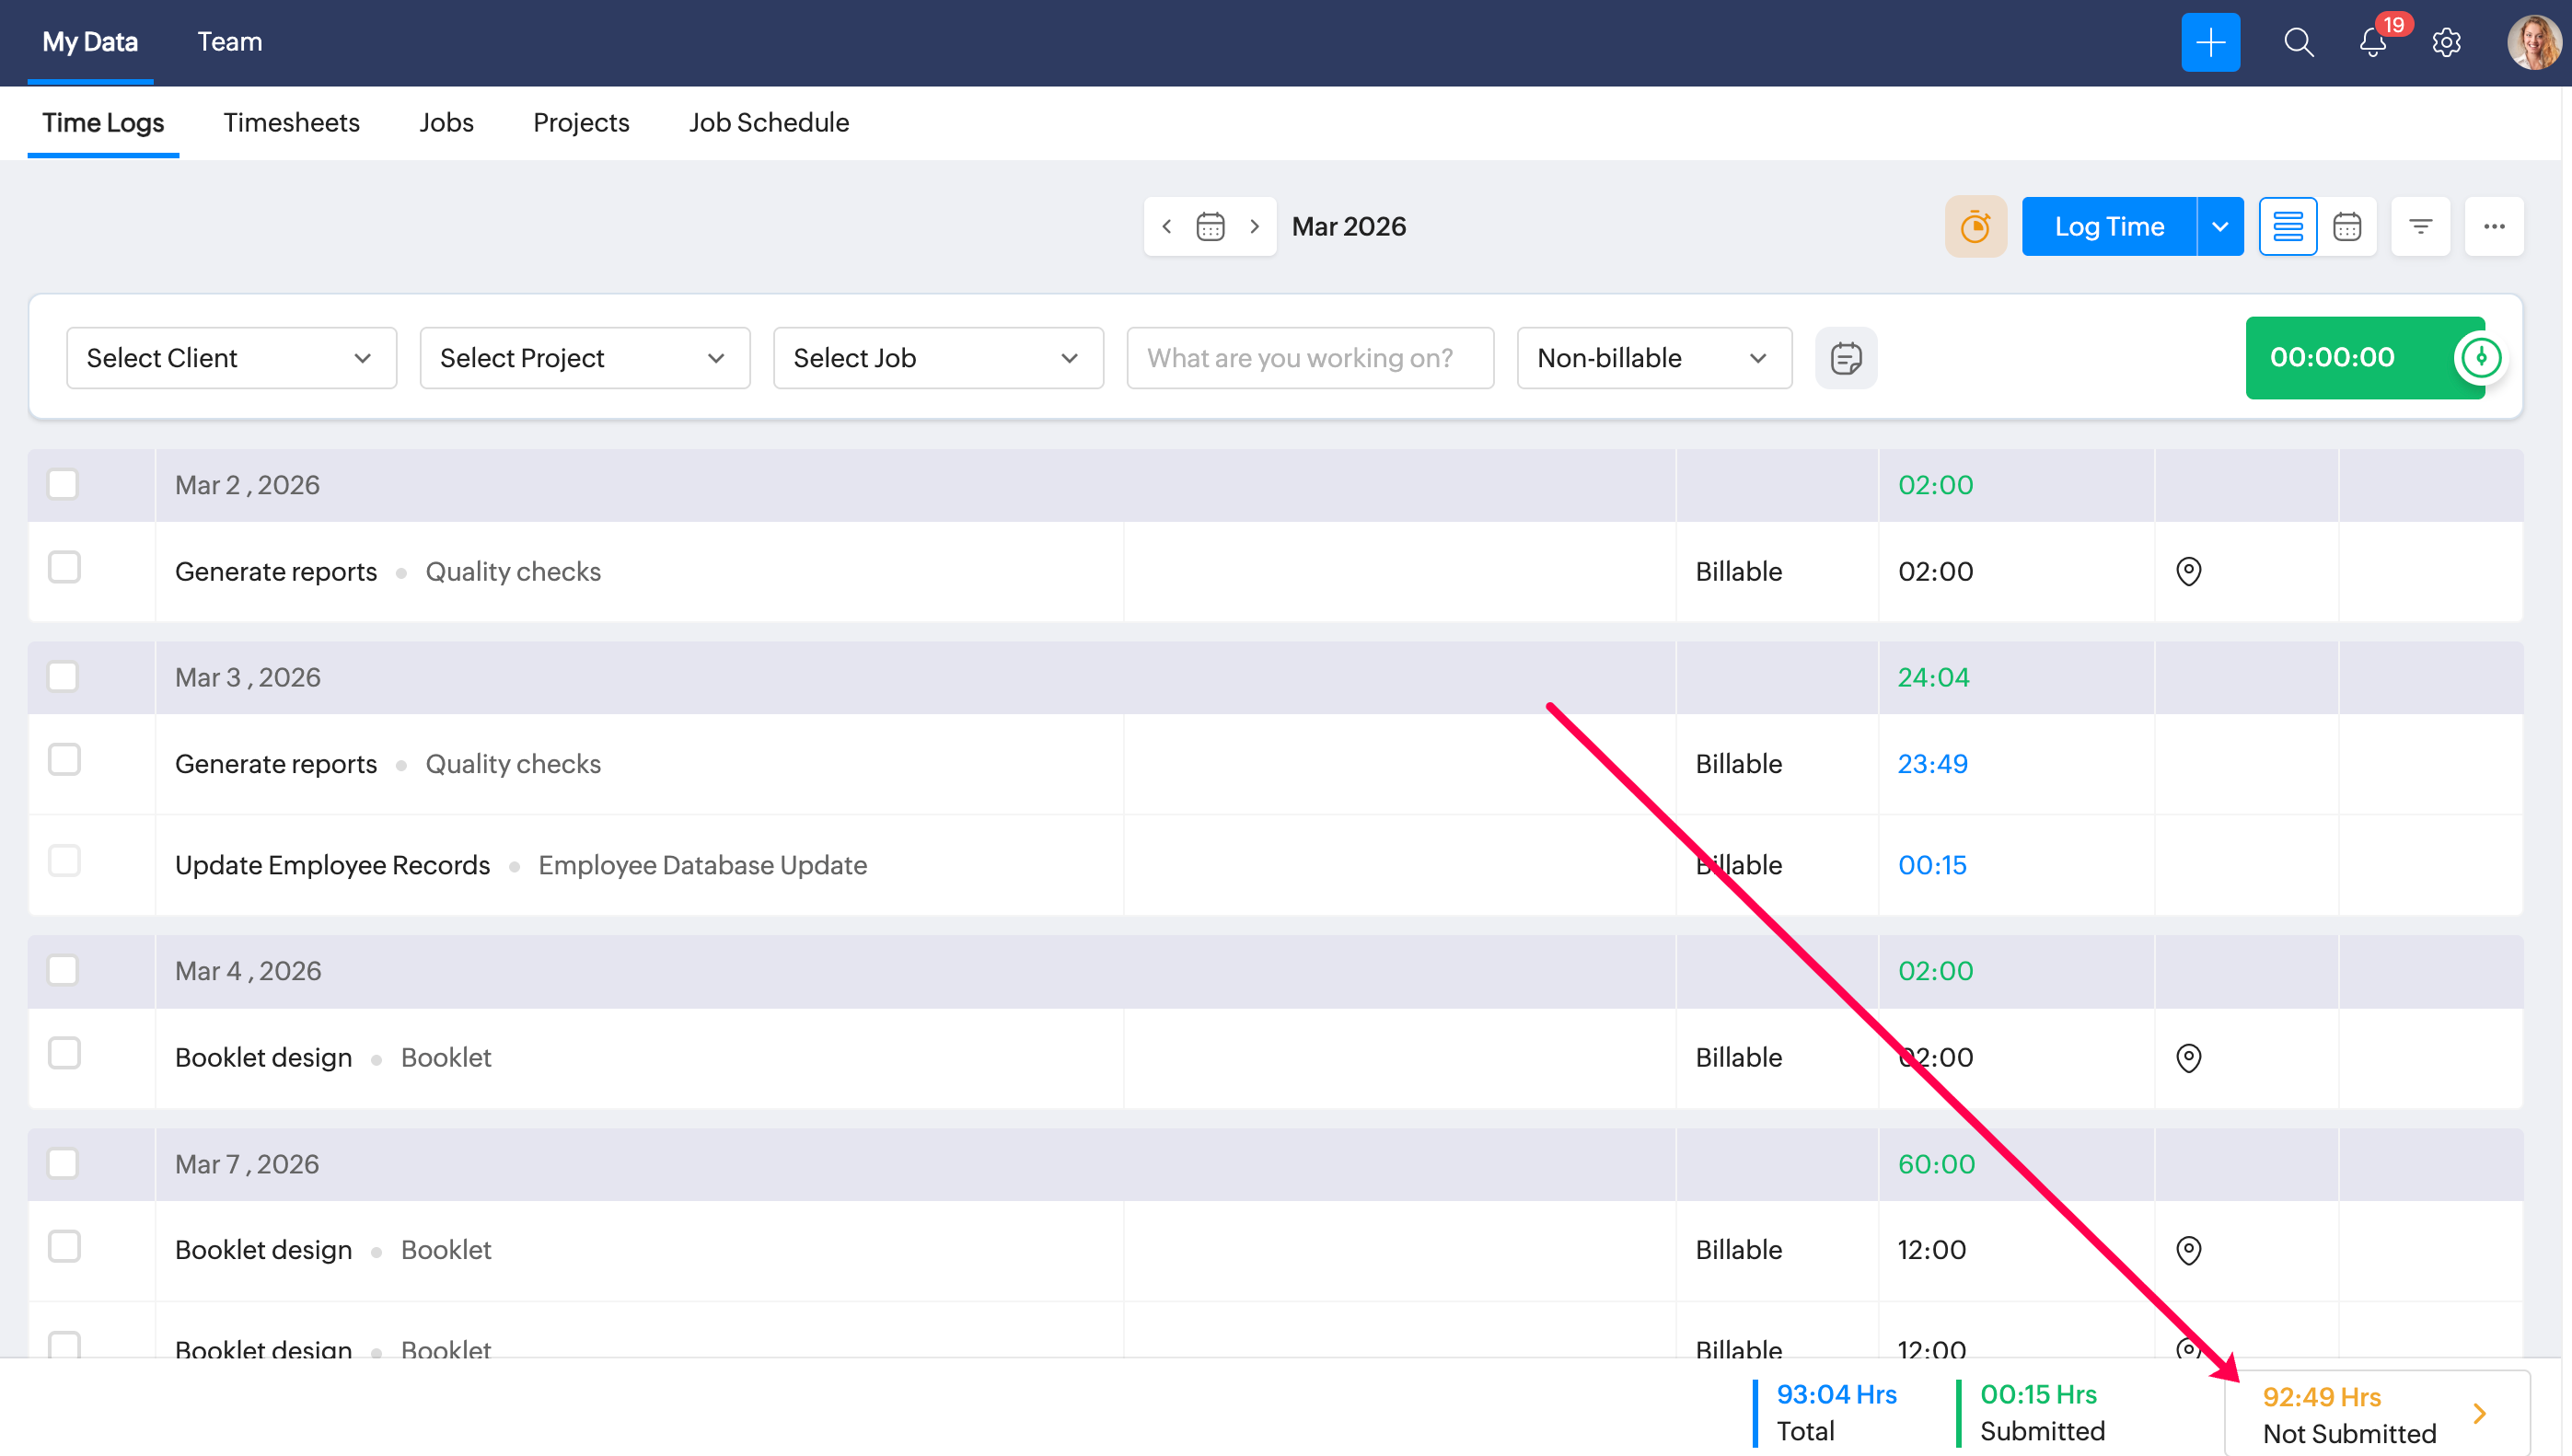
From the home page, navigate to Timesheet > My Data > Time Logs. Use the month selector at the top to navigate to the desired month. Click on the Not Submitted button in the bottom right corner to submit a timesheet comprising all unsubmitted timesheets of that particular month.
Audit History for Timesheets
Employees can view a complete timeline of all actions performed on a timesheet—from creation to final approval. This helps track changes, ownership, and decision history.
To view audit history of timesheets:
-
Go to Timesheet (user service) > My Data > Timesheets.
Reporting managers can navigate to Team > Timesheets to view their reportees data. - Click on the required timesheet.
- Click on the Audit History icon on the top right corner.
- You will be able to see the audit history of the timesheet. You can also print this history by clicking on the print icon.
View and add projects
Based on organization's permissions. Options to add projects to self (Employee), Department and Division may be available.
- Navigate to Timesheet > My Data > Projects to view your associated projects.
- From the list of associated projects, click on a specific project to open the detailed view.
From the projects listing, you can directly add jobs to the corresponding projects using the Add Job option.
When hovering pointer over a project listing, options to Edit and Delete will appear. (only for projects without any activity).
- From the detailed view, you can access the Feeds, Project Performance, Jobs, Users, and Attachments tabs
- In the Project Performance tab, you can view a ton of project insights, such as the estimated versus logged hours, billable versus non-billable, overdue info, contributors information and more.
- From the Jobs tab, you can view existing jobs and add new jobs to the project. (based on your organization's permissions)
- From the Users tab, you can view associated users and assign more users to a project. (based on the organization's permissions)
- See job related attachments in the Attachments tab.
- Use the Feeds tab to submit posts associated with the project, you can even do a @mention to someone directly.
- The project status, client, cost and users count can be viewed in the left card.
Adding a new project
- Navigate to Timesheet > My Data > Projects tab and click Add Project (based on your organization's permissions)
- Enter the project details. If you are using Zoho CRM, you can directly select a CRM client here.
- Enter the corresponding project cost.
- Select corresponding users in the Project Head, Project Manager and Project Users fields.
- Enter RPH (Rate Per Hour) information.
- Click Submit.
View team availability, associated jobs and projects
You can quickly check your team / project members check-in status, weekly logged duration by navigating to the Timesheet > Team tab. Navigate to Jobs and Projects tabs within the Team tab to view Jobs and Projects associated with your team.
View timesheet related reports
You have access to three timesheet-related reports, namely Time Logs, Jobs Status, and Projects Status. To view the corresponding report, navigate to Reports (bottom left-corner) and access the required timesheet report.