Customizing Organization Modules
Organization modules in Zoho CRM, let you categorize and track various aspects of your business such as Sales, Marketing, Customers, Products, Meetings and the like. These modules are represented in the form of tabs in the sidebar such as Leads, Contacts, Deals, Tasks etc. They are of two kinds.
- Standard Modules
- Custom Modules or User-Generated Modules

Apart from organization modules, we have team modules in Zoho CRM. A team module is a user-controlled module in CRM, separate from the organization modules managed by CRM admins. To learn more about team modules and how they differ from org modules, see: Configuring team modules.
Standard Modules
Zoho CRM lets you work with more than 10 standard modules for Sales, Marketing, Customer Support and Inventory management. These predefined modules come with a set of default fields and layout. You can edit most aspects of a standard module to suit your requirements. For example, if there is a field called X (Twitter) in the Leads module and you think none of your leads use X (Twitter), you can remove this field from the Leads layout. Similarly there are many other customization options provided to Standard modules. The customization options and their exceptions vary depending on the module you wish to modify.
Standard, predefined modules are available to all Zoho CRM users, regardless of the Edition they have subscribed to.
Custom Modules or User-Generated Modules
Sometimes, the standard, predefined modules present in Zoho CRM do not always meet your requirements. In such a case, Zoho CRM lets you create a new module depending on your business needs. For instance, Leads, Contacts, and Deals will not be ideal for an educational institution. Students, Teachers and Parents would be more appropriate modules for them and they can create these modules. A hospital can create new modules called Doctors, Patients, and Nurses.
To address these unique business requirements, you can create your own modules. With the Custom Modules functionality in Zoho CRM, you can develop new modules using built-in tools that need no programming skills. These custom modules can seamlessly integrate with core CRM modules and need not be stand-alone modules. What's more, you can:
- Add fields and modify the page layout as per your needs.
- Use roles and profiles to define access controls for the custom modules and its fields.
- Import data to the custom modules with ease.
- Take a backup of your data, anytime.
- Send mass emails to the records in the custom module.
- Create mass email schedulers.
- Use macros to execute a set of actions.
- Create workflow rules to automate your business process.
- Build module relationship by linking custom module records with standard module records.
- Use autoresponders to send automated replies and follow-up emails.
To learn more about the need for custom modules, see: Build new modules to bring every unique process into Zoho CRM.
Availability
Permission Required
Users with Module Customization permission in their profile can access this feature. For users with administrative profile this permission will be enabled by default.
- Standard edition - 10 modules (custom modules and team modules combined).
- Professional edition - 25 modules (custom modules and team modules combined).
- Enterprise edition - 200 modules (custom modules and team modules combined).
- Ultimate edition- 500 modules (custom modules and team modules combined).
Note: There are no more user-based restrictions to add additional custom modules to an account.
With Zoho CRM's simple WYSIWYG Module Editor (What-You-See-Is-What-You-Get Editor), you can create new modules as well as edit existing modules easily.
Difference Between Custom Modules and Custom Apps Features
Custom Modules and Custom Apps are two different functionalities in Zoho CRM that helps you extend your CRM to suit the requirements that are unique to your business.
- Custom Modules - Create custom tabs, just like other standard modules, and build module relationship by linking custom module records with standard module records. Like other standard modules, you can customize, import and export data, configure workflow rules and generate reports for the custom module.
- Custom Apps - Create custom applications, forms and views (powered by Zoho Creator) and use them to build custom tabs inside Zoho CRM.
Module Customization - In a Nutshell
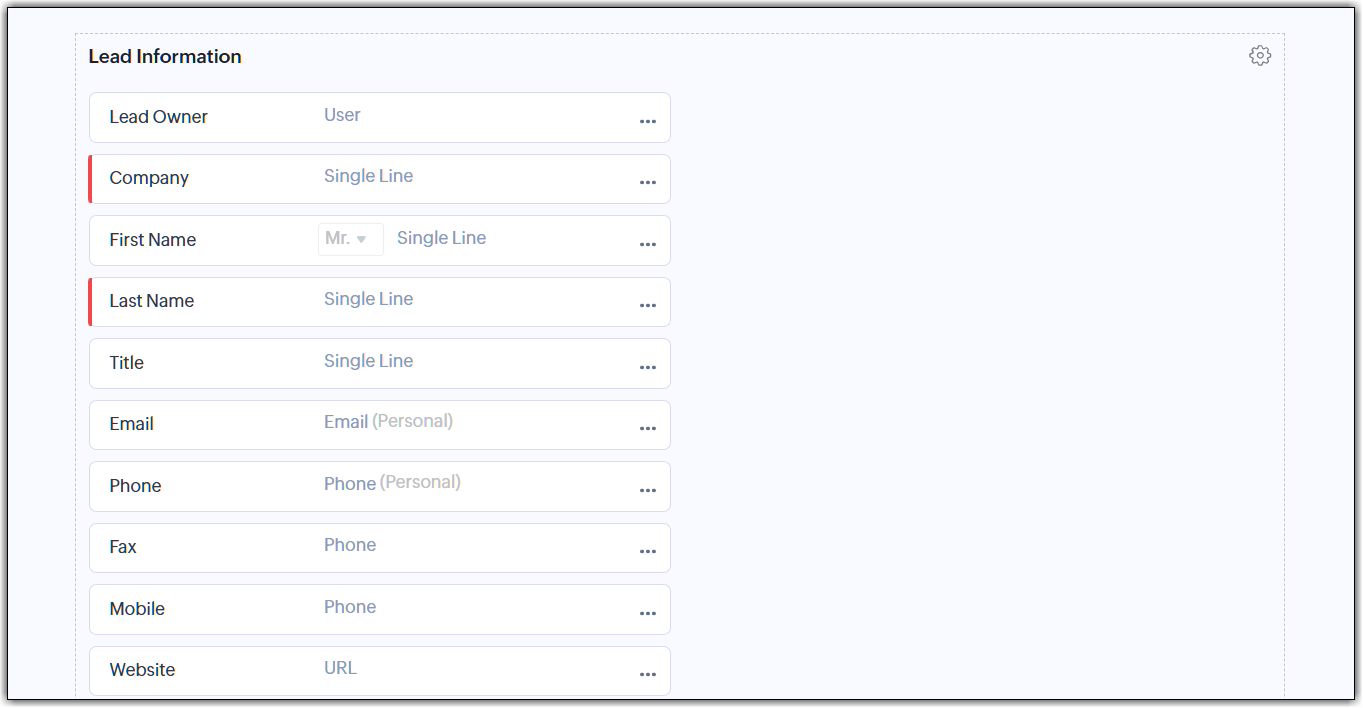
Using the What-You-See-Is-What-You-Get (WYSIWYG) Module Editor you can easily create/edit modules in Zoho CRM. Take a quick glance at how to use this editor to customize your module.
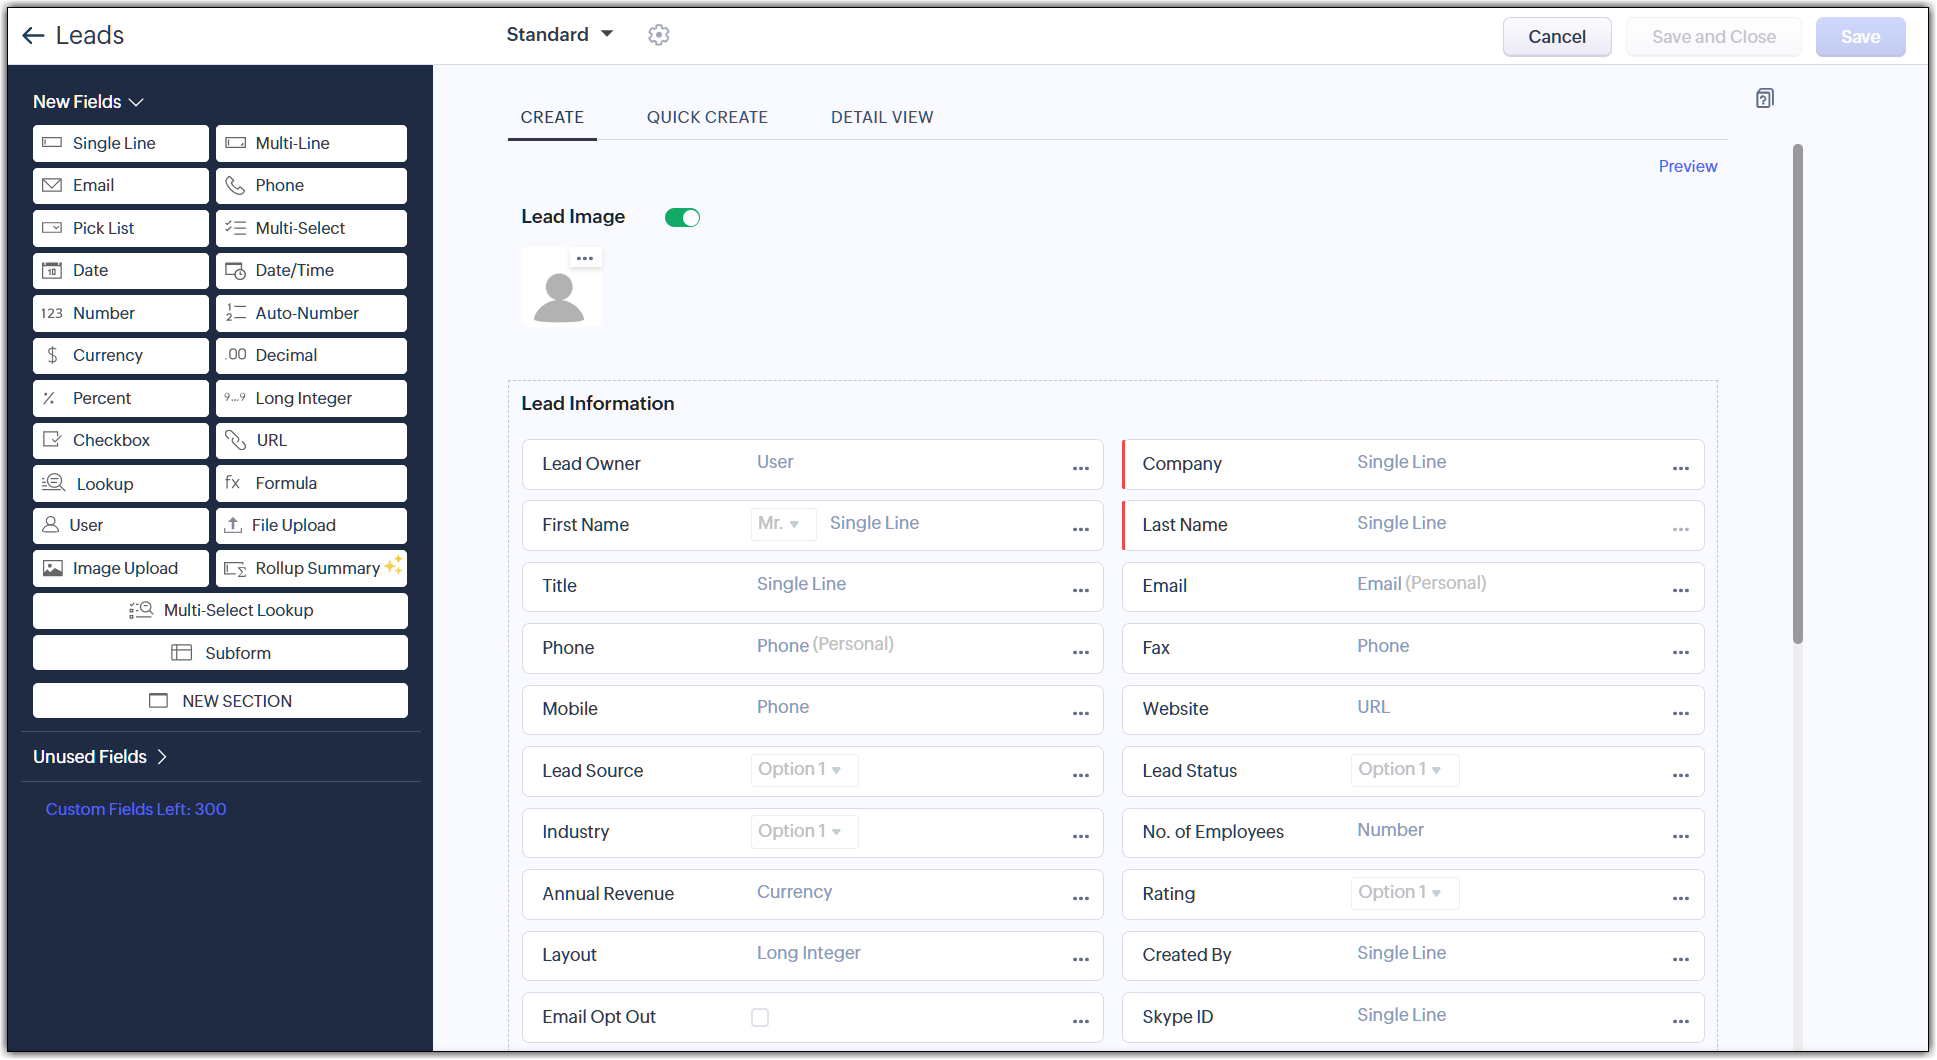
- Name/Rename the module.
- Drag and drop one or more fields to the layout from the New Fields tray and click Save Layout.
- Edit the Field Properties and Set Permissions for the fields from the Settings icon. Remove fields from the Layout using the Trash icon.
- Drag and drop new sections to the layout from the New Fields tray.
- Switch between single-column layout and two-column layout for a section. Move the sections around to rearrange them. Use the Delete icon to delete a section.
- View the removed fields in the Unused Fields section.
- Set Module permission for different user profiles.
- Preview the module layout as a particular profile. This is useful if you have given different Field Permissions for different user profiles.
- Save the Layout, once you are satisfied with it.
Quick create and Detail View
The module builder consists of two additional components: Quick create and Detail view.
- The quick create tab lets you customize a form to capture information of look-up records. You can add standard and custom fields to the form. It is layout-specific, so you can create different forms for each layout.
- The detail view tab consists of two components: Business card and Related list. You can customize the business card by adding up to 5 standard or custom fields. Like quick create, detail view is also layout specific so you can create different detail view for each layout. To customize the related list, you can drag and drop fields to the related list section, re-order or modify the columns and create custom related lists.
Create a Module
- Go to Setup
> Customization > Modules and Fields.
- Under the Modules tab, click Create New Module.
- Click Organization modules. You can select team modules if that suits your needs. To learn more about team modules, see Configuring team modules.
- Click on the top left corner and enter a name for the module - both the singular and plural forms.
- Click Save.
- Click + Add Teamspace to select the teamspaces where these modules will be available. You can also select the folder in each teamspace where the module needs to be placed.
- Under Module Permission, select the profiles that need access to the module.
- Click Save.

If you try to save a module name that already exists for any other module or subform, an error will be triggered.
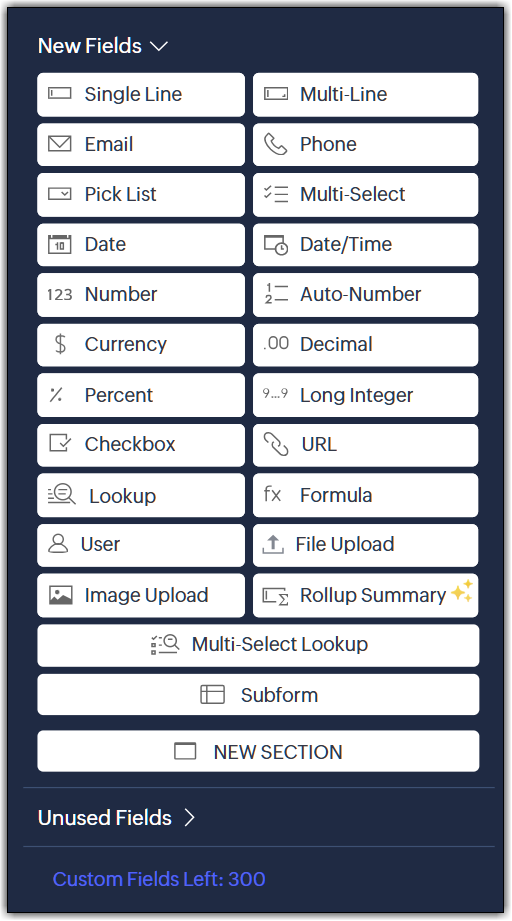
Add Fields to a module
There is a limit to the total number of fields that you can create in your account and also a limit to the type of fields that you create. This varies based on your Zoho CRM Edition. Refer to the following link to check the field limits: Custom Field Limits
- Custom fields are not available in the Free edition of Zoho CRM.
- Formula fields are not available in the Standard Edition of Zoho CRM.
- You can add fields specific to particular layouts in Quick Create and Detail View.
As you add new fields and remove existing fields, Custom Fields Left in the bottom left of your screen automatically tells you how many more fields you are allowed to create based on the field limits applicable for your Edition.
To add fields in a module
From the New Fields Tray on the left, drag and drop the fields you require in the section.
See also: Creating Custom Fields
See also: Creating Custom Fields
Add sections
To add a new section
From the Module Builder Tray on the left, drag and drop +Add New Section to include more sections for the module.
Set Module Permissions
To set module-level permission for your organization module
- Go to Setup
> Customization > Module and Fields.
- Hover to a module and click the More icon
and select Module Permission from the drop-down menu.
- In the Module Permissions-[Module] pop-up, select the profiles that should have access to the new module.
- Click Save.

Note
- The options Module Permission and Set Permission will not be available in a single-user account. They are available only for accounts with more than one user.
- If you downgrade from your current edition then:
- All the customizations and data related to the custom modules will be retained as is.
- If the lower edition does not support the custom module, the data will be hidden from your CRM account and will be displayed when you upgrade the edition.
- In the lower edition, if the customization limits are reached, the recently created customizations will be deactivated and only the ones that fall within the edition's limit will be displayed. Remaining customizations will be hidden from your account and will be available upon upgrading the edition.
See the record limit changes upon downgrading an edition here.
Design Module Layout
The look and feel of a module can be changed by modifying the layout. Make form fields look organized by rearranging fields and sections, and changing layout settings. For instance for your custom module "New Property" to manage property leads, you can design a layout for the section "Apartment Details" consisting of the required fields. Layout determines the structure of your screen. You can choose between a single layout and a double layout.
Single column layout
The single column layout allows the fields to be listed one below the another.
Double column layout
The double column layout allows the fields to be listed in two columns. Here's a screen on how these layout appear.
To rearrange fields
- Hover to the field you want to rearrange.
- Drag and drop where you wish to.
To change module layout
- Click the gear icon at the top right of a section.
- Under Section Layout, choose either Single Column or Double Column.
Preview Module
A preview of the module is available that helps you get a quick idea of what the module will look like to users in each profile. All you have to do is select the user profile to check out the preview. Based on the preview, you can modify permissions and layout, if required.
To preview a module
- In the layout builder page, click the Preview link.
- In the pop-up that appears, select the desired profile from the Preview Layout As drop-down. You will be able to look at what the module will look like for users in the profile that you have selected.
Note
- Availability of custom modules for a user is subject to the Zoho CRM Edition that the user is part of. See Custom Modules Limits to check limits for your Edition.
- The Field Properties of default fields of custom modules as well as standard modules are not editable. For all other custom fields which you create from the New Fields Tray, the Field Properties are editable.
- The Default Field Name label of the custom module is editable.
Customize the Meetings Module
The Meetings page layout is different from the other modules' page layout but you can still add or remove fields, rearrange the fields and mark them as mandatory. The following three links provides the options to edit the layout of the meeting related details:
- Create - Creating a meeting requires you to fill up a form. The form lists some fields that can be customized. You can change the order of the fields, give colors to the picklist values, remove fields that are not required and also mark them as mandatory.
- Quick View - While viewing a meeting in your calendar, you can choose to have a quick glance at only the most important information about the meeting. That can be defined here in the Quick View.
- View - While viewing a meeting in the Meetings tab, you can rearrange the fields and add sections. You can also check out the fields used for the business card view.
Quick Edit Modules
Zoho CRM lets start edit and manage your modules right from the sidebar, instead of having to go to Setup. In the sidebar, simply hover over the module, click the More Actions (three dots) icon that appears. You can start configuring your module from here. To learn more about see: Configuration shortcuts.
Delete Modules
In Zoho CRM, the standard modules cannot be deleted but when there is a need to delete a custom module make sure that it is not linked to another module. Once you delete the custom module, you can't restore data from it. You will also be permanently deleting the following entities associated with that module:
- Created Records
- Custom Fields
- Workflows
- EmailParser Rules
- Email Templates
- Reports
- Dashboard Components
- Associated Portals Users and User Types, if any
- Associated Zia features
- Segmentation
- Scoring Rules
- Wizards
- Canvas
- Associated Appointment Records if any.
- Client Script
- Cadences
- CPQ
- Auto-Response Rule
To delete a module
- Go to Setup
> Customization > Modules and Fields.
- Under the Modules tab, point your mouse to the required module.
- Click the More icon
and select Delete from the drop-down list.
-
Click Yes, Delete now to confirm the action.
SEE ALSO