How to export modified data to the cloud database?
Let's assume you want to sync data from an on-premise PostgreSQL database table called market_leads to a cloud database table called all_leads. Let's use incremental fetch in Zoho DataPrep to sync only new and modified records to the cloud database.
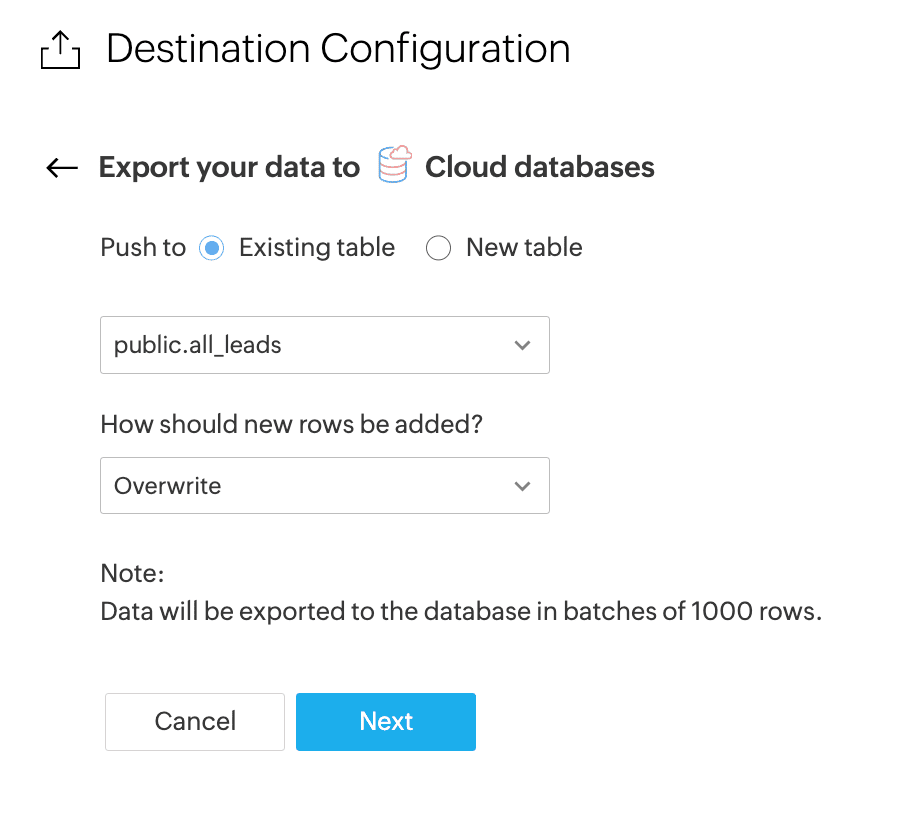
While exporting records to a cloud database, Zoho DataPrep allows you to choose how to add new rows to the table:
- Append – Adds new and modified rows to the table without removing existing rows.
- Overwrite – Replaces the existing rows in the table with the new and modified rows.
Zoho DataPrep does not update modified records in PostgreSQL when using the Append option; instead, it appends the modified rows to the destination table. This may result in duplicate records. To overcome this, please follow the solutions below:
A. No code solution
To update modified records in your cloud database, you must compare the data in the output table with the incoming data and merge the records in DataPrep, then overwrite the output table with the merged data. Here's how it works:
1. Import the source table
Import the data from the market_leads table incrementally from your cloud database into DataPrep. This is the source table that contains the new and modified lead records, which need to be merged into the all_leads output table.
2. Add a Timestamp Column
Formula transform to add a new column with timestamp:
- In the DataPrep studio page of the market_leads table, click on the Transform menu and select the Add formula option.
- Provide a name in the New column name field say ZDP_timestamp.
- Insert the current_timestamp() function in the Formula field.
- Click Apply. The output will be generated in a new column. Click here to know more about Formula functions.
3. Import the output table
Import the output table all_leads from your cloud database (e.g., PostgreSQL) into DataPrep. This data will be used to compare with the source data to identify which records are new or updated.
4. Append the tables
Now append both the tables and include the ZDP_timestamp column.
5. Deduplicate Records
Identify the duplicates from the appended dataset and remove the records with earlier or no timestamp. Use the Deduplicate transform in the DataPrep studio page.
To apply column-wise deduplication:
1. Click the Transform menu, click Deduplicate, then select Column-wise.
2. Select the ID column to identify duplicates. You can choose to ignore case and whitespace to find duplicates.
3. Choose Manual conditions and enter the conditions to keep the rows if the ZDP_timestamp column has the latest timestamp.
6. Export the merged data
Now, export the cleaned table to the existing table, i.e., All_leads master table, where all the leads data is stored in the cloud database, and choose to overwrite.
7. Check Target Matching
Add an empty ZDP_timestamp column in the destination table in the cloud database to match the target matching.
Make sure the target matching is done to avoid export failure. Click here to know more about target matching.
With this destination configuration, each pipeline run will export the complete dataset, including both newly added and modified records, and overwrite the destination table, ensuring there are no duplicates.
This ensures the master table remains up to date with the most current lead data.
B. Database solution (Pro-code solution)
This approach combines Zoho DataPrep with your Cloud Database.
- In DataPrep, you only prepare the records by adding a timestamp column and inserting them incrementally into the database.
- In the Cloud Database, you use a materialized view with window functions to return the most updated records.
This ensures your output dataset is always clean without manual inserts, updates, or deletes.
1. Prepare Data in DataPrep
a. Import the Source Table
Import the market_leads table incrementally from your cloud database (e.g., PostgreSQL) into DataPrep.
This table contains the new and modified lead records.
b. Add a Timestamp Column
In the market_leads table, add a new column (ZDP_timestamp) with the current timestamp using the Formula function. This will help you track when each new or modified record was last updated from Zoho DataPrep.
Formula transform to add a new column with timestamp:
- In the DataPrep studio page of the market_leads table, click on the Transform menu and select the Add formula option.
- Provide a name in the New column name field, say ZDP_timestamp.
- Insert the current_timestamp() function in the Formula field.
- Click Apply. The output will be generated in a new column. Click here to know more about Formula functions.
c. Export to Cloud Database
Export the table to your cloud database (eg, PostgreSQL), all_leads_raw table, using the Append option.
At this point, your table (all_leads_raw) contains multiple versions of the same record (per ID) but with different timestamps.
2. Create a clean view in the Cloud Database
Create a view all_leads_clean that always returns the latest record per ID using a window function:
- CREATE VIEW all_leads_clean AS
- SELECT id, name, modified_time, ZDP_timestamp
- FROM (
- SELECT id,
- name,
- modified_time,
- ZDP_timestamp,
- ROW_NUMBER() OVER (
- PARTITION BY id
- ORDER BY ZDP_timestamp DESC
- ) AS rn
- FROM all_leads_raw
- ) ranked
- WHERE rn = 1;
3. Query the Clean Data
When querying all_leads_clean, you’ll always get the deduplicated, most up-to-date dataset:
- SELECT * FROM all_leads_clean;
Example:
This table contains all records (including duplicates/updates) with timestamps.
id | name | modified_time | ZDP_timestamp |
1 | Alan | 2025-06-20 12:22:00 | 2025-08-10 10:15:00 |
2 | Francis | 2024-06-20 12:25:00 | 2025-08-10 10:15:00 |
3 | Dan | 2024-06-20 12:27:00 | 2025-08-10 10:15:00 |
1 | Al | 2024-06-21 01:29:00 | 2025-08-11 09:45:00 |
4 | Gaja | 2024-06-21 01:30:00 | 2025-08-11 09:45:00 |
5 | John | 2024-06-21 01:35:00 | 2025-08-11 09:45:00 |
This view returns only the latest record per ID:
id | name | modified_time | ZDP_timestamp |
1 | Al | 2024-06-21 01:29:00 | 2025-08-11 09:45:00 |
2 | Francis | 2024-06-20 12:25:00 | 2025-08-10 10:15:00 |
3 | Dan | 2024-06-20 12:27:00 | 2025-08-10 10:15:00 |
4 | Gaja | 2024-06-21 01:30:00 | 2025-08-11 09:45:00 |
5 | John | 2024-06-21 01:35:00 | 2025-08-11 09:45:00 |
For id = 1, only the latest record (Al with the most recent ZDP_timestamp) is kept.