Shopify
Use Case:
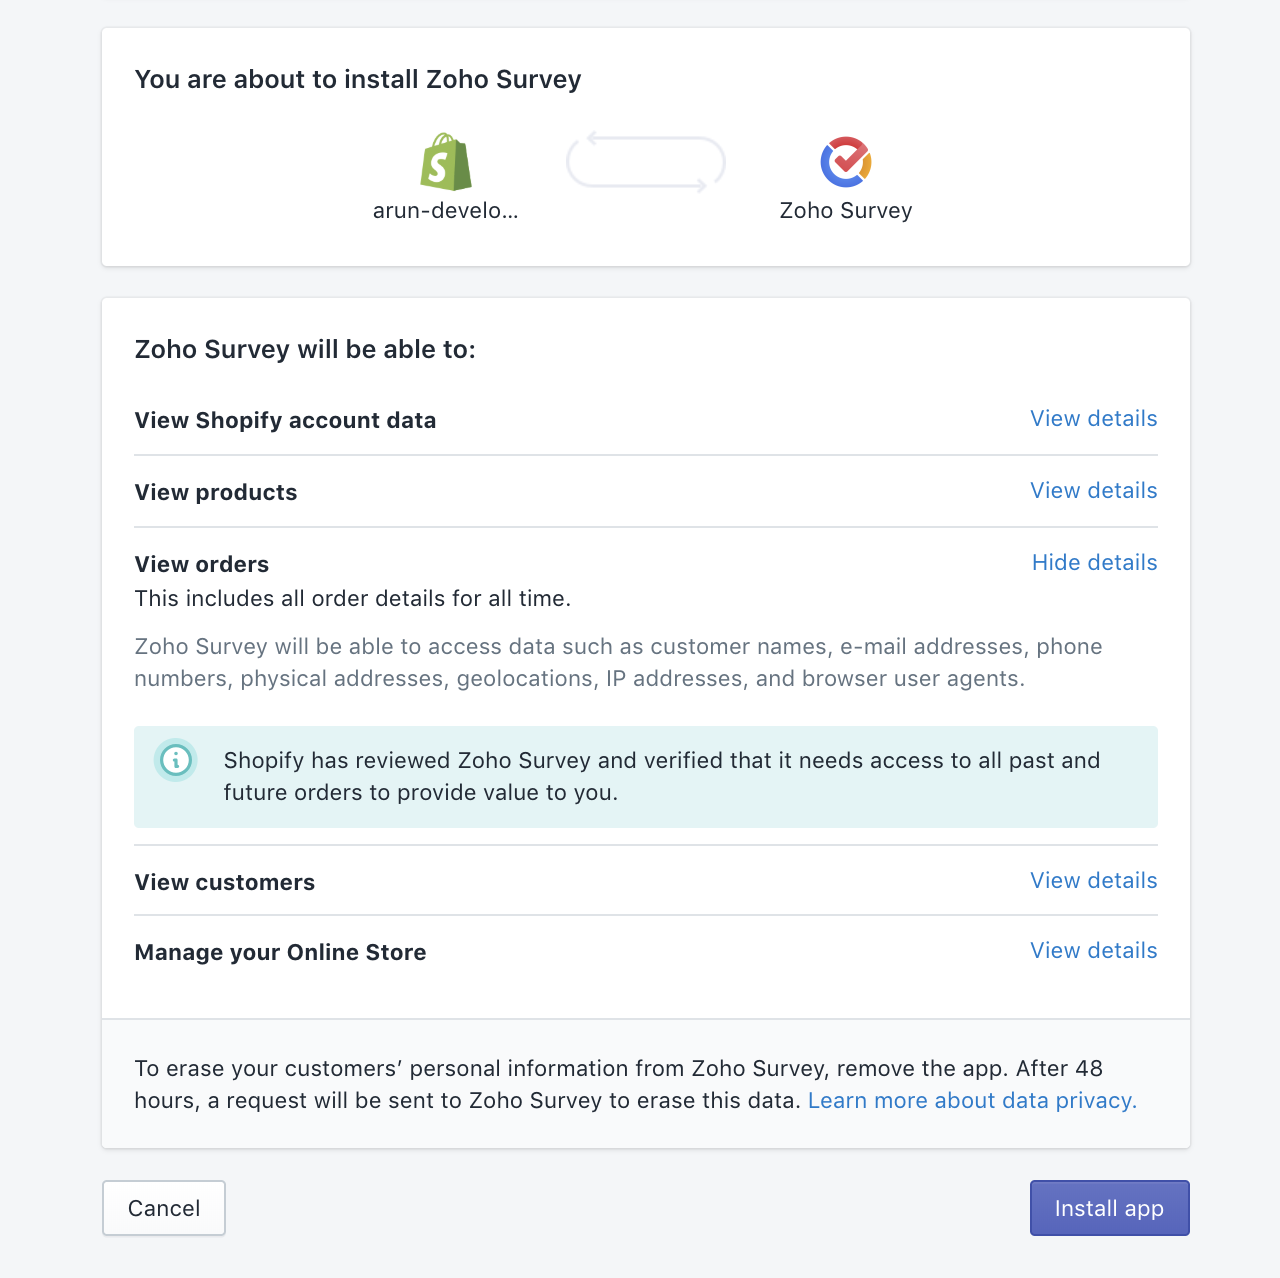
To install the Zoho Survey app in your Shopify account:
- Log on to your Shopify account.
- Search for Zoho Survey in the Shopify App Store.
- Click Zoho Survey.
- Click Add App.
- Click Install app.
To send out a survey to your Shopify users:
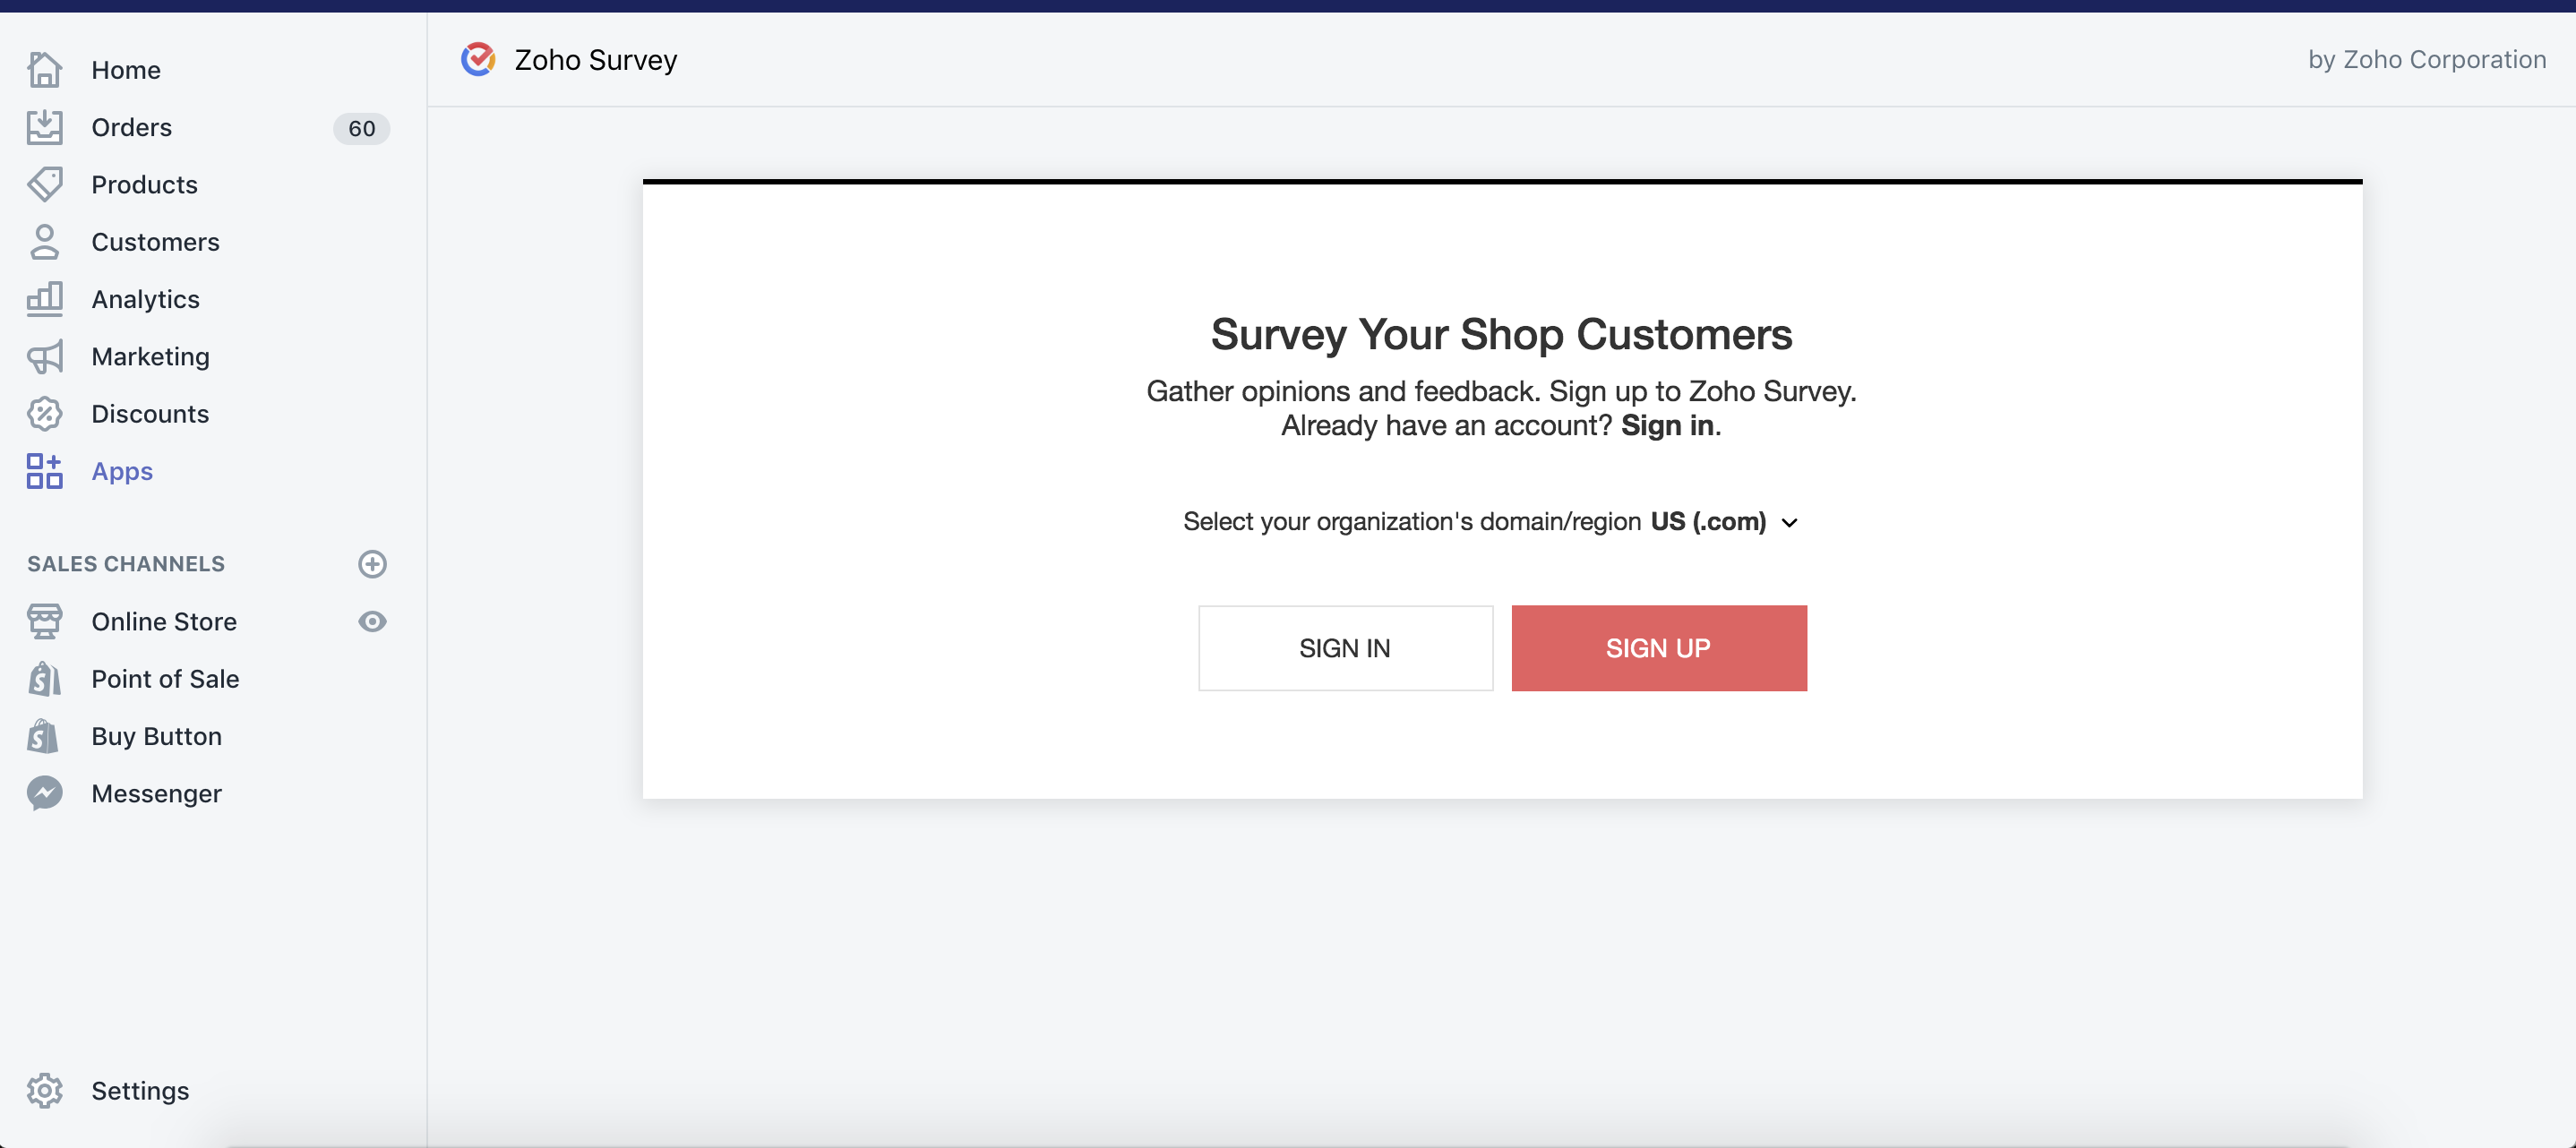
- Log in to your survey app using your Zoho account. If you don't have a Zoho account already, sign up to use the app.
- Click Create New after opening the Zoho Survey app.
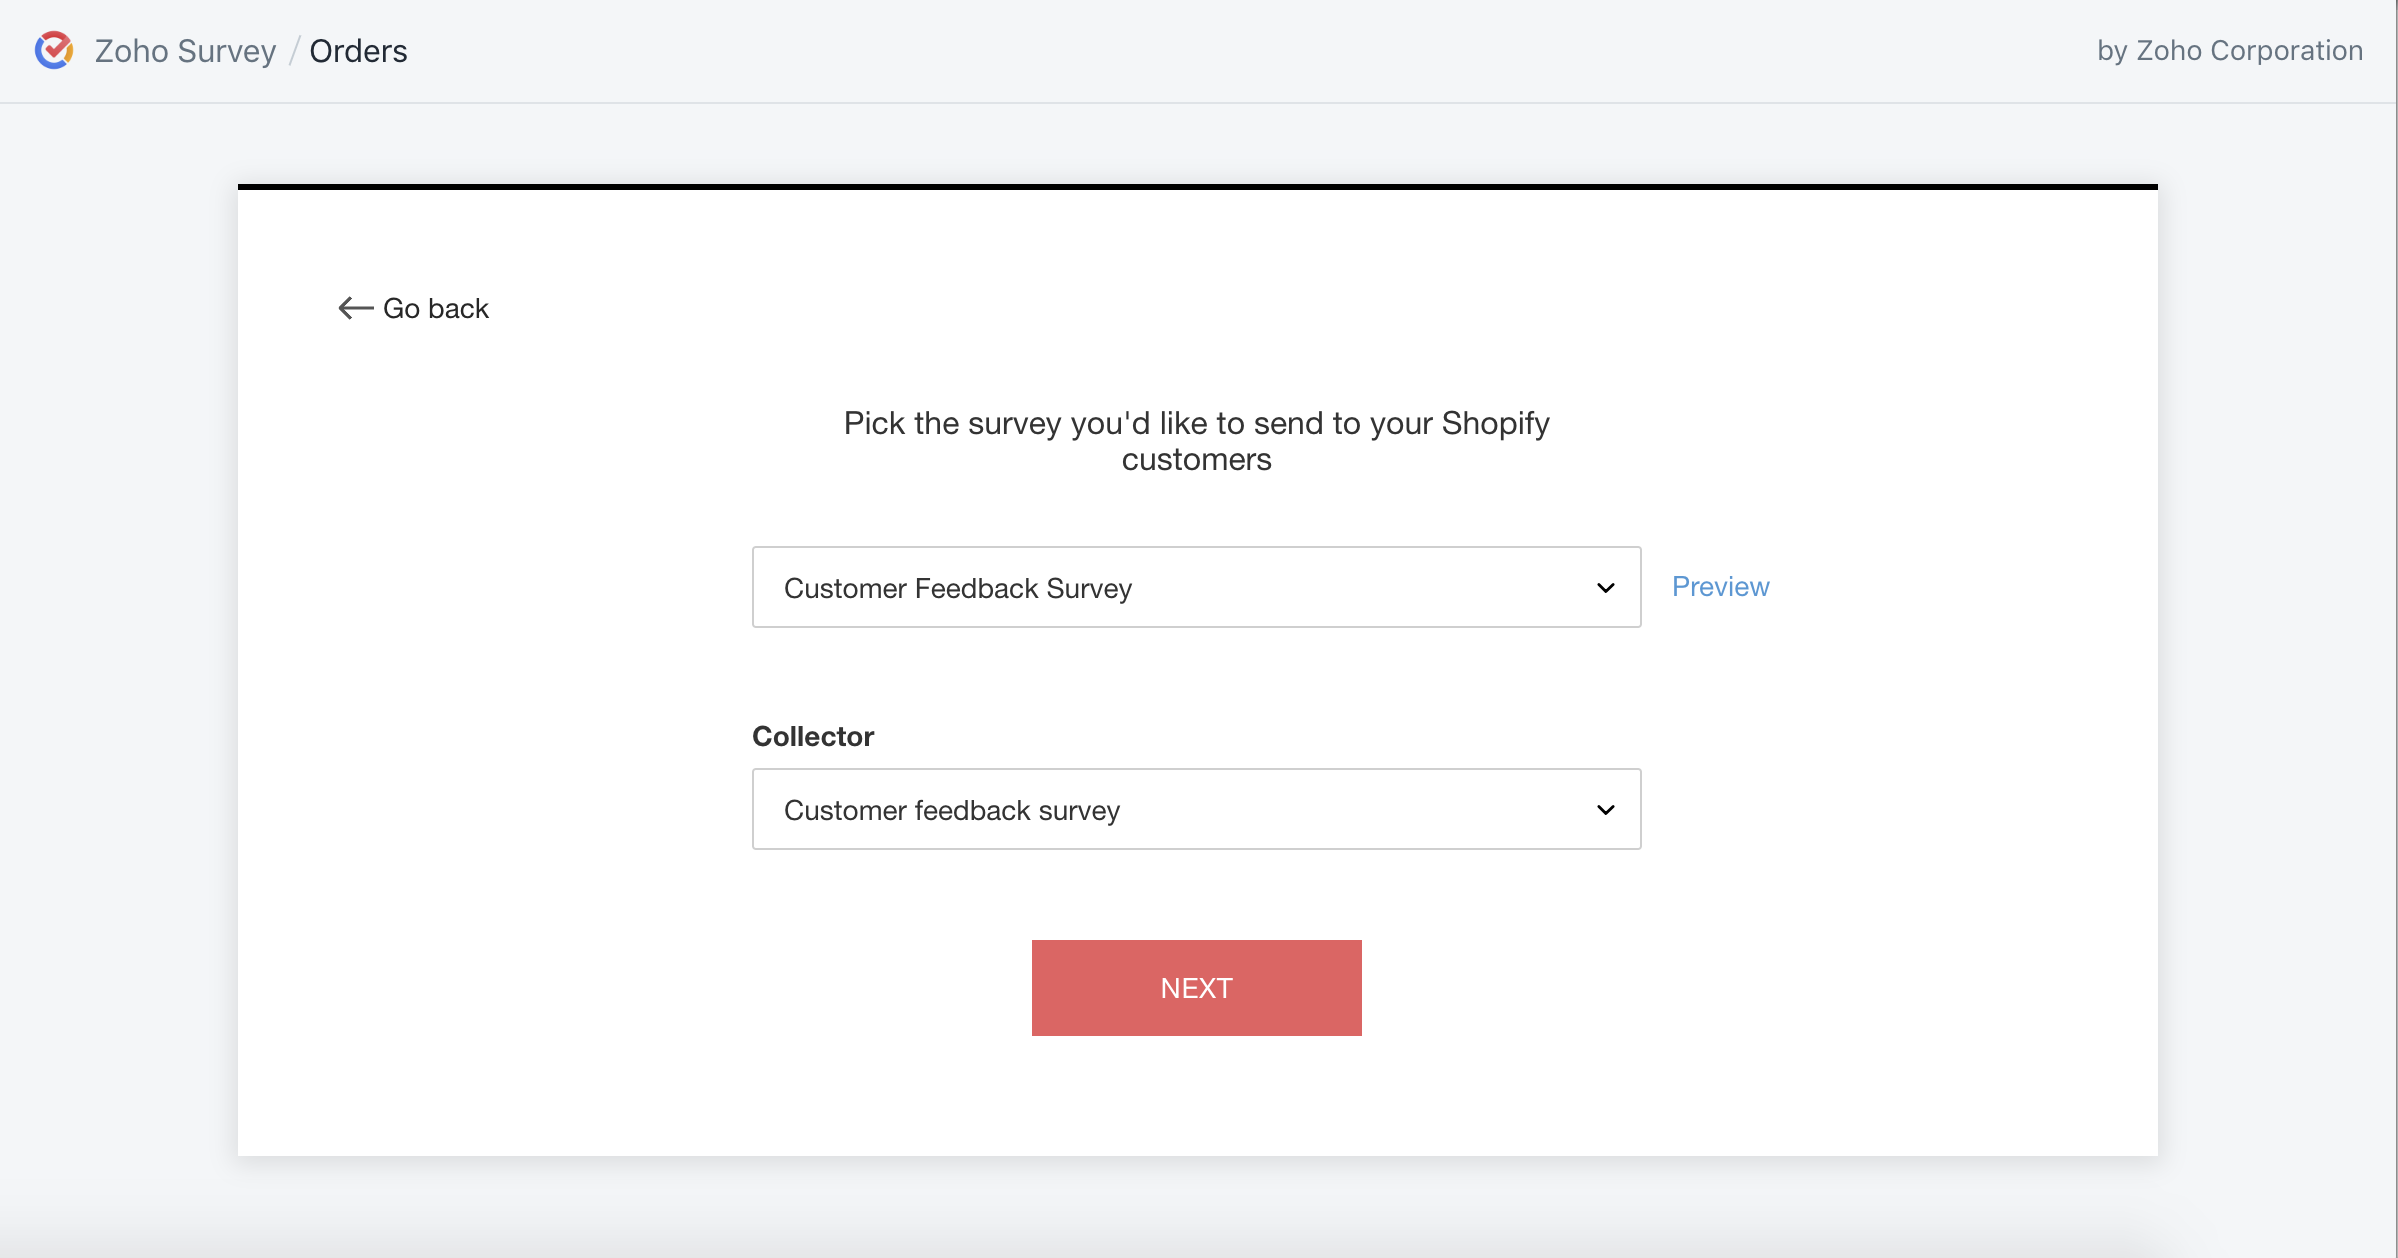
- Select the survey you want to send from the Select a Survey dropdown list.
- Select a collector from the Collector dropdown list.
- Click Next.
- Click on the Templates dropdown.
- To select an existing email template, click on Select an existing email template. Select a template and click Use Template.
- To save the current template for future use, click Save as template. From here, you can choose to overwrite an existing email template or create a brand new template.
- Enter the subject of your email in the Subject textbox. You can insert variables by clicking Insert Variable.
- To edit the email contents, click on Edit Message.
- From here, you can edit the Header, Body, and Survey Link sections. Enter the title in the Title Name textbox.
- Click the Background Color and Font Color palettes in the Header section to adjust the colors of the template.
- Enter the body of the email in the Rich Text Editor.
- Set the survey link display type to Button format or Question Embed format.
- If you choose Button:
- Enter the button label in the Button Label textbox.
- Click the Background Color and Font Color palettes in the Button section to adjust the colors of the button name.
- If you choose Question Embed:
- Choose the question to be embedded in the dropbox.
- Add a URL parameter by clicking + Add Parameter. Enter the URL and select a value. Click + to add more parameters and X to delete a parameter.
- Click the Select Value dropdown and select a value. Similarly, you can insert a direct value as a respondent variable. For example, type "Organization" and under Select Value, click Param-Value and enter "XYZ Inc." Make sure you have created a corresponding custom variable for "Organization" in the survey.
- Select Show "Powered by Zoho Survey" in the footer preferences if you wish to display the message.
- Click OK.
- Click Next.
- Enter the sender's name in the Sender Name textbox.
- Choose the "from" email address from the From dropdown.
- Choose the replying email address from the Reply to dropdown and click Next.
- Select your recipients from the Select your Recipient dropdown list. The recipient list is categorized byusers' attending status and ticket type. If you haven't yet added any attendee email addresses, please add them and refresh the page to proceed.
- Click Next.
- To send the email immediately, click SEND NOW under Immediately.
- To schedule the email, click SCHEDULE under At Scheduled Time. You can choose the date and time from their respective dropdowns to schedule the email.
- Select Send Periodically to send the email regularly over a defined period and set the interval. Set the start and end date on the Start Date and End Date calendars respectively.
- Click the Set Interval dropdown to select the interval and time at which the email invite should be sent out.
- If you want to set a custom interval, click Custom Interval and select the interval and date from the dropdown.
- Click Schedule.
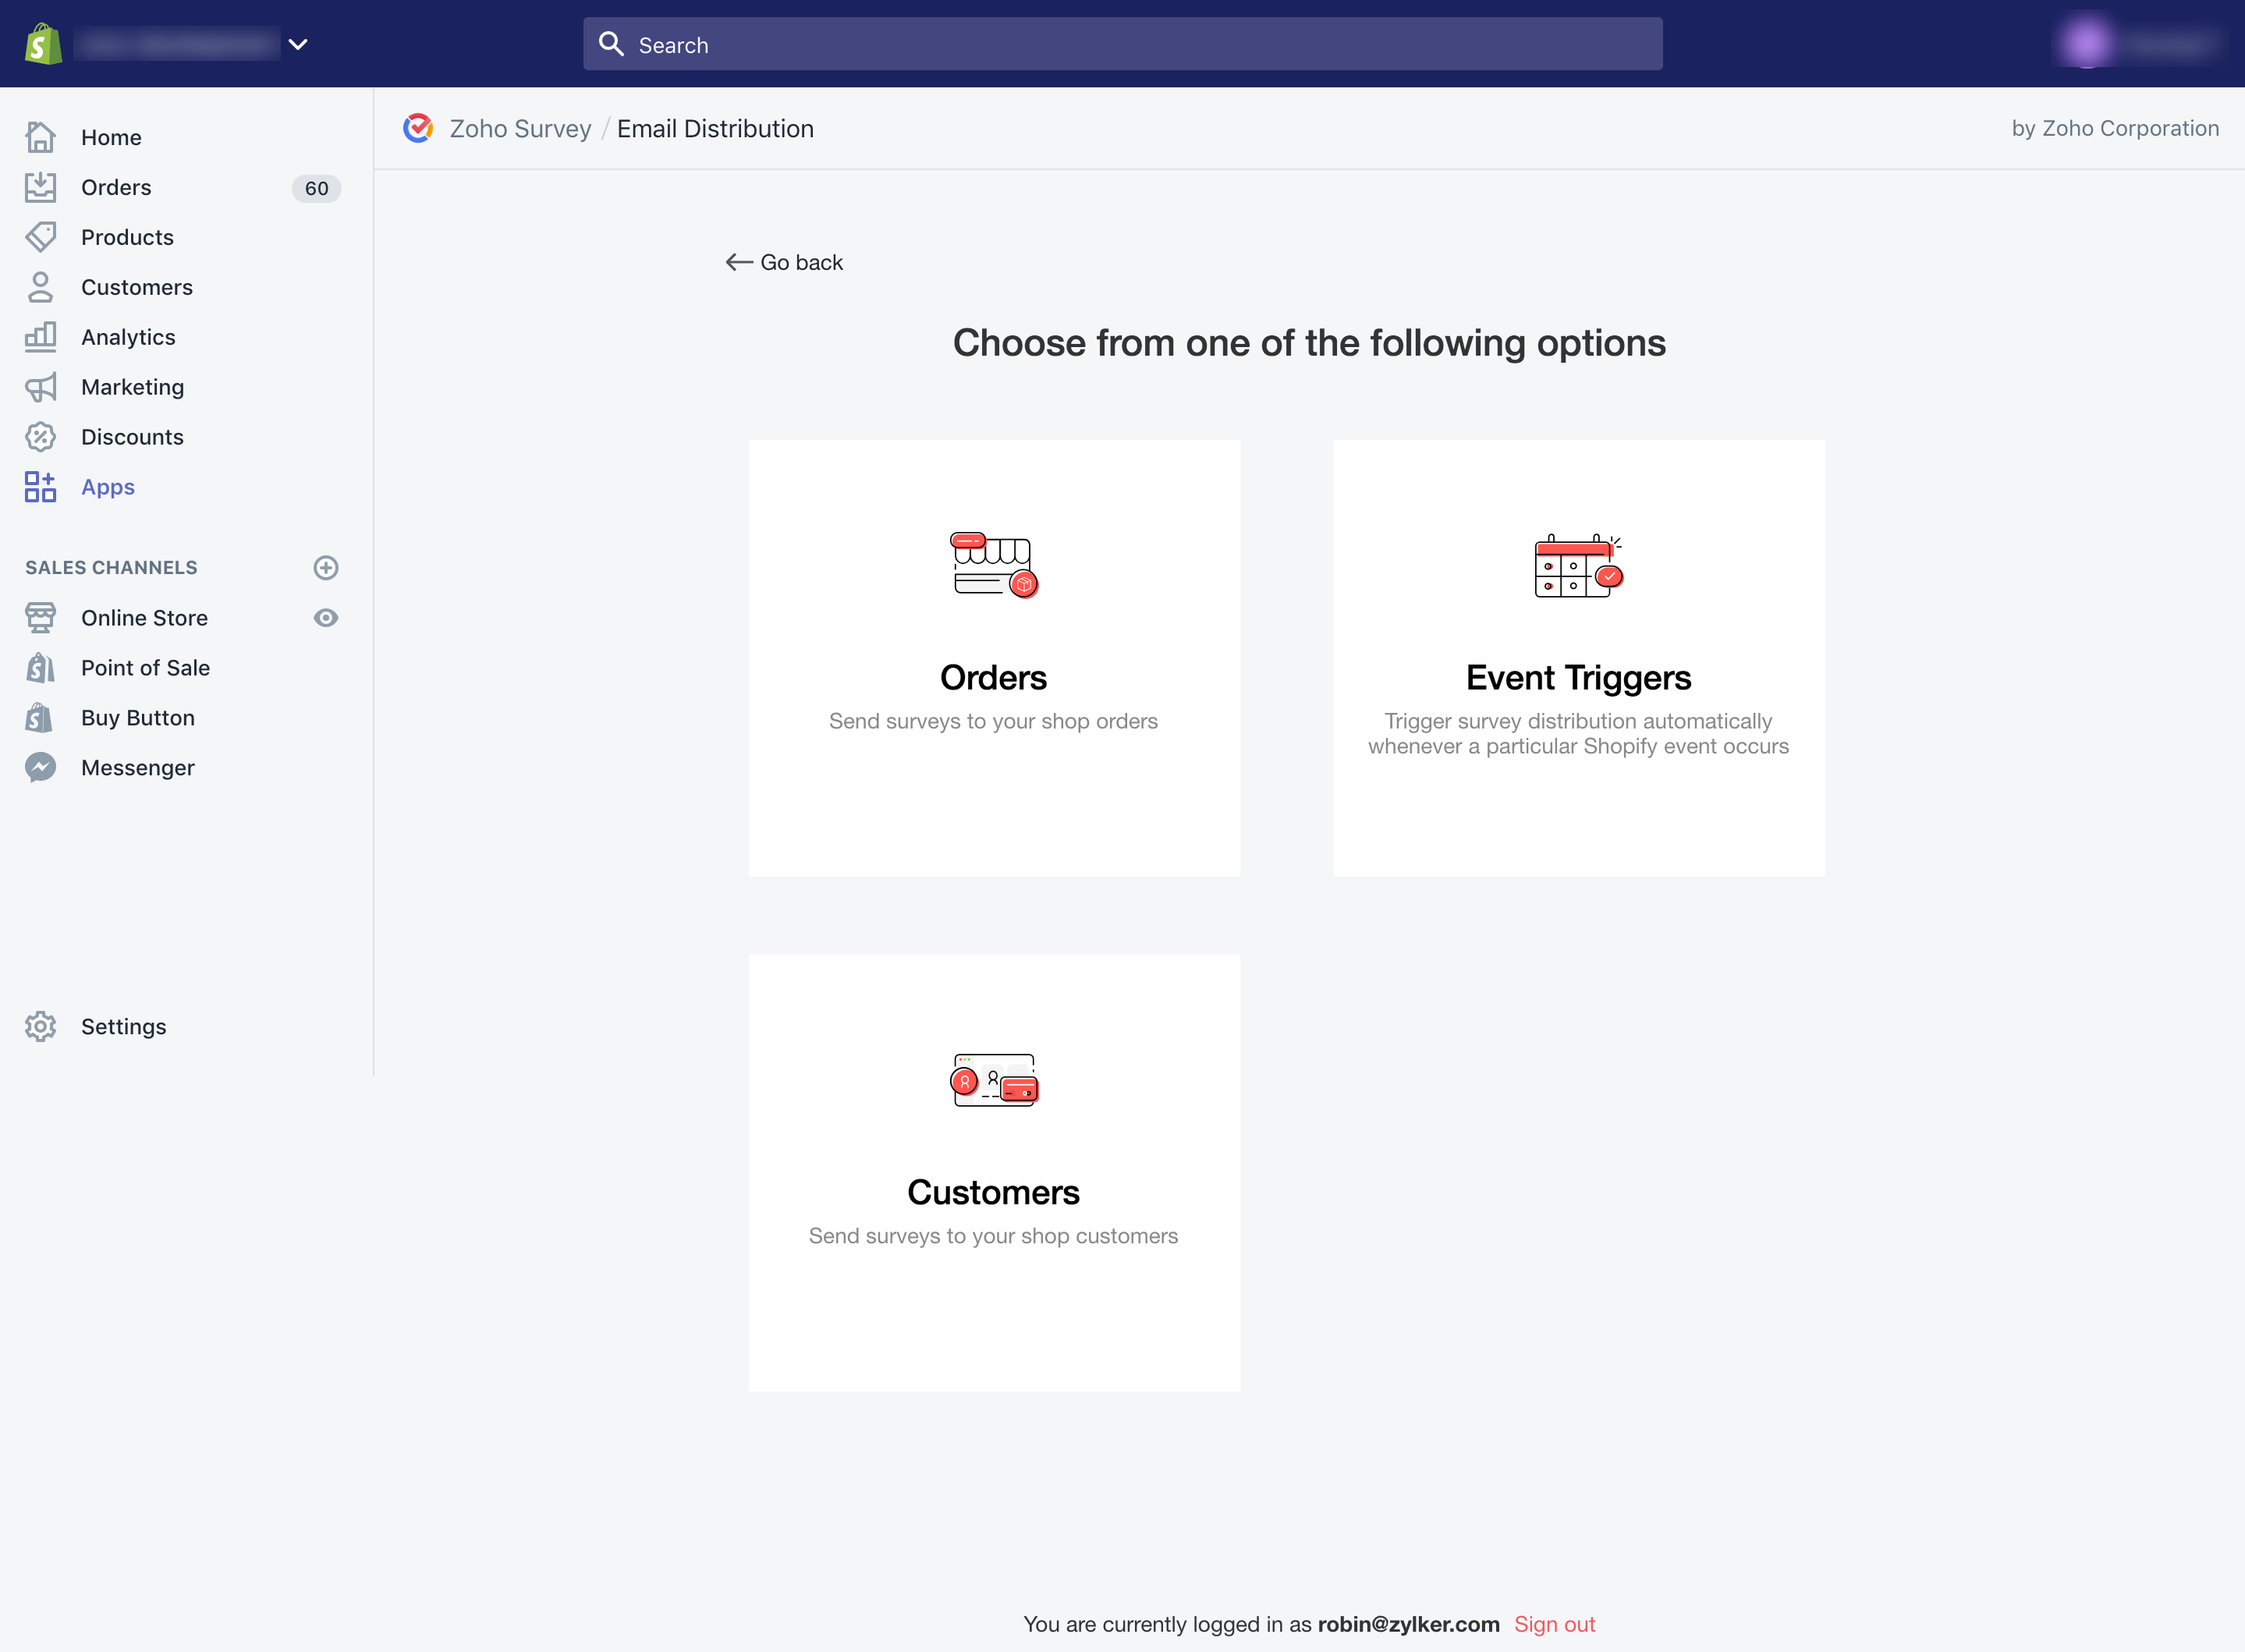
To send out a survey through email distribution:
- Click Email Distribution. Select Orders to send out order-specific and product-specific survey,or Customers to send surveys to a particular customer.
- Click Event Triggers to trigger a survey when a particular Shopify event occurs.
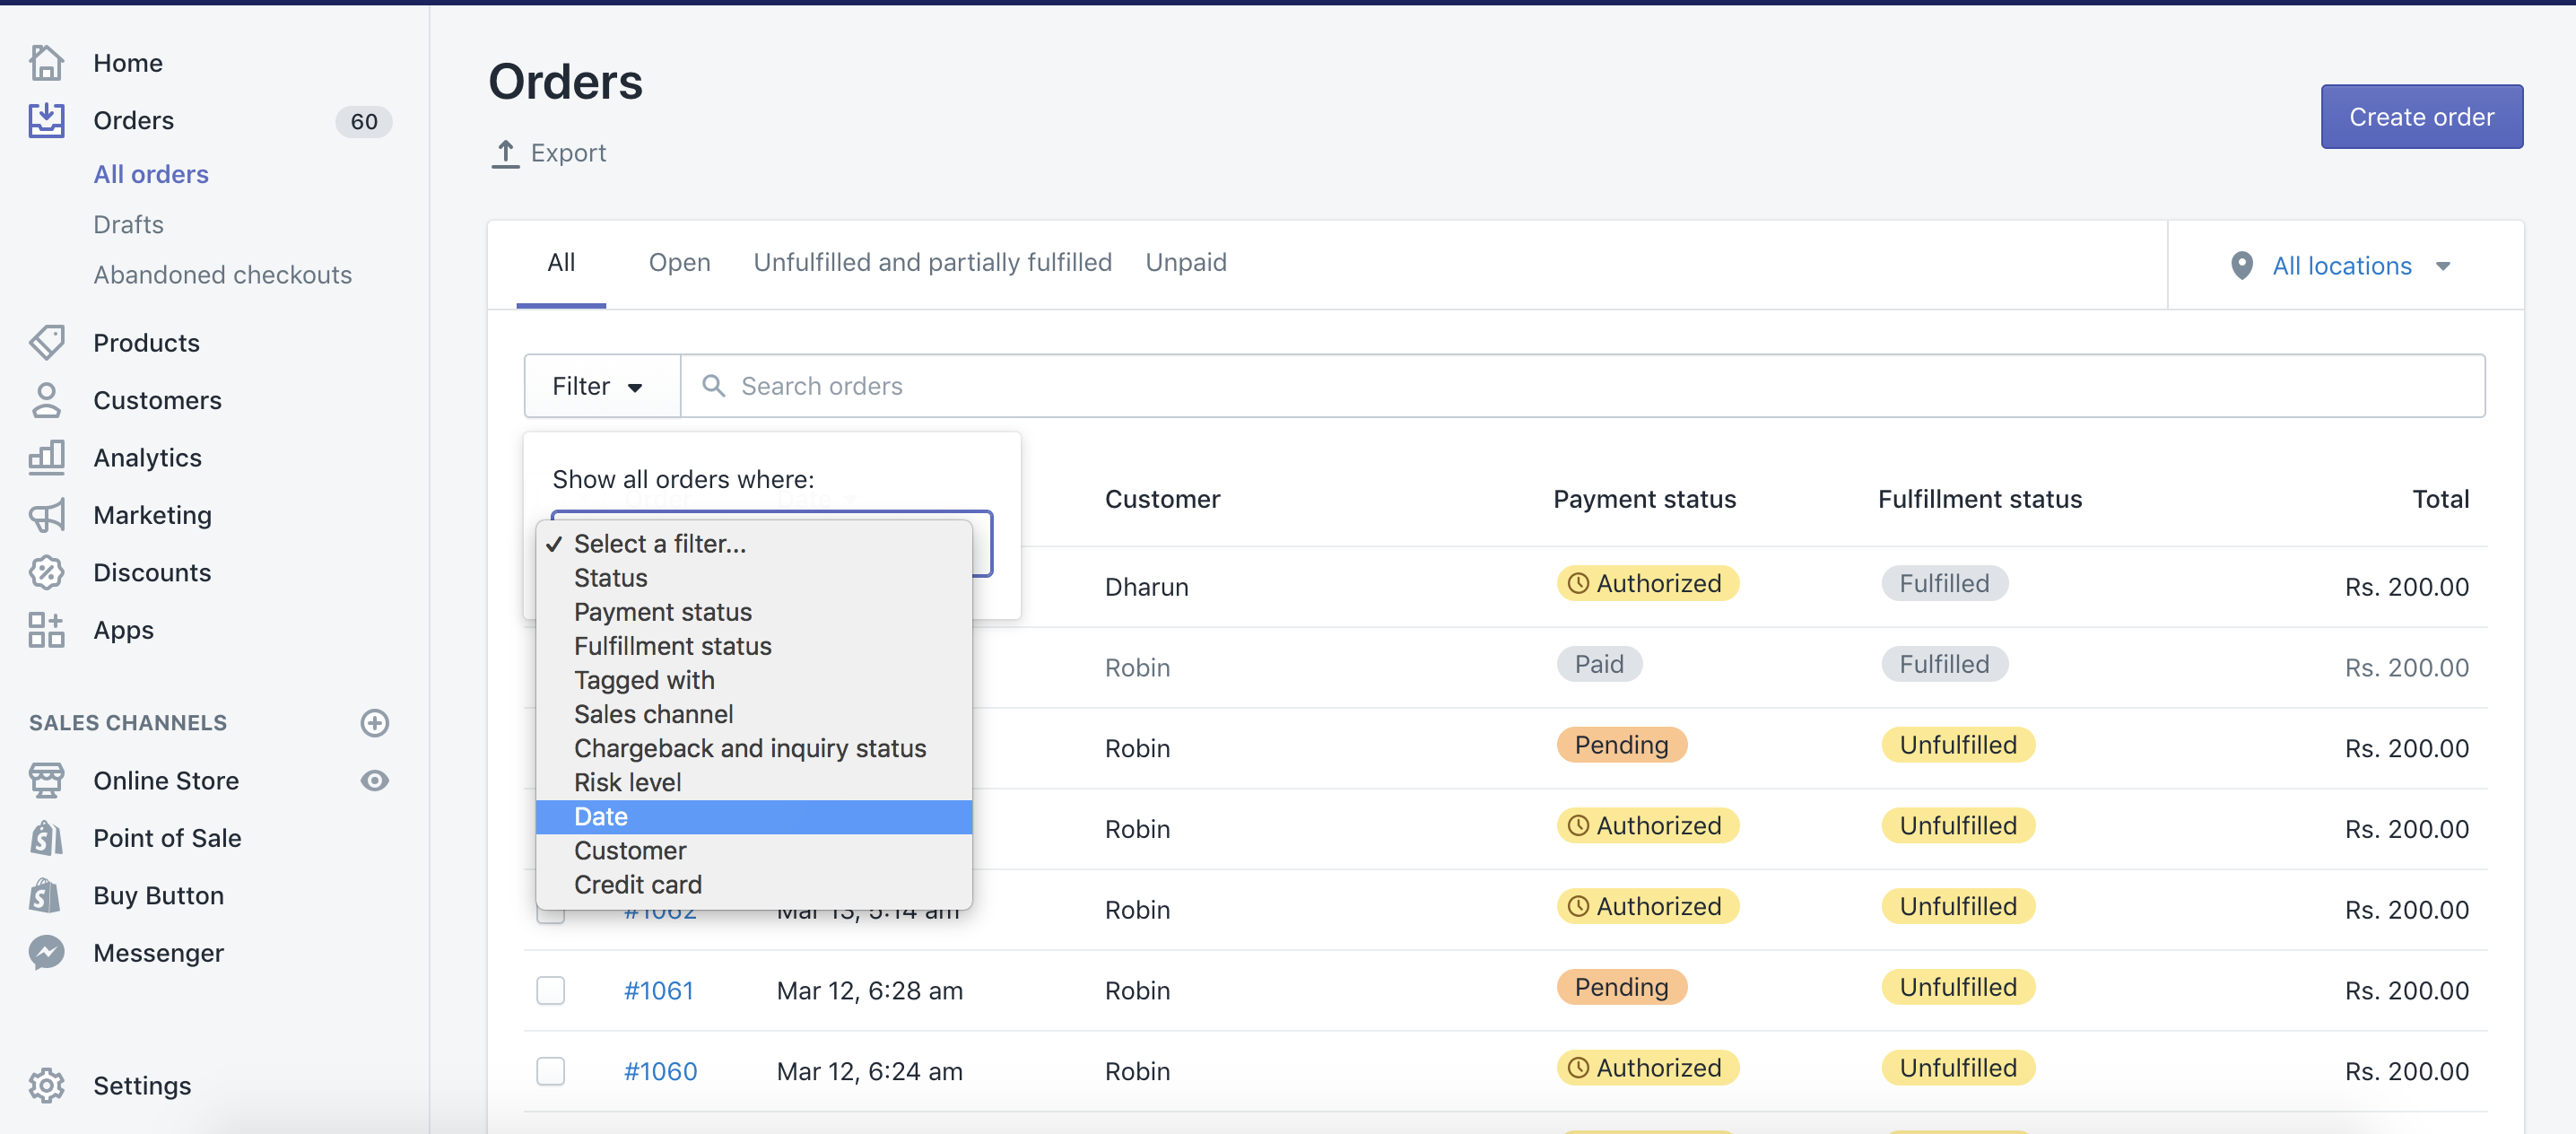
- Select an order. You can filter the orders based on various parameters.
- Click Actions, then select Send Survey.

- Select a survey to send by clicking the Select a Survey dropdown.
- To view the survey, click View.
- Select a collector in the Select a Collector dropdown list.
- Click Next.
On the Compose Email screen, click the Templates dropdown.
To select an existing email template, click Select an existing email template. Choose a template and click Use Template.
To save your current template for future use, click Save as Template. From here, you can choose to overwrite an existing email template or create a brand new template.
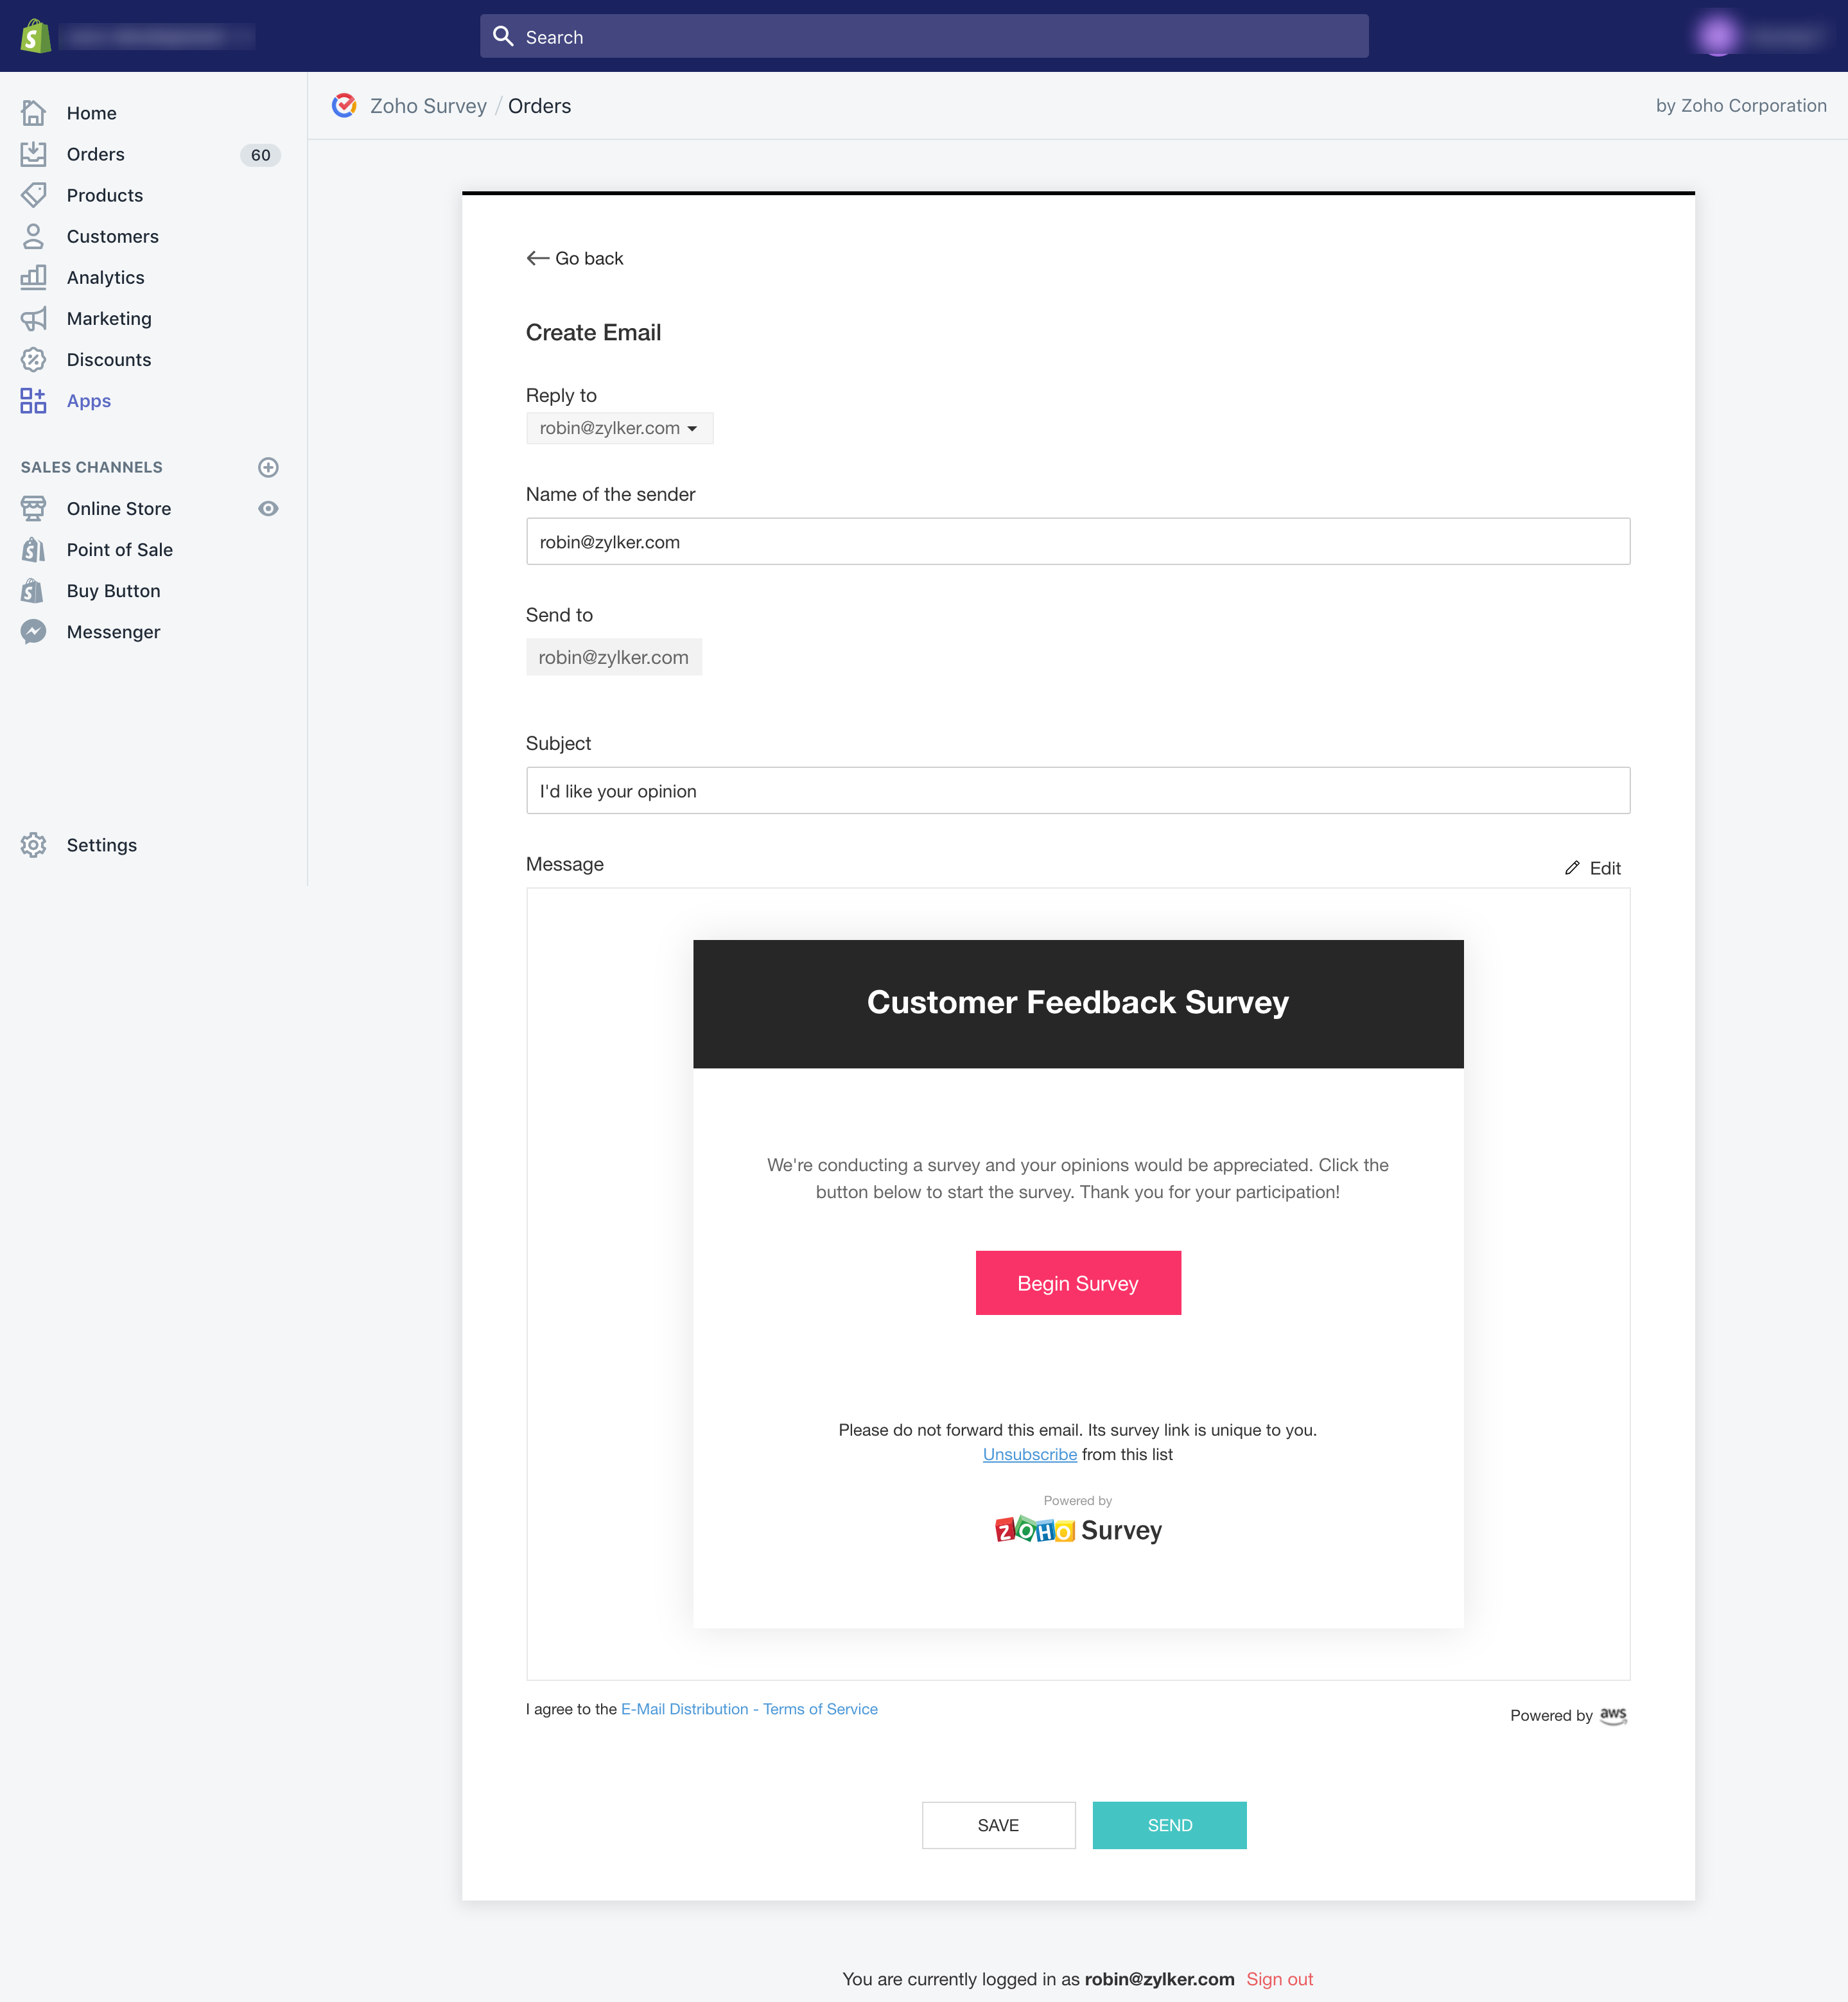
- Enter the subject of your email in the Subject textbox. You can insert variables by clicking Insert Variable.
To edit the email contents, click on Edit Message.
From here, you can edit the Header, Body, and Survey Link sections. Enter a title in the Title Name textbox.
Click the Background Color and Font Color palettes in the Header section to adjust the colors of the template.
Enter the body of the email in the Rich Text Editor.
Set the survey link display type to Button format or Question Embed format.
If you choose Button:
Enter the button label in the Button Label textbox.
Click the Background Color and Font Color palettes in the Button section to adjust the colors of the button name.
If you choose Question Embed:
Choose the question to be embedded in the dropbox.
Add a URL parameter by clicking + Add Parameter and select the value. You can insert the respondent variable from Shopify into your survey. Click + to add more parameters and X to delete a parameter.
Type a name. If, for example, you want to track the respondent's name, you can append the Product Name and Order Name to the URL, or display these variables in your customized message.
Click the Select Value dropdown and choose a value. Similarly, you can insert a direct value as a respondent variable. For example, type "Organization" and under Select Value, click Param-Value and enter "XYZ Inc." Make sure you have created a corresponding custom variable for "Organization" in the survey.
Select Show "Powered by Zoho Survey" in the footer preferences if you wish to display this message.
Click OK.
Click Next.
Enter the sender's name in the Sender Name textbox.
Choose the "from" email address from the From dropdown.
Click Next.
The email addresses selected from the Orders section will be displayed in the Send To section.
Click Next.
To send the email immediately, click SEND NOW under Immediately.
To schedule the email, click SCHEDULE under At Scheduled Time. You can choose the date and time from their respective dropdowns to schedule the email.
Select Send Periodically to send the email regularly over a defined period and set the interval. Select the start and end date from the Start Date and End Date calendars respectively.
Click the Set Interval dropdown to select the interval and time at which the email invite should be sent out.
If you want to set a custom interval, click Custom Interval and select the interval and date from the dropdown.
Click Schedule.
Note |
You can add up to 1000 email addresses per batch in an email campaign i.e. you can send 1000 emails at a time. |
To track your survey:
- Click the survey you want to track from the list of published surveys.
- Click Overview to view the following details.
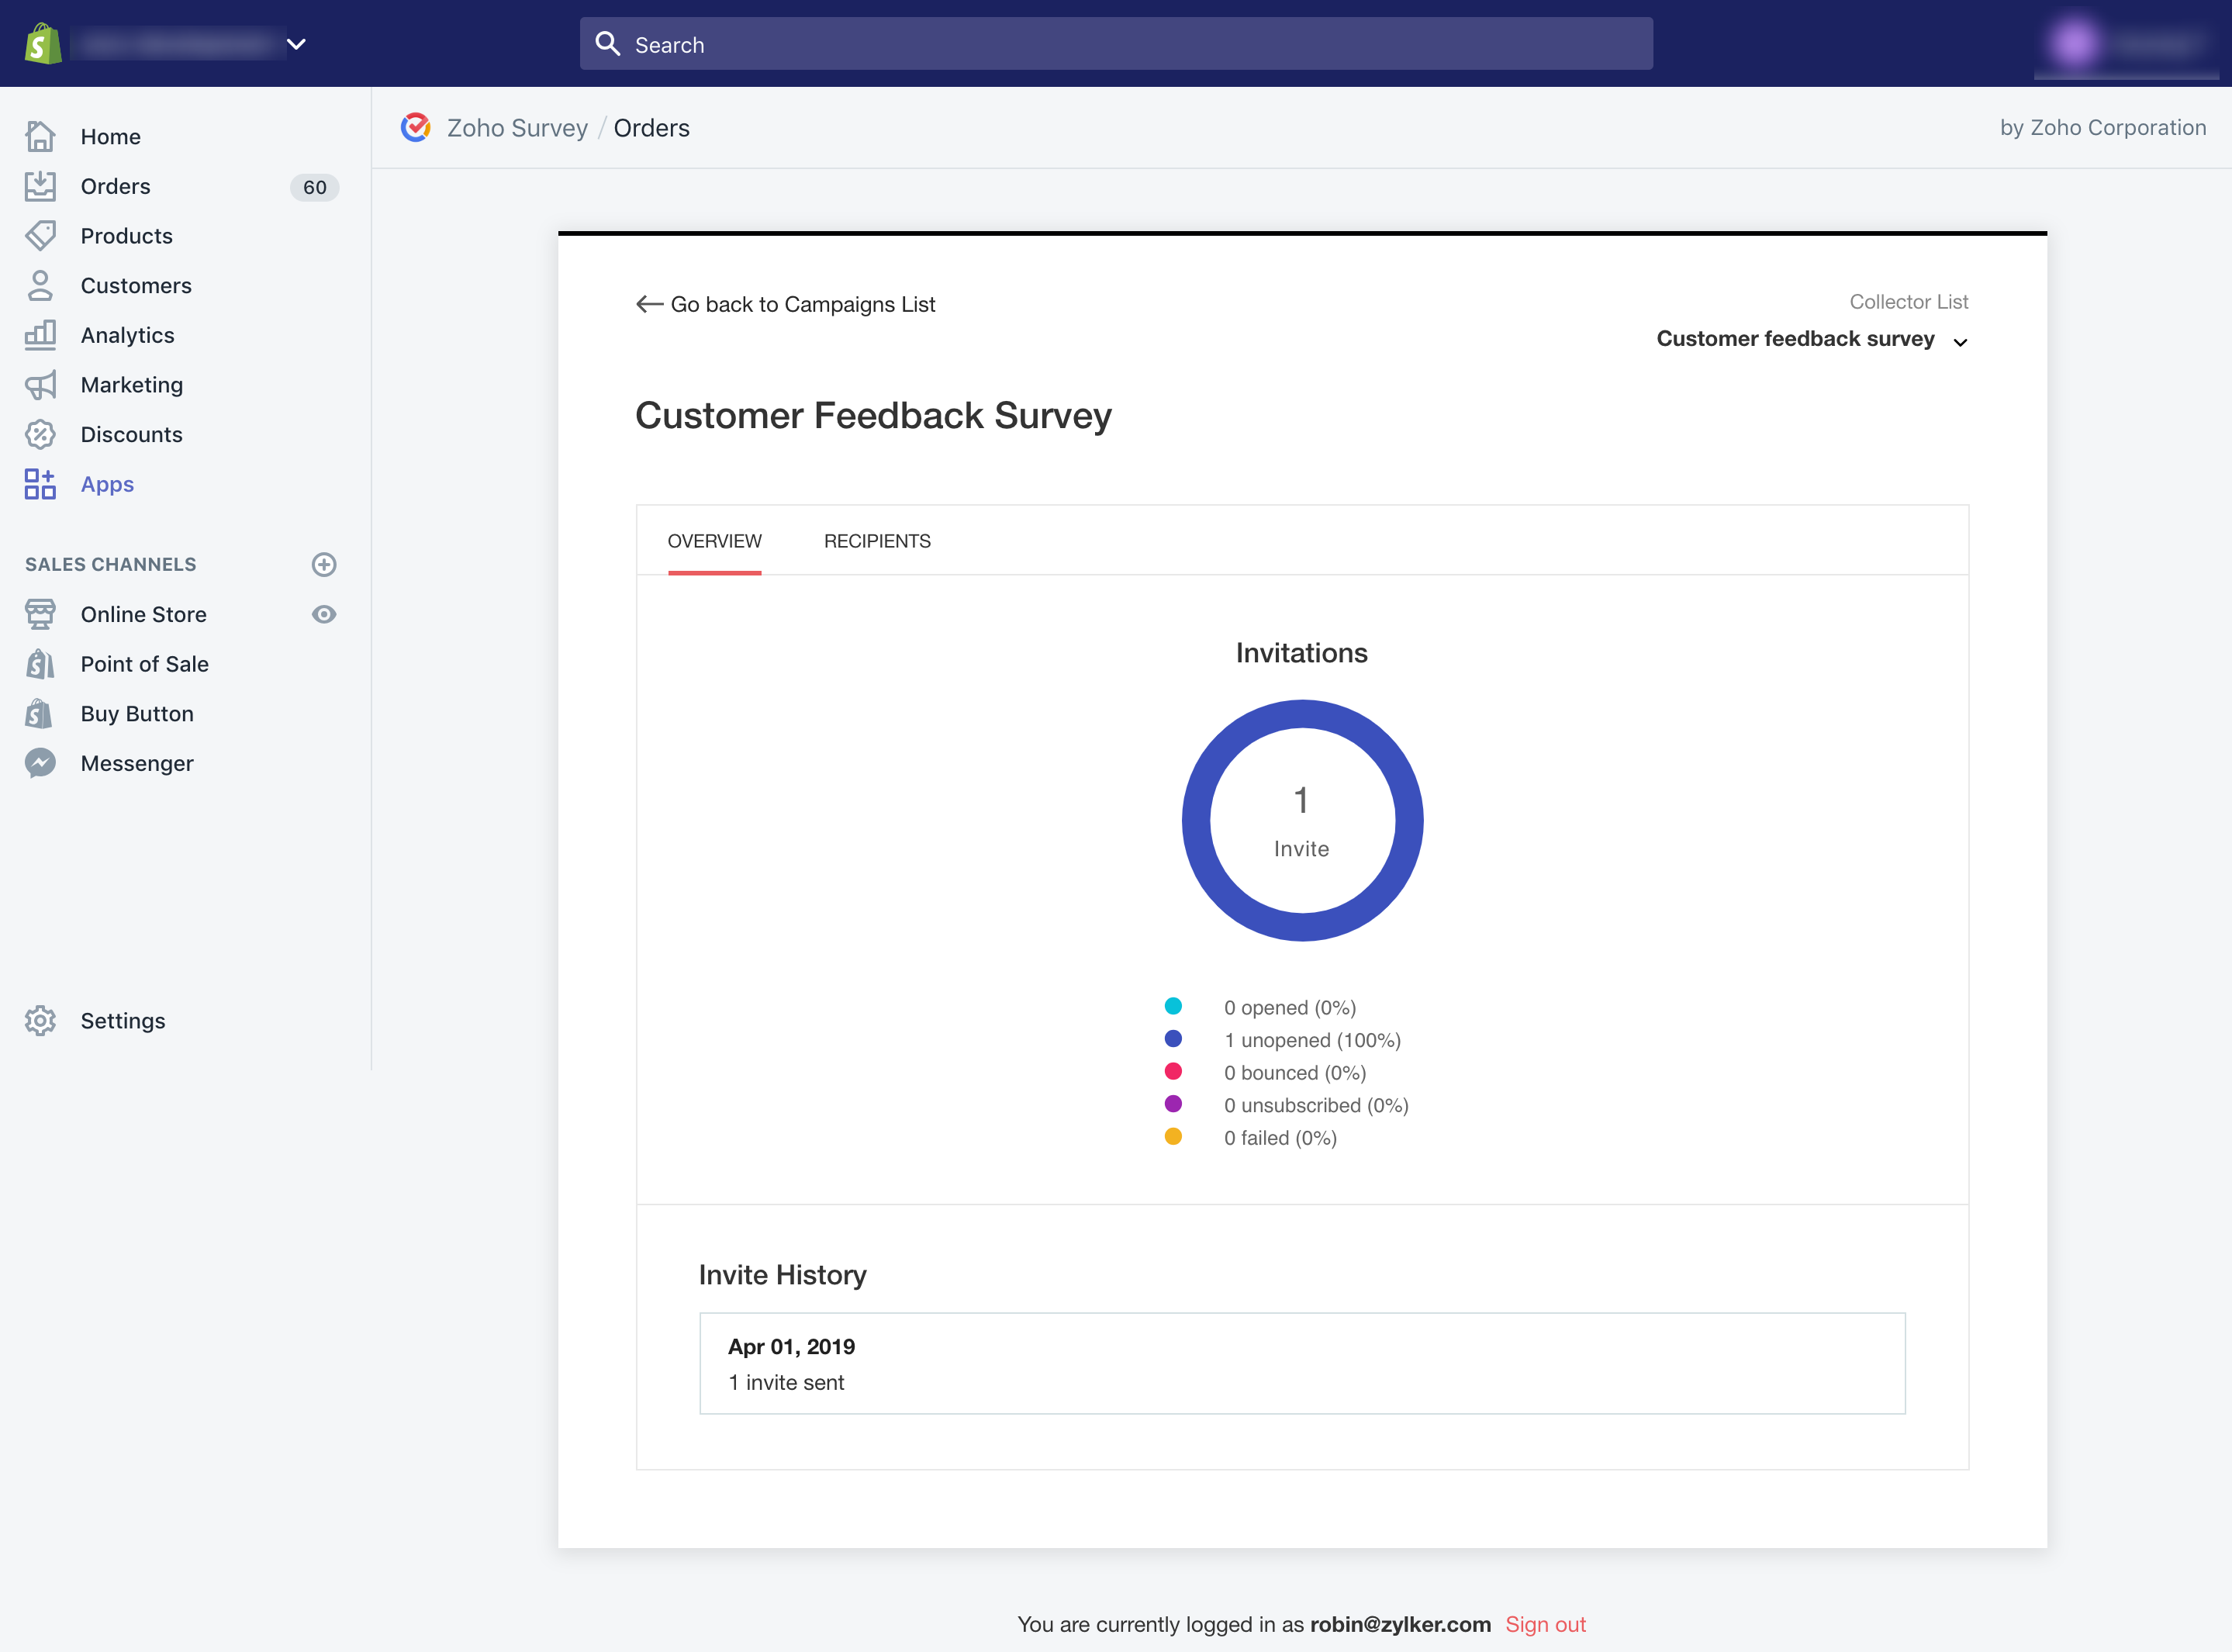
- Invitations - Displays the details of how many of your respondents have opened your invite, how many are yet to open it, if any email has been scheduled or bounced, or if someone has unsubscribed from your invite.
- Collector list - Shows the collector from which the survey has been sent. You can also see the list of collectors here.
- Responses - Displays the total number of responses, and the details of completed, partial, and disqualified responses.
- Invite History - Displays the date and other details of each invite. Click View for a detailed history. You can also send reminders here.
- Click Recipients to see the following details.
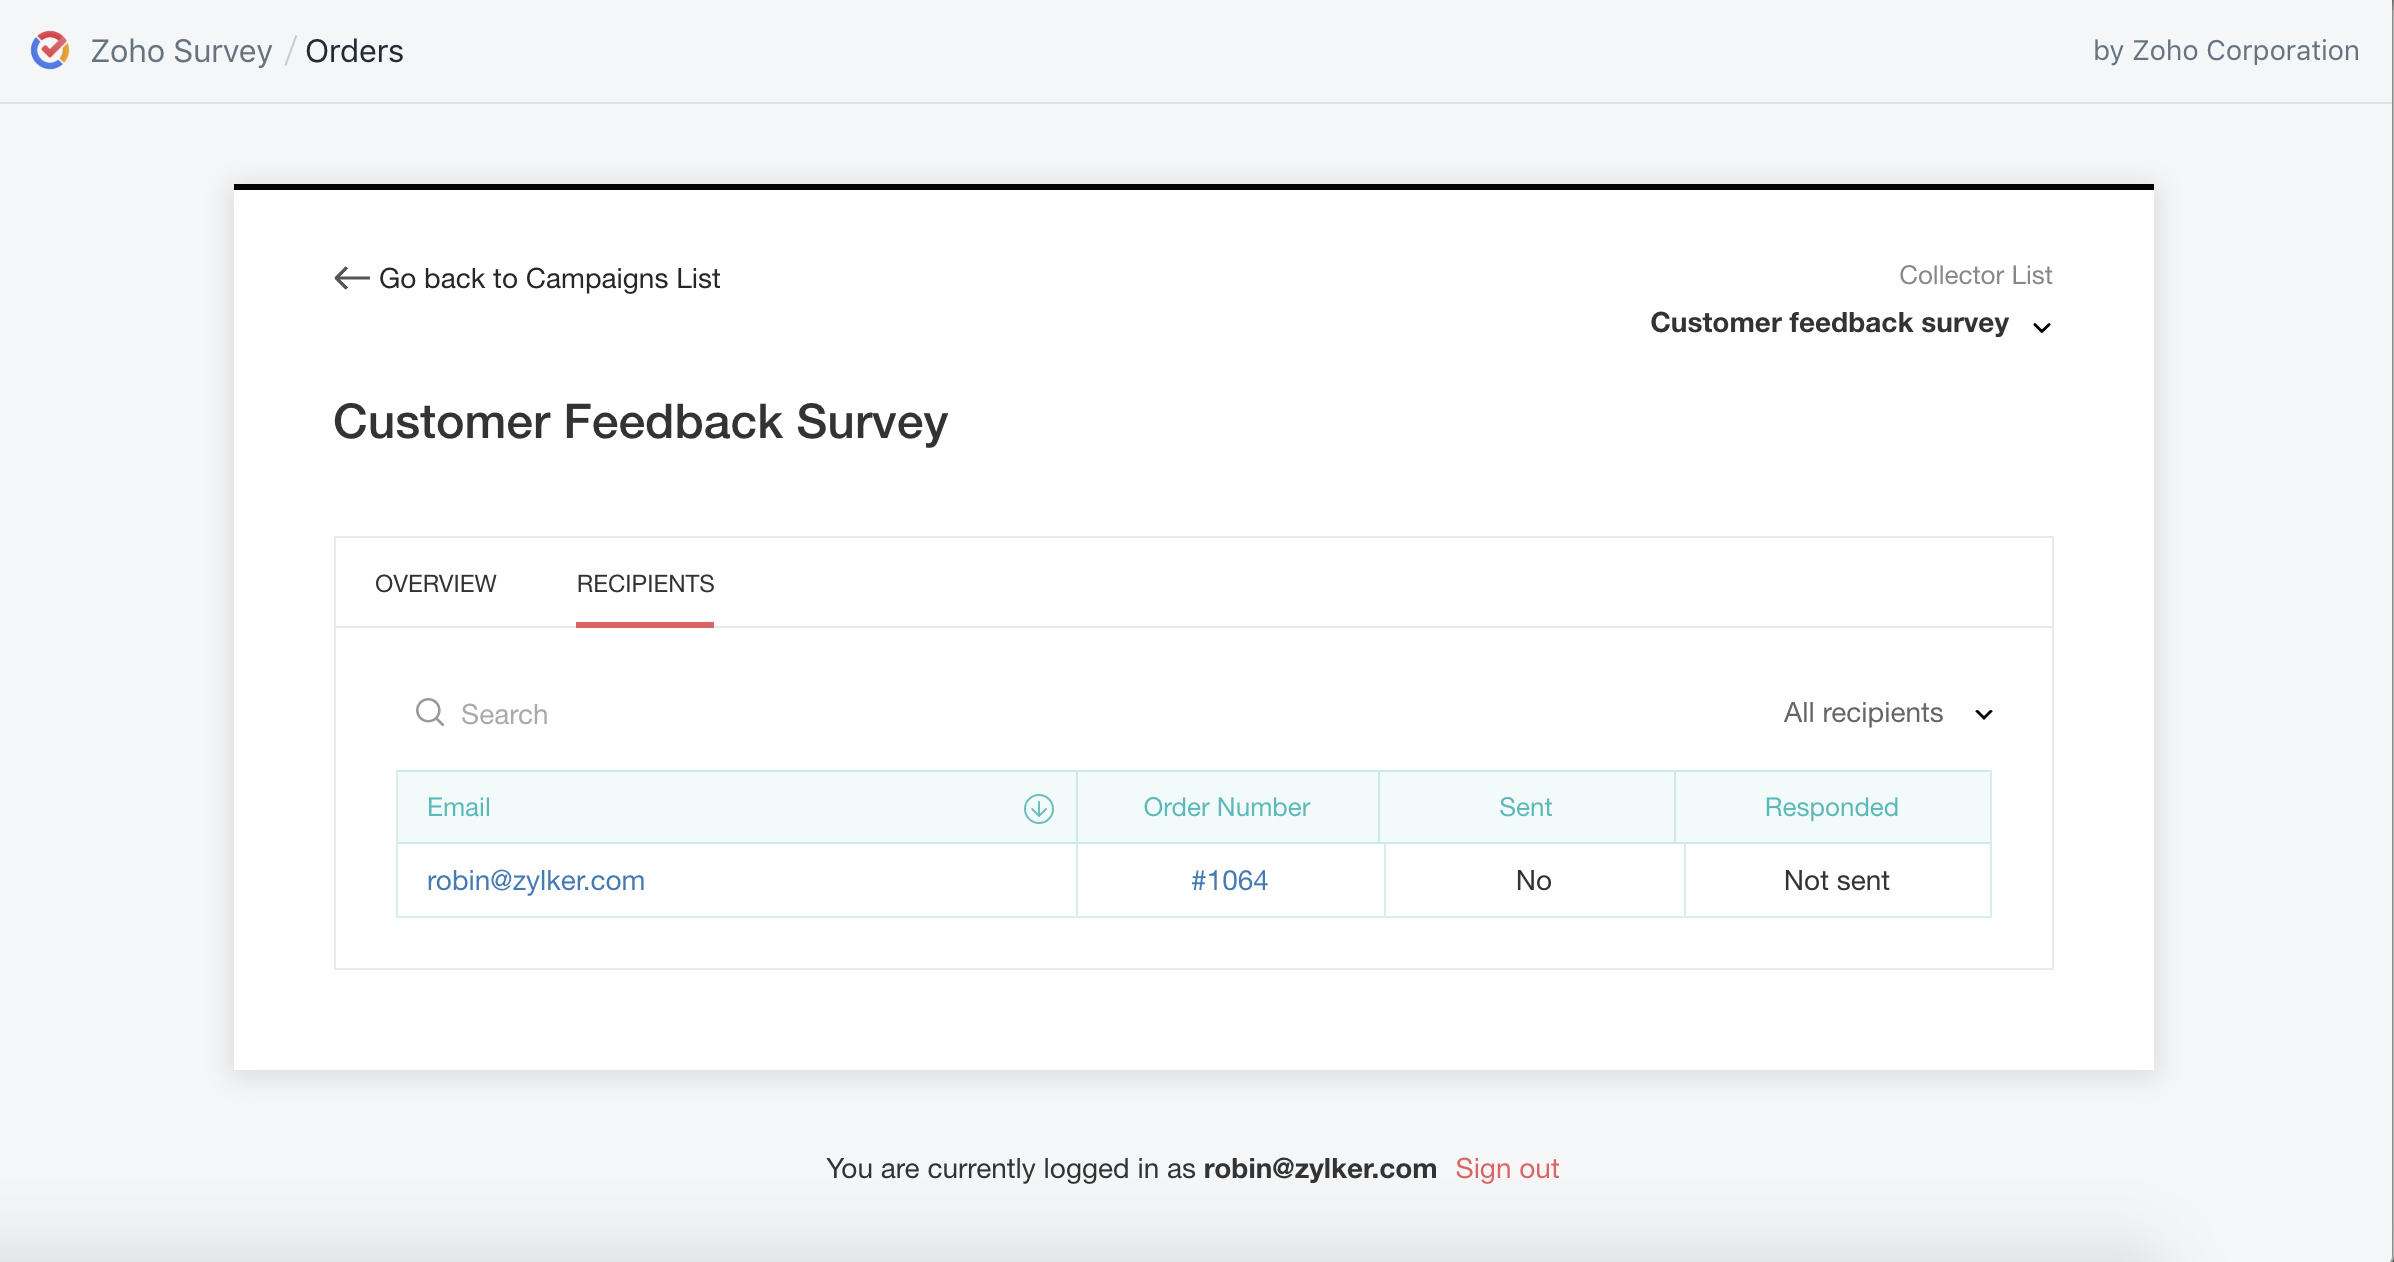
- Search Recipients - Search for a recipient by using keywords.
- Email - Displays email addresses of the customers.
- Order Number - Displays the order numbers.
- Sent - Displays whether your invite has been sent.
- Responded - Displays the response status of your survey. If they have responded, click View Response. This will take you to the reports section, where you can see the responses in detail. You will also be able to track the respondent variables applied here.
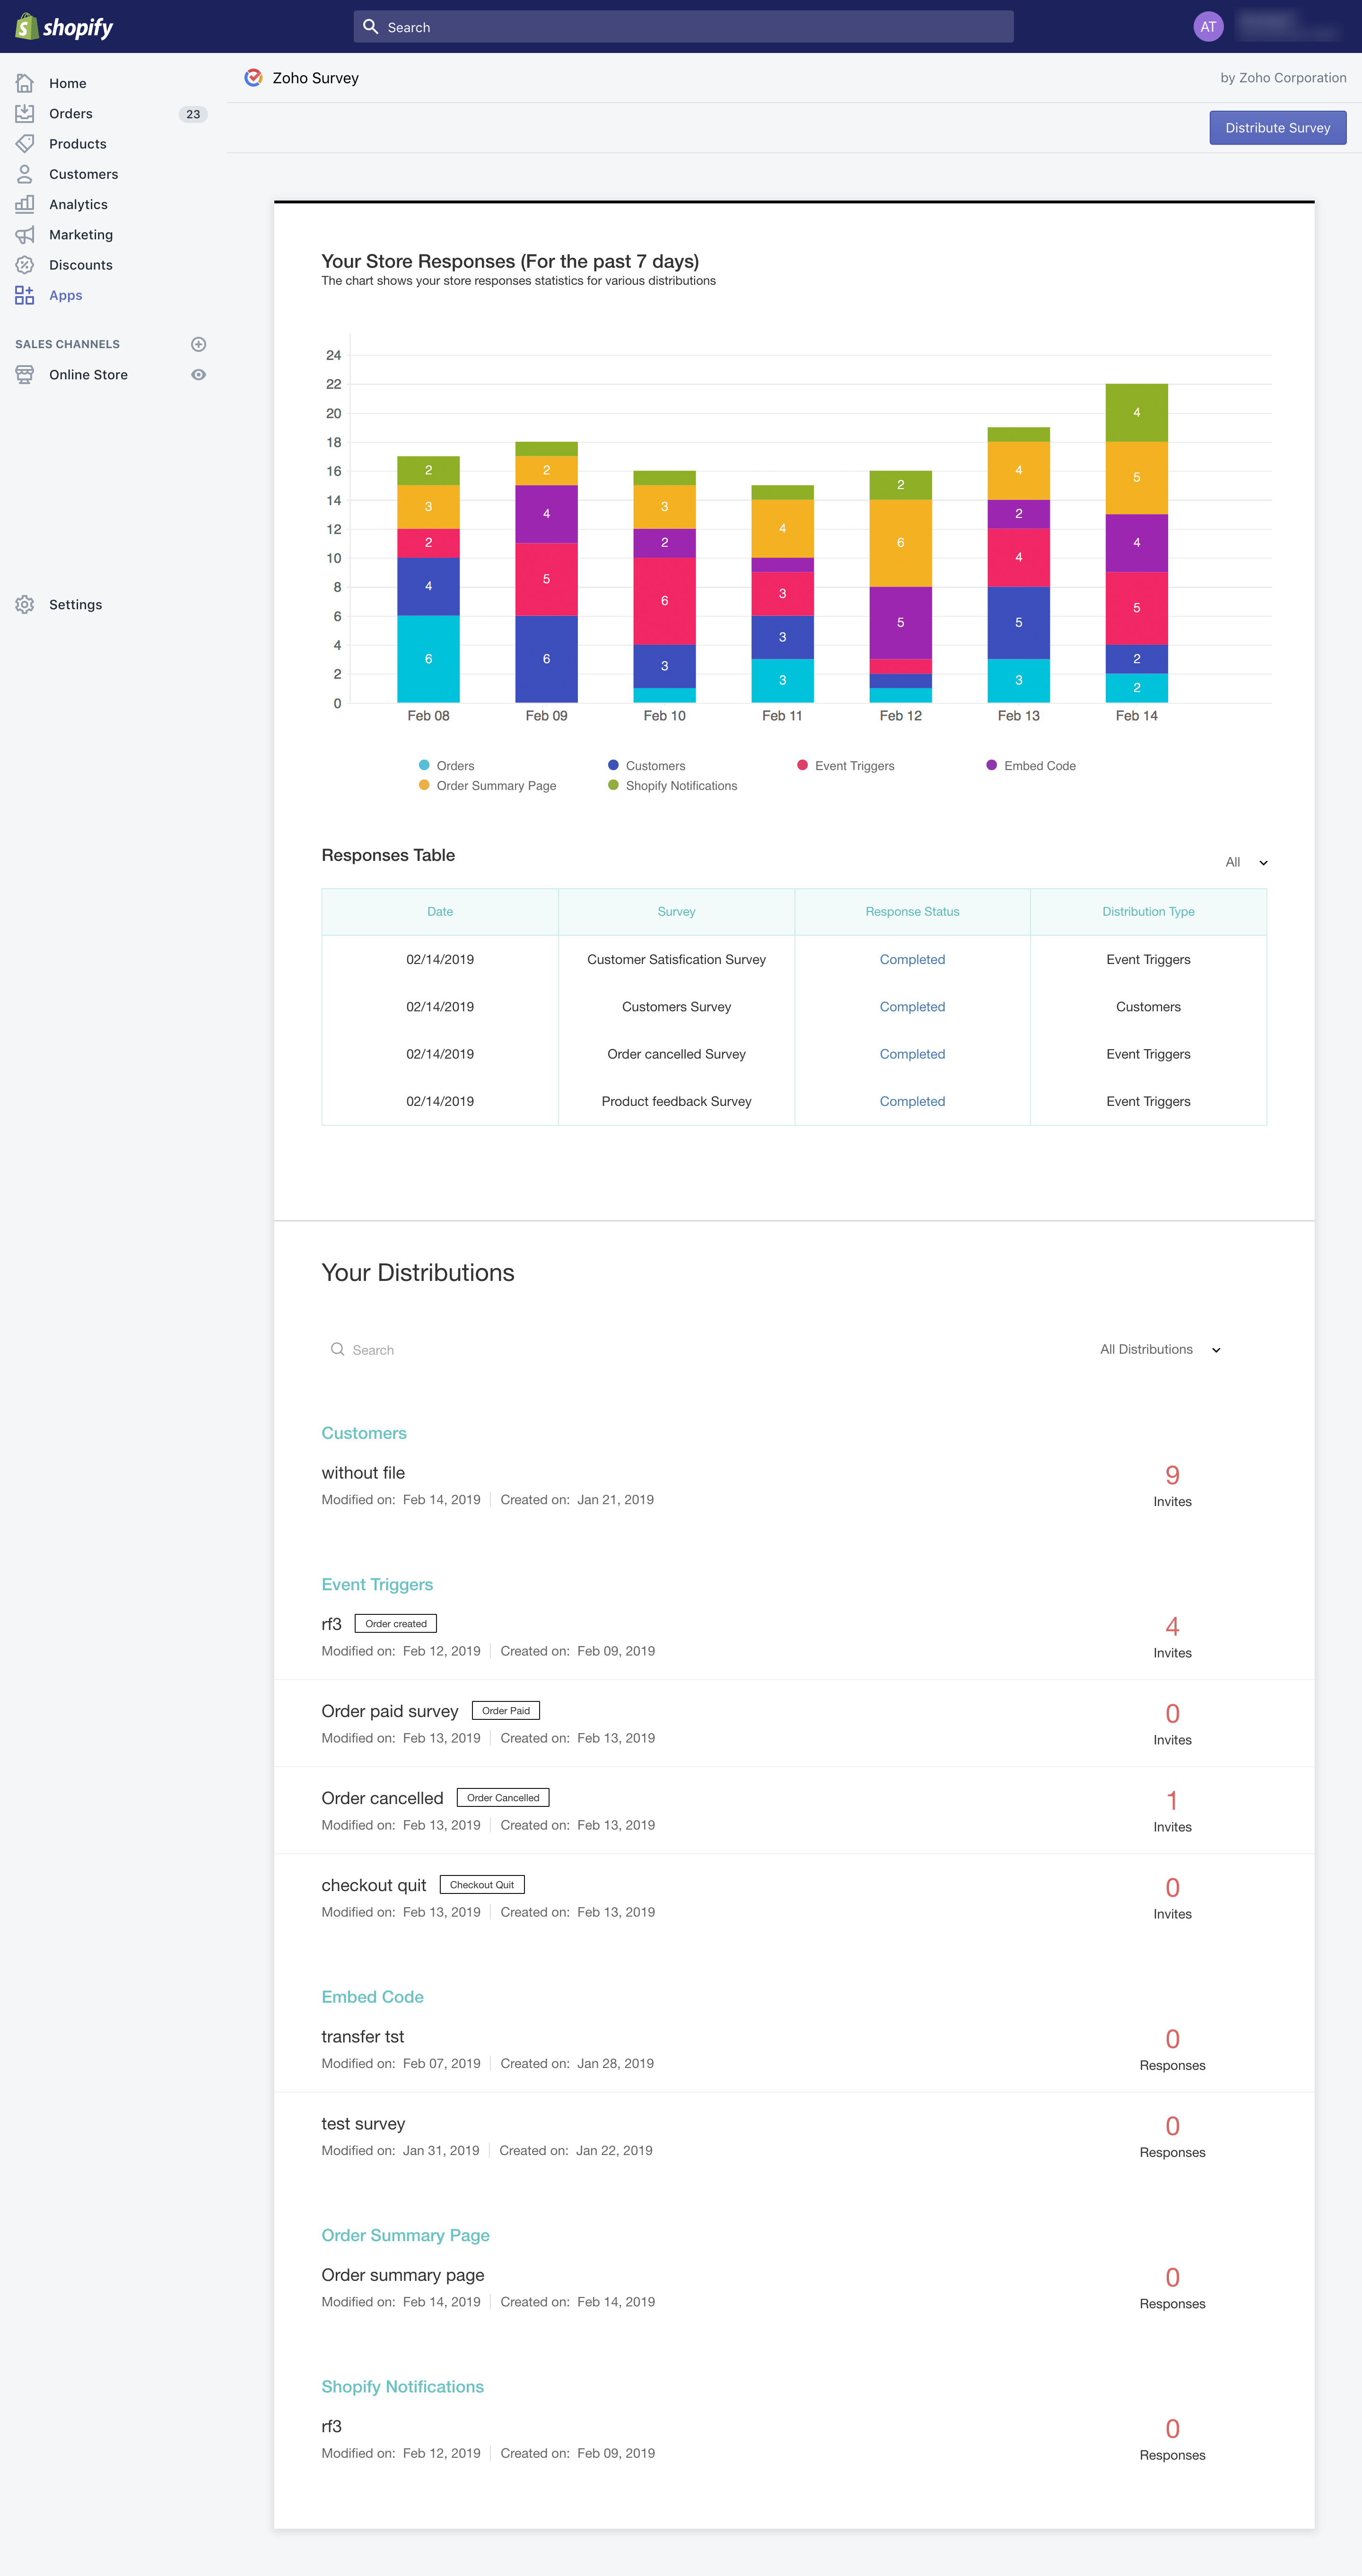
- Filter - Filter your recipients based on various parameters. Click Go back to Campaigns List to see the list of surveys you have already sent. You can find the following here:
- Store the responses chart and all your distributions
- Responses table with the date of distribution, name of the survey, response status, and distribution type
- List of distributions
- Filters to categorize the distributions
To edit the email invite:
- Click the draft saved tag on the email template and click
 to edit the default email template.
 - Edit the contents of the email invite as described above and click OK.

Note |
|
To schedule an email invite or a reminder:
To search for a Shopify user to check if they have answered your survey:
To filter your recipients:
- All recipients
- No responses
- Partial responses
- Complete responses
- Disqualified responses
- Opened
- Unopened
- Unsubscribed
- Bounced
- Not sent
- Failed
To set up a survey trigger when a particular event occurs in the Shopify account:
- Log in to your survey app using your Zoho account. If you don't have a Zoho account already, sign up to use the app.
- Click Email Distribution, and select Event Triggers to trigger a survey when a particular Shopify event occurs.
- Select a Shopify event and follow the procedure to set up an email distribution whenever the following events occur:
- Order Created
- Order Fulfilled
- Order Paid
- Order Cancelled
- Refund Created
Note |
You can only save the trigger here. You can't save a draft. |
To track your event trigger:
- Click the survey you want to track from the list of published surveys.
- Click Overview to view the following details.
- Invitations - Displays the details of how many of your respondents have opened your invite, how many are yet to open it, if any email has been scheduled or bounced, or if someone has unsubscribed from your invite.
- Collector list - Shows the collector from which the survey has been sent. You can also see the list of collectors here.
- Responses - Displays the total number of responses, and the details of completed, partial, and disqualified responses.
- Invite History - Displays the date and other details of each invite. Click View for a detailed history. You can also send reminders here.
- Click Logs to see the following details.
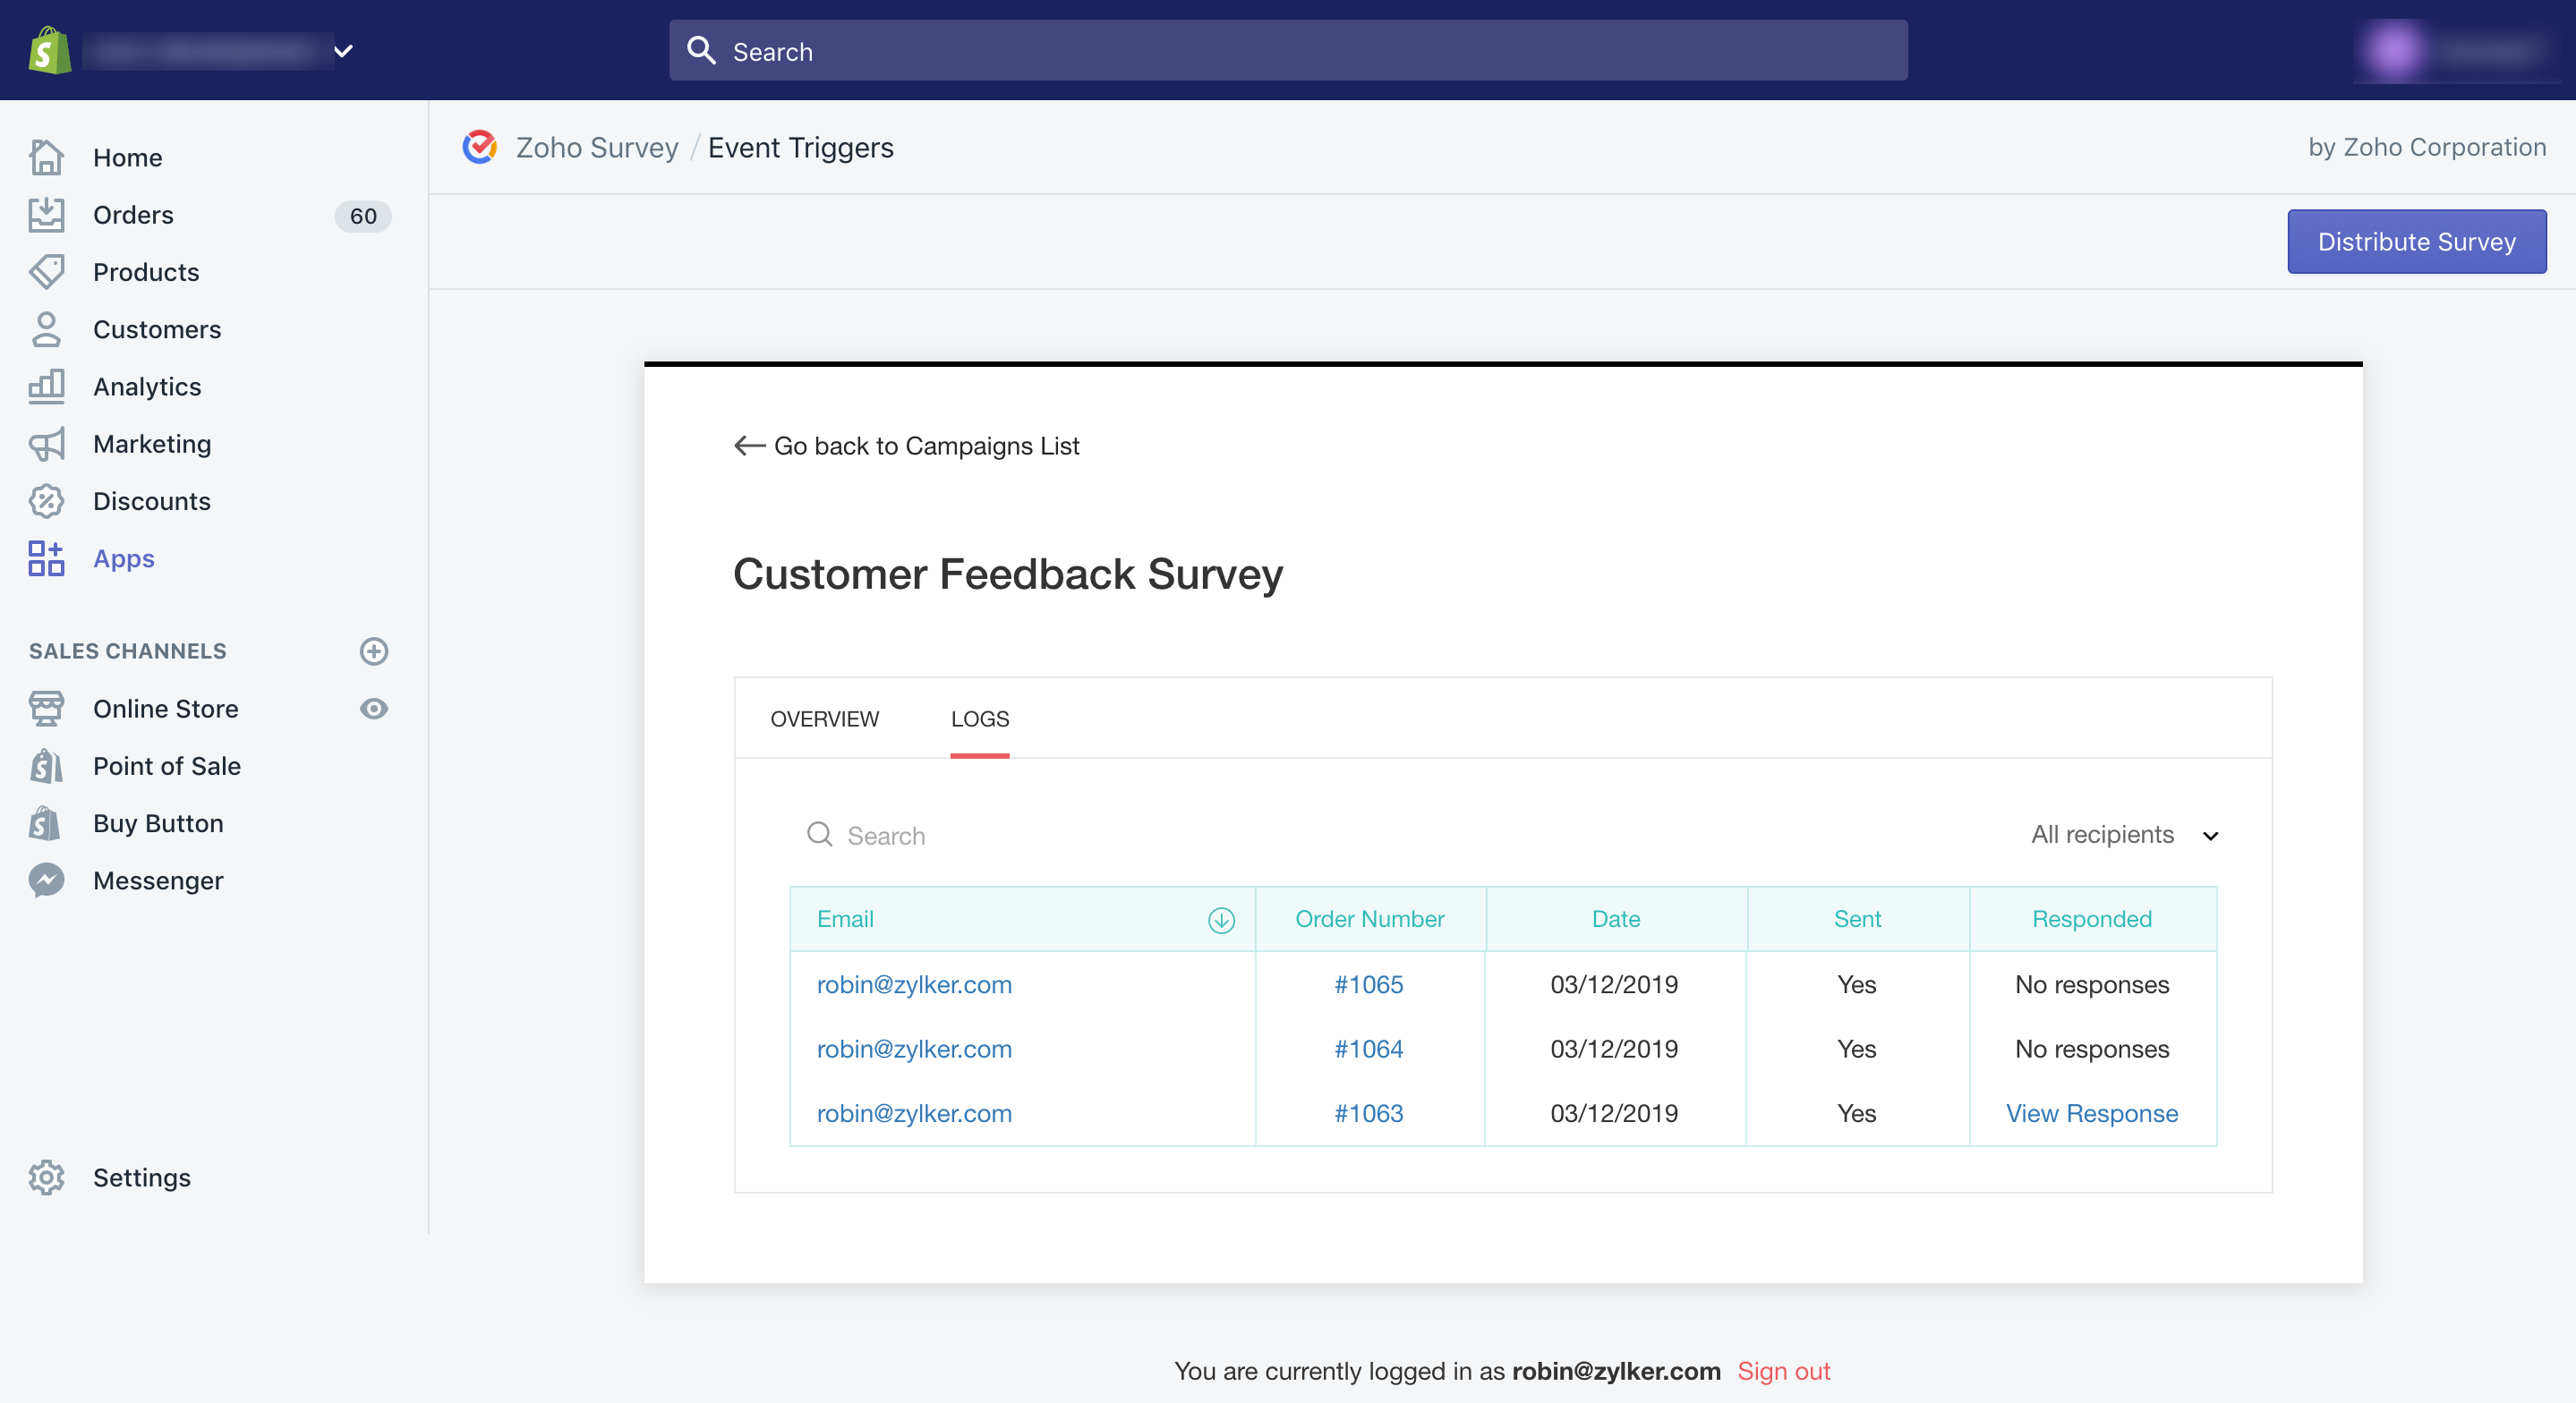
- Email - Displays email addresses of the customers.
- Order Number - Displays the order numbers.
- Date - Displays the date on which the invitation was sent.
- Sent - Displays whether your invite has been sent.
- Responded - Displays the response status of your survey. If they have responded, click View Response. It will take you to the reports section where you can see the detailed response details.
- Filter - Filter your recipients based on various parameters.
- Click Go back to Campaigns List to view the list of surveys you have already sent. You can find the following here:
- Store the responses chart and all your distributions
- Responses table with the date of distribution, name of the survey, response status, and distribution type
- List of distributions
- Filters to categorize the distributions
To send out a survey using the embed option:
- Click Embed Survey and perform the following instructions to embed the survey as code, on your order summary page, or in Shopify notifications.
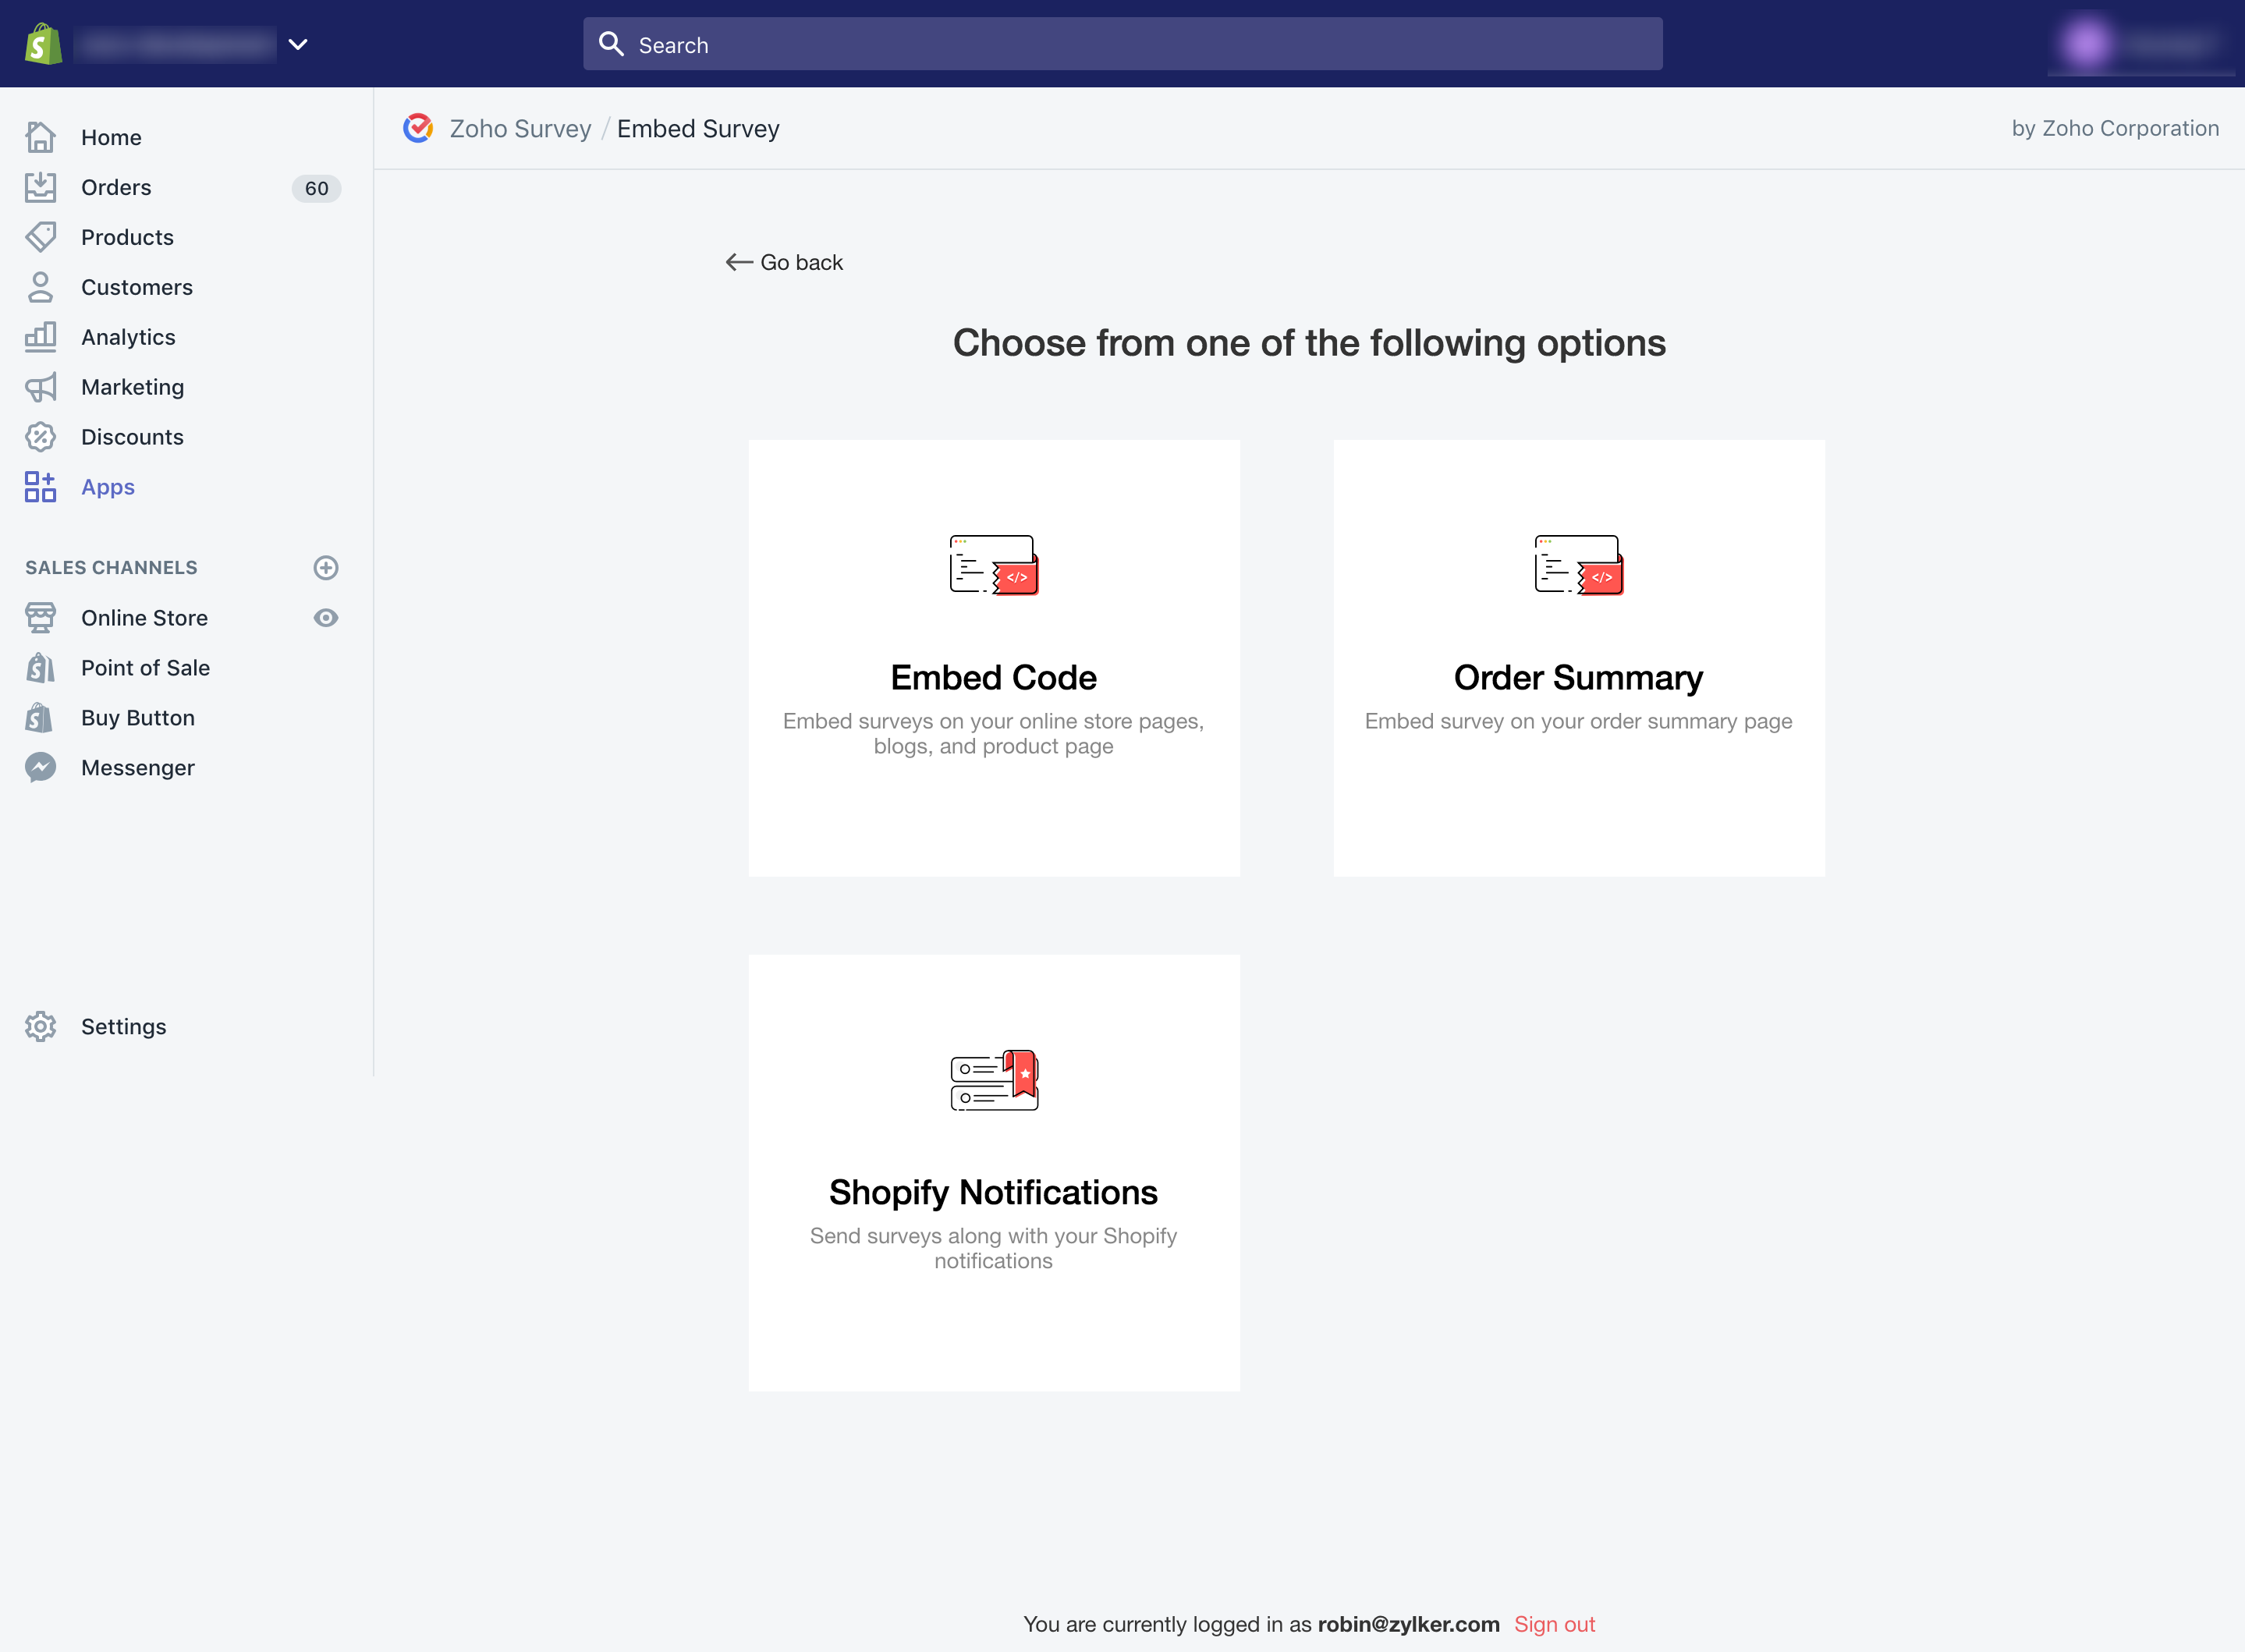
To embed a survey on your online store or product page using the embed code:
- Select the survey you want to send in the Select a Survey dropdown list. If you haven't created any surveys yet, click Create a New Survey or select a survey from one of our pre-built templates.

- Click Preview to take a quick look at the survey you selected.
- Select a collector in the Collector dropdown list.
- Click Add Merge Tag to include Shopify variables in your survey responses.
- Select a variable in the Select Variable dropdown list.
- Click Create Custom Variable to create your own.
- Select a Shopify variable in the Shopify variable dropdown list.
- Click + to add more variables.
- Click X to remove the variables you have added.
- Click Generate Code.
- Copy the HTML code.

- Select where you want to post the survey (themes, blog posts, pages) from the left pane.
- If you select Pages or Blog posts, click Show HTML.
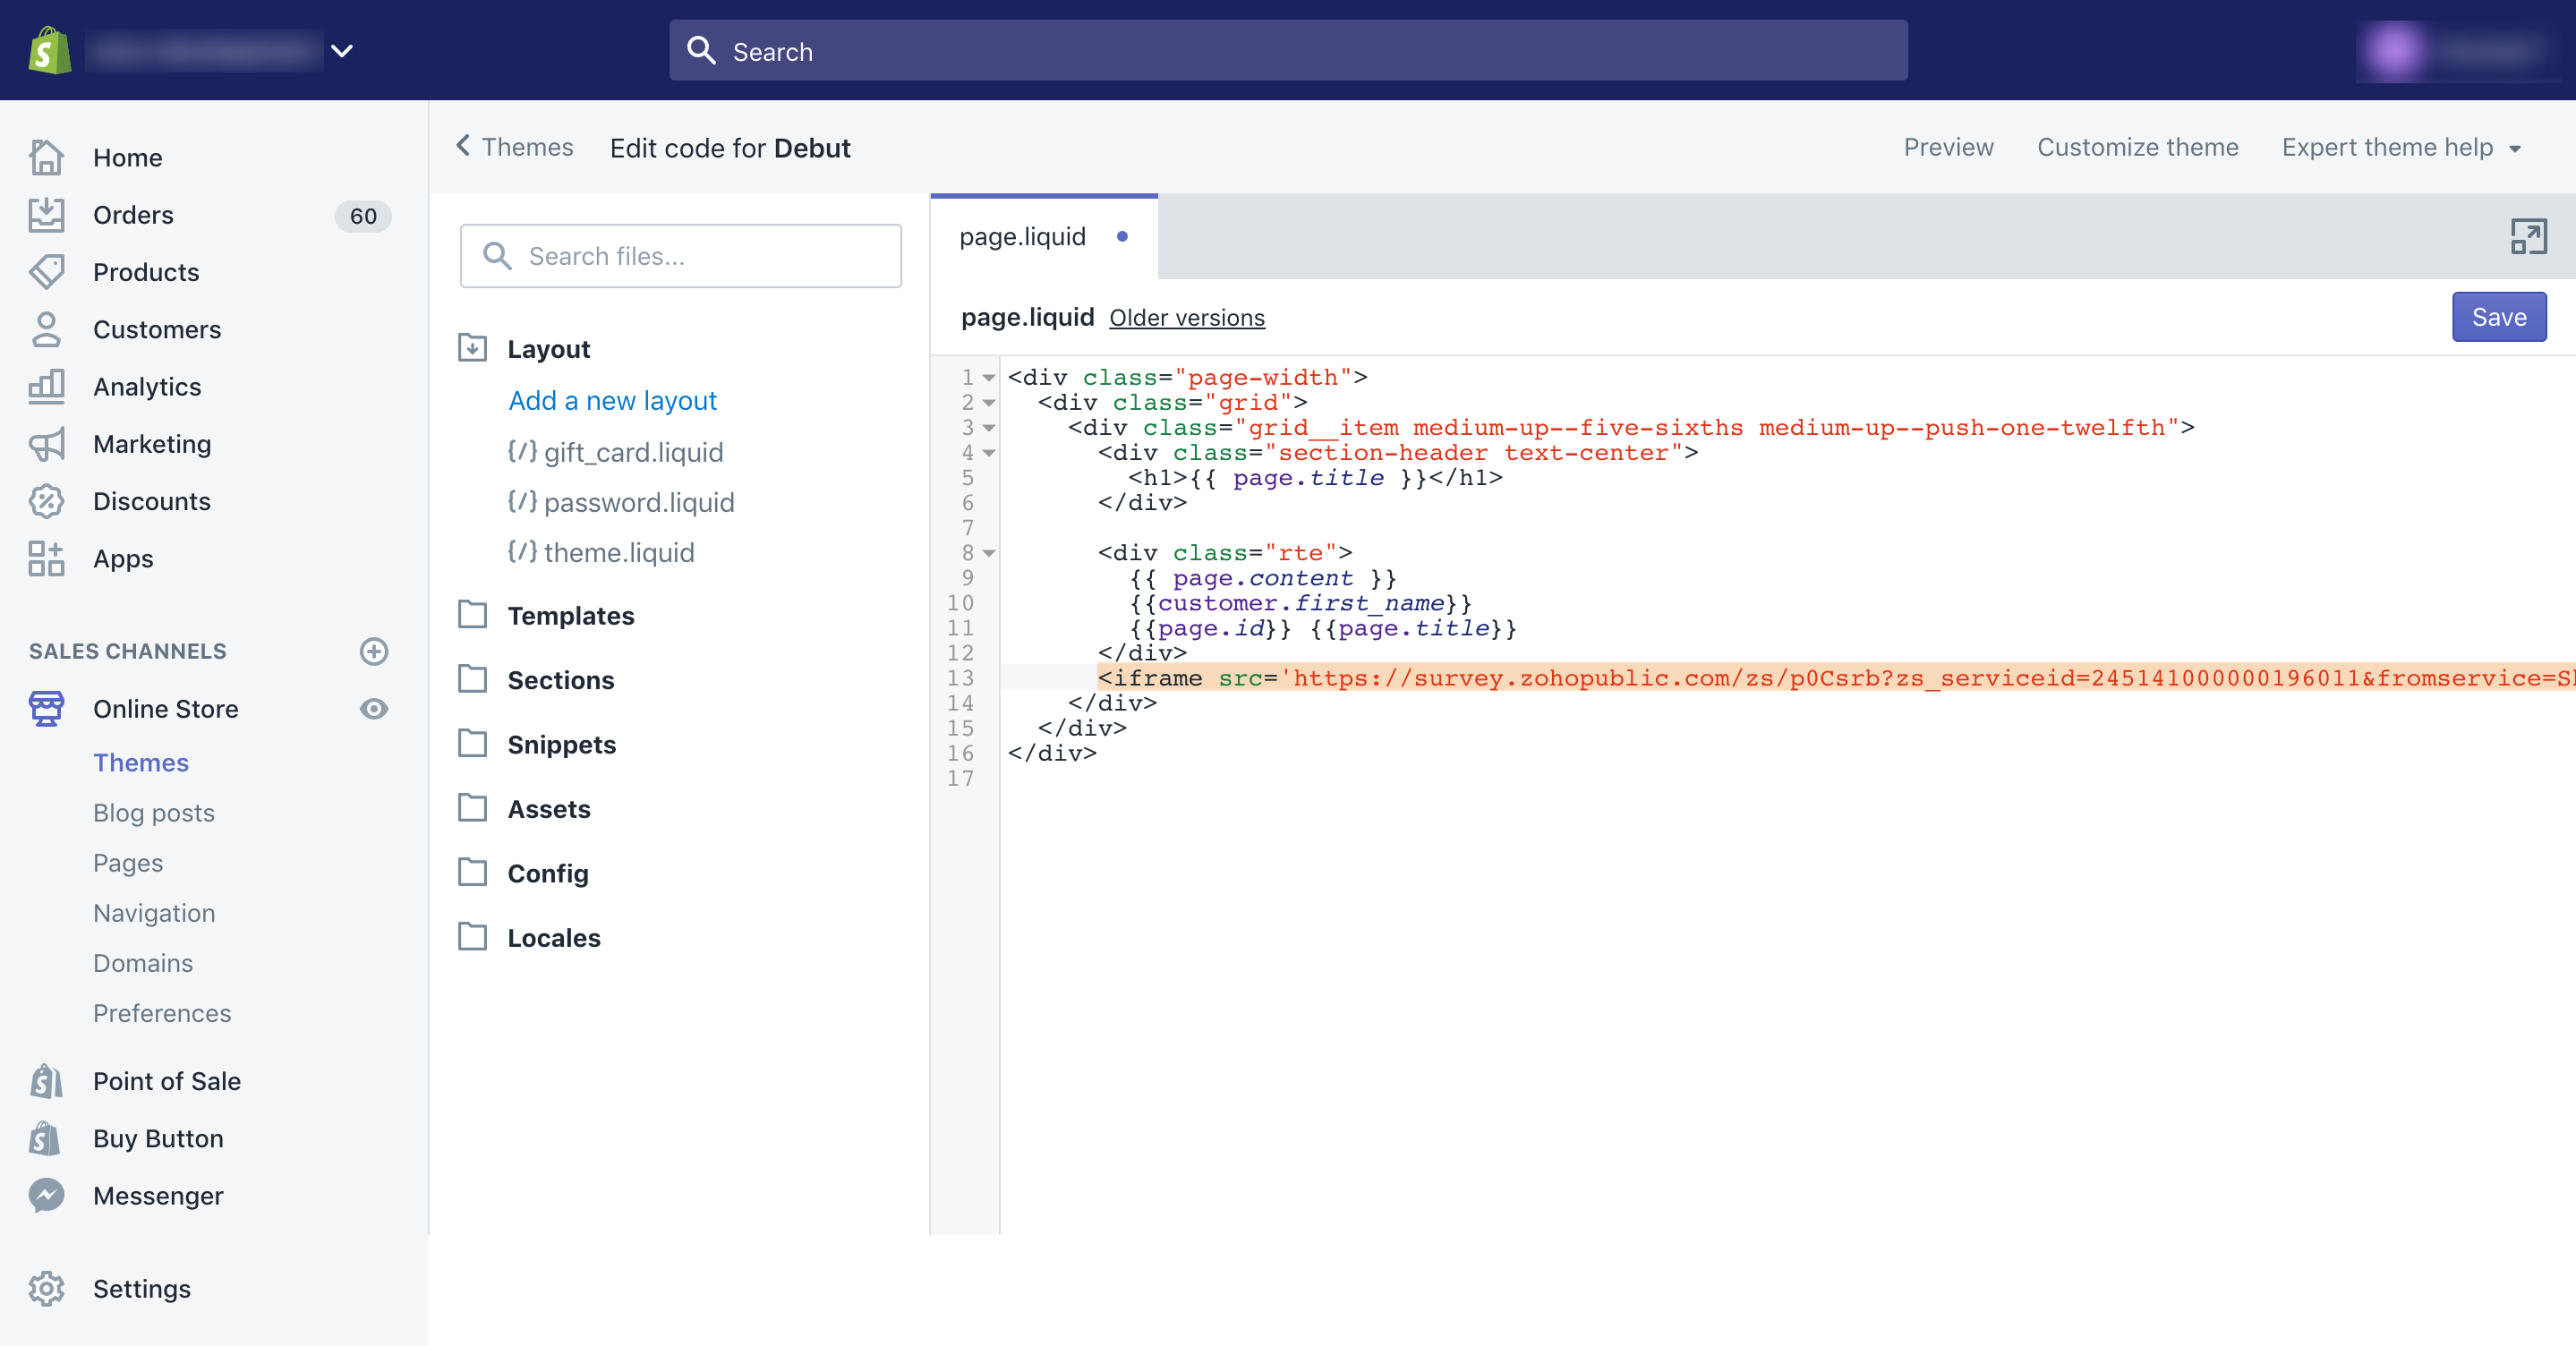
- If you select Themes, click Actions, and select Edit code.
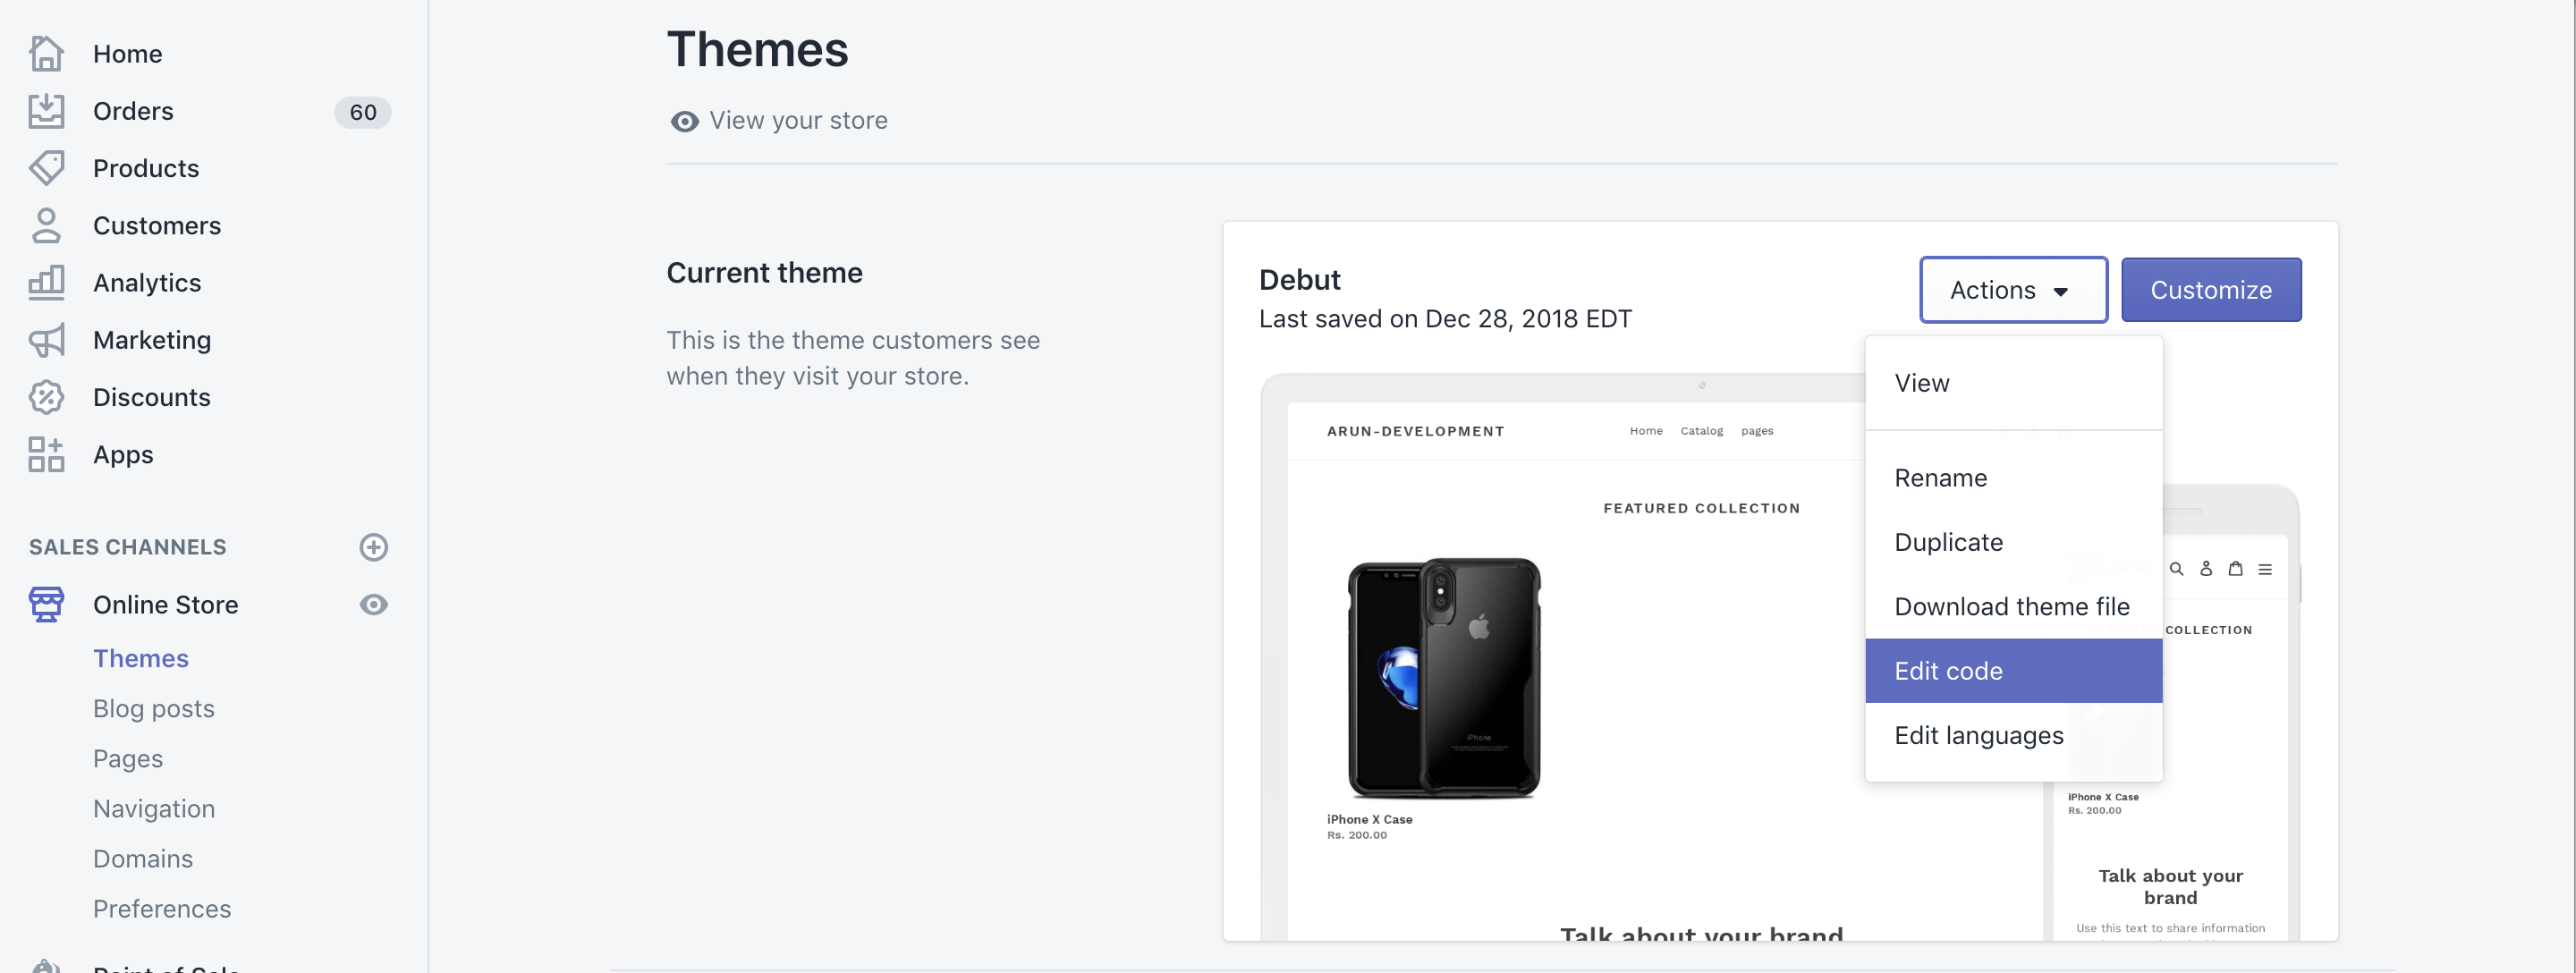
- Select any liquid file and paste the code in the editor and click Save.
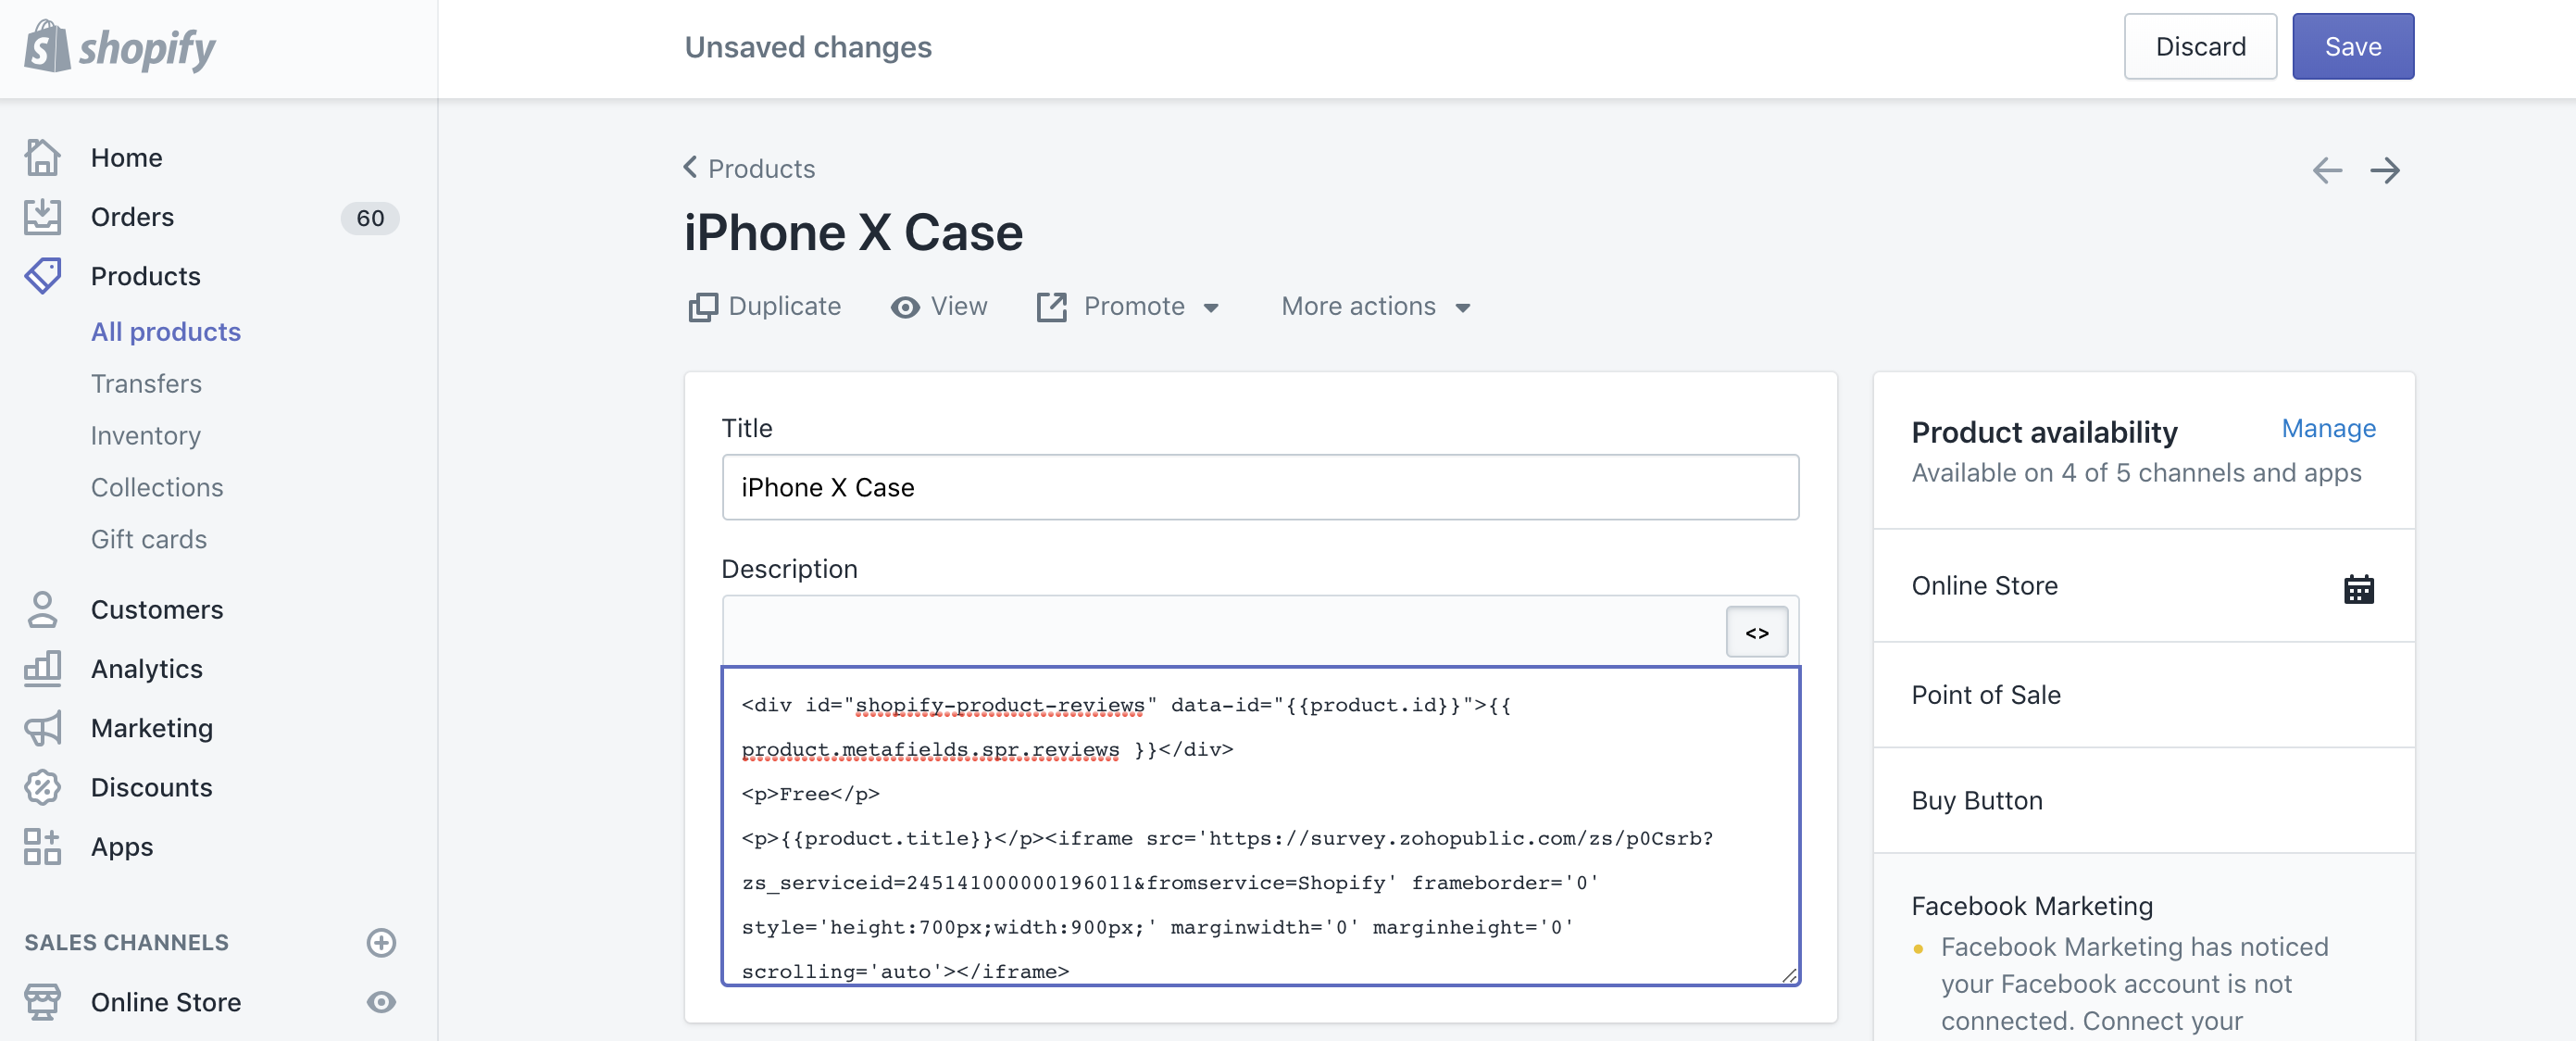
- If you select Products, select any product, and click Show HTML. Paste the code in the description and click Save.
- Paste the code in the Content editor.
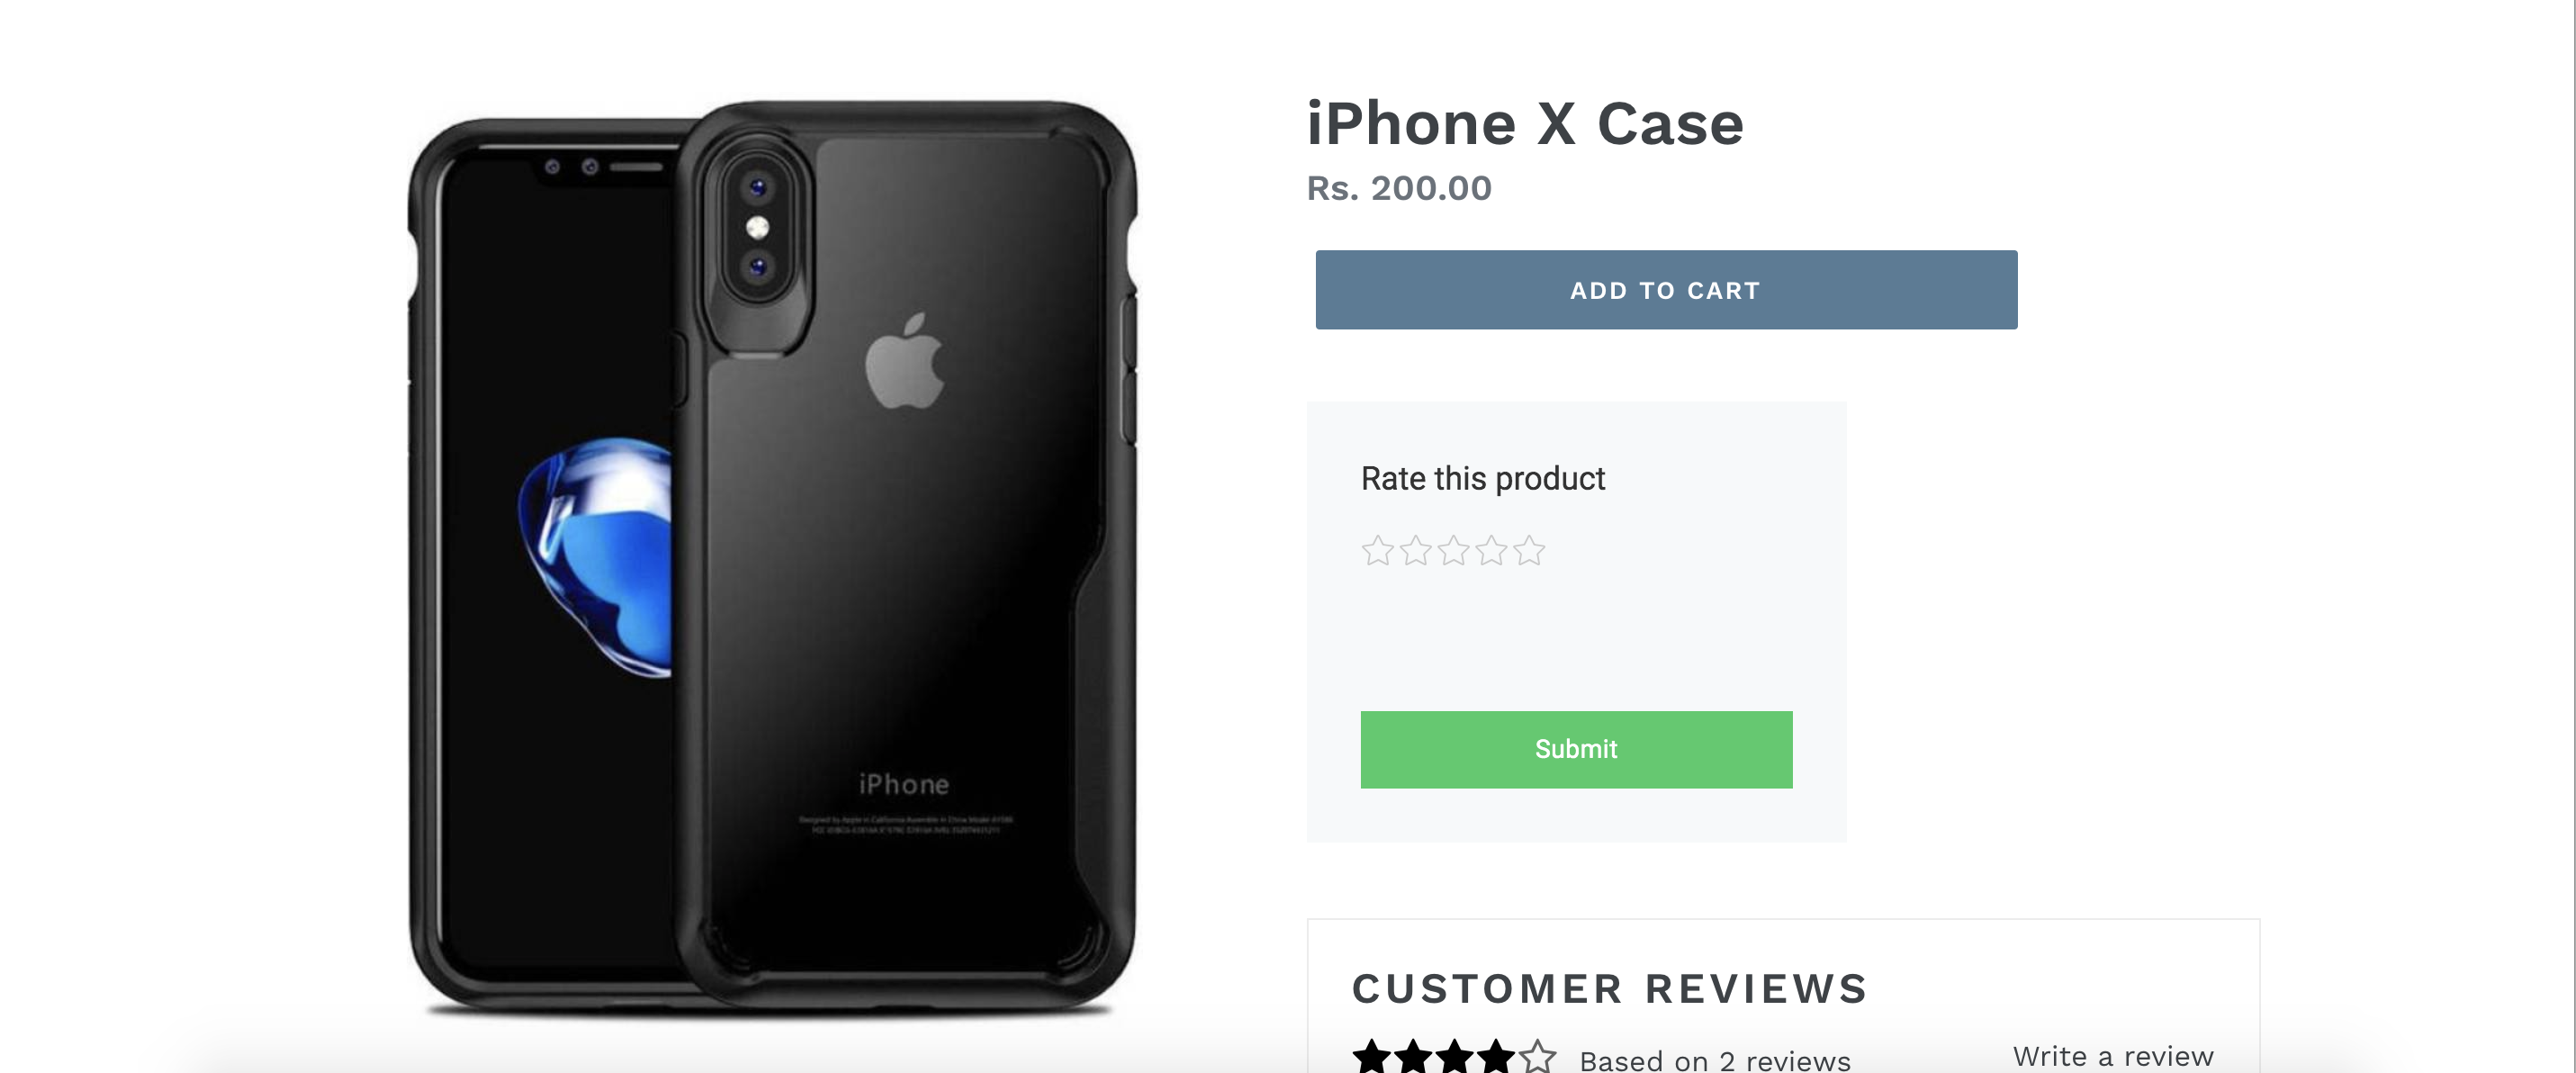
- Click Save. You will be able to view the survey embedded in your online store.
To save your customer information in your survey report:
- Select the survey you want to send in the Select a Survey dropdown list. If you haven't created any surveys yet, click Create a New Survey or select a survey from one of our pre-built templates.
- Click Add Merge Tag to include Shopify variables in your survey responses.
- Select a variable in the Select Variable dropdown list.
- Click Create Custom Variable to create your own.
- Select a Shopify variable in the Shopify variable dropdown list.
- Click + to add more variables.
- Click X to remove the variables you have added.
To embed a survey on your order summary page:
- Select the survey you want to send in the Select a Survey dropdown list. If you haven't created any surveys yet, click Create a New Survey or select a survey from one of our pre-built templates.
- Click Preview to take a quick look at the survey you selected.
- Select a collector in the Collector dropdown list.
- Click Add Merge Tag to include Shopify variables in your survey responses.
- Select a variable in the Select Variable dropdown list.
- Click Create Custom Variable to create your own.
- Select a Shopify variable in the Shopify Variable dropdown list.
- Click + to add more variables.
- Click X to remove the variables you have added.
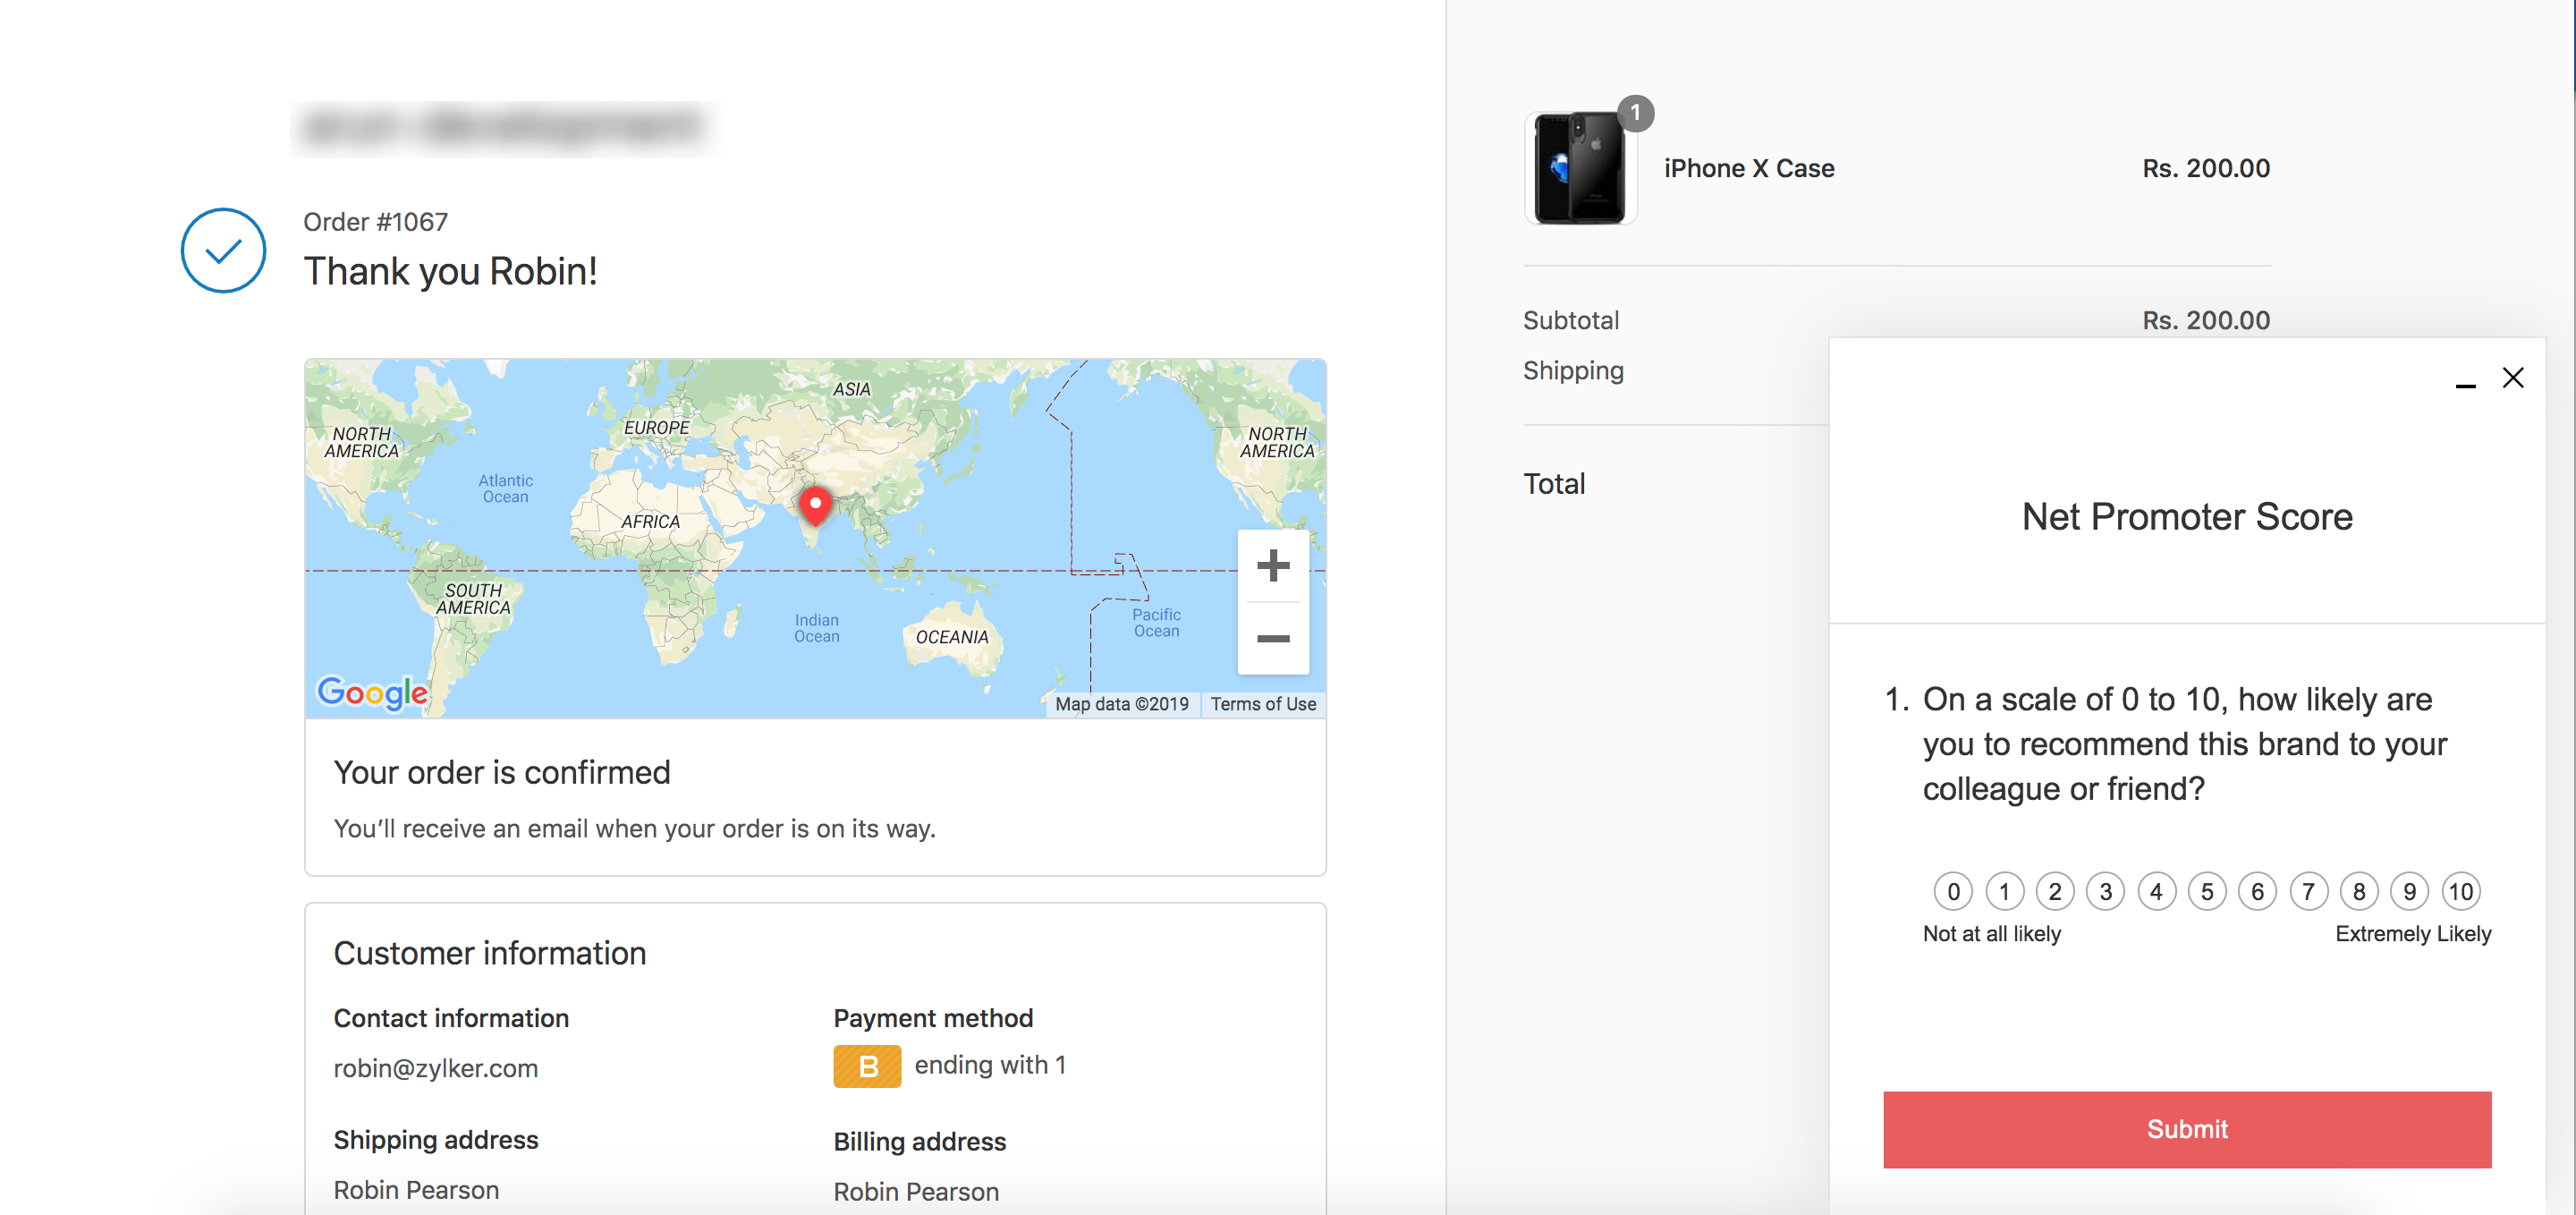
- Click Embed Survey. The survey will be displayed on the order summary page when an order is complete and view the responses in your survey reports section. You can only create one distribution under this category.
To send surveys along with Shopify notifications:
- Select the survey you want to send in the Select a Survey dropdown list. If you haven't created any surveys yet, click Create a New Survey or select a survey from one of our pre-built templates.
- Click Preview to take a quick look at the survey you selected.
- Select a collector in the Collector dropdown list.
- Click Add Merge Tag to include Shopify variables in your survey responses.
- Select a variable in the Select Variable dropdown list.
- Click Create Custom Variable to create custom variables.
- Select a Shopify variable in the Shopify Variable dropdown list.
- Click + to add more variables.
- Click X to remove the variables you have added.
- Click Generate Code.
- Copy the HTML code.
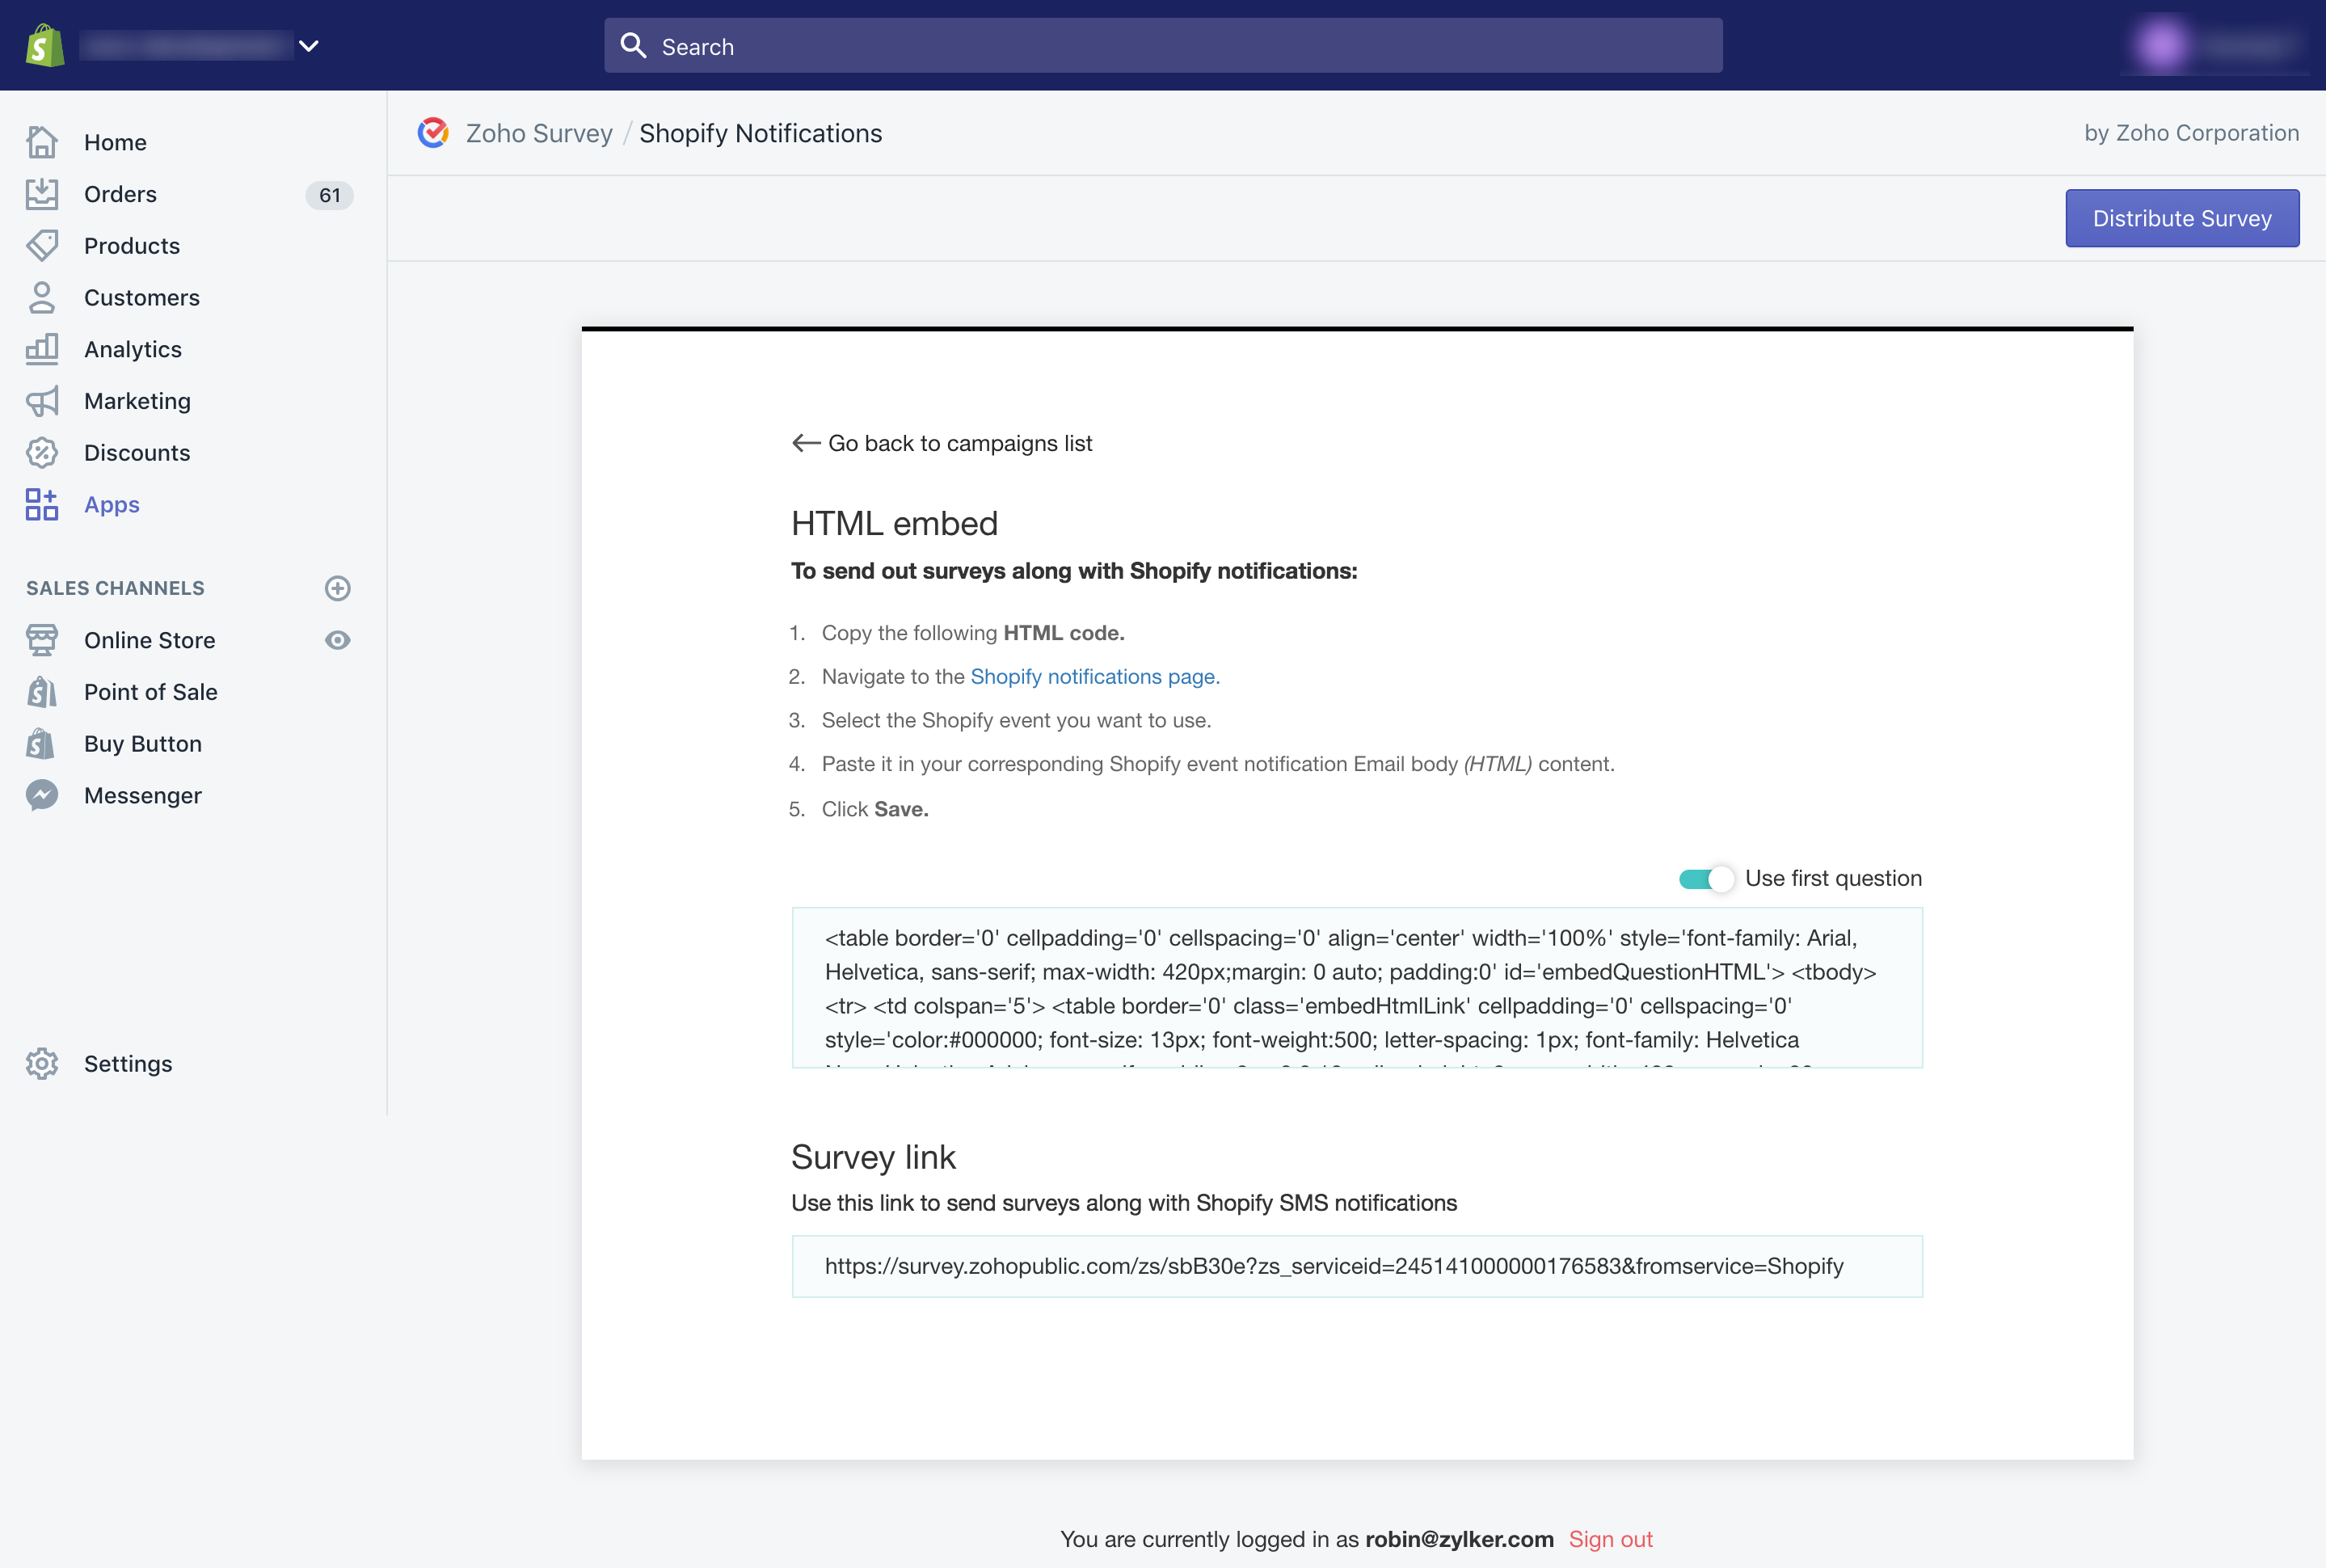
- Click Settings and select Notifications to navigate to the Shopify notifications page.
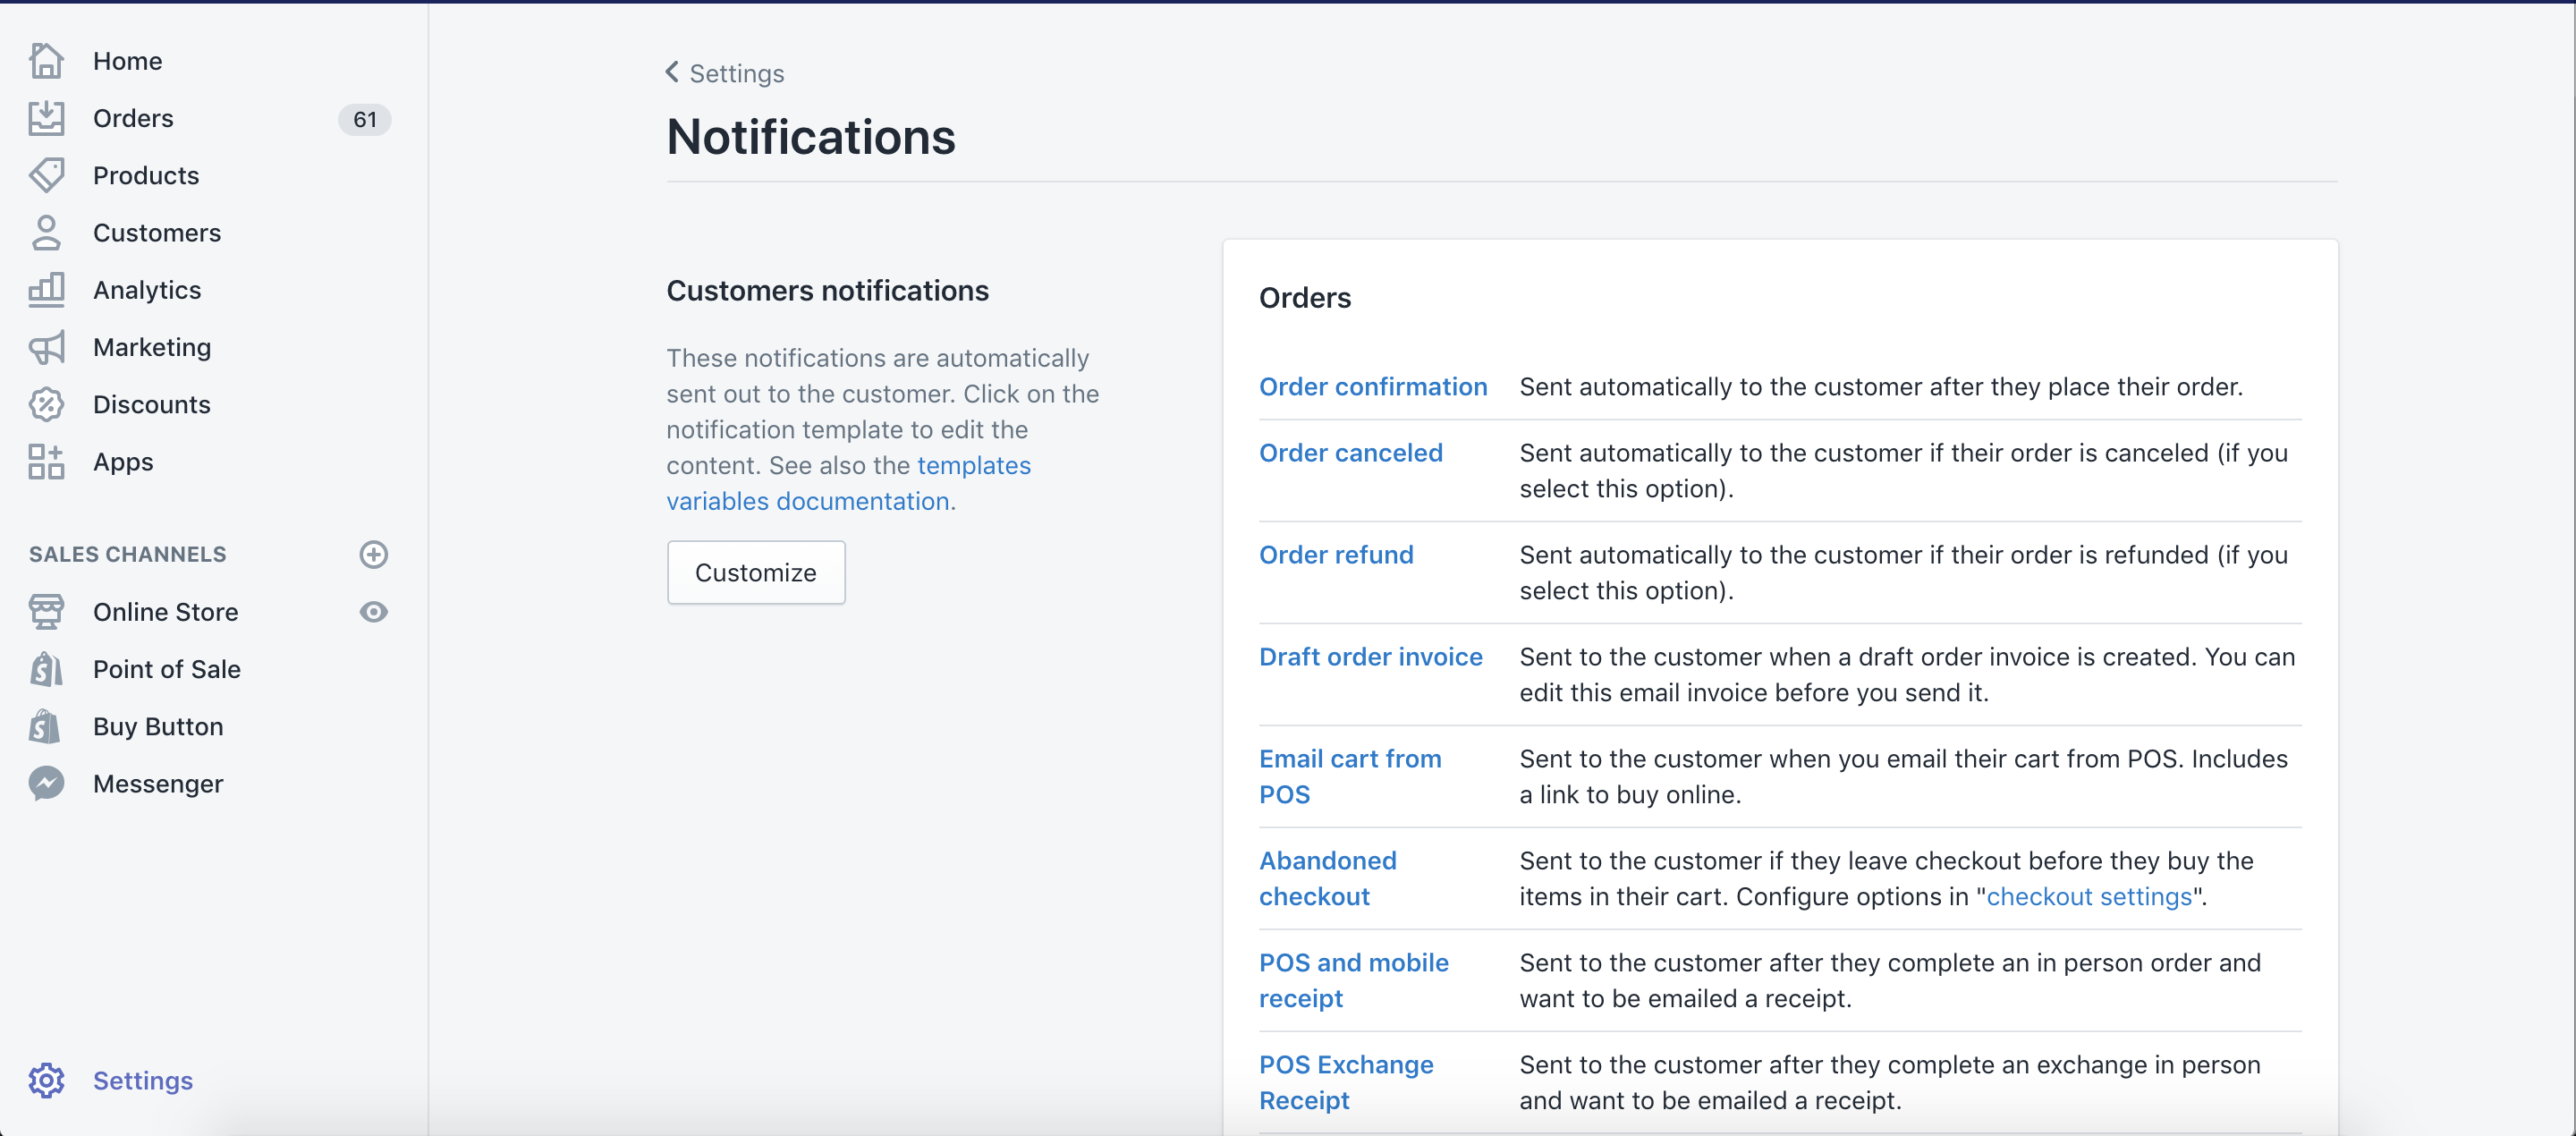
- Select the Shopify event you want to use.
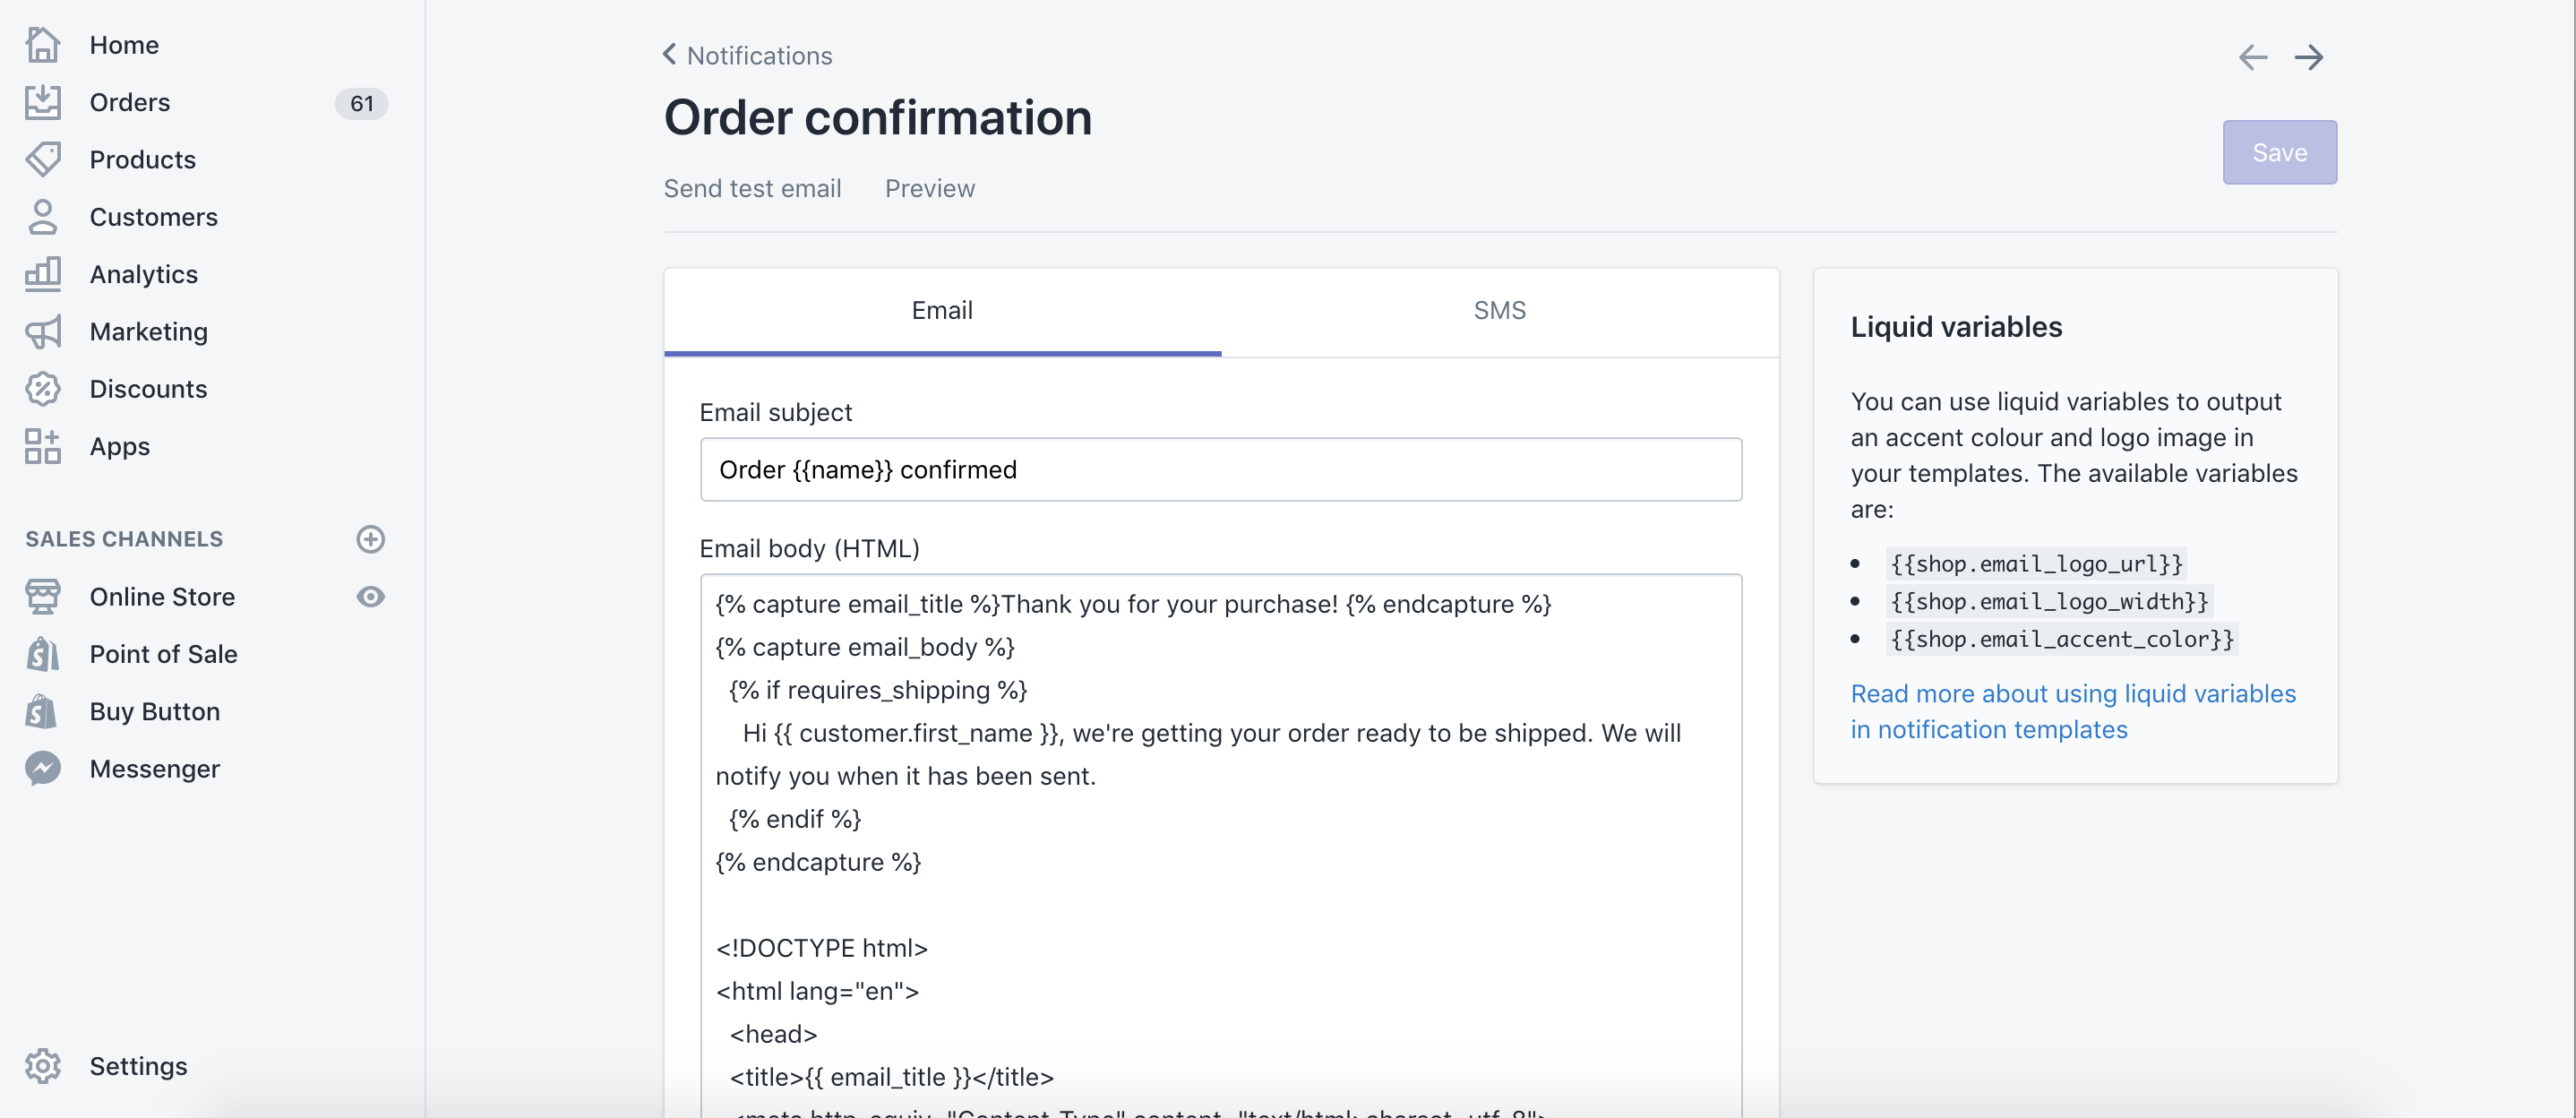
- Paste it in your corresponding Shopify event notification Email body (HTML). Or, you can paste the survey link in the SMS content template.
- Click Save. You'll receive a survey along with an email or SMS notification from Shopify.
- Click Preview to take a look at how your survey would appear.
To remove this integration:
- Click Apps on the left pane.
- Click the delete icon next to Zoho Survey.

- Fill in the feedback fields and click Remove.

Access your files securely from anywhere
Zoho CRM Training Programs
Learn how to use the best tools for sales force automation and better customer engagement from Zoho's implementation specialists.
Zoho DataPrep Personalized Demo
If you'd like a personalized walk-through of our data preparation tool, please request a demo and we'll be happy to show you how to get the best out of Zoho DataPrep.
- Zoho Workerly Home
- Forums
- Connect With Us:


- Zoho Recruit Home
- Forums
- Connect With Us:
All-in-one knowledge management and training platform for your employees and customers.
![]()
Create. Review. Publish.
You are currently viewing the help pages of Qntrl’s earlier version. Click here to view our latest version—Qntrl 3.0's help articles.


Zoho Sheet Resources
Zoho Forms Resources
Zoho Sign Resources
Sign, Paperless!
Zoho TeamInbox Resources
Design. Discuss. Deliver.
Related Articles
Create an Email Invitation Trigger on Pipedream
Pipedream is a powerful tool that connects different applications and automates their workflows. The Zoho Survey and Pipedream integration can help you send timely survey emails or set automated workflows based on the actions performed in your ...Email Distribution
Send your survey's link to your email lists within Zoho Survey, without having to switch a tab. You can also track the responses and see the details of opened, unopened, bounced, and unsubscribed invites. There are four ways to do this: Zoho Survey's ...