Zoho Flow Actions in Bigin
Zoho Flow is an integration platform that connects cloud applications and automates the exchange of information between them, without requiring any coding knowledge. With Zoho Flow, you can create workflows by combining a trigger with one or more actions.
- A trigger is an event that starts the flow, such as a data update or a scheduled time.
- Actions are the tasks executed automatically once the trigger occurs.
Integrating Bigin with Zoho Flow Actions, will allow you to execute third-party application tasks directly from Bigin’s workflow and stage automation rules. This means you can automate actions across your third-party apps without needing external connectors or additional integration tools.
For example:
- Send an SMS through RingCentral when a deal is closed.
- Create an invoice in QuickBooks when a deal enters a specific stage.
- Send a Slack message when a deal is lost.
This helps businesses integrate Bigin with the other apps they use daily, improving automation and reducing manual work.
Availability
Zoho Flow Actions are available only for paid editions of Bigin.
Permissions
- Users with Manage Automation, Manage Flow Connections (can use, edit, and delete connections created by others), or Access Flow Connections (can create and use their own connections but cannot edit or delete connections created by others) will have access to Zoho Flow Actions.
- If Manage Flow Connections is enabled, Access Flow Connections will be automatically enabled as well. However, you can also choose to enable only Access Flow Connections if needed.
- These permissions are enabled by default for Administrator and Standard profiles.
Installation
You can install Zoho Flow Actions in any of the following ways:
- From Toppings:
Go to Setup > Automation > Toppings and search for Zoho Flow to install the topping. - From Automation Setup:
Go to Setup > Automation > Zoho Flow Actions and click Get Started. This step is required only during the initial setup. - During Workflow Creation:
- While creating a workflow, under Actions, select Zoho Flow Actions.
- If the topping is not installed, you will be prompted to install it immediately.
- If it is already installed, you can proceed to add your Zoho Flow actions to the workflow.
Once installed, Bigin automatically creates a hidden organization in Zoho Flow.
You can then:
- Create Connections: A connection is the authentication link between Bigin and a third-party application. It allows Zoho Flow to securely access the external app so you can automate tasks with it.
- Create Actions: Actions are the specific tasks you want to perform in the connected third-party application. These actions can be created only after a valid connection exists.
- Use these Actions within your Workflow or Stage Automation rules in Bigin to automate tasks across different applications.
Notes
- You must have an active connection established with the third-party app before creating an action. if a connection is not established, you will be redirected to the connection creation page before creating a action.
- Each action can perform only one operation.
- If you cannot find the required third-party app, contact support@bigin.com.
Credits
A credit is consumed each time a Zoho Flow action is successfully executed. Every month, you are charged based on the total number of credits used in the previous month.
- Free credits: Each account starts with 100 free credits every month. You will not be charged for these first 100 credits.
- Additional credits: Once the free credits are consumed, you will be billed for any additional credits used. You can set a maximum cap on how many additional credits can be consumed per month.
Slab (in credits) | Price (per thousand credits) |
1 - 20,000 | $ 2.00 |
20,001 - 50,000 | $ 1.40 |
50,001 - 100,000 | $ 1.30 |
100,001 - 200,000 | $ 1.20 |
200,001 - 500,000 | $ 0.80 |
500,001 and above | $ 0.50 |
For example, even if you set your maximum cap to 20,000 credits, and if you end up using only 10,000, you will be billed only for those 10,000 credits.
Usage is calculated at the end of every month, and for annual subscriptions, the charges are added to the renewal invoice. You can change the maximum cap at any time, and any changes made in the Storage page or Credits page will stay in sync. Only users who have made payments through a card can view the Credits Availability section.
You can check your credit usage in the store.
A maximum of 5,00,000 credits can be purchased, and if more are needed, users can contact support@bigin.com.
Creating a Connection
- Go to Setup > Automation > Zoho Flow Actions > Connections.
- Click + New Connection.
- Select the third-party app.
- Provide a Connection Name.
- Choose the actions you want to enable for that app.
- Click Authorize.
- If it’s a Zoho app you can directly authenticate since you are already signed-in.
- If it’s a third-party app, you may need API keys, OAuth credentials, etc.
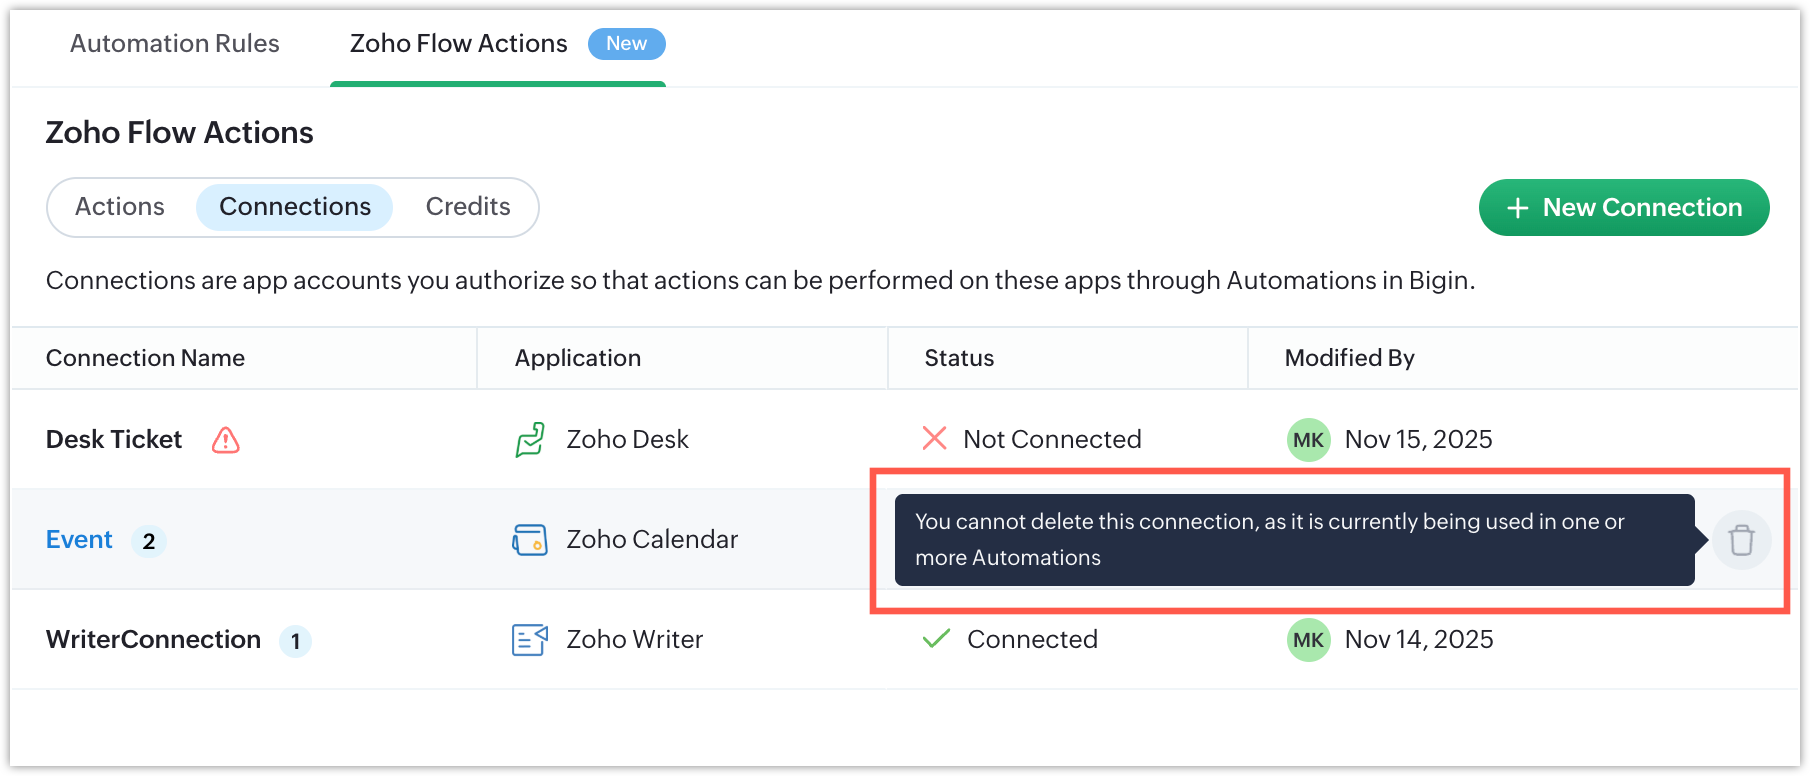
You can also view how many actions are created for each connection. If a connection is not configured properly, an error icon will appear, its status will show as Not Connected, and you will not be able to create any actions using that connection.
Notes:
- If you manage multiple Bigin organizations, you can create Flow connections for each, and actions will work independently between those organizations.
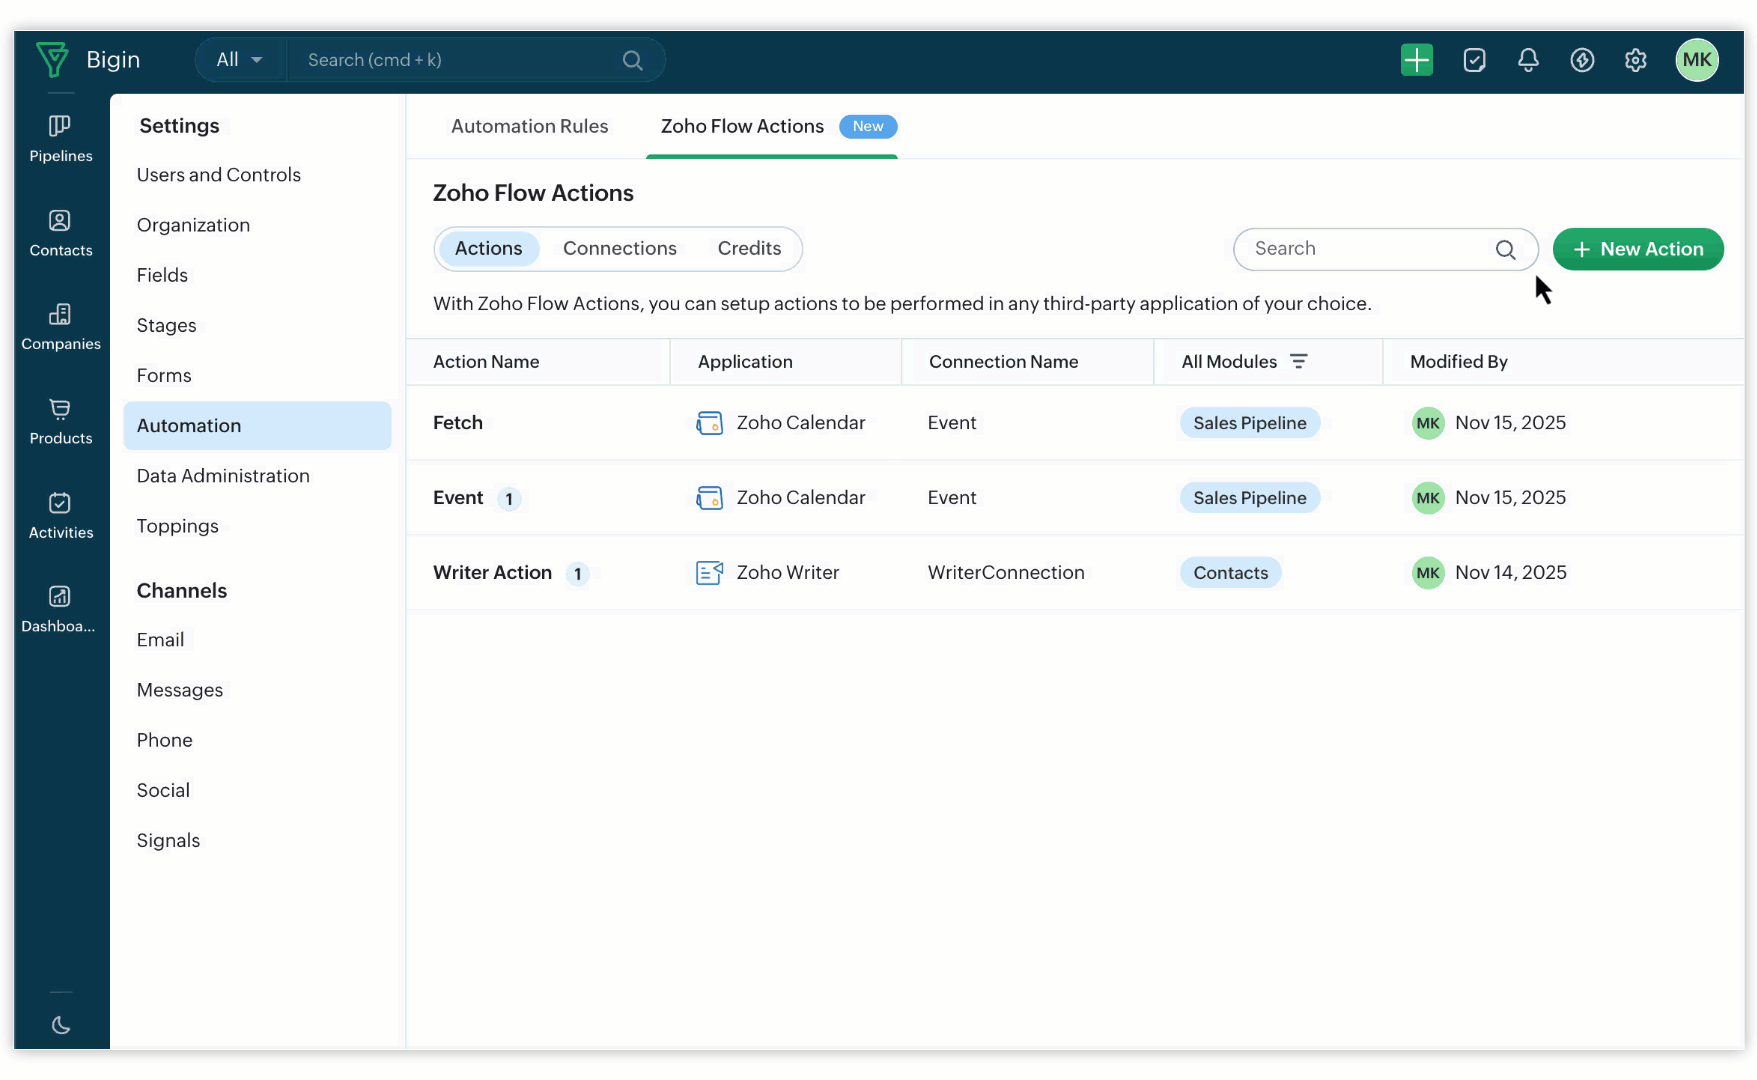
Creating Actions
For every action you add in Zoho Flow, a connection with the corresponding third-party application is required. Actions can be created only when a connection exists, and if none is available, the system will prompt you to create one.
- Go to Setup > Automation > Zoho Flow Actions > Actions.
- Click + New Action and enter the Action Name.
- Select the module from the list of workflow-supported modules.
- Add a description.
- Based on the third-party app, an iFrame loads with required fields, provide all the necessary details to complete the action.
Using Zoho Flow Actions in Automation
Add to Workflow Automation
Add to Stage Automation
Add to Workflow Automation
Go to Setup > Automation > Workflow Automation.
Create or edit a workflow rule.
Under Actions, select Zoho Flow Actions.
You may add one Instant Action and one Scheduled Action per workflow rule.
Add to Stage Automation
Go to Setup > Automation > Stage Automation.
Click + Stage Automation.
Under Actions, choose Zoho Flow Actions.
Only one action can be added here as well.
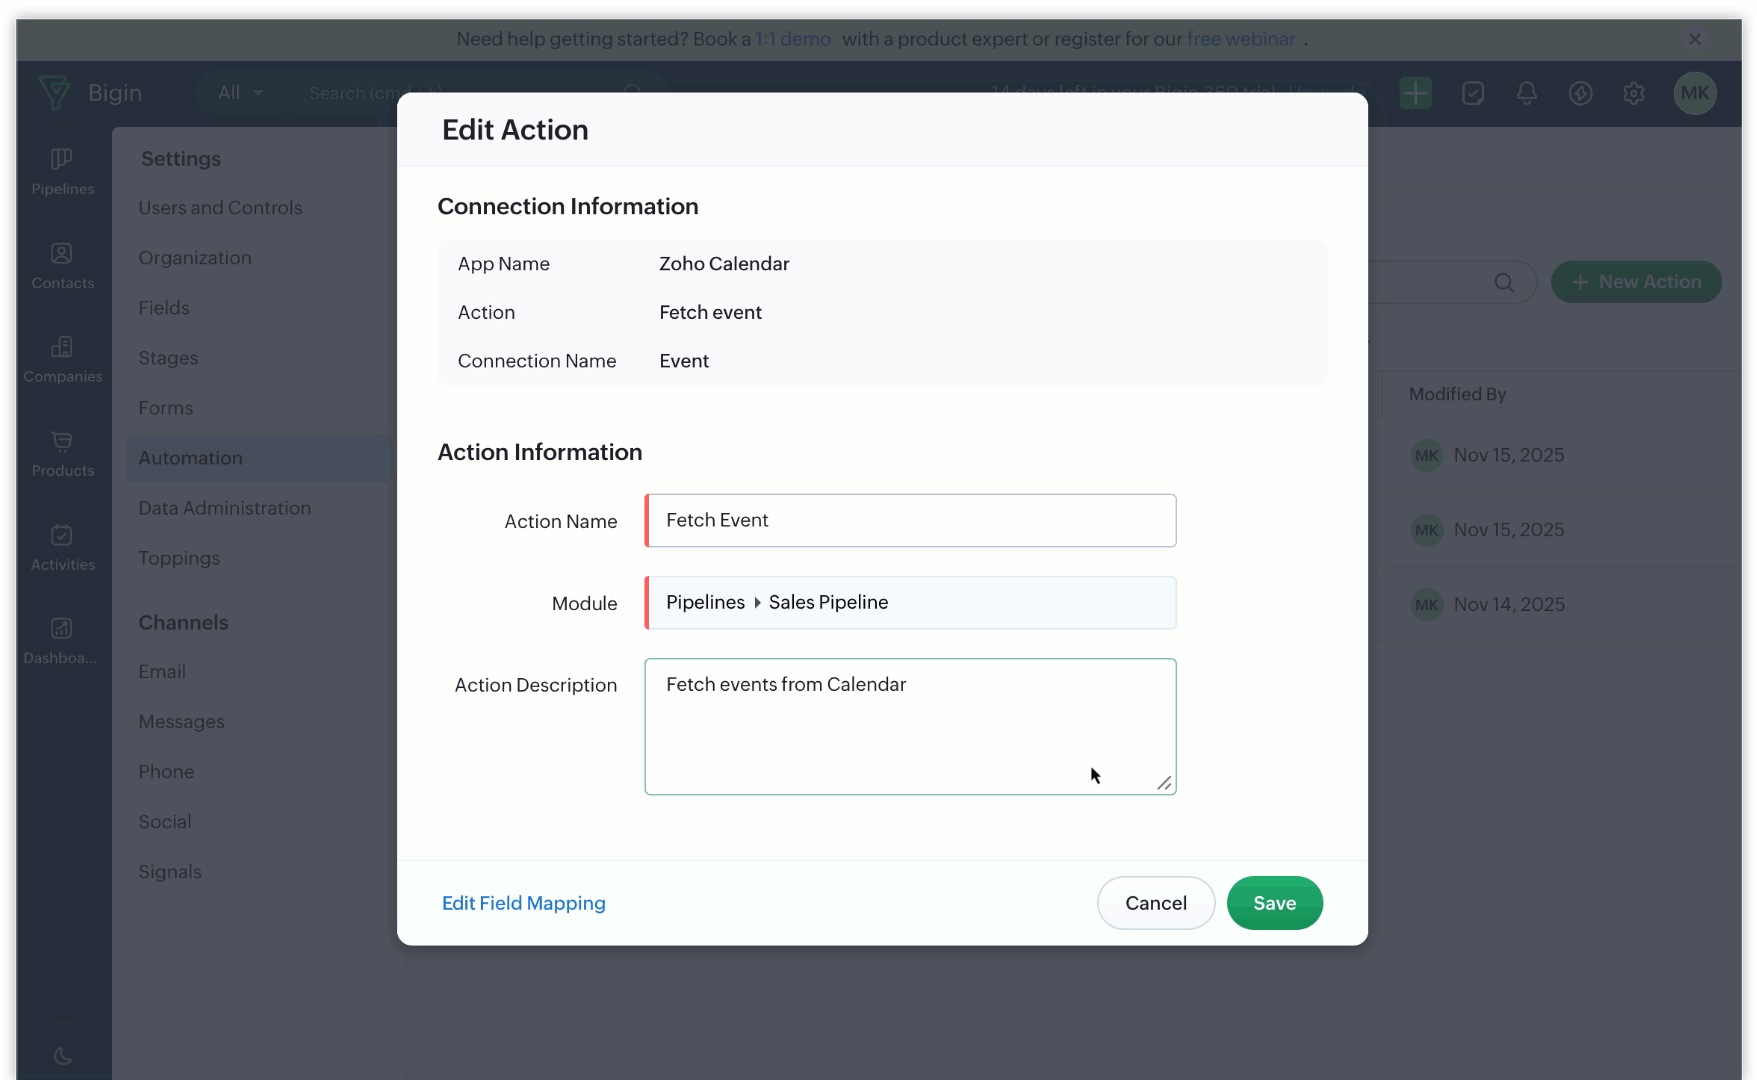
Editing Actions
You can preview where a connection or action is used in workflows.
For actions, you can edit the name and description, but you cannot modify the associated modules.
However, you can update the field mapping using the Edit Field Mapping option.
Deletion
You can delete actions only if they are not used in any workflow or stage automation. Where as, Connections, once created, cannot be deleted.
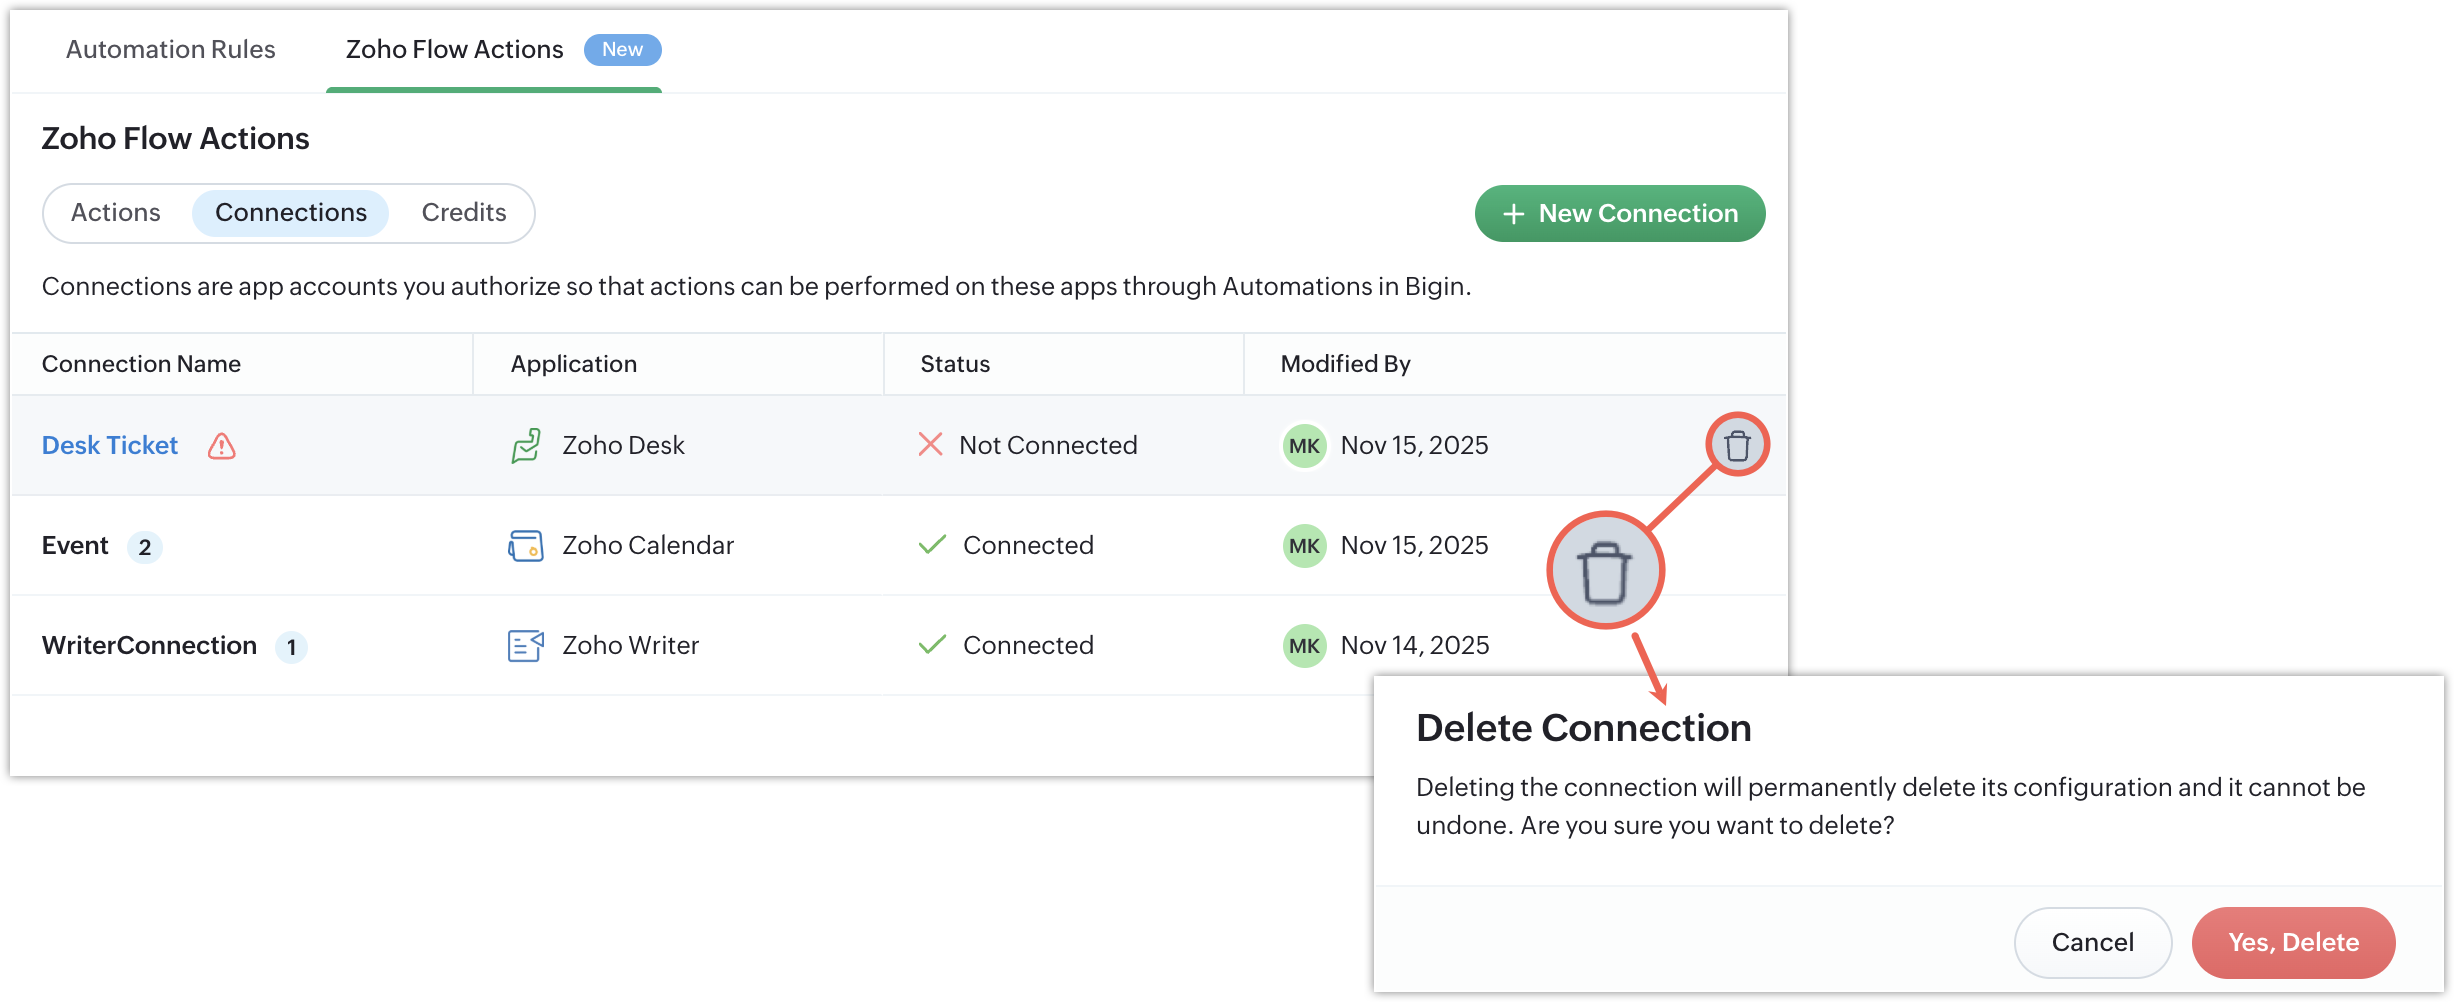
If an action or connection is linked to a rule, deletion will be restricted.