Working with Sandbox
Rebuilding a sandbox

Note: Rebuild was earlier referred to as refresh
When your Sandbox setup is not in sync with the Production setup, any testing that you conduct in Sandbox will not be relevant when deployed to production. So it is important that you always update Sandbox by using a Rebuild Sandbox option. This ensures you have the latest production configurations and data in your sandbox.

Note
- Upon rebuilding the sandbox only changes made to the configuration is updated, data is not transferred from the production to the Sandbox account. During every rebuild, populated data will reload newly.

Points to remember
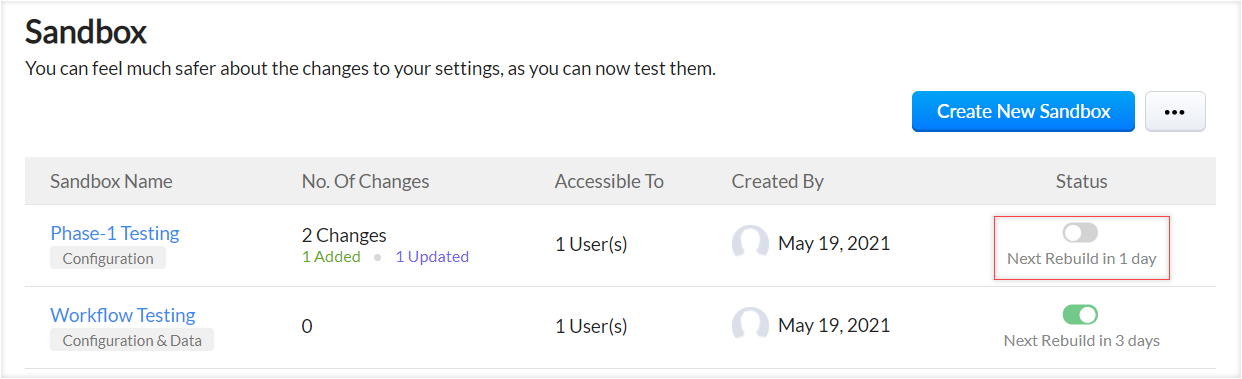
- You can rebuild the sandbox created for
(i) Configuration and Data type only once in 3 days,
(ii) Configuration type only once in a day
- Any changes made in the Sandbox settings which is not yet deployed to Production will be lost when you rebuild the Sandbox. All settings will be replaced with those in the Production setup.
- Data and settings done to the Sandbox will be lost if not already deployed to the production account.
- Changes deployed from Sandbox over the last 6 months will be displayed under Deployment Logs.
- Trial edition users cannot rebuild the sandbox.
- Once you have deployed changes to production, the remaining changes in the Change set will be retained until the next rebuild.
To rebuild Sandbox
- Go to Setup > Data Administration > Sandbox.
- Click the Rebuild Sandbox button on the top right.
Editing a sandbox
Users with Manage Sandbox permissions can edit the configuration. They can change the name and description and add or remove users who can access the sandbox.
Note that the fields, sandbox type, and data to be populated can only be modified and saved if the Rebuild Sandbox option is available.
To edit a sandbox
- Go to Setup > Data Administration > Sandbox.
- Click the sandbox you want to edit.
- Click the
icon from the top right corner and click Edit.
- In the Edit Sandbox popup, make the necessary changes.
Setting a default sandbox
Users and Developers who have access to more than one sandbox account can set a default account for themselves. This also helps users to switch between different sandbox accounts easily.
To set a Sandbox as default,
1. In the CRM account, click the profile on top-right corner.
2. Click the org dropdown and click Manage.
3. In the screen, hover to the sandbox under Organization list and click Set as default.
Reviewing outgoing emails in a sandbox (Email Outbox)
Testing often involves verifying that automations, templates, and approvals generate the right emails. The Email Outbox keeps every sandbox‑generated message in one place, so issues can be fixed before deployment.
Accessing the Email Outbox
- Go to Setup > Data Administration > Email Outbox.
- The page lists all emails sent from the current sandbox.
On the Email Outbox page, you will see the email details.
- Outbox Emails: Subject line with an icon showing read/unread status. A tag beneath the subject states the send mode, for example Individual, Workflow Alert – Big Deal, Mass Email, Cadence, Connected Workflow, and more.
- Record Name: Clickable link to the record (module name shown below).
- Sent By: User name and timestamp.
The emails can be viewed based on criteria like All Emails to see complete history of emails, and Unread Emails for emails that are not opened in the Outbox.
Additionally, you can filter emails by the source of the email under the listed modes: Individual, Workflow Alert, Mass Email, Mass Email Follow‑up, Web Form, Kiosk, Cadence, Macro.
Filtering results
You can filter the emails by the source.
- Module filter (top‑right) – choose a module, such as Leads or Deals.
- Date filter – Any time, Today, Yesterday, This Week, Last Week, or Custom Range.

Mass‑email behavior:
|
Scenario
|
How it appears
|
|
Merge‑field personalization for customers
|
Each personalized email is a separate entry.
|
Retention and clean‑up rules
- Emails remain in the Outbox for 60 days.
- Rebuilding the sandbox permanently deletes all Outbox entries.
- Emails linked to records that are later deleted are removed automatically.
- Deleting an email template does not remove the corresponding Outbox entry.
- Manual deletion and email analytics are not supported inside the sandbox.
Deactivating a sandbox
There might arise situations where you do not need a sandbox for a period of time. For instance, your organization is undergoing major automation changes, sales restructure etc. and you do not want the users and developers to test admin related changes in the sandbox temporarily. At the time you can deactivate the sandbox account .
Only those CRM users who have access to the Sandbox account can deactivate it. Upon deactivation developers and other users will not be able to access the account.
Points to remember
- Changes to the production account cannot be deployed until the account is reactivated .
- After reactivating the sandbox, all un-deployed changes listed in the Change Set before deactivation will be retained and can be deployed to production.
To deactivate Sandbox
- Go to Setup > Data Administration > Sandbox.
- Click the sandbox you want to deactivate.
- Click the
icon from the top right corner and click Deactivate.
- Click Deactivate to proceed with the deactivation of your sandbox.
Alternately, you can toggle the Status from the Sandbox list page.
Deleting a sandbox
You can delete the sandboxes that you no longer need to test or once the changes are deployed to the production. Users with Manage Sandbox permission can delete sandbox.
To delete a sandbox
- Go to Setup > Data Administration > Sandbox.
- Click the sandbox you want to delete.
- Click the
icon from the top right corner and click Delete.
- Click Delete to proceed with the deletion of the sandbox.
Alternatively you can delete it from the Sandbox page, by clicking the delete icon next to the sandbox name.
Note:
The developer and the CRM users will not be able to access a deleted sandbox.