Exporting Data From Zoho Desk Modules
Exporting data from Zoho Desk allows businesses to migrate records to other platforms, ensuring a smooth transition. It also provides a secure backup of critical help desk data, helping businesses meet compliance and audit requirements. In addition, exporting data enables businesses to conduct offline analysis and generate reports in other applications.
For example, businesses can use their native applications to perform trend analysis, forecast resource allocation, and budget analysis for proactive decision-making.
Difference between Export and Data Backup
- Export: Allows users to manually export records from individual modules (e.g., Tickets, Contacts, or Accounts) in CSV format. It is also useful to apply filters and extract only specific records, for example, tickets from ABC Corp that are overdue, contacts who purchased x product last month.
- Data Backup: Provides a complete backup of the help desk data, including email threads, attachments, and other critical information such as tickets, contacts, products, KB articles, and so on. Unlike Export, Data Backup cannot be done for selected modules.
Availability
 Permission Required
Users with the permission to Export Records can export data from the Desk modules.
Check Availability and Limits
Exporting data from Zoho Desk
Users can choose specific modules and apply different options for exporting records in the CSV format. Here's a breakdown of the available export options:
All records
Users can export all records from a selected module (e.g., all Tickets, Contacts, Accounts, Tasks, etc.).
Export based on views
Users can export records based on custom views that have been created in the module. For example, a manager who has created a custom view called "John's Tickets for Review" can export this view for review instead of manually filtering all tickets.
Export based on criteria
Users can export records based on specific criteria. Multiple criteria can be applied to filter the data. For example, users can export "Closed Tickets" "Last month" for "X product" with issue "Manufacturing Defect".
Select fields to export
In addition to selecting records based on views and criteria, users can choose either all or specific fields to export.
- All fields: Users can export all available fields from the module.
- Specific fields: Users can select only the fields they want to export. This option includes fields from all layouts within the module, allowing users to choose the desired fields.
Timelines
Users can specify a timeline and export the records. Note that this option is visible only when All Records is selected. The export can be based on:
- Created time
- Closed time
- Modified time
- Completed time
Date range
Users can export records within a predefined or custom date range:
- Custom date range: Users can select a start and end date for the data export.
- Predefined Date Range: Users can select from available date ranges, which can be found when creating a report.
Encrypt with password
The exported modules may contain sensitive information that should not be accessible to unauthorized users. Enabling the Encrypt with Password option protects the exported file with a password, ensuring the contents remain secure and confidential.
The password set for the export must be shared with the respective customer via an authorized channel such as email or chat for them to be able to access the file.
To set the password successfully, ensure that it meets all of the criteria:
- Eight characters
- One uppercase character
- One lowercase character
- Numbers (0-9)
- Special character (!@#$%^&*)
For security reasons, only the user who created the password can access and view the password entry on the Export homepage. Other users will not be able to access or view the password.

Points to remember
- Modules available for export: Users can export data only from one module at a time. They can export data from both standard and custom modules.
- Export is department-specific, hence cannot be viewed when All departments is selected.
- Date and time: All Date/Time columns are exported in GMT format, regardless of the user’s timezone.
- Record Count: Users can export up to 50,000 records at once. Data above 50,000 can be retrieved as backup.
- Module-based limitation:
- When the Agent is selected, All Records will be exported with all respective fields; the View-Based Export and Criteria-Based Export options will be disabled.
- When the Article module is selected, the Criteria field will be disabled. Articles can be exported based on views, but not based on criteria.
- Blueprint views: All the blueprint views cannot be exported, blueprint views such as:
- Active Blueprint Tickets
- All Transitions
- My Transitions
- My Team Transitions
- Unassigned Transitions
- A maximum of five lookups can be exported using lookup ID and lookup names in specific fields. Any additional lookup selected will only have the lookup ID exported when a lookup field is selected.
- Revoke export: Users cannot revoke an export once it has been initiated.
To export data
- Choose the desired Department.
- Go to Setup > Data Administration > Export and click New Export.
- In the New Export page, choose the Module.
- Select the desired export records option:
- All Records
- Export Based on Views
- Export Based on Criteria
- Choose between All Fields or Specific Fields for export.
- Choose the desired Time Frame, either by selecting the time in Based on field or by specifying a predefined or custom date range.
- Enable Encrypt with Password if required.
- Click Export.
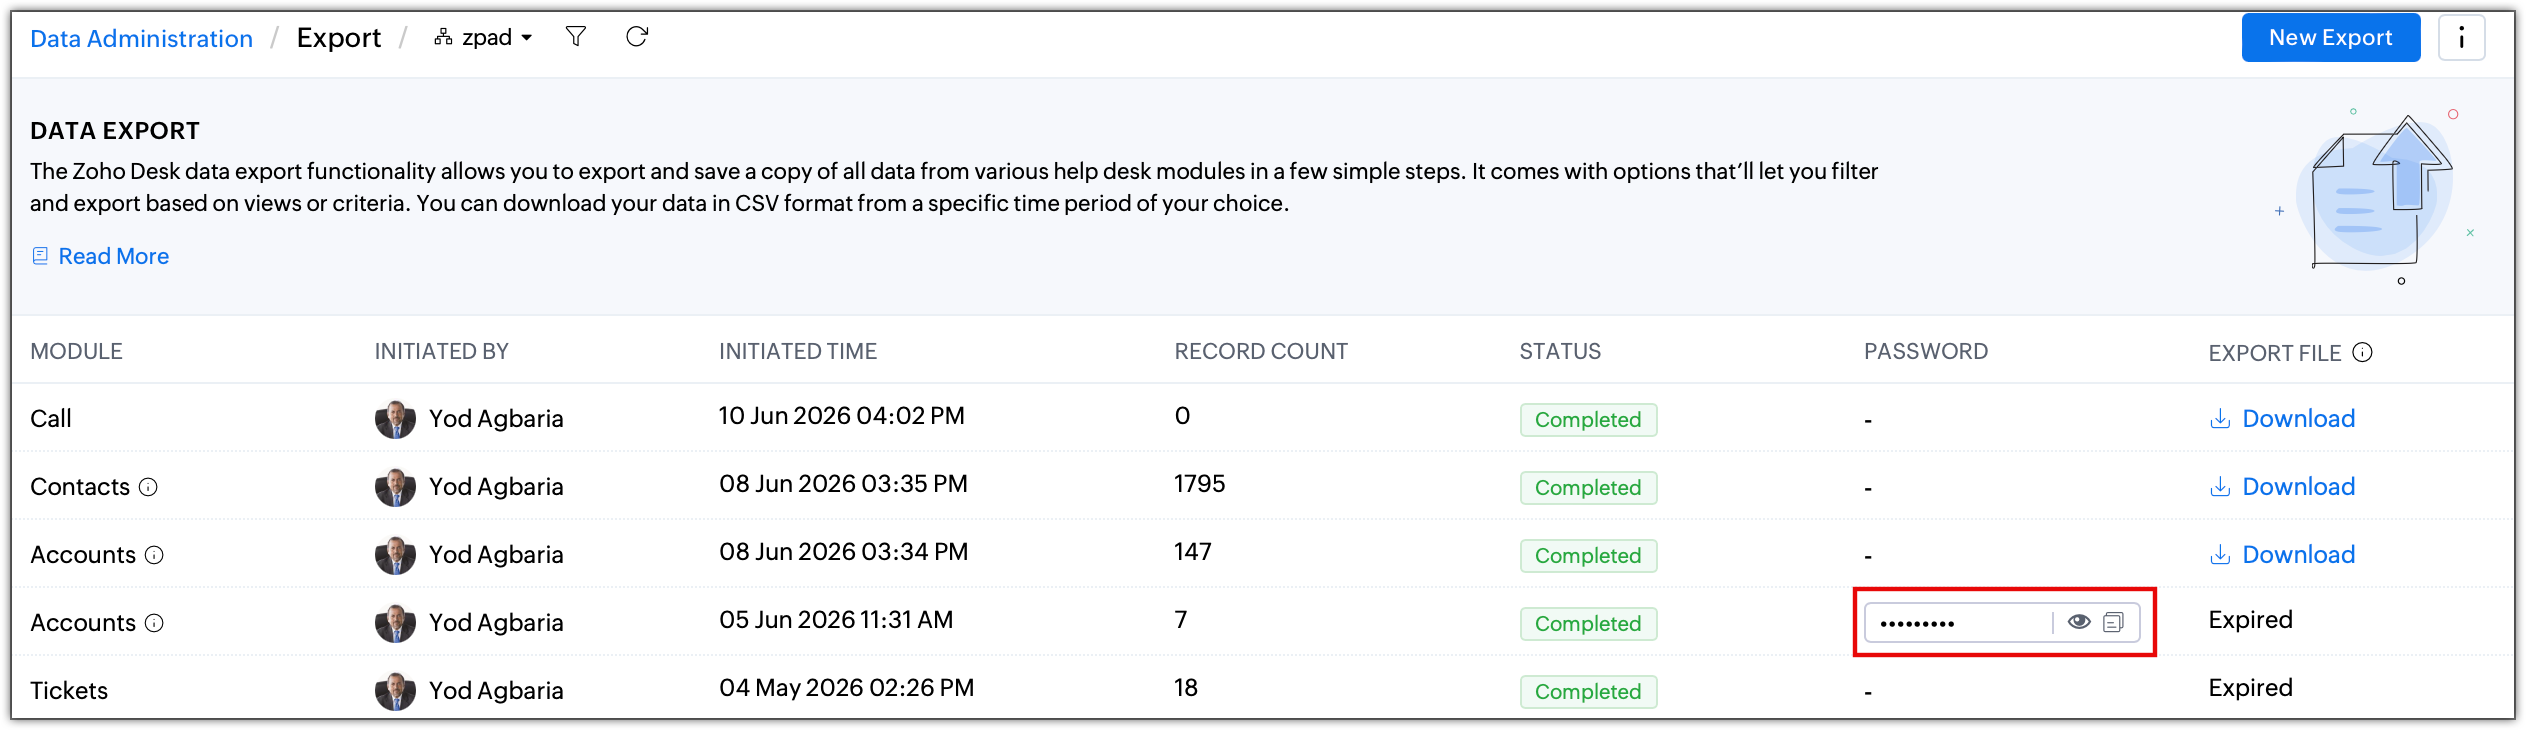
Accessing export history
Once the user initiates the export, they will be redirected to the export history page. On the export history page, users can view details about each exporting a tabular format:
- Module: The module from which the data was exported (e.g., Tickets, Contacts, etc.)
- Modified by: The user who initiated the export.
- Initiated time: The time when the export was initiated.
- Status: In progress, completed, failed.
- Export can fail due to several reasons, such as internet connectivity issues, or technical glitches at the backend.
- Export file: Contains the exported file, which users can download. The downloadable link is valid ONLY for 7 days.
- Once the export is complete, the user will be notified via email, as well as in the notification center in their Desk account.
- Export history can be filtered based on module, initiated by, initiated time, and status.
- Audit log: Export history can be viewed in the audit log as well.