Setting up Path Finder
You can decipher from its name—Path Finder help find customers' paths taken in your business.
Your business infrastructure is a multi-layered maze through which your customers enter and exit in a non-linear fashion. On one side you have different platforms upon which you conduct your business and on the other you have different processes that are relaying deliverables from one team to the other. In order to track your customer navigation through these front-end and back-end structures, Path Finder can perform the following capabilities upon configuration:
- Identifying and recognizing prospects and customers wherever and however they go
- Capturing their actions and interactions
- Recording their overall navigation
How does Path Finder identify, capture and record paths?
Path Finder is built to identify customer events and navigation as signals. Every time a customer performaces an event, the signals configured in Path Finder are stimulated and connected together in the order of activation. Imagine a neural network—like how brain cells synapse with each other and transmit messages whenever there is a signal, Path Finder connects activated interactions to form paths.
To connect interactions across your business, Path Finder relies on three important components:
Stages
Stages are milestones of a journey.
Journey, in general, have the following characteristics: they are non-linear, influenced by experiences, unpredictable, and importantly, they have stages. These stages indicate progress like milestones and reveal patterns.
Let's look at a prospect's journey, for example. They ideally start anew, explore, communicate with your business before making a decision. These are in itself brief stops in which they make micro-decisions about moving ahead or not. These advancing stages are Stages.
Or, consider your customer's shopping pattern. They will enter your business, browse through different products, add some to favorites, move some to cart, and complete the sale for a product. These are also steps your customers have been through in your business.
In both the examples, you would have understood that be it a sales funnel or your customers' journey on your product, their travel involved multiple brief stops which can be Stages.
Configuring Stages
Step 1: Define your journey objective
Because Stages form the backbone of a journey and it determines the result of the journey map, it is important to start with defining your objective. You need to identify what type of journey you'd like to discover and add those stages as Stages to map the journey.
Examples:
Micro-journey: Prospect management journey, pipeline governance, et cetera.
Macro-journey: Sales conversion, customer behavior analysis, et cetera.
Step 2: Jot down all the possible stops or stages
List all the vital stages involved in the journey you'd like to discover. Customers anyways take the order per their desire, so the list can be in any order.
Examples:
1. Lead created, lead qualified, lead converted, contact created, demo given, deal creation, negotiation, Decision-making, deal closure.
2. Electronics, Men's fashion, Home decors, Pets, Books, Movies, Automobile accessories, video games.
To configure Stages
- Navigate to the Path Finder and click Create Path Finder.
- On the ensuing Create Path Finder page, provide a name for your Path Finder. add a description, click Create.
- A draft version of the Path Finder is created. It is time to start adding Stages. Click Add Stage.
- To the Stage 1, provide a stage name, add a description, and click Create.
- Likewise, add the rest of your milestones as Stages. Click Add Stage.
If you are accessing Path Finder from Zoho CRM. Click here to follow the steps from CRM.
Managing Stages
Once you have added all the desired Stages to your Path Finder, you can do the following actions:
- Edit a Stage: To edit the name and description. Two Stages cannot have the same name.
- Delete a Stage: You can delete a State by clicking on the ellipsis that appears on hover.
- Mark as end Stage: End Stages indicate your customers' final objective. Marking a state end state will denote the journey is accomplished and will lead to the path to quit from the Path Finder.
- Prioritize a Stage: If two Stages have identical touchpoints, the first in the order will be executed.
If you'd like to prioritize the execution order, you can do so by a simple drag and drop of the Stages. Alternatively, you can also label the order.
Touchpoints
Touchpoints are access points present in your business.
At each stage of your business, you may have multiple junctures like a button, link, chat box, email, through which your customers interact with you or your business. These interactions are imprints, which if connected with each other in the order of occurrence will constitute a path.
What constitutes for Touchpoints in Zoho CommandCenter?
From the above, you would have understood what a touchpoint is—they are interaction hubs. Within Path Finder, the interactions observed at each of your Touchpoints are captured as Signals.
Read me: Signals in Path Finder
Signals are a powerful event bus service that can connect your tools with CommandCenter and capture, communicate or deliver events from various environments to CommandCenter.
Types of Signals
You can capture your events as two types of Signals: Standard Signals and Custom signals.
- Standard Signals are a list of events that are readily available from the Zoho applications connected with CommandCenter. For example: Record Created, Record Edited, Sending of a Survey, Attending a Webinar, and so on.
- Custom Signals is a facility to capture events observed in other environments of your business. Click here to learn more about Custom Signals. For example: Added to cart, Marked as favorite, clicked on the products tab, used the EMI calculator, are different interactions or events that can be configured as Signals for the respective Touchpoints.
Configuring Touchpoints
Step 1: Curate touchpoints
For each state, you might have contextual touchpoints to serve a purpose. For example, in the prospecting stage, you might have webform as an interactive asset—that is a touchpoint. Likewise, curate a list of touchpoints available and applicable for each state you have configured.
Step 2: Configure Signals
You can configure up to five touchpoints for a stage.
- Start adding touchpoints within each stage. It is important to note that a stage cannot be empty.
- Choose the touchpoints, select the Signals, and provide more information about the Signal (event).
Step 3: Configure the touchpoint pattern
If you have more than one touchpoint in a stage, you can determine if you'd like for all the Signals to be captured before extending the path with any of the other stages, using the and/ or logic.
Touchpoint pattern :
Touchpoint behavior is provided when there are two or more touchpoints in a stage. By default, the touchpoint pattern will follow the 'or' behavior—meaning, the path will be connected to this stage and proceed to connect the subsequent one even if one of the configured touchpoint is applicable. If you'd like to be accurate, you can make the touchpoint pattern follow the 'and' behavior, where the Path should qualify for both touchpoints. Meeting one touchpoint and not meeting or still waiting for that Signal to trigger, will put the path on hold and subsequently the navigation.
Step 4: Manage touchpoints
- For a more granular path discovery, you can choose the characteristics of the record that needs to be associated to a particular touchpoint using the record criteria.
- If you have similar touchpoints in a different stage and do not like to process them, you can choose to stop processing the other Stages' touchpoints once a record reaches this state. This is like an end state for touchpoints.
To configure Touchpoints
- Select the stage you want to add your touchpoints to.
- Click Add Touchpoint.
- On the Choose Signal page, select the source of your Signals: Zoho apps or Custom Signals.
- Select the desired events and related source information.
- If you'd like to create Custom Signal, click Custom Signal beneath the standard Signals and do the following:
- Provide a Signal name.
- Add additional Signal details. Furnish the Name and Data type. Create and furnish as many events as Custom Signals.
- You can also use existing Signals. To do so, click on Custom Signal, and choose Use existing Signal button displayed aside New Custom Signal title.
- Select the Signal and click Use this Signal.
- Provide Signal pattern to qualify and refine the records.
- Provide Touchpoint pattern (and /or) if you have more than one touchpoint for a stage.
- Select the Stop processing other Stages for same touchpoints once a record reaches this stage checkbox, if do not want other Stages with similar touchpoints to be processed as well.

Note: You can use Record ID and Module Name as parameter names to associate the signal with a specific CRM record.
Identifiers
Identifiers are unique characteristics of a prospect or a customer that will help identify and recognize them in your business.
For example: Registration ID, Last name, Company name, Invoice number, Mobile number, and so on are unique parameters that could indicate a prospect, customer, or their entity.
Whenever your prospects/customers interact with your business, Path Finder can readily identify and associate them to their existing path (if) or create a new one for them. Identifiers are, thus, crucial to ensure accuracy in paths. It is also by the virtue of identifiers, can you understand the different buyer personas in your business.
How do Identifiers work?
In Path Finder, like how you'd add modules as touchpoints, fields within a module will constitute for identifiers. Field values that your prospect/customer provide as and along their persisting interaction will also be accrued alongside their journey. Based on their growing information, common identifiers in one touchpoint will be mapped with the other in the neighboring touchpoint to connect interactions together.
Here are quick facts about how Identifiers validate a prospect or a customer for accurate mapping:
- Path Finder considers only the value of the identifiers. That said, you just have to ensure you have fields between two touchpoints that might have overlapping values.
For example: Touchpoint 1 may have Last name as one of the identifiers and Touchpoint 2 may have Last name and Email. With the two touchpoints matching with the identifier Last Name, the touchpoints get connected, simultaneously connecting the records and developing the path. - Now that you know that two touchpoints should have overlapping values, the question of how do I know the touchpoints are neighboring. For a journey is non-linear and can be unpredictable, it is fair to have this question. Only for that reason, Path Finder lets you configure five identifier values for one touchpoint. If not for one field, you can have four other field values, that can have a commonality with other touchpoints.
Also, a quick tip is to have an abstract idea as to what could be the next touchpoint your customer might interact with and ensure the identifiers in those touchpoints have overlapping value. For example: you can bundle your products with similar identifiers, your linear sales pipeline with overlapping field values in the order, and so on.
Configuring Identifiers
- Identifiers are a subset of touchpoints and it lists all the fields available in the module selected in the touchpoint.
- You can configure up to five identifiers per touchpoint.
To configure identifiers,
- Go to the touchpoint, click on the Identifiers field.
- Select the desired fields that could represent a prospect or a customer.
Click on How it works? cue to understand identifiers for different user types.
Managing Path Finder
Start tracking
Once you have laid down your Stages, touchpoints, and identifiers, it is time to start tracking journeys.
To start discovering, click Discover Paths on the configuration page.
Provide your tracking preferences
You can choose which records should be tracked. You can track records that are already available, records that are created after publishing Path Finder configuration, or records that are created from a particular date. Choosing to Save and track, will publish the configuration.
Once published, any edits made to the configuration post tracking will be versioned as drafts. At a time, only one version of the configuration will be executed.
- If you have made changes to the existing journey and published it, ensure the identifiers you chose have values in your records. If not, the Path Finder will stagnate the expedition.
- Removing a Stage from the configuration will remove the record from the path, subsequently removing the records from the reports.
Path Finder tracks real time journeys. That said, you can verify your setup in the setup overview and view reports as and when records move from the reports page.
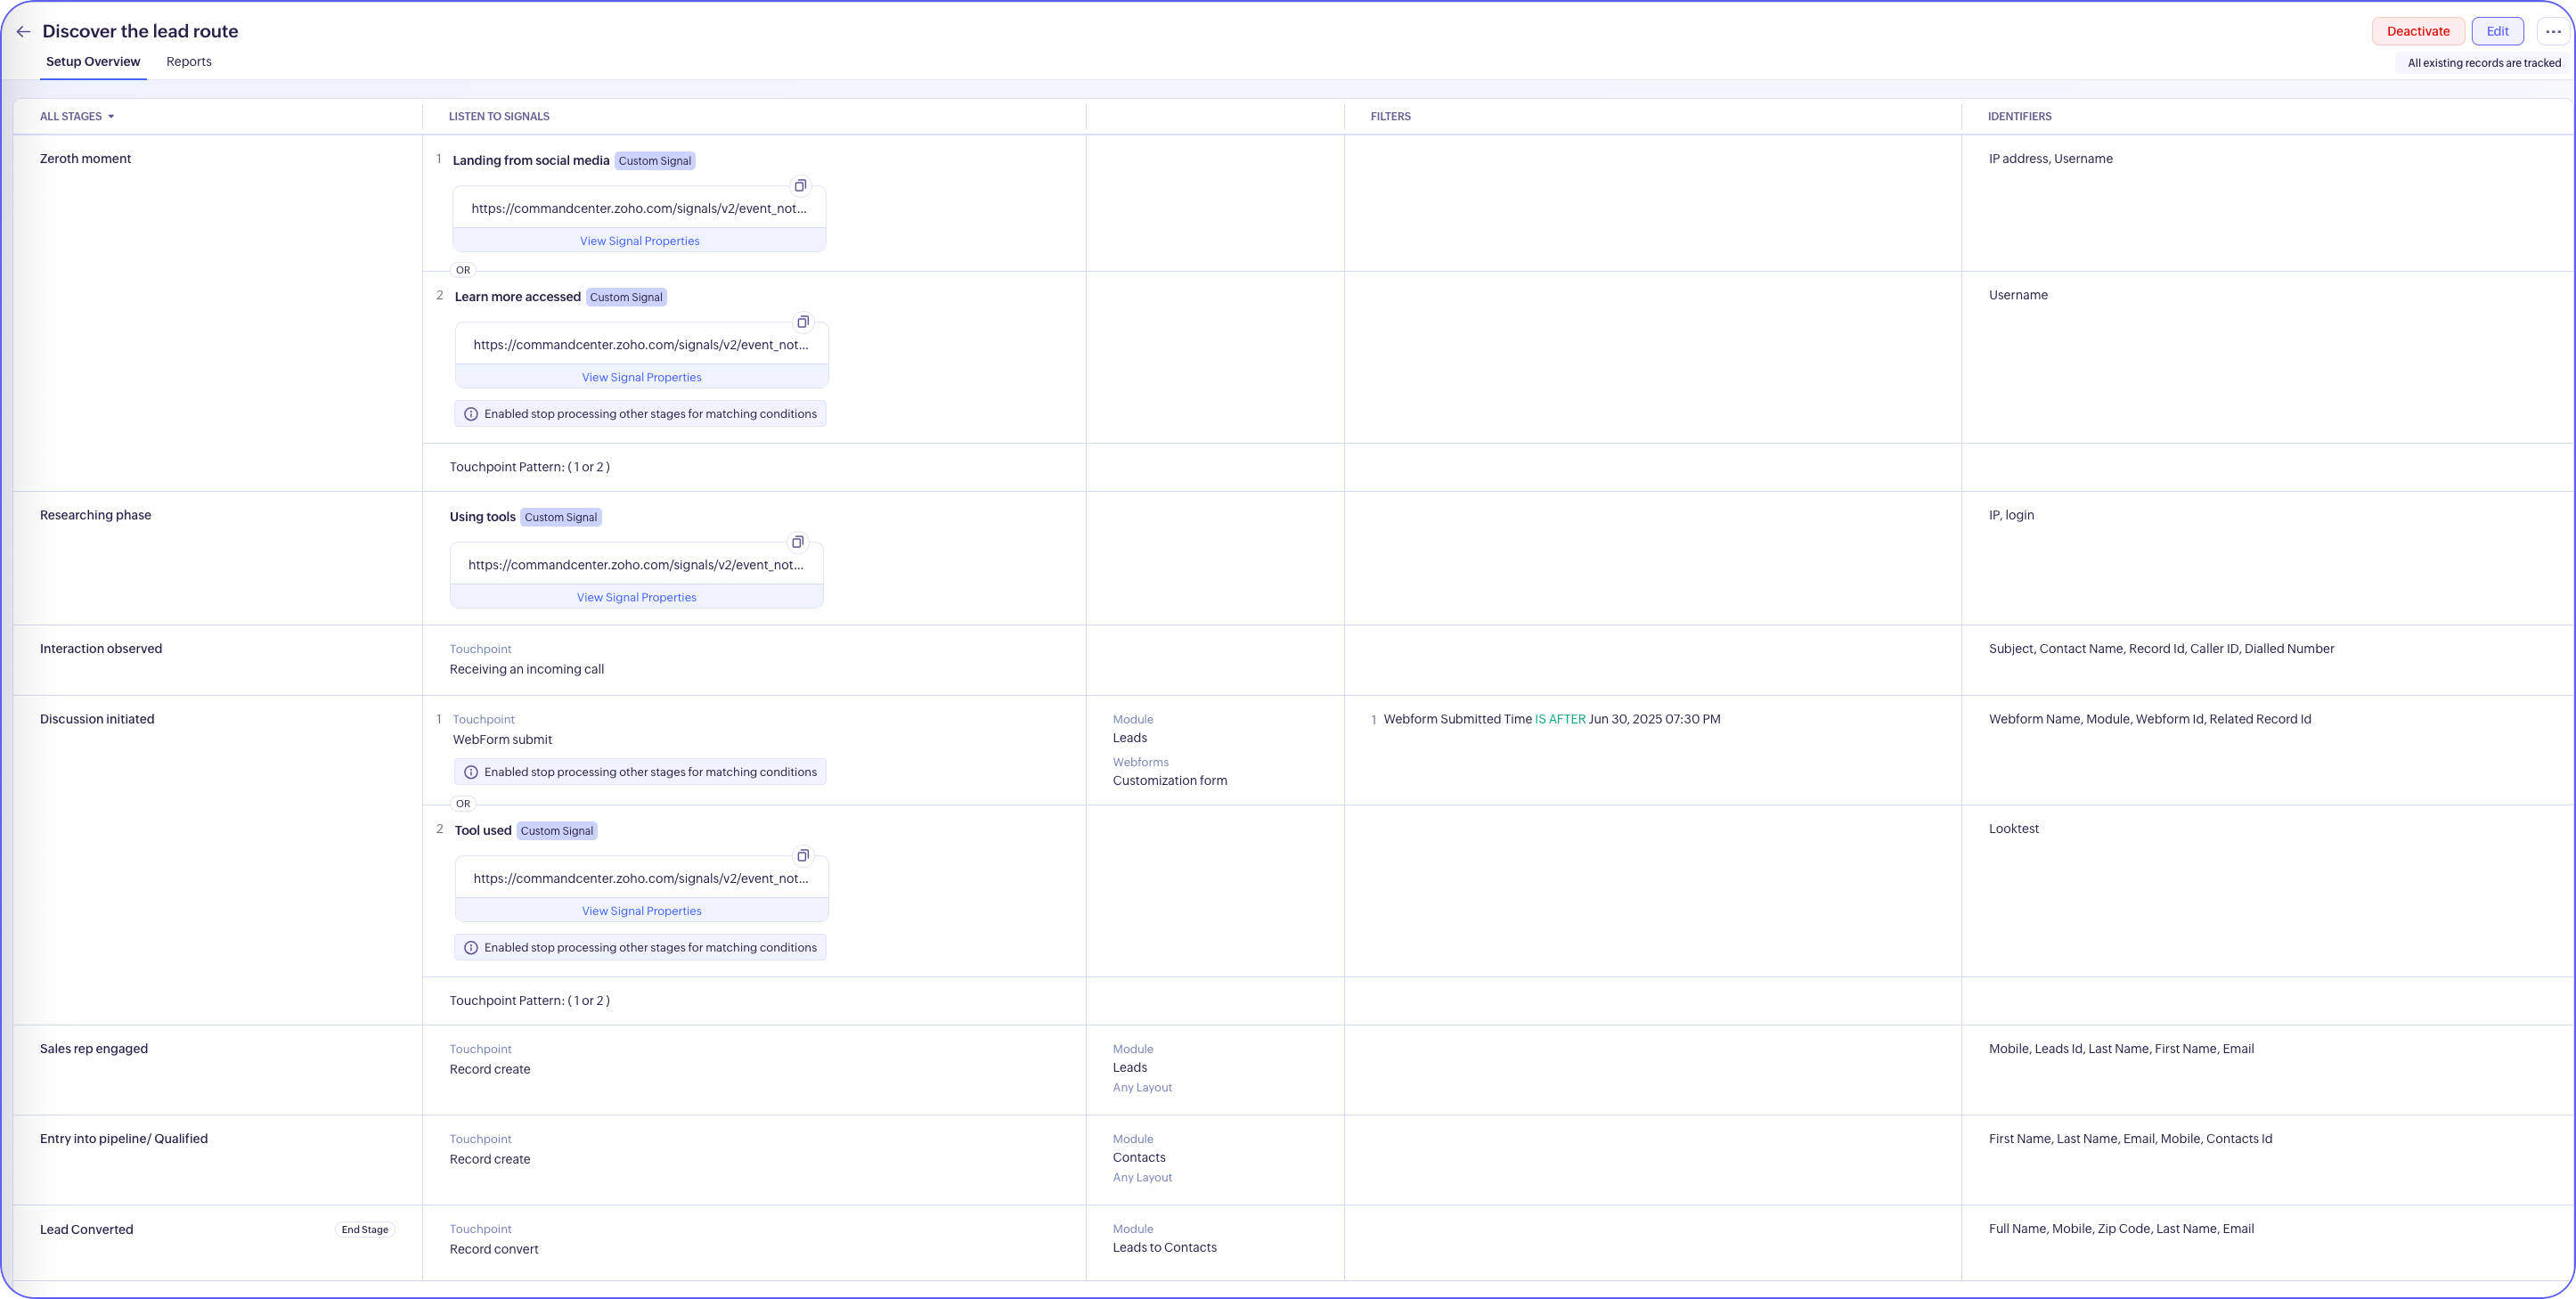
Path Finder displays three types of visual reports: Path, Sankey, and Journey report. Click here to learn how to interpret these visualizations.
Manage Variables
Variables are fields from the touchpoints configured. For example, Lead generation> webform submission > webform name. Here Lead generation is your state, webform submission is the trigger for the touchpoint and webform name is the field you have provided values for. Likewise, if you have configured email as your touchpoint trigger, you'd have mentioned response to which email should act as a trigger. The name of the email becomes a variable.
How does it help you?
These line of attributes (variables) will be used as a parameter to sift reports, filters, and so on, to get a finer analyzes outside Path Finder.