Adding a New Record
Integration Setup
To push your form entries to Bigin,
- Navigate to the Integrations tab on your form builder.
- Click Bigin under CRM from the left menu and click Integrate.
- If you are a part of multiple organizations in Bigin, you will be prompted to select an organization.
- Select the Bigin Module to which you want to push your form data.
- Map all the mandatory fields in Bigin to the corresponding Zoho Forms fields. To map other fields, click + Add Fields.
- Once all the fields are mapped, you can select the necessary Actions to be performed when your form data is pushed to Bigin.
- Click Integrate to save your settings.
Supported Modules
You can integrate your forms with the following Bigin modules:
- Deals
- Contacts
- Companies
- Products
- Tasks
- Events
Supported Field Types
These are the Zoho Forms fields that can be mapped with the respective fields in Bigin.
S. No | Bigin Field | Supported Zoho Forms Fields |
| 1 | Single Line | Single Line, Regex, Name, Multi Line, Name, Address, Phone, Email, Date, Time, Date-Time, Website, Unique ID, Radio, Multiple Choice, Checkbox, Number, Decimal, Currency, Slider, Rating, Formula, Dropdown, Radio, Matrix Choice, Image Choices, Terms and Conditions,UTM Campaign Details, Payment Status, Payment Currency, Payment Transaction ID. |
| 2 | Multi Line | Single Line, Multi Line, Regex, Name, Address, Phone, Email, Date, Time, Date-Time, Website, Unique ID, Radio, Multiple Choice, Checkbox, Number, Decimal, Currency, Slider, Rating, Formula, Dropdown,Radio, Matrix Choice, Image Choices, Terms and Conditions, UTM Campaign Details, Payment Status, Payment Currency, Payment Transaction ID. |
| 3 | Email, Single Line, Regex | |
| 4 | Phone | Phone, Single Line, Regex |
| 5 | Single Select | Dropdown, Radio, Single Line, Regex, Matrix Choice, Image Choices, Terms and Conditions, Name, Address(Country),UTM Campaign Details, Payment Status, Payment Currency |
| 6 | Long Number | Number, Rating, Slider |
| 7 | Date | Date |
| 8 | Date & Time | Date-Time, Added Time |
| 9 | Decimal/ Percent | Decimal, Number, Formula, Rating, Slider, Currency, Payment Amount |
| 10 | Number | Number, Rating, Slider |
| 11 | URL | Single Line, Website, Regex |
| 12 | Multi - Select | Checkbox, Multiple Choice, Matrix Choice, Image Choices, Single Line, Dropdown, Radio, Terms and Conditions, Regex |
| 13 | Profile Image | Image Upload |
| 14 | Checkbox | Decision Box |
| 15 | Currency | Number, Formula, Currency, Rating, Slider, Payment Amount |
Lookup Filter
- In the Field mapping section, click Add Fields and choose Contact Name under Bigin fields. Click Configure Lookup Filter under Zoho Forms field.
- In the pop-up, define your Criteria. You can only include unique or mandatory Bigin fields while defining your criteria. The following fields can be used to define your criteria:
- Single Line
- Phone
- Single Select
- Long Number
- Number
- Date
To add more than one criteria, click the
icon.
- If you define more than one criteria, you can choose to perform a desired action when any one condition is met or when all the conditions are met by selecting OR/AND.
- After defining the criteria, you can select an action based on the results under Perform the action:
- If only one record matches: If only one record in Bigin matches the Search Criteria, the lookup field will be associated with that record.
- If more than one records match: When multiple records in Bigin match the Search Criteria, you can choose to:
- Associate the lookup field with the first matched record based on the record ID.
- Log an error without adding a new record to Bigin.
- Not fill the lookup field.
- If none of the records match: When none of the records in Bigin match the Search Criteria, you can choose to:
- Log an error without adding a new record in Bigin.
- Not fill the lookup field.
- Create a new record: Upon choosing this action,
- A pop up to map the Bigin fields to the respective Zoho Forms fields will be shown.
- Once the fields are mapped, you can select the actions to be triggered in Bigin.
- Click Done. The new record created will be associated with the lookup field.
- Click Done.
- To make any changes to the configuration in the lookup filter, click View/Edit Lookup Configuration.
Trigger Actions in Bigin
Workflow: This option triggers Workflow Rules configured in Bigin while pushing data from Zoho Forms.
Attachment: This option pushes attachments associated with each form entry to Bigin.The following attachments can be pushed from Zoho Forms to Bigin:
- Signatures
- File upload/ Image Upload field attachments
- PDF of form submissions
You can choose to push the Default Template, Custom Template(s), PDFs sent in form submission workflows, and PDFs sent in approval process as attachments to Bigin.
If you choose PDFs in form submission workflows, the PDF template sent to the respondent after submitting the form (for example, the PDF downloaded from the Thank You page, or any PDF sent via email notification) will be pushed to Bigin as an attachment.
If you choose PDFs in approval process, the PDF template sent to the respondent along with the Final Approval Email will be pushed to Bigin as an attachment.
Upsert Record: The Upsert Record option lets you update existing records in Bigin with new values. Upon selecting this option, if a record with the identical value exists in Bigin, it will be updated with the new values. If not, a new record will be created in Bigin. You can arrange fields in the order in which upsert should happen.
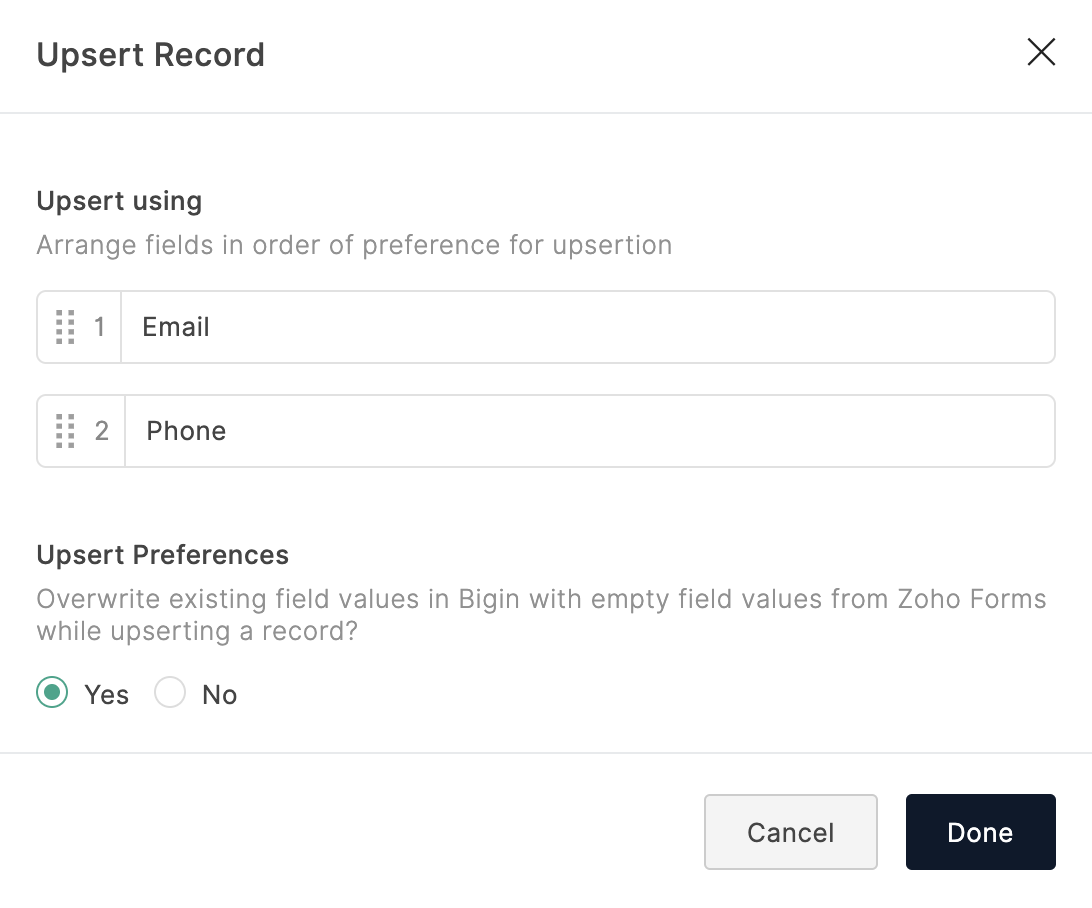
Here's how upsert works:
For example, you arrange an Email field before a Company field. When a form is submitted with the Company as Zylker and Email as rebecca@zylker.com,
- First, it's checked if the email rebecca@zylker.com exists in Bigin. If it does, then the mapped fields get updated to the record associated with that email address.
- In case the email address rebecca@zylker.com does not exist in Bigin, it's checked if the company Zylker exists. If it does, then the mapped fields get updated to the record associated with that company name.
- If none of the field values exists, then a new record with all the mapped details is created in Bigin.
- You can also choose to overwrite existing values in Bigin with empty field values from Zoho Forms or exclude empty values while upserting a record.
- Click Done to save your preferences.
 Note: Only the fields that are configured with 'do not allow duplicates values' in the respective module of your Bigin will be displayed in the Upsert Record option in Zoho Forms.
Tag Records: This option lets you add a tag to the records that are pushed to Bigin. You can create a new tag or use values from a form submission to tag records. You can also enter existing tag names created in Bigin and the records will be associated with that tag.
Approval: This option pushes form entries to your Bigin approval list instead of adding them to your module. You can manually approve these records in Bigin to add them to a module and discard the spam entries.
Set Alert on Integration Failure
- Click Set Alert in the top-right corner.
- Configure the email alert template and click Save.
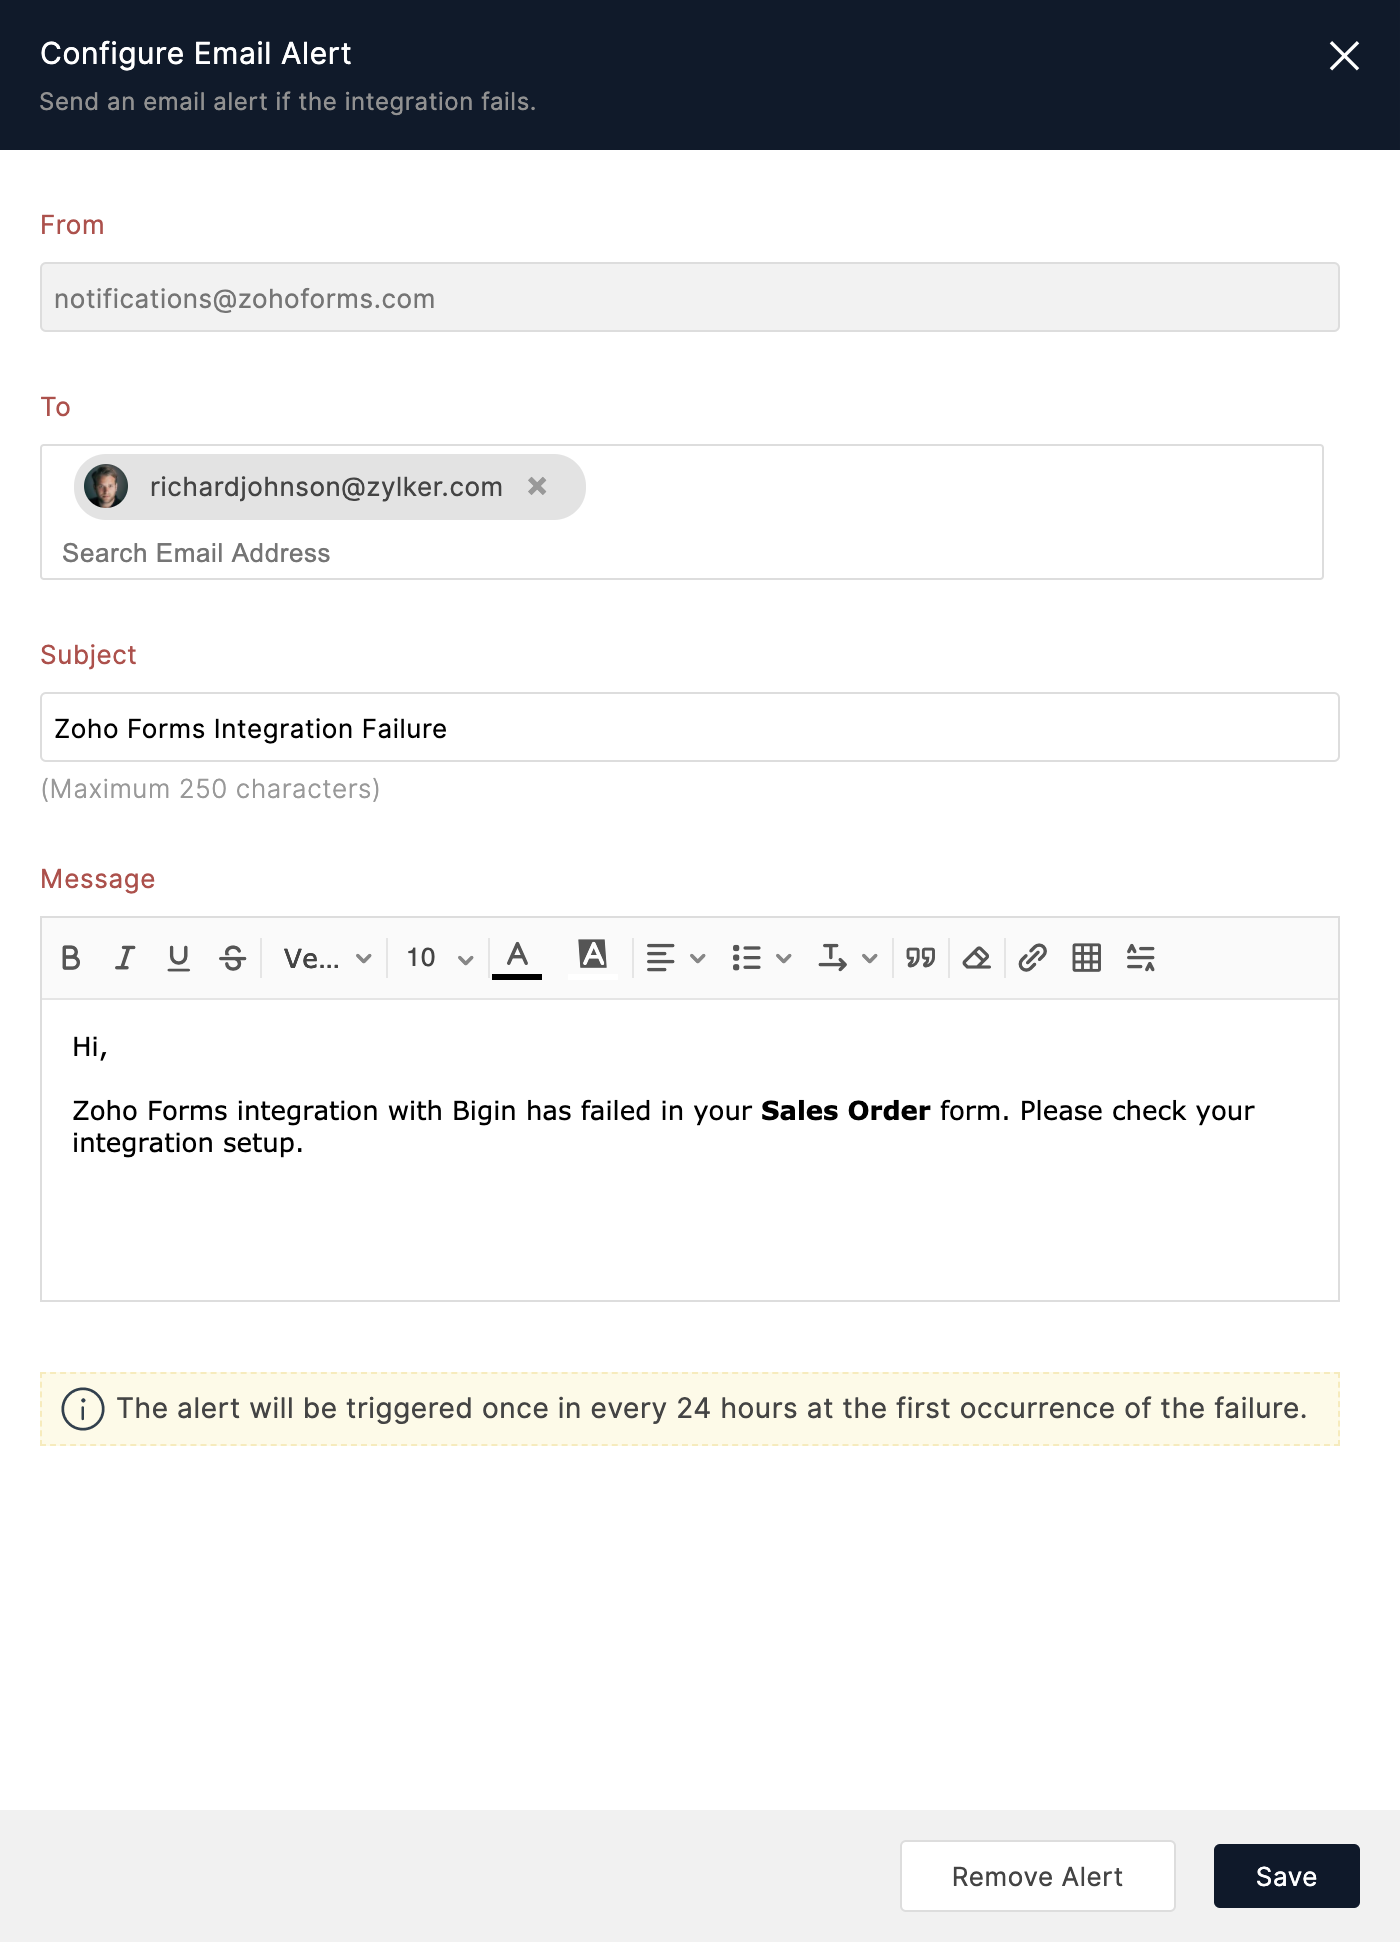
Note:
- The option to set an email alert on integration failure is available only in our paid plans.
- You can send email alerts to a maximum of 5 users within your organization.
- An email alert will be triggered only on the first occurrence of integration failure every 24 hours.