Creating extension using CLI
Overview
Things to remember before you start
The manifest file
Every extension must have its own plugin-manifest.json file that defines its behavior. After defining this file, you can use client-side technologies like HTML, JavaScript, and CSS to build your extension. You can host the extension privately or declare it public.
Private and public extension
You will have to declare the extension as private or public when you submit it to us. However, learning their differences might help you to plan your work better:
| Behavior | Private Extension | Public Extension |
|---|---|---|
| Visibility | Whoever has the installation URL will be able to access the extension. | Everyone |
| Review after submission | NA | Yes. The extension will be reviewed and published by us to Zoho Marketplace. |
Set up a runtime environment
- Install "Node.js" to set up a development environment for your extension.
- Download the file from the link below.
- Verify its version by executing the following command: $ node -v
 File download link: https://nodejs.org/en/
Versions supported by the Zoho Extension Toolkit(ZET): 6.0 and above
Install the Zoho Extension Toolkit
The Zoho Extension Toolkit (ZET) is a command line interface tool. You will be using this tool to build, test, and pack your extension. Execute the command that's mapped to your OS to install the tool.
| Your Operating System | Command |
|---|---|
| MacOS / Linux | sudo npm install -g zoho-extension-toolkit |
| Windows | npm install -g zoho-extension-toolkit |
-g denotes global installation. When ZET is installed globally, you will be able to execute the commands from anywhere in your machine. Otherwise, you will have to navigate to the path where ZET is installed and then execute the ZET commands. After installation, verify its version by executing the following command: zet -v
ZET options

- -v, -version - shows the version number
- -h, -help - shows the usage information
ZET commands
init
This command creates a new project template directory. Execute steps 1 to 4 in this section to get the folder structure created for your extension.
run
This command starts a local server with the current directory as the context. Execute steps 6 and 7 in this section to run your extension.
validate
This command validates the current extension. Execute step 8 in this section to validate your extension against the rules defined in the plugin-manifest.json file.
pack
This command packs the project into a zip file so that it can be uploaded to Zoho Marketplace. Execute step 9 in this section to pack your extension. This is the last step in the creation of an extension.
Create your first extension
How to create an extension
- Execute zet init
- You'll see a prompt where you have to choose a Zoho service for which you are creating an extension.
- Choose Zoho Projects
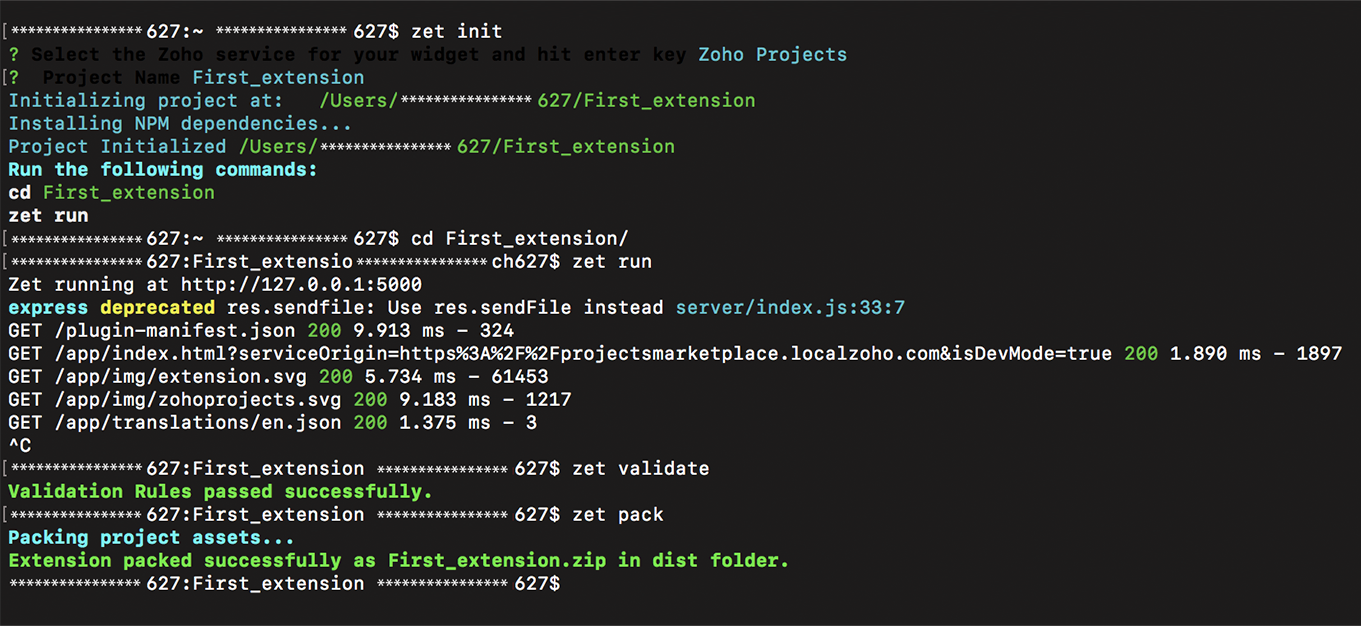
- Give a name for your extension. A folder structure will be created.
- Execute cd [extension name]
- This command will set the current path to the newly created extension's directory path.
- Navigate to the above directory in your machine and develop your extension using client-side technologies like HTML, JS, CSS, etc.
- Points to remember:
Define the manifest reference clearly. - Include this JS in your code before calling the JS SDK methods supported by us.
- Points to remember:
- Execute zet run
- This command starts a local server and runs the extension locally.
- Your extension will run on the port 5000. Ensure its availability before you execute this command.
- Hit http://127.0.0.1:5000/plugin-manifest.json or http://127.0.0.1:5000/app/index.html to confirm whether the server has started successfully. You can also test the extension in the developer mode before validating it.
- Execute zet validate
- This command checks whether the extension meets the guidelines defined in the plugin-manifest.json file. Learn how to configure your plugin-manifest.json file here.
- A success message will be displayed in green if the file passes validation. In case of failure, make changes accordingly and execute zet validate again.
- Execute zet pack
- This command compresses the files and folders essential for running the extension and gives a ".zip" file as the output. The file will be present inside the path "/{extension's directory}/dist".
- Sample file path: "/myfirstextension/dist".
- This zipped file should be submitted to ZApps irrespective of whether your extension is private or public.
Test extension in developer mode
Prerequisites
- You must be logged into your Zoho Projects portal to test the extension in the developer mode. If you don’t have an account yet, sign up with us here and have an active session opened on your browser.
- The extension should be running on the port 5000.
- Click
 in the upper-right corner.
 - Choose Developer Space under Integration and select Create Extension.
- Click Enable developer mode.
- The extension that’s running on the port 5000 will be rendered in all the predefined locations in Zoho Projects. You can navigate to the specified widget locations and test the extension.
- Only the extensions running on local will be rendered when developer mode is enabled and other extensions will be disabled.
- To exit from the developer mode, deselect the Enable developer mode button.
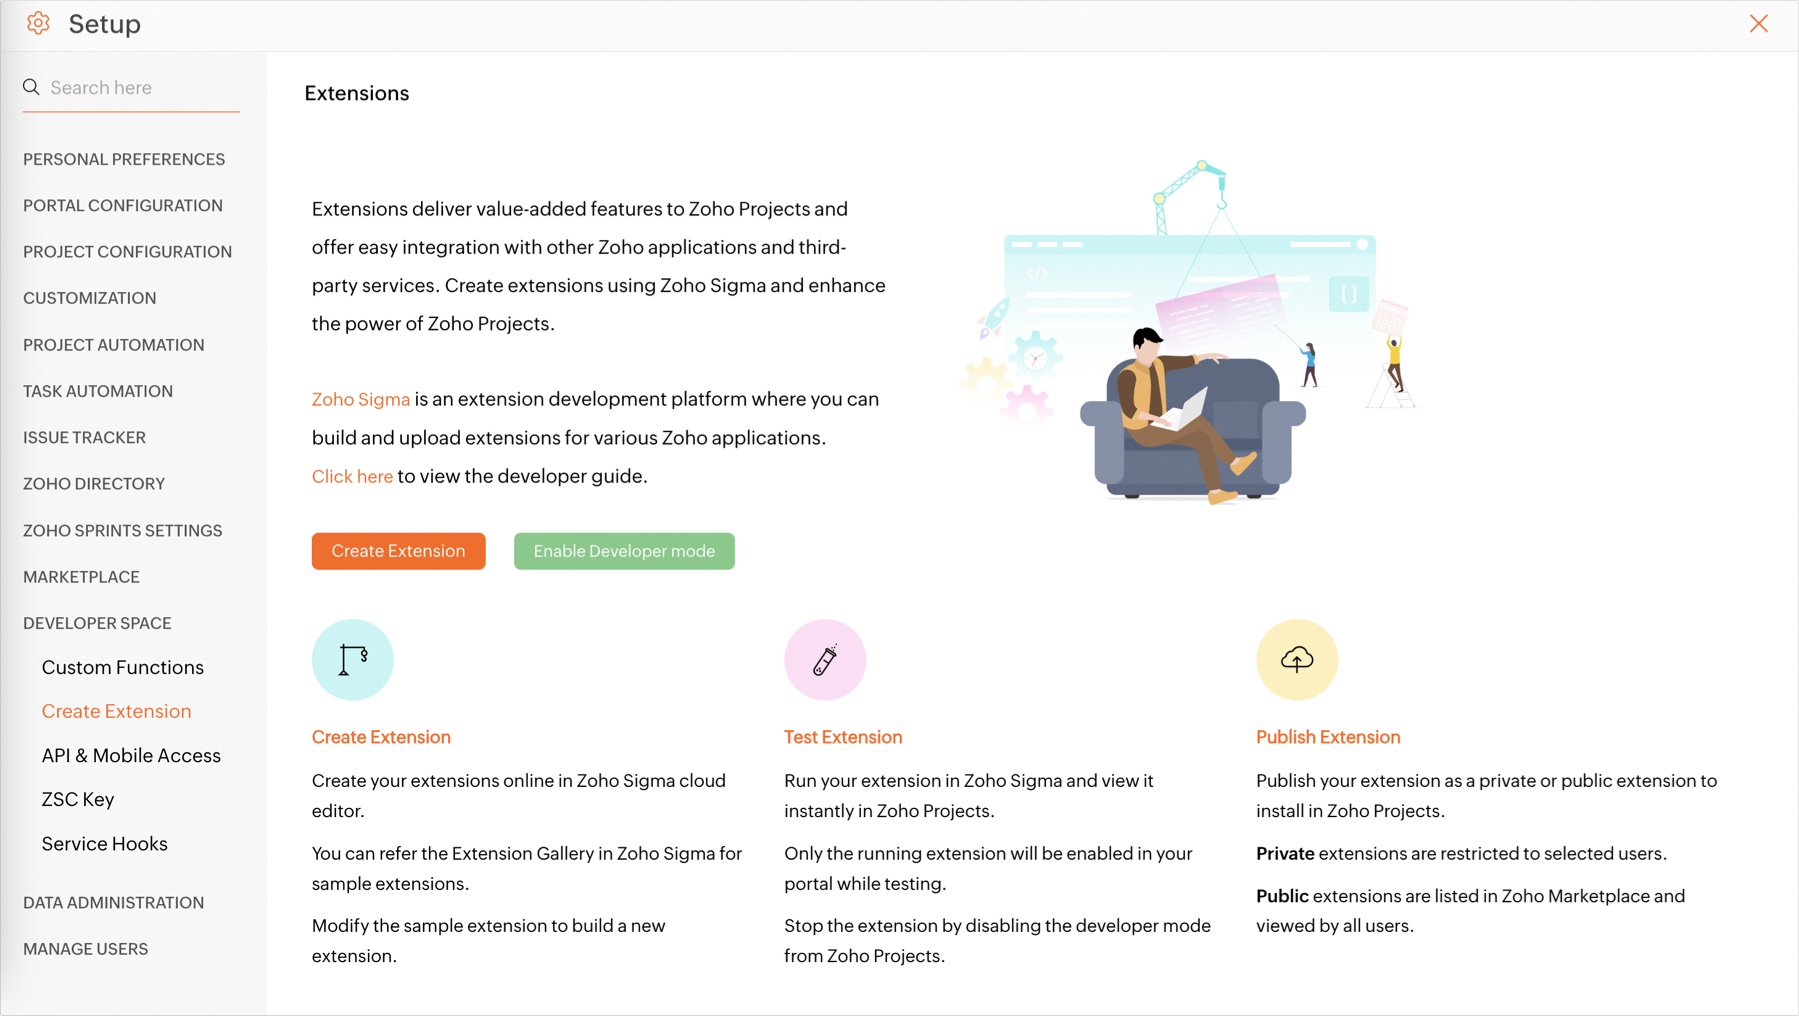
- Installation is not needed to test the extension in developer mode. Hence the value parameter in the configuration should be provided along with the name in plugin-manifest.json file.
- Do not authorize the connection once again since it was already done while creating plugin-manifest.json file.
- The data of the extension running on local is not stored in Zoho Projects. Instead, it takes the local storage of the browser.
- The extension that's running on the port 5000 will only be shown in the developer mode.
Update an existing extension in the marketplace
Developers can update their extensions whenever they want. For every update, the extension's version keeps changing. Here's how an available extension can be updated in the marketplace:
- Go to https://sigma.zoho.com
- Click the Extension Details icon.
- Click
 below the extension title.
 - Upload the new zip file (the packaged version of the extension).
- Accept the terms and conditions.
- Click Save as Draft.
- Click Publish in the top right corner.