Create and manage a DLP policy (Automatic classification)
Protecting sensitive data is essential for maintaining business integrity and regulatory compliance. Implementing a data loss prevention (DLP) policy in WorkDrive enables admins to automatically secure sensitive files by preventing unauthorized actions such as external sharing, downloading, copying, and printing or displaying warnings when sharing the files externally.
This guide will help you configure and manage DLP policies in WorkDrive.
Region-based pre-filled policy
To help you get started with Data Loss Prevention (DLP), we offer a Region-Based Pre-Filled DLP Policy option. This automatically creates a policy with region-specific sensitive content identifiers and applies a warning restriction on external sharing.
You can review, customize, and enable the policy across your team as needed.
 Note: This option is available only if no DLP policies currently exist in your WorkDrive account.
- Sign in to your WorkDrive account as an admin or super admin.
- Click Admin Console in the bottom-left corner.
This will open the Admin Console window, and the Dashboard tab will be selected by default. - Select Data Loss Prevention from the left pane.
- Click Create a new policy and select your region.
- Once done, click Region-based policy option. This will automatically create a DLP policy based on your selected region.
- Policy Rules: Based on the selected region, all the supported region-specific sensitive content identifiers will be pre-selected.
- Policy Restriction: External sharing will be enabled in warning mode.
- Review and modify the policy as needed. Below are the steps to modify the policy as needed.
- Once finalized, click Create Policy to enable it.
Configure a custom DLP policy
- Sign in to your WorkDrive account as an admin or super admin.
- Click Admin Console in the bottom-left corner.
This will open the Admin Console window, and the Dashboard tab will be selected by default. - Select Data Loss Prevention from the left pane.
- Click + New policy in the top-right corner of your screen and choose the Build a custom policy option if prompted.
The Create Policy window will appear. - Create a policy by entering a policy name and a short description about the policy.
- Under the Policy Scope field, you can define where and when this policy applies:
- Where to apply the policy:
- Apply to all of WorkDrive
- Exclude specific folders
- Selected folders only
- When to apply the policy:
- Policies are automatically enforced during actions such as upload, modify, or create. (This option is currently not customizable)
- Configure the appropriate Policy Rule by clicking the + Add Rule button. You can choose from three types of identifiers:
- Single Keyword identifier: This identifier scans the actual content of files for configured keywords or phrases.
To configure specific keywords or phrases: - Select Single Keyword Identifier.
- Provide a rule name for your reference.
- Specify the keywords or phrases to scan for.
Notes: - A keyword must have at least three characters.
- You can use a keyword containing multiple words (E.g., Security Certificates).
- Select Multi-Keyword Identifier as Identifier Type to add more than one keyword.
- Select Case sensitive to match the keyword exactly as typed. For example, if you search for "Zylker Tech" with Case sensitive enabled, only "Zylker Tech" will match, not "zylker tech" or "ZYLKER TECH".
- Click Add to finalize the rule.
- Sensitive content identifier: This identifier detects and classifies files based on country-specific personally identifiable information (PII), such as Social Security Numbers (SSN) or National ID numbers.
Note: Currently, the country-specific PII data category is only supported for a few countries (149 PIIs for 47 countries/regions). Please check the list of supported country-specific PII - Select Sensitive Content Identifier.
- Provide a rule name for your future reference.
- Select a country-specific sensitive content identifier from the available list.
- Click Add to finalize the rule.
- Regex Identifier: This identifier detects and classifies files based on a custom regular expression (regex) pattern. You can use it to identify any text format unique to your organization. For example, sequences that follow a structured number format, such as a credit card number "\b(?:\d[ -]*?){13,16}\b".
Note: Only files containing text that matches the exact regex pattern you provide will be flagged. - Select Regex Identifier.
- Provide a rule name for your reference.
- Enter the exact regex pattern you want the system to match (for example, a pattern representing a credit card number).
- (Optional) Enable Case sensitive if your pattern requires case-specific matching. For example, if you search for "Zylker Tech" with Case sensitive enabled, only "Zylker Tech" will match, not "zylker tech" or "ZYLKER TECH".
- Click Add to finalize the rule.
- File identifier: This identifier examines the file name or extension to identify sensitive files.
- Select File Identifier.
- Provide a rule name for your reference.
- Specify the keywords in the filename to scan for.
Notes: - A file name must have at least three characters.
- You can use a file name containing multiple words.
- You cannot add multiple keywords separated by commas.
- Specify the file extensions to match. You can add multiple file extensions, and each one should be separated by a comma.
- (Optional) Define the file size range in bytes (if required).
- Click Add to finalize the rule.
- Multi-Keyword Identifier: This identifier scans the content of files for multiple configured keywords or phrases. Use this option when you need to monitor several terms together under a single rule.
Note: All configured keywords operate using an OR condition. If any one of the specified keywords is found in a file, the entire rule is considered a match.
To configure multiple keywords or phrases: - Select Multi-Keyword Identifier.
- Provide a rule name for your reference.
- Enter the exact keywords or phrases you want to scan for, separated by commas.
Notes: - Separate each keyword with a comma.
- Each keyword must contain at least three characters.
- You can include multi-word phrases (for example, Security Certificates).
- Select Case sensitive to match the keyword exactly as typed. For example, if you search for "Zylker Tech" with Case sensitive enabled, only "Zylker Tech" will match, not "zylker tech" or "ZYLKER TECH".
- Click Add to finalize the rule.
- Assign a classification label to easily identify sensitive files and enforce restrictions such as blocking external sharing, downloading, copying, printing, or displaying warnings when shared externally. You can either select an existing label or create a new one to suit your specific requirements.
- To create a new classification label:
- Click + Create Classification Label under the Classification Label field to open the Create Classification Label window.
- Provide a name, description, and select a color for the badge.
- Select the action(s) you want to restrict:
- Block external sharing options for files
- Block download, copy, and print actions for files
- Display a warning before users share externally
- Click Create to finalize the new classification label and link it to your policy.
- Ensure all required fields are filled and click Create Policy. This will create and apply the new policy to all files that match the configured criteria.
Important: In automatic classification, newly created DLP policies will not be applied to existing files. Only new, modified, or uploaded files after the policy is created will be scanned and enforced if they meet the policy criteria.
Managing DLP policies
As an admin or super admin of a WorkDrive team, you can manage your team's DLP policies as follows:
Enable or disable a DLP policy
- Sign in to your WorkDrive account as an admin or super admin.
- Click Admin Console in the bottom-left corner. This will open the Admin Console window, and the Dashboard tab will be selected by default.
- Select Data Loss Prevention from the left pane. The Policies tab will open, displaying a list of all your created DLP policies.
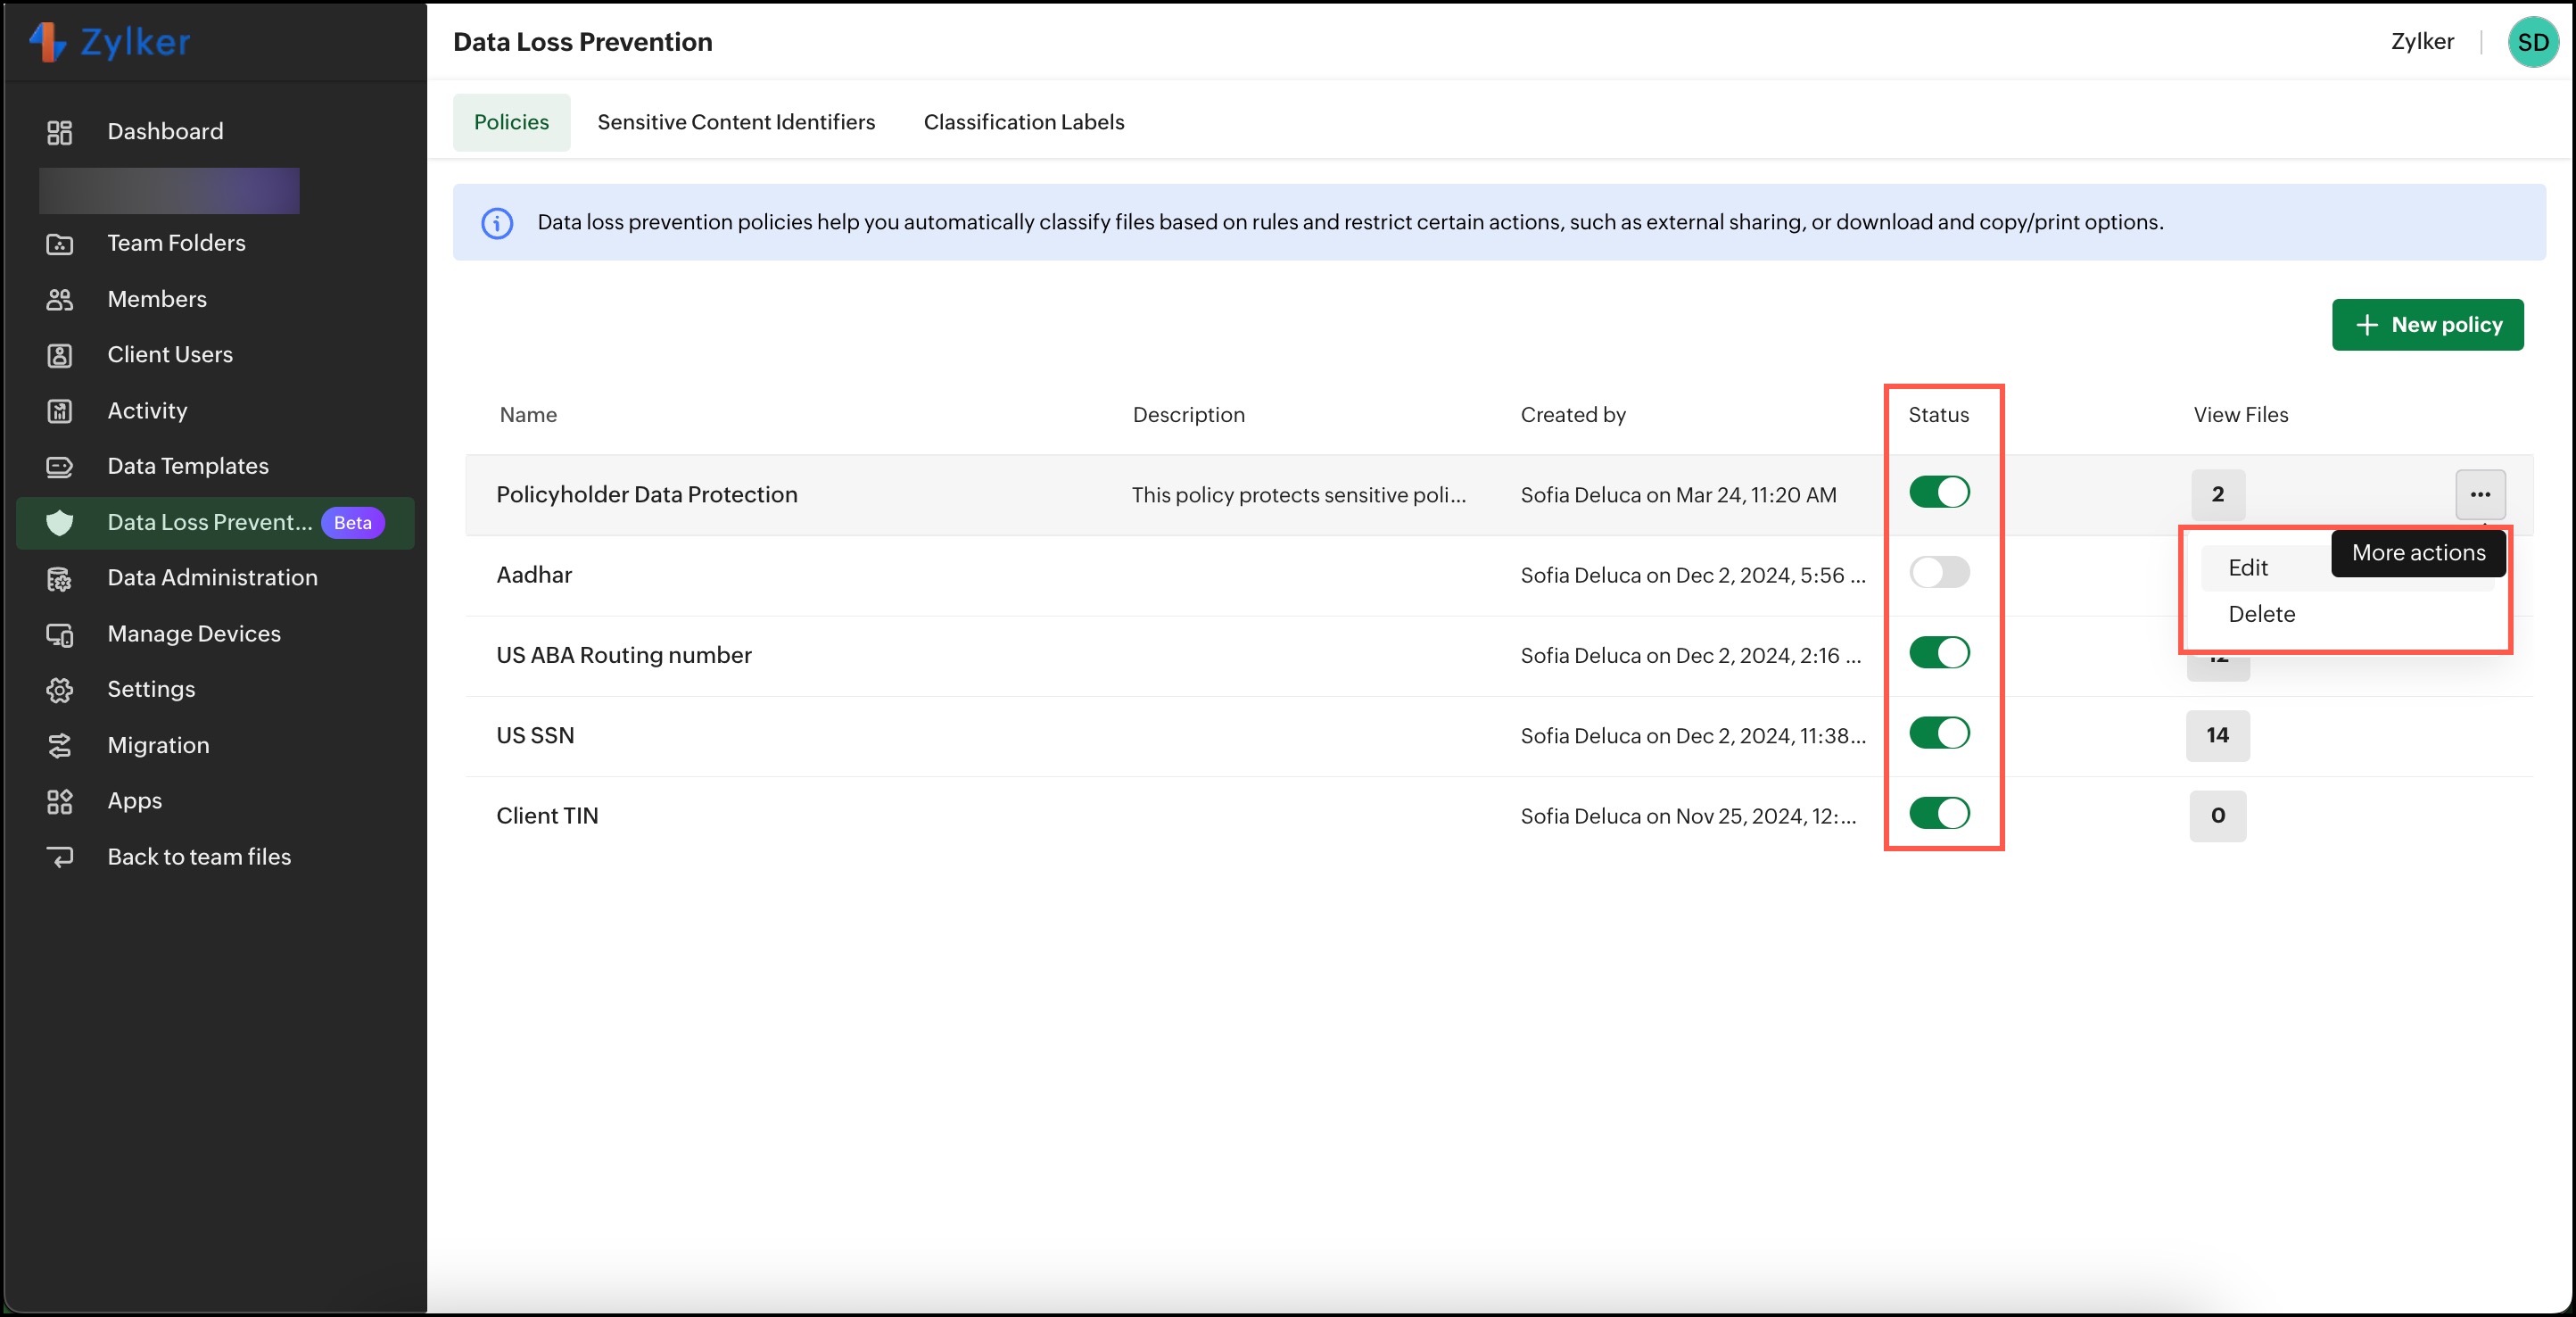
- Locate the policy you wish to modify and use the toggle in the Status column:
- Toggle ON to enable the policy
- Toggle OFF to disable the policy
Edit a policy
- Sign in to your WorkDrive account as an admin or super admin.
- Click Admin Console in the bottom-left corner. This will open the Admin Console window, and the Dashboard tab will be selected by default.
- Select Data Loss Prevention from the left pane. This will open the Policy tab by default.
- Hover over the desired policy and click the More actions (...) icon.
- Choose Edit and update the policy as needed.
- Click Save to apply the changes to the current policy.
Delete a policy
- Sign in to your WorkDrive account as an admin or super admin.
- Click Admin Console in the bottom-left corner. This will open the Admin Console window, and the Dashboard tab will be selected by default.
- Select Data Loss Prevention from the left pane. This will open the Policy tab by default.
- Hover over the desired policy and click the More actions (...) icon.
- Choose Delete and confirm it in the confirmation dialog box.
Note: You need to confirm your identity by entering your account password in order to delete a DLP policy.
By managing these options, you can maintain control over your sensitive data and ensure your DLP policies are up-to-date and effective.