What's New in Zoho Subscriptions - April 2022
Hello everyone,
This time, our updates are focused on report enhancements, and some payment-related self-service options for your customers. Here's what's new:
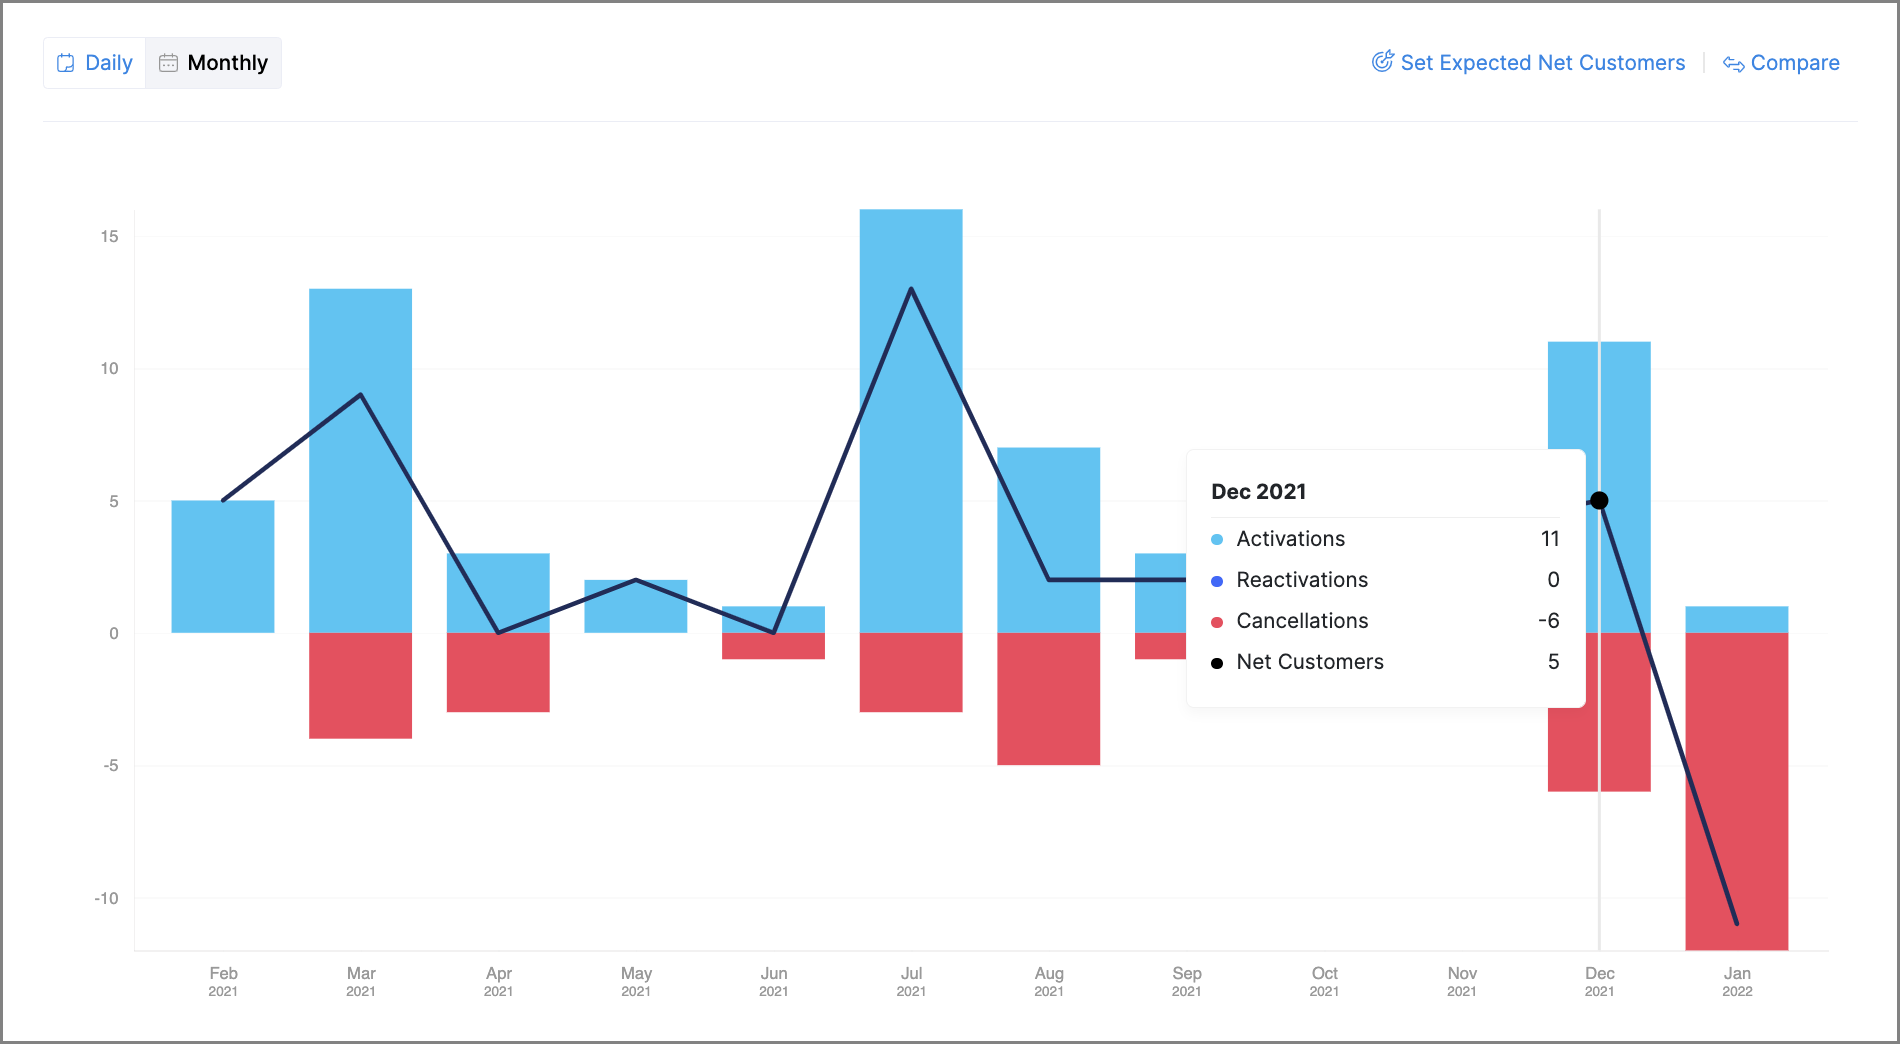
Net Customers Report
The Net Customers report is useful for identifying the total number of new active customers you've received in a particular date range. It's similar to the existing Active Customers report, the difference being that the Net Customers report only shows new active customers in a particular date range, instead of all the active customers until a particular date range.

The net customers are calculated like so:
Number of new customers + Number of customers who reactivated - Number of customers who churned (includes cancelled and expired subscriptions)
You can view a breakdown of these details by hovering your cursor over the graph, or from the breakdown table below the graph.
Associate & Remove Payment Methods from the Portal
If your customers have saved multiple payment methods, they can now switch between these payment methods for individual subscriptions by themselves from the portal. We've also added the ability for your customers to remove the associated payment method from a subscription; however, this is not enabled by default.
To enable this:
- Go to Settings > Portal.
- Check the Allow customers to remove their associated payment method option.
- Click Save.

Tax Summary Customization
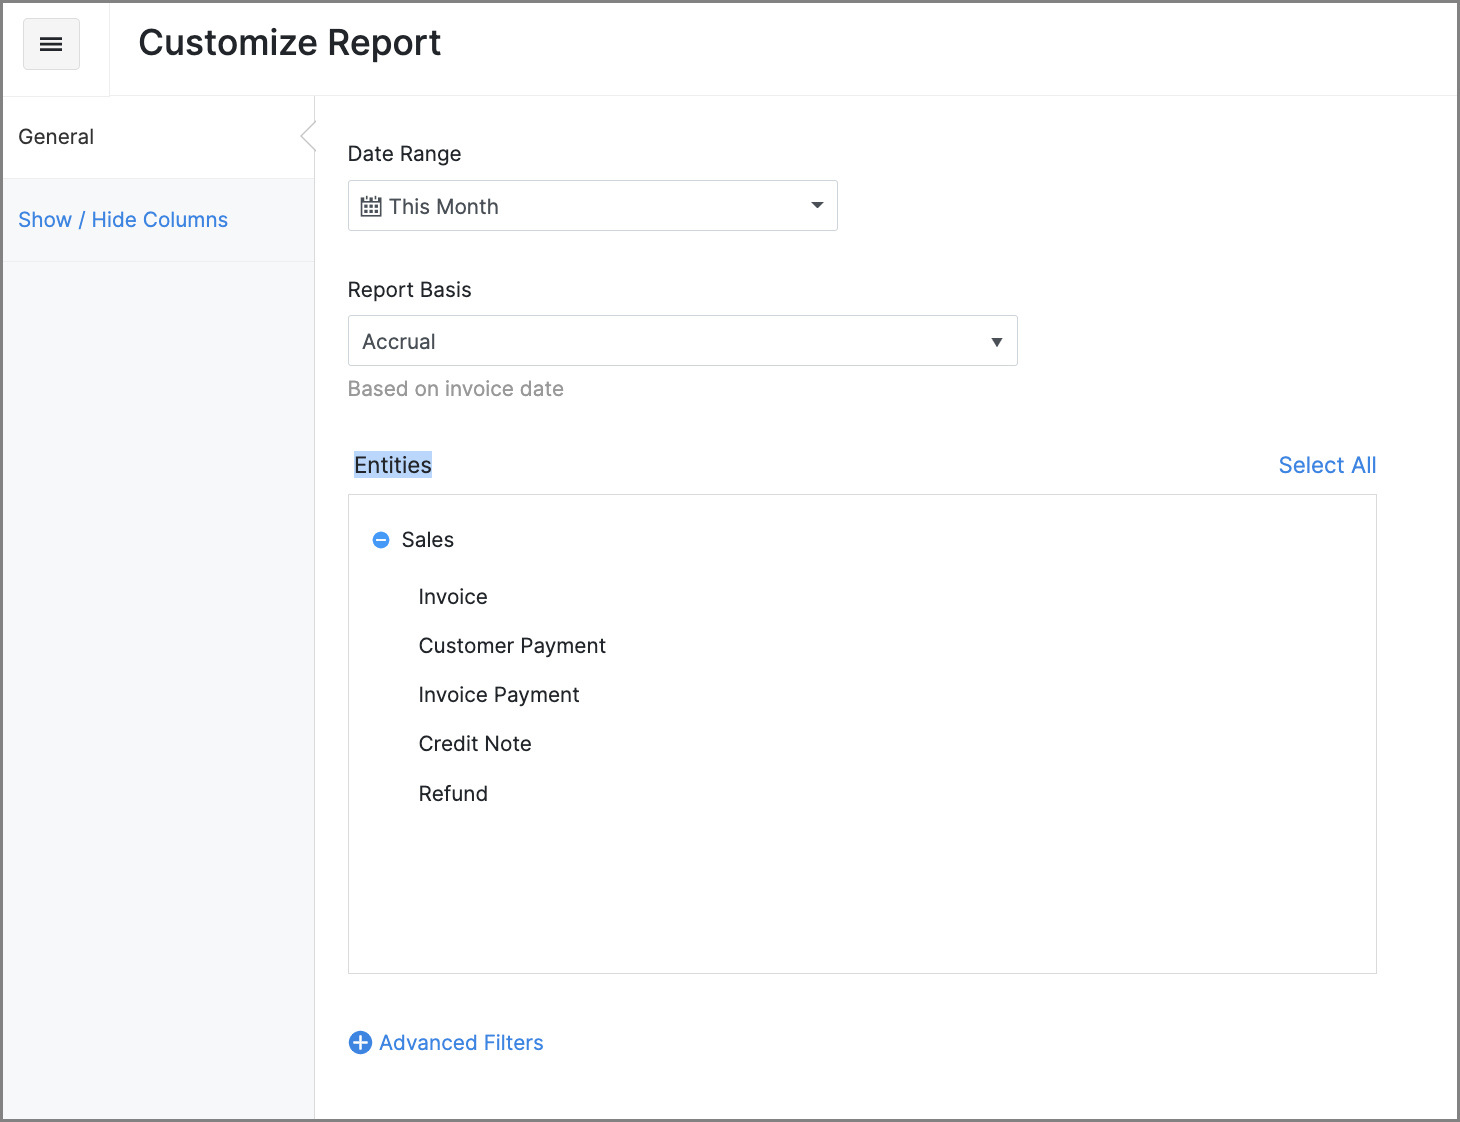
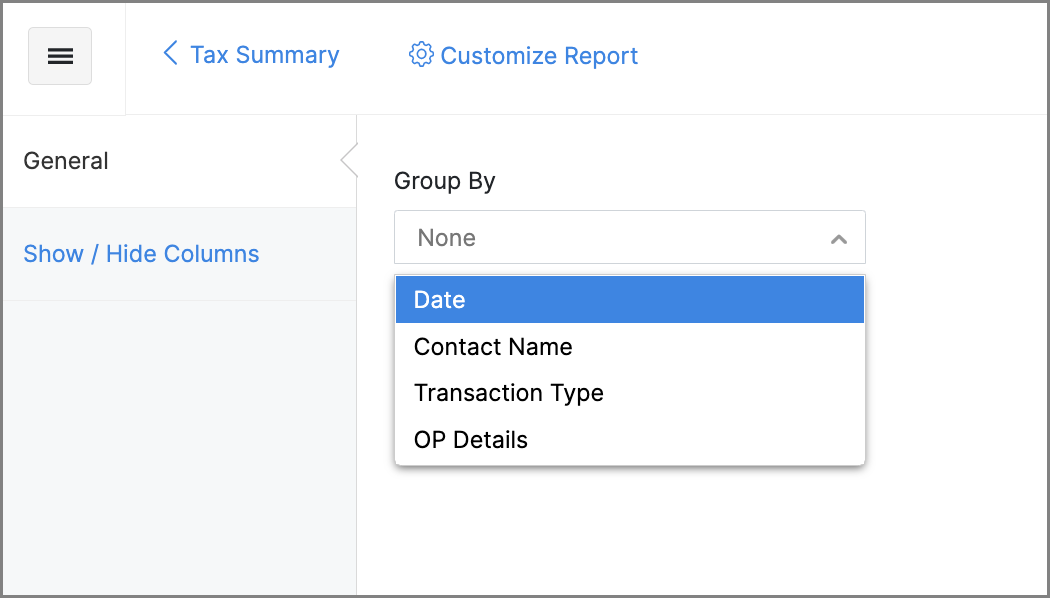
The Tax Summary report has been enhanced with new customization options like advanced filters, which can filter the report based on criteria such as a particular tax rate or contact name.

When you drill down into this report by clicking a tax rate, you will be able to see individual transactions with that tax rate. Now, you can customize this section as well by applying filters.

ePHI Custom Fields
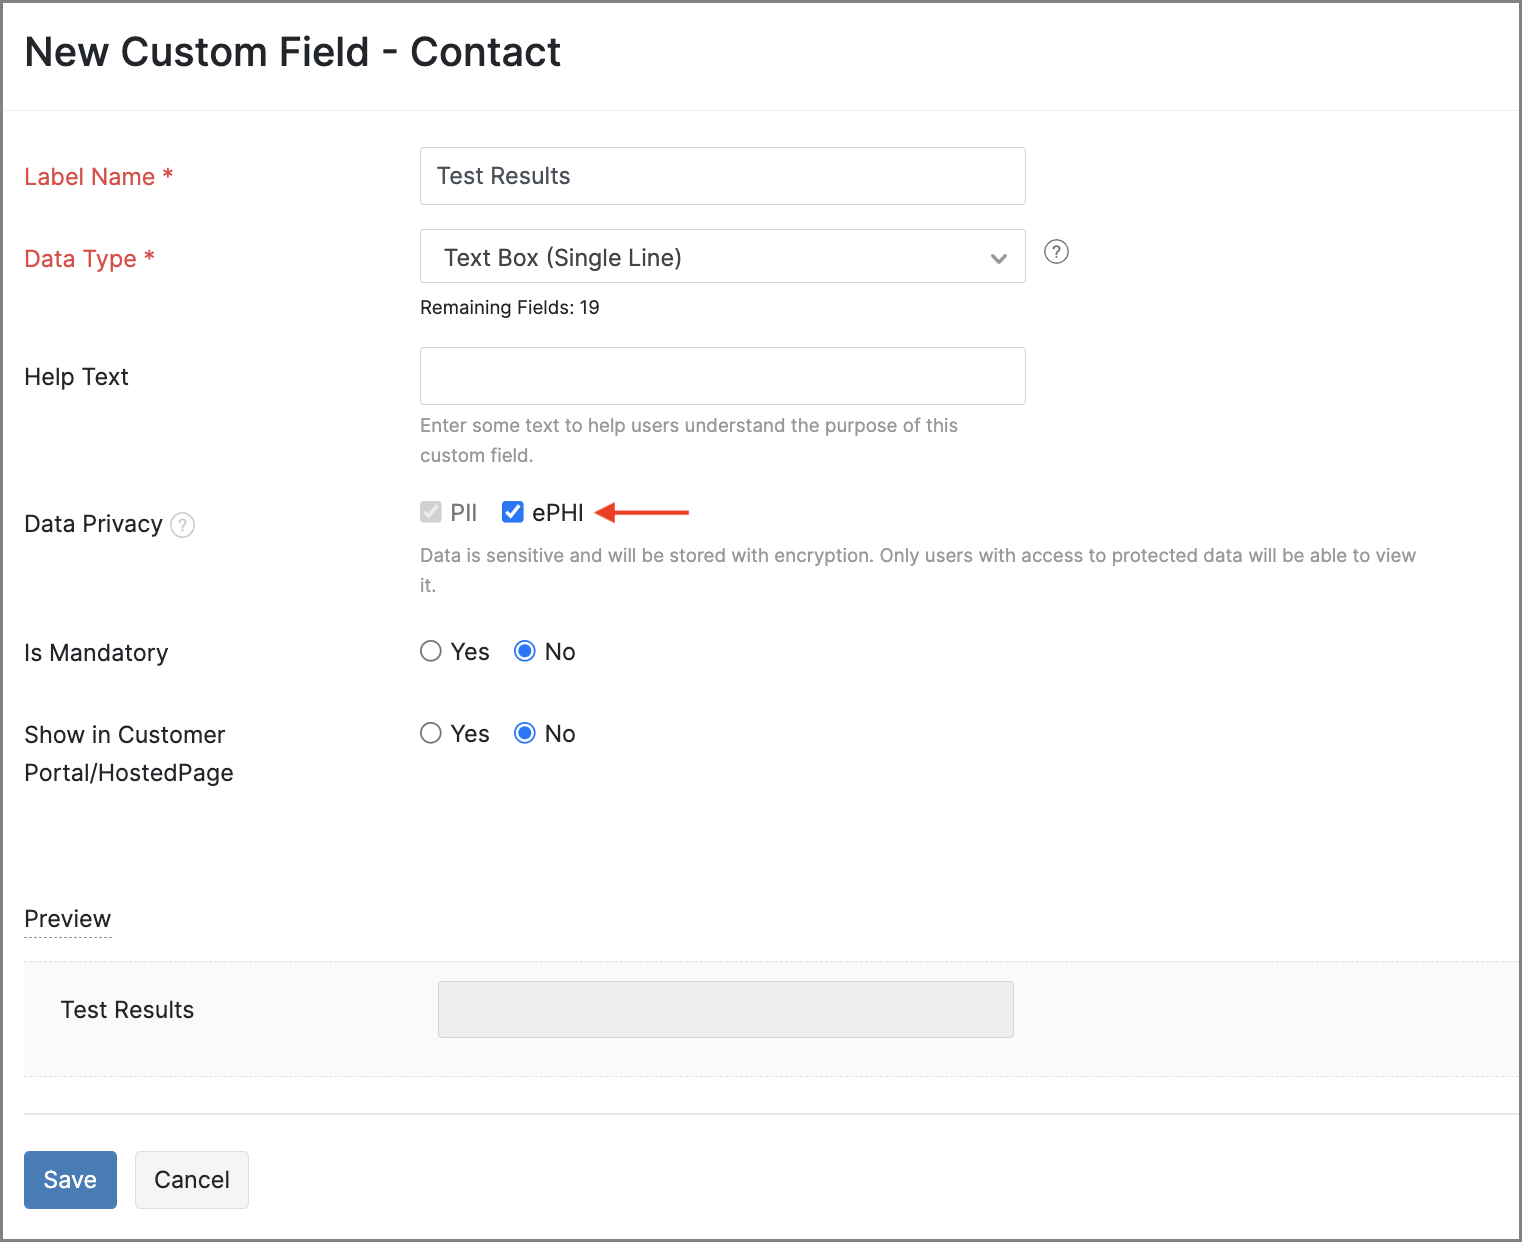
If your business deals with personally identifiable health information, you can now store this information in ePHI (Electronic Protected Health Information) custom fields. This way, the data in these custom fields will be stored with encryption, which prevents them from showing up when you perform searches, and can only be viewed by the users in your organization with permission to do so. These custom fields can help you stay compliant with HIPAA regulations.


To create an ePHI custom field:
- Go to Settings > Preferences.
- Navigate to the module for which you want to create the custom field, and click the Field Customization tab.
- Click + New to create a new custom field, and select ePHI as the Data Privacy option.
Note: ePHI custom fields will be accessible by all Admin user roles by default. Users with other roles will need to have the Provide access to Personally Identifiable Information option enabled for their role.
You can view more features that we've released in the past from our What's New timeline.
Let us know what you think about the latest updates in the comments below. We'd love to hear from you! You can also write to us at support@zohosubscriptions.com.
Best regards,
The Zoho Subscriptions Team
New to Zoho Recruit?
Zoho Developer Community
New to Zoho LandingPage?
Zoho LandingPage Resources
New to Bigin?
Topic Participants
Varun Steven
Abhishek - Zoho Partner
Shrikant
Sticky Posts
What's New in Zoho Billing - February 2024
Hello everyone, We are excited to share the first set of updates for Zoho Billing in 2024. Read along to know more about a wide range of updates, from the Aging Summary in customer statements to Apple Pay support in Stripe. One-Time Invoice with PlansZoho Finance Workshop 2023 is coming to the USA. Get exclusive training on Zoho Finance apps, one-on-ones, and more.
Hello all, We'd like to invite you to our biggest Zoho Finance workshop in the United States. After a brief break, we are excited to be back. This year, we're bringing together our customers and community members for two days of curated hands-on sessions,Zoho Subscriptions wins IDC's 2020 SaaS CSAT Award for Subscription Billing
Dear customers, We're excited to share that Zoho Subscriptions has won IDC's 2020 SaaS Customer Satisfaction Award! As a team, we cherish each and every milestone with our customer community. And this particular award, focusing on customer satisfaction,Introducing: SMS notifications via Zoho Subscriptions
Dear customers, We hope you are doing well! We are happy to announce that you can now send SMS notifications to your customers right from Zoho Subscriptions. To facilitate this, we've integrated with Twilio, a leader in the business communication space.What's new this December in Zoho Subscriptions
The year is almost over and we here at Zoho Subscriptions have released new features and updates on the month of November. Let's take a look at the features we have worked on in the past month. Zendesk Integration The Zoho Subscriptions app for Zendesk allows your customer support executive to access customer details in an instant. You will be able to view the customer information from Zoho Subscriptions right from your ticket view. On enabling the integration, you will be able to: Get your customer
New to Zoho TeamInbox?
Zoho TeamInbox Resources
Zoho CRM Plus Resources
Zoho Books Resources
Zoho Subscriptions Resources
Zoho Projects Resources
Zoho Sprints Resources
Qntrl Resources
Zoho Creator Resources
Zoho CRM Resources
Zoho Show Resources
Get Started. Write Away!
Writer is a powerful online word processor, designed for collaborative work.
Zoho CRM コンテンツ
-
オンラインヘルプ
-
Webセミナー
-
機能活用動画
-
よくある質問
-
Ebook
-
-
Zoho Campaigns
- Zoho サービスのWebセミナー
その他のサービス コンテンツ
Nederlandse Hulpbronnen
ご検討中の方
Recent Topics
Let us view and export the full price books data from CRM
I quote out of CRM, some of my clients have specialised pricing for specific products - therefore we use Price Books to manage these special prices. I can only see the breakdown of the products listed in the price book and the specialised pricing forPython - code studio
Hi, I see the code studio is "coming soon". We have some files that will require some more complex transformation, is this feature far off? It appears to have been released in Zoho Analytics alreadySomething wrong with client script??
Someone have the same feeling? Client script behavior become very strange..Set Default Status of Assembly to "Assembled" When Entered in UI
I've just discovered the new "confirmed" status of Assemblies within Inventory. While I understand the intent of this (allowing for manufacturing planning and raw material stock allocation), it was initially confusing to me when manually entering someHow to apply customized Zoho Crm Home Page to all users?
I have tried to study manuals and play with Zoho CRM but haven't found a way how to apply customized Zoho CRM Home Page as a (default) home page for other CRM users.. How that can be done, if possible? - kipi Moderation Update: Currently, each user hasIncrease Round Robin Scheduler Frequency in Zoho Desk
Dear Zoho Desk Team, We hope this message finds you well. We would like to request an enhancement to the Round Robin Scheduler in Zoho Desk to better address ticket assignment efficiency. Current Behavior At present, the Round Robin Scheduler operatesPlug Sample #14: Automate Invoice Queries with SalesIQ Chatbot
Hi everyone! We're back with a powerful plug to make your Zobot smarter and your support faster. This time, we're solving a common friction point for finance teams by giving customers quick access to their invoices. We are going to be automating invoiceEnrich your contact and company details automatically using the Data Enrichment topping
Greetings, I hope you're all doing well. We're happy to announce the latest topping we've added to Bigin: The Data Enrichment topping, powered by WebAmigo. This topping helps you automatically enhance your contact and company records in Bigin. By leveragingZoho Analytics + Facebook Ads: Performance Alerts for Active Campaigns
Is it possible with integration of Zoho Analytics with Facebook Ads and set up alerts or notifications for active campaigns when performance drops? For example, triggering a notification if CTR goes below a defined threshold or if other key metrics (likeAbility to Link Reported Issues from Zoho Desk to Specific Tasks or Subtasks in Zoho Projects
Hi Zoho Desk Team, Hope you're doing well. When reporting a bug from Zoho Desk to Zoho Projects, we’ve noticed that it’s currently not possible to select an existing task or subtask to associate the issue with. However, when working directly inside ZohoSalesIQ Chat Owner to CRM Lead Owner Mapping
There is no proper mapping between the SalesIQ chat owner and the CRM lead owner. When a chat is assigned to an agent, the lead created in CRM is often assigned to a different user, forcing admins to manually change ownership every time. This createsEnhancements for Currencies in Zoho CRM: Automatic exchange rate updates, options to update record exchange rates, and more
The multi-currency feature helps you track currencies region-wise. This can apply to Sales, CTC, or any other currency-related data. You can record amounts in a customer’s local currency, while the CRM automatically converts them to your home currencyEnsure Consistent Service Delivery with Comprehensive Job Sheets
We are elated to announce that one of the most requested features is now live: Job Sheets. They are customizable, reusable forms that serve as a checklist for the services that technicians need to carry out and as a tool for data collection. While onAny update on adding New Customer Payment Providers who support in store terminal devices?
Currently there is only one Customer payment provider listed for terminal devices in USA- Everyware. They charge a monthly fee of almost $149 minimum. Will you add other providers - like Zoho Payments or Stripe or Worldpay that would allow integratedGetting Subform Fields to Display Top to Bottom
I have a form where the fields are all in one column. I want to insert a subform where the fields are stacked in one column as well. I have built both the form and subform but the subform displays the fields from left to right instead of a stacked column. This will cause a problem displaying the subform correctly on mobile apps. How can I do this please?' Here is my form with subform now. As you can see the subform "Follow Up Activity" is displaying the fields left to right. I need them to go topHow do i move multiple tickets to a different department?
Hello, i have several tickets that have been assigned to the wrong department. I am talking about hundreds of automatically generated ones that come from a separate system. How can i select them all at once to move them to another department in one go? I can select them in "unsassigned open tickets view" but i can't find a "move to another department" option. I also can't seem to assign multiple tickets to the same agent in that same view. Could somebody advice?Zoho CRM Layouts
I have customised all our modules, Leads, Contacts and deals, and within them, I have created lots of different layouts depending on the type of Lead or contact, for example. Since the new Zoho UI came out, they have all disappeared. I have gone intoHow to Convert NSF to PST Format Effortlessly? - SYSessential
It is highly recommended to obtain the error-free solution of the SYSessential NSF to PST converter to convert NSF files from Lotus Notes. Using this professional software, it becomes easier to convert all NSF database items, including emails, journals,Can't connect to POP and SMTP over VPN
I use Thunderbird to access Zoho Mail via POP and SMTP. I have configured an app-specific password for Thunderbird to use. Everything is properly configured and works correctly — until I enable my VPN. I'm using a paid commercial VPN service (Mullvad).my zoho mail is hacked
my email is sending my username and password to people i dont knowSuministrar accesos
Asunto: Enable UPLOAD_RULE for API Attachments Mensaje: Hola, Necesito habilitar la capacidad de subir attachments vía API en Zoho Mail. Actualmente recibo el error: "UPLOAD_RULE_NOT_CONFIGURED" al usar el endpoint: POST /api/accounts/{accountId}/messages/attachmentshow to change the page signers see after signing a document in zoho sign
Hello, How can I please change the page a signer sees after signing a document in Zoho Sign? I cannot seem to find it. As it is now, it shows a default landing page "return to Zoho Sign Home". Thanks!Introducing real-time document commenting and collaboration in Zoho Sign
Hi, there! We are delighted to introduce Document commenting, a feature that helps you communicate with your recipients more efficiently for a streamlined document signing process. Some key benefits include: Collaborate with your recipients easily withoutPolish signer experience to compete with docusign
I would like to suggest that someone spend the little bit of time to polish the signer experience, and the email templates to more of a modern professional feel. They are currently very early 2000s and with some simple changes could vastly improve theTicket Loop from Auto Responce
We’re seeing an issue where a client’s help desk triggers a ticket loop. When they email us, our system creates a ticket and sends the acknowledgement. Their system then creates a ticket from that acknowledgement and sends one back to us, which createsvalidation rules doesn't work in Blueprint when it is validated using function?
I have tried to create a validation rule in the deal module. it works if I try to create a deal manually or if I try to update the empty field inside a deal. but when I try to update the field via the blueprint mandatory field, it seems the validationHow to make rule to filter out some emails from receiving the notification "Receiving a new ticket"?
Good Morning, We are currently using the "Receiving a new ticket" notification rule to provide that auto reply template to a customer that emails us for support. However, there are some emails we don't want to receive this auto-reply. Where can I setZoho Signatures Missing
In the past after collecting signatures from two different PDFs I would merge them by calling an api and the signatures would appear in the combined PDF. Recently the signatures have disappeared whenever I combine the PDFs together. Why did this randomlyStop the Workarounds: We Need Native Multi-Step Forms
After over 17 years of community requests, I'm hoping the Zoho team can finally address the lack of native multi-page form support in Zoho Creator. This has been one of the longest-standing feature requests in the community, with threads spanning nearlyMetadata API Access to Functions
I think it would be incredibly helpful to have api access to every function's code. Our team primarily uses deluge functions to update fields across modules according to business logic. I would like to create a visual dependancy model for our CRM, butFilter button in the Zoho Sheet Android App doesn't toggle on
I am a new Zoho Sheets user and experiencing a specific issue with the filter functionality in the Android mobile application. Detailed Issue Description: The filter icon appears correctly in the toolbar. Upon tapping the filter icon/button, the toggleAutomate pushing Zoho CRM backups into Zoho WorkDrive
Through our Zoho One subscription we have both Zoho CRM and Zoho WorkDrive. We have regular backups setup in Zoho CRM. Once the backup is created, we are notified. Since we want to keep these backups for more than 7 days, we manually download them. TheyExciting Updates to the Kiosk Studio Feature in Zoho CRM!
Hello Everyone, We are here again with a series of new enhancements to Kiosk Studio, designed to elevate your experience and bring even greater efficiency to your business processes. These updates build upon our ongoing commitment to making Kiosk a powerfulReply to Email for SO/PO
Hello, We are new to Zoho Books and running into an issue. Our support@ email is our integration user. When our team is sending out PO/SO's we are updating the sender email, but for some reason many of our responses are coming back to our support@ emailNew activity options for workflows
Greetings, We are excited to announce the addition of two new dynamic actions to our workflow functionality: Create Event and Schedule Call. These actions have been thoughtfully designed to enhance your workflow processes and bring more efficiency toRemove the “One Migration Per User” Limitation in Zoho WorkDrive
Hi Zoho WorkDrive Team, Hope you are doing well. We would like to raise a critical feature request regarding the Google Drive → Zoho WorkDrive migration process. Current Limitation: Zoho WorkDrive currently enforces a hard limitation: A Zoho WorkDriveImportant Update: Google Ads & YouTube Ads API Migration
To maintain platform performance and align with Google's newest requirements, we are updating the Google Ads and YouTube Ads integrations by migrating from API v19 to the newer v22, before the official deprecation of v19 on February 11, 2026. Reference:Kaizen #228 - Process Large-Scale Migrated Data Using Catalyst Solutions
Howdy, tech wizards! This week’s Kaizen explores how Catalyst Solutions in the Zoho CRM Developer Hub help import large volumes of data into Zoho CRM while improving data quality and simplifying the migration process. Why Catalyst Solutions? CatalystZoho Expense Import Reports Won't Work Because Default Accounts Already Exist
Im trying to import reports from another Zoho expense account to mine and im getting errors that won't allow the import to happen The account name that you've entered 'Ground Transportation' already exists. Enter another name for the account and try again.zInactive License for free account.
I recently upgraded my Cliq subscription not my team (on the free version), are unable to login to their accounts. The error message received is Inactive License Looks like you have not been covered under the current free plan of users. Please contactNext Page


