Using Calendar in Zoho CRM
Knowing your calendar and the various components in it is helpful in planning all your meetings and scheduled calls efficiently. Following are some of the components in the Zoho CRM calendar that will help you understand the calendar better and make the best use of it.
Components of Calendar in Zoho CRM
When you click on calendar from the utility bar, you will land on the primary view of the calendar. This view comprises of the following options:
- A static, collapsible menu bar that persists through all the actions occurring in the interface of the calendar in Zoho CRM. It comes with the following options:
- List of calendars: Your calendar, calendar of all users in the organization, of those you created, and of those that are shared with you.
With this list in the menu bar, it is easy to view shared calendars in a click of the cursor. - Mini-calendar with navigation arrows to seek months before and after the current month.
- Options to manage shared calendars and a quick-create button to create Users view and Groups view.
- The calendar space with views for day, week, and months.
- Based on your preference,
- All the three views will carry the week number badge for quick reference.
- Each activity tile will bear the color codes chosen for the respective meeting purposes.
- The day view and week view will have all the all-day activities displayed on top of their schedule for ease of schedule management.
- Each activity is marked with a unique icon for quick visual identification.
- Create button to create activities: Meetings, calls, tasks, appointments, and Mark as Unavailable.
- Options to import, export, set calendar preferences, and manage calendar bookings.
For quick comprehension
UI elements:
- All day event gauge
- Available/ working hours
- Current time indicator
Icon sets for activities

Calls 
Meetings 
Tasks 
Appointments 
Overdue 
Unavailable 
Controls
- Hide Menu:
to collapse the static menu bar.
- Contextual mini-calendar to invoke on-demand:
near the selected day, week, or month.
- Navigational arrows to move ahead and aside from the current day, week, or month:
- Hover on an activity to view information. Click on them to expand.
- Patterned tile indicating current cursor position.
MEETINGS
Create Meetings
Creating meetings from within the calendar is quick and easy. You can either click the Create button or click on a date or time slot in the calendar to create meetings. Once created, these meetings will be available under the Activities tab also. By default, Zoho CRM provides the following fields while creating a meeting from the calendar.
- Title - Name of the meeting
- Location - Where the meeting is held
- All day - Is it an all day meeting
- From & To - Date and time of the meeting
- Host - User conducting the meeting
- Participants - People invited for the meeting
- Meeting purpose - The objective of the meeting.
- Related to a lead, contact, or other
- Repeat - When the meeting is schedules on a regular basis
- Participants Reminder - A reminder for the meeting
- Meeting agenda - To describe the meeting in a few words.
The form that you fill in to add an meeting can be customized. You can add or remove fields in the form, except for the above mentioned default fields that are important for the record Additionally, you can also mark fields as mandatory.
To learn more, see: Edit Page Layout.
To create meetings from the calendar
- Navigate to Calendar from your Zoho CRM.
- Click Create from the top-right corner of the calendar and select Meeting.
Alternatively, clicking on a calendar cell will allow you to create new meeting. - In the Meeting Information page, furnish the meeting information:
- Specify the meeting title and the location of the meeting.
- Check the All day box if the event is meant to occur for the entire day.
- Provide the start and end date and time of the meeting.
- Select the host from the list of users in your organization.
- Add Participants to the meeting. You can select leads, contacts, or users and groups as participants.
- You can search and select the participants.
- Choose to display contacts without an email address.
- You can also invite more participants that are not in your CRM contact list by email address.
- Click Done.
- Select the meeting purpose from the list displayed in the dropdown.
- Specify whom this meeting is related to: A lead, contact, or others.
- Lookup the related lead, contact, or other in the following field.
- Choose the repeat schedule if you’d like this meeting to recur:
- Choose All day if the recurrent meeting is an all-day event.
- Choose the meeting duration.
- Determine the repeat type from the options: Daily, Weekly, Monthly, Yearly, or Custom.
- Click Done.
- Add Participants Reminder if you’d like to remind the participants before the meeting. The interval options are: At the time of meeting, 5 minutes before meeting, 10 minutes before meeting, 15 minutes before meeting, 30 minutes before meeting, 1 hour before meeting, 2 hours before meeting, 1 day before, or 2 days before. You can choose to remind them more than once.
- Click Add more details, to add the meeting agenda.
- Click Save to create a meeting.

Note: Upon saving the meeting information, if you have added participants, you can choose to send invitations to them via email.
- Selecting Send will trigger the email to all of the added participants.
- Selecting Do not Send will only schedule their calendars without any email about the meeting scheduled.

Note: Business Holidays and Shift Holidays cannot be used as dates to create meetings using Calendar. An error indicating the unavailability will be shown.
Managing meetings from Calendars
Once created, meetings can be viewed, rescheduled, deleted, right from the interface of the calendar.
By default, the dates in the calendar will bear meeting information on display.
- The name of the meeting can be constricted to accommodate the date cell of the calendar. Hover over the meeting to view the full name of the meeting and the timing.
- Click on the tile to view the complete information about the meeting.
- Click on the vertical ellipsis option (⁝) to add participants, edit the meeting, or delete it altogether.
- Click on Reschedule the meeting to change the meeting timings. This will take you to the meeting information page. Modify the time and click Save.
Accepting Meeting Invitations
Within the calendar, you can check out the invitations that you are yet to respond to. Invited meetings are separately marked. Accept or decline meeting invitations in the calendar.
Importing and Exporting Meetings
Use .ics format files to import calendar meetings. Exported calendar meetings will also be available in .ics file.
Reminders
Get reminders before the meetings starts and before the call.
Other Users' Calendar
- Users with Administrator profile an see all the users' meetings in the calendar.
- Users other than administrator profile can see the meetings of other users, if they have Public Read/Write/Delete or Public Read Only permission for the Activities module under Data Sharing Settings feature. This applies irrespective of the profile permission and role hierarchy. To learn more, see: Setting up Data Sharing Rules.
- Others who do not have the above mentioned permission will be able to see other users' meetings as per the role hierarchy in Zoho CRM.
- Click on the My Meetings & Calls drop-down list and choose All User's Meetings & Calls to view other users' meetings.
CALLS 
Schedule Calls
From within the calendar, you can schedule calls. You can either click the Create link or click on a future date or time slot in the calendar to schedule calls. Once created, these calls will be available under the Activities tab also. By default, Zoho CRM provides the following fields while adding a scheduled call from the calendar
- Subject - Subject for the call.
- Call Type - By default it is Outgoing, as they are scheduled calls.
- Call Purpose- The purpose of the call such as negotiation, prospecting, demo, etc.
- Contact Name and Related To - Contact or other related record to the call.
- Call Details - This included the call date and start time.
- Owner - User who is the owner of the record or to whom the call is assigned.
- Reminder - A reminder for the call
To add scheduled calls from calendar
- Click the Create button in the calendar and select Call.
You can also click on the date or time slot in the calendar and add scheduled calls. - Select Schedule a call.
- By default the Call Type will be Outbound. Fill in the other fields like Call for, Related to, Call start time, Call owner, Call purpose, and Agenda.
- Set a Reminder for the call.
The reminder settings in the Calendar Preferences will not be taken into consideration as it is set for meetings only. - Click Add more fields if you need other fields to be populated to add more details about the call.
- Click Save.
Log calls
Like scheduling calls in advance, you can also log a call to record past calls in your calendar. Calls recorded in calendar will be synced with the calls module of your Zoho CRM.
To log calls
- Provide call information. Specify the following information about the call.
- In the Call for field, select the lead or contact module and lookup the lead or contact.
- In the Related to field, select the entity module and look up the related record.
- Select the call type: Inbound, outbound, missed.
- If the type is an outgoing call, logging a call will indicate the call as completed.
- If the type is an incoming call, provide the call start time and the total duration of the call.
- If the type is a missed call, then provide the call start time.
- Provide the Subject of the call.
- If you have a voice recording of the call, you can store them to the calendar for future reference.
- Furnish the purpose of the outgoing call.
- Select the call purpose from the following options: Prospecting, Administrative, Negotiation, Demo, Project, or Desk.
- Describe the agenda of the call you’d like to log.
- Provide the outcome of the outgoing call to understand the effectiveness.
- Select the call result from the following options: Interested, Not interested, No response/ Busy, Requested more info, Requested call back, Invalid number.
- Describe the call more in the description field.
- Click Save.
Managing calls from within the calendar
Once a call is scheduled or logged, you can reschedule, mark as completed, or cancel the call.
To do so,
- Click on the call scheduled in the calendar interface.
- Click Mark as Completed button displayed on the preview screen. In the ensuing call information page, verify the call status, starting time, duration, and other information. You can also associate the call’s recording to this activity for reference.
- Click Save.
- To reschedule a call, click the dropdown arrow near the Mark as completed button and select Reschedule call from the list.
- In the ensuing reschedule page, update your preference and notes, and click Save to reschedule your call.
- To cancel a call, lick the dropdown arrow near the Mark as completed button and select Cancel call from the list.
- In the ensuing reschedule page, update the reason for canceling the call and click Save.
TASKS 
Creating tasks
Tasks are goal-based notes you create to help accomplish your work.
To create tasks
- Click the Create button in the calendar and select Task from the drop-down menu.
- In the Create Task page, provide the following information:
- Subject: You can enter your own subject or look up a subject from the list of objectives: Email, Call, Meeting, Send Letter, Product Demo.
- Due date for the task.
- Priority of the task: High, Highest, Low, Lowest, Normal.
- Owner of the task. If you are creating the task for yourselves, then you will be the owner, and the task will be scheduled in your calendar. If you select another user, then it implies you are assigning a task on their name and calendar.
- Reminder for the task. You can also choose how you’d like to alert them: Email, popup, or both.
- Repeat recurrence. You can choose for the task to recur daily, weekly, monthly, yearly or in custom interval.
- If you choose custom interval, choose the frequency and the interval.
- Select the Except weekends and holidays checkbox if you’d like to exclude reminders during weekends and holidays.
- Determine when you’d like to end the recurrent task creation from the options: Never, After a certain number of time(s), or on a particular date.
- Select More Fields to associate the task with contacts, other related modules, mark the status, and describe the task.
- Click Save to create task.
Managing Tasks from Calendar
- You can hover over a task to see the task name and task type.
- To view further information about the task, click on the task tile. A preview screen will be displayed.
- Click on the vertical ellipsis option (⁝) to edit or delete a task
- Click on Mark as Completed button to quickly mark a task as completed.
APPOINTMENTS 
Create an appointment
Businesses in the service industry work based on customer appointments, and accuracy in schedule management is paramount to ensure reliability. If you have enabled the services and appointment module, you can create appointments right from within the interface of the calendar.
To create appointments
- Click the Create button in the calendar and select Appointment from the drop-down menu.
- In the Appointment Information page, provide the following details:
- Which contact are you creating the appointment for? Select the module and lookup their record.
- Look up the service the appointment is being booked for.
- Provide the appointment start time.
- Give a name for the appointment.
Example: Model house showing for Mr. and Mrs. Smith. - If you have special notes or additional information about the service, describe them in the Additional Information field, and click Save.
Managing appointments from Calendar
You can view, reschedule, cancel, and mark your appointments as completed.
- Click on the appointment tile in the calendar.
- Click Mark as Completed button to mark the appointment as completed.
- Click on the dropdown besides, to reschedule or cancel the appointment.
- You can edit or delete the appointment by clicking on the vertical ellipsis icon displayed in the preview screen.
Mark as unavailable
If you are unavailable for a particular period, you can mark your unavailability in your calendar to indicate to your peers.
To mark as unavailable
- Click the Create button in the calendar and select Mark as Unavailable from the drop-down menu.
- In the ensuing Mark As Unavailable page, determine the duration you will be unavailable for and add comments if you’d like.
- Click Save.
SCHEDULE MANAGEMENT
Working with shared calendars
In addition to managing your own schedules, you can also view the schedules of all users in the organization by default. Also, you can collaborate, supervise, and act on initiatives by creating calendar views for users and groups.
- Users view is a calendar view that displays the selected users’ schedules for the day, week, and month.
- Group view is a calendar view that displays the schedules of all users in a group.
Selecting these views will display the schedules of all participating users at once.
To create calendar views
- Go to Calendar and access the plus icon besides the text Calendar in the static menu bar.
- Click Create user views to create views for users.
- Provide a name for the view and select the users.
- Click Save.
- Click Create Group Views to create a view for a group.
- Provide a name for the view and select the groups.
- Click Save.
- Once the views are created, click on the ellipsis button by each of the views to manage, delete, or clone the view.
Using views to manage the schedules of these users
The views you created for users and groups of users will ultimately have users’ schedules listed individually. The day, week, and month view will display the schedules of all users from that view.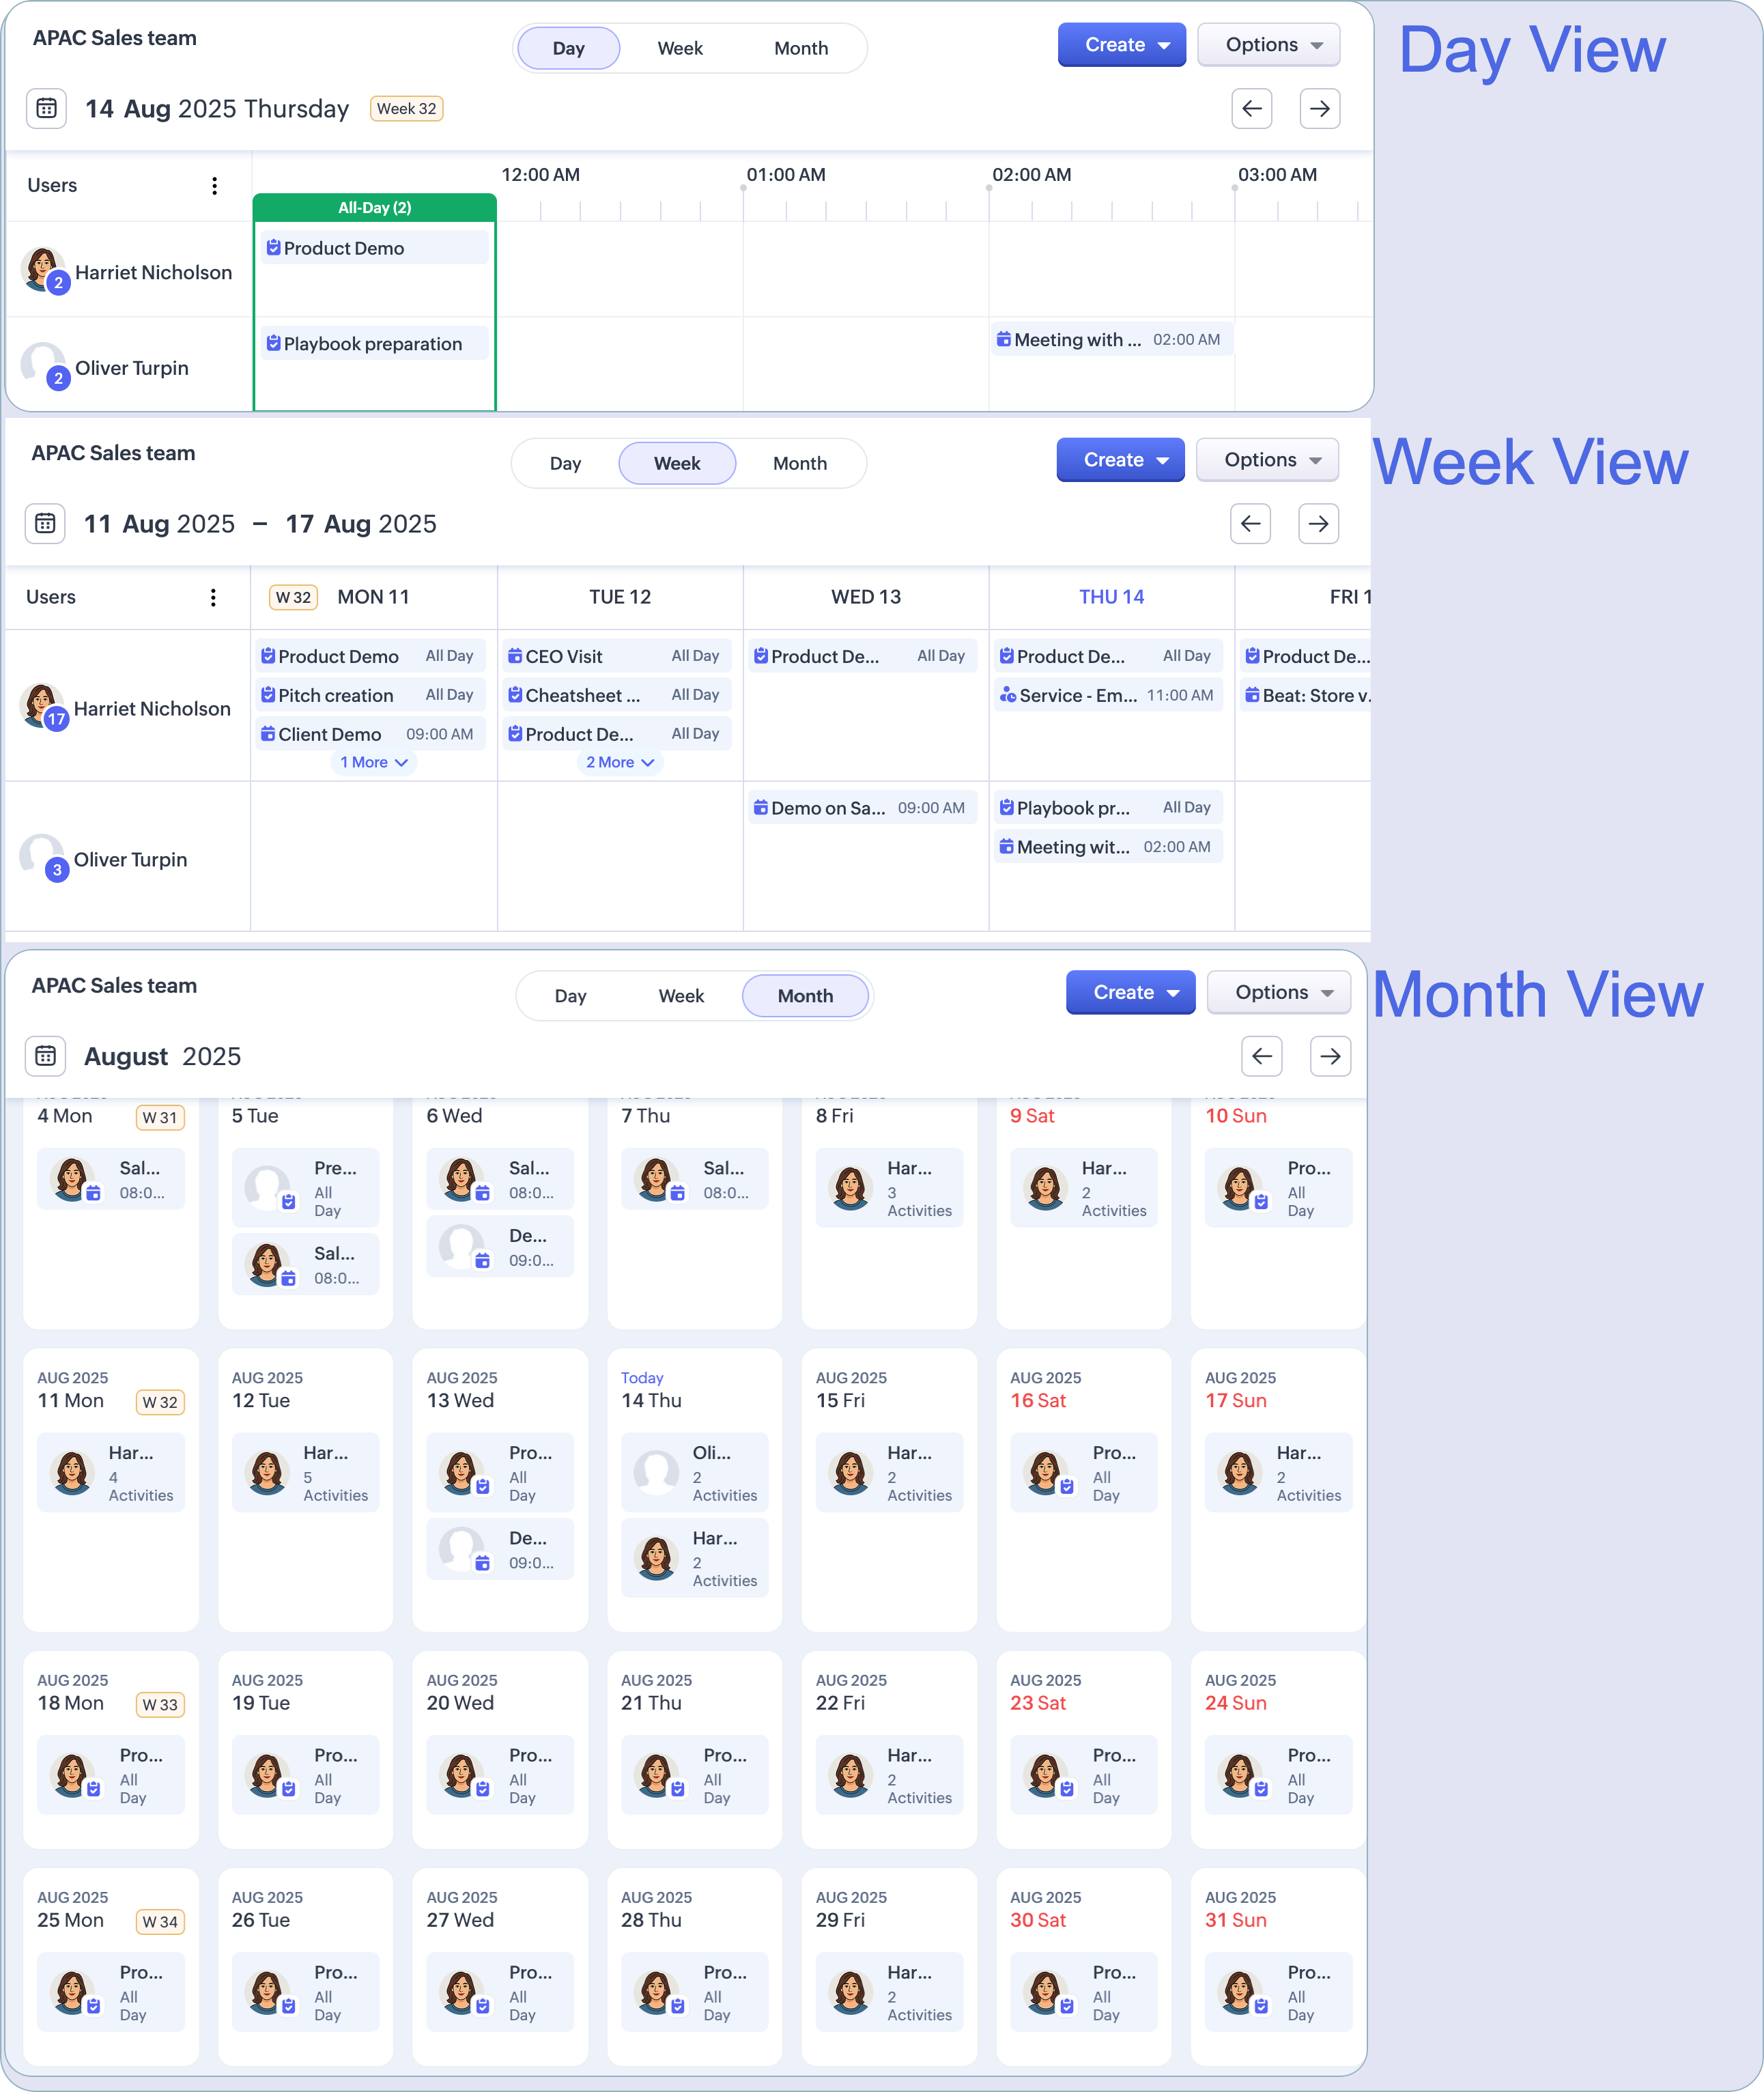
Controls in calendar views
If you have more users in a view, you can filter and/or reorder the calendars of users in display.
More options for calendar management
Under the more options near the text Calendar in the static menu bar, you can do the following actions:
- Organize the calendar views.
- Click on the ellipsis icon besides the text Calendar.
- In the organizing mode, drag and drop the created views in the order of your preference and click Save.
Your views will be reordered. - View the calendars of users and groups that are not part of your views yet.
- Click on the ellipsis icon besides the text Calendar.
- Select View Users calendar option to open a user’s calendar.
- Under the Select user(s) to view the calendar option, select the user whose calendar you want to view. You can select as much as you’d like.
- Click View Activity. In the radar wheel displayed on this page, you also get to know the users you are viewing frequently.
- The calendar of the selected users will be listed. To this page, you can add more users, remove individual users from the calendar, remove all from the calendar, filter users, reorder users, and save this view as a calendar view for quick access.
Note: To revisit the calendars of the users or groups selected, you must save the list of users as a view. - Likewise, you can also quickly lookup the calendar of users in a group.
Related resources: