Incremental data fetch is a method used to import new files or modified files from a source. Zoho DataPrep helps you import incremental data from the following cloud storages using the advanced selection feature.
-
Google Drive
-
Zoho WorkDrive
-
Amazon S3
-
Dropbox
-
Box
-
Microsoft OneDrive
-
SharePoint
To start with import
1. Open an existing pipeline or create a pipeline from the Home Page, Pipelines tab, or Workspaces tab and click the Add data option.
 Info: You can also click the Import data
  icon at the top of the pipeline builder and bring data from multiple sources into the pipeline.
2. Choose the Cloud storage category from the left pane and click the required cloud storage service. You can also search cloud storage services in the search box.
 Note: If you had already added a connection earlier, click the Saved connections category from the left pane and proceed to import. To learn more about Saved connections, click here.
3. If you have already added a connection, click the existing connection and start importing data.
Note: Click the Add new link to add a new account. You can create as many connections as required.
4. Authenticate your Cloud storage account. You will need to authorize DataPrep to access your files when you do this for the first time.
Info: For Zoho WorkDrive, data will be directly fetched from your WorkDrive account using which you have logged into Zoho DataPrep.
Note: The connection configuration will be saved for importing data from your cloud storage in the future. Credentials are securely encrypted and stored.
Import incremental data with Advanced selection
5. To import your data incrementally, click the Advanced selection link.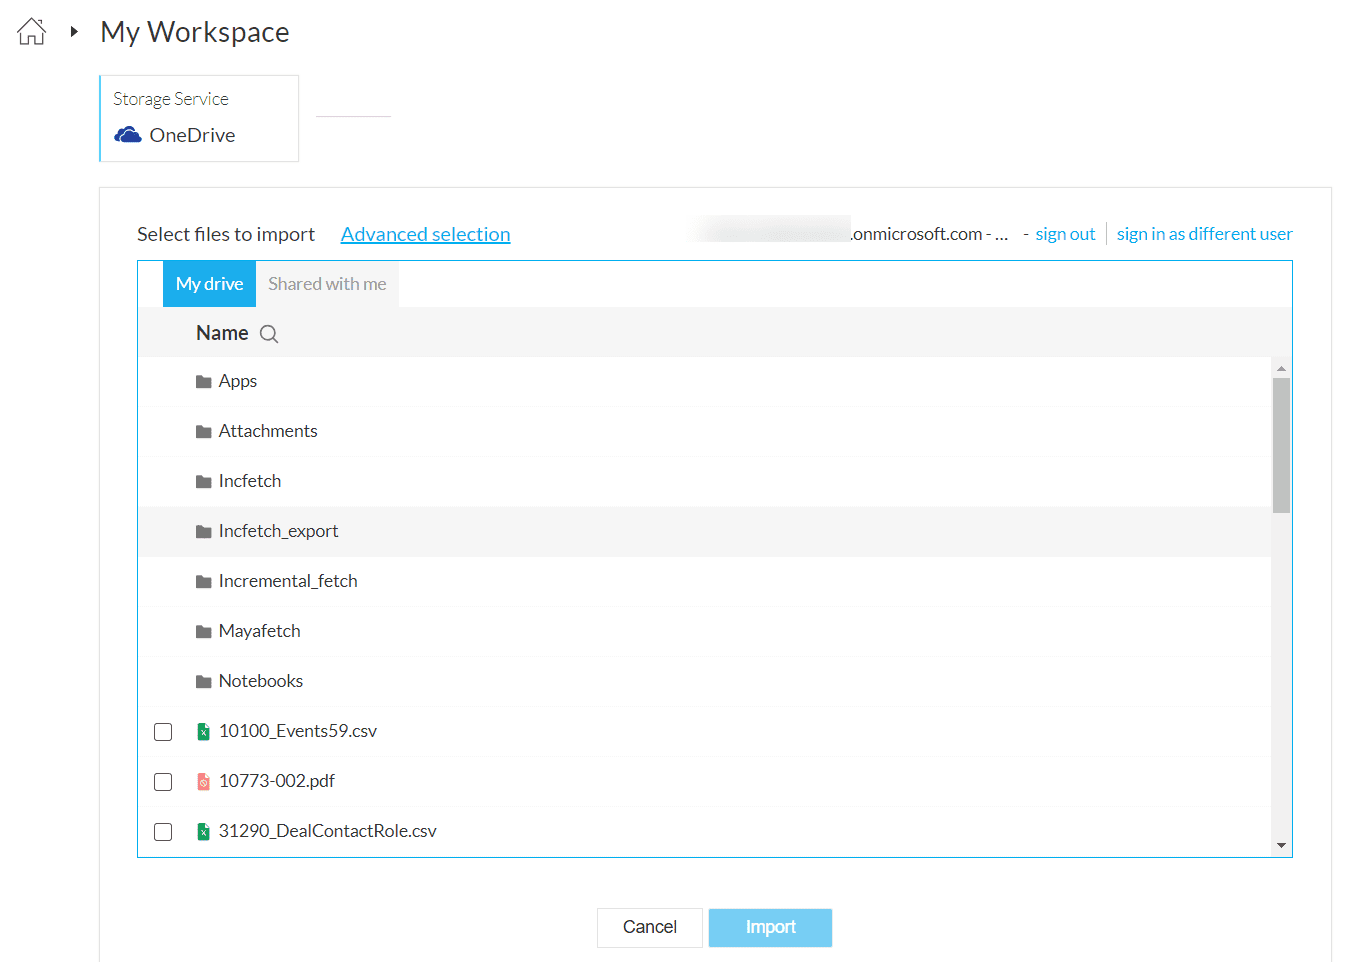 Advanced selection helps you perform dynamic file selection based on regex. This can be used for getting new or modified data from your cloud storage account. The data file that matches the file pattern will be fetched from your cloud storage service.
You can learn more about how to use the advanced selection option for each of the available cloud storage services from the links below: Info: We support only CSV, TSV, JSON, XML, and TXT file formats for incremental fetch from cloud storage.
6. Once you have completed importing data, the Visual Pipeline builder opens and you can start applying transforms. You can also right-click the stage and choose the Prepare data option and prepare your data in the DataPrep Studio page. Click here to know more about the transforms.
7. Once you are done creating your data flow and applying necessary transforms in your stages, you can right-click a stage and add a destination to complete your data flow.
8. After adding a destination to the pipeline, you can try executing your pipeline using a manual run at first. Once you make sure manual run works, you can then set up a schedule to automate the pipeline. Learn about the different types of runs here.
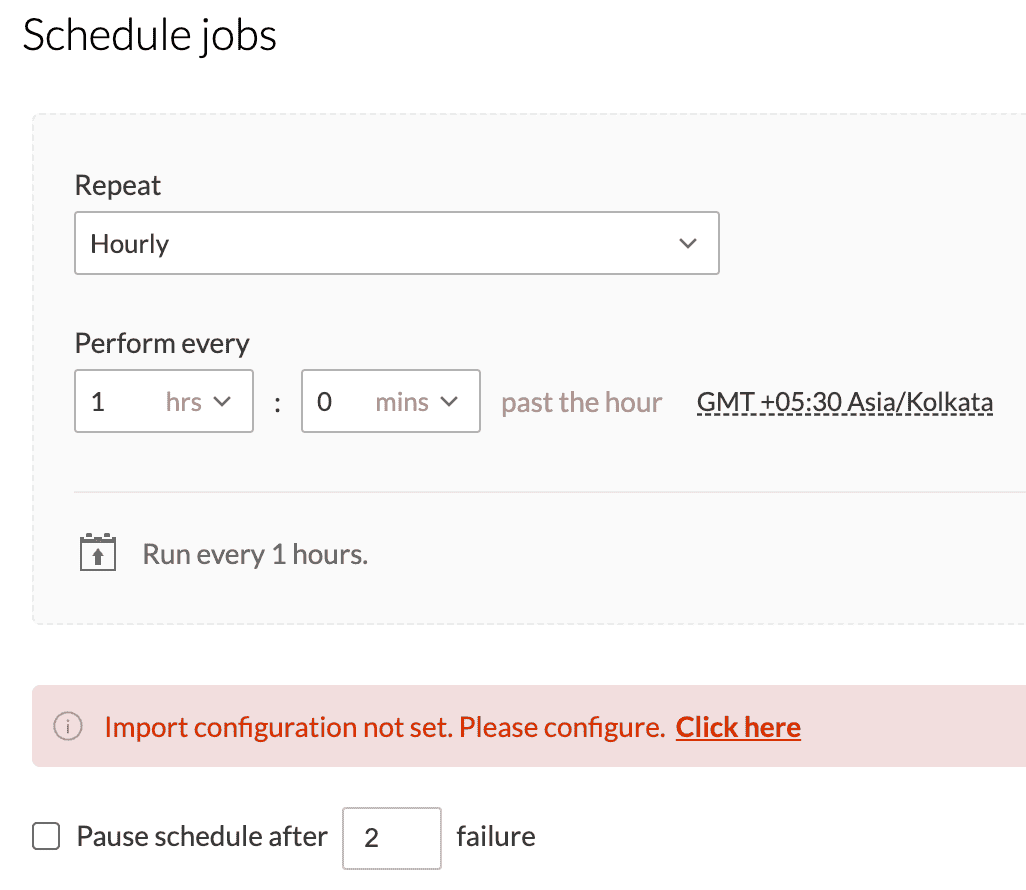
While configuring the Schedule, Backfill, Manual reload, Webhooks, or Zoho Flow, the import configuration needs to be mandatorily setup for all the sources. Without setting up the import configuration, the run cannot be saved. Click here to know more about how to set up import configuration.
9. After configuring a run, a pipeline job will be created at the run time. You can view the status of a job with the granular details in the Job summary. Click here to know more about the job summary.
Import configuration for advanced selection
If you import data from cloud storage using the advanced selection, you can configure how to import and fetch incremental data from your cloud storage using the below Import configuration options.
You can select the Click here link to set the import configuration.
Below is a snapshot from the schedule configuration.
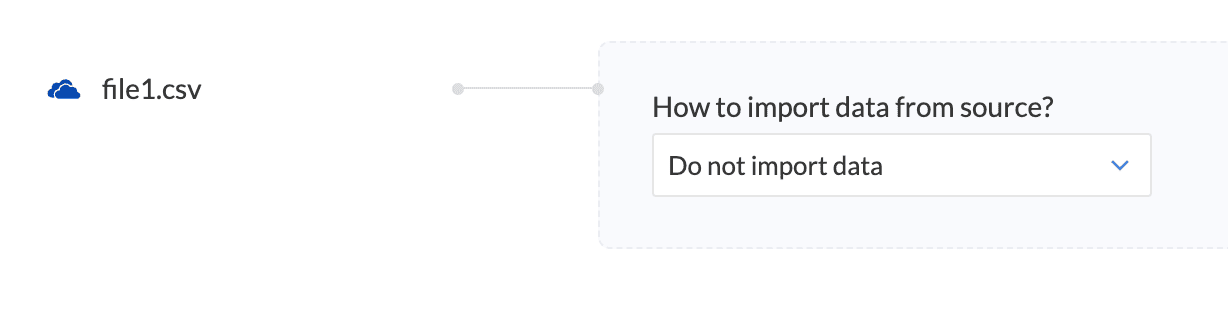
How to import data from source?
Select the way you would like to import your data from the drop-down - Import all data, Incremental file fetch, Do not import data.
Import all data
This option will import all available data that matches the file pattern.

File batch size: Specify the batch size when you choose to import all files. Files will be grouped by this number, based on their first modified time. These files will be imported as a single file and exported to the destination in every run.
Info: File batch size cannot be greater than 10. This option is available only for advanced selection in cloud storage
Incremental file fetch
You can configure how to import and fetch incremental data from your cloud storage using the Import configuration option. Incremental data import is a method used to import new or modified records from your source.

Use the previously imported data if no new data is available:
During incremental import,
- If the checkbox is checked: When there is no new data in the source, the last fetched data will be imported again.
- If the checkbox is unchecked: When there is no new data in the source, the import will fail and no files will be imported. This will, in turn, cause the entire pipeline job to fail.
Which file to import? You can choose to import All files, Newest file, or Oldest file using this option.
All files
This option will import all the files that match the given file pattern only in the specific data interval based on the Fetch based on field.
Fetch based on: You can choose to select the time based on which the file must be sorted and imported - Modified time, Created time.
Note: Google Drive, OneDrive, SharePoint, Box has modifiedTime and createdTime.
DropBox, Amazon S3 has only modifiedTime (There is no created time)
File batch size: Specify the batch size when you choose to import all files incrementally. Files will be grouped by this number, based on their first created or modified time in that specific data interval. These files will be imported as a single file and exported to the destination in every run.
Info: File batch size cannot be greater than 10. This option is available only for advanced selection in cloud storage.
Newest file
This option will import the latest file that matches the given file pattern in the specific data interval based on the Fetch based on field.

Oldest file
This option will import the oldest file that matches the given file pattern in the specific data interval based on the Fetch based on field.

Do not import data
The data is imported only once. The second time, the rules get applied to the same data and get exported.
How incremental sync works
You can configure how to import and fetch incremental data from your source using the Import configuration option. Incremental data import is a method used to import new or modified records in the specific data interval.
In incremental file fetch, when the pipeline is run, the new or modified files will be fetched. During every data interval, the file created or modified after the previous data interval is imported. If there is no new file in the cloud storage, no data will be imported, or the previously imported data will be fetched again according to the import configuration. In the next data interval, the file created or modified in that interval will be fetched and so on.
Incremental fetch for schedule run
In incremental file fetch, when the pipeline is scheduled, the data interval of the first schedule will span from the previous one up to the current data interval. During this interval, all the new or modified files will be fetched. The second schedule will extend from the current interval to the next, with subsequent schedules following this pattern.
For example, The schedule is set to 1 hour interval. The data source contains a total of 10 files, in which 5 files were uploaded an hour ago that matches the file pattern. Import configuration is set to import all files incrementally, and the batch size is set to 10. 
When the first schedule runs, the 5 files created/modified in the last 1 hour will be fetched and exported as a single file.
In the second schedule, if 4 new files with the same file pattern are added in the source, only the 4 files will be fetched and exported as a single file based on the created/modified time in the source in that specific interval.
In the third schedule, if 13 new files are added to the source that matches the file pattern, then only the first 10 files will be fetched and exported as a single file based on the created/modified time in the source since the batch size is set as 10. The same logic will be applied for files during incremental fetch in the upcoming schedules and so on.Click here to know about the schedule run.
Incremental fetch for backfill run
In an incremental file fetch, when a backfill run is configured for a pipeline, all incremental files within the specified data interval will be fetched.
For instance, the backfill is set from August 1st to 3rd with a daily job frequency. August 1st has 4 files, August 2nd has 7 files, and August 3rd has 13 files. The import configuration is set to fetch all files incrementally with a batch size of 10.
During the first backfill job, the 4 files created or modified on August 1st will be fetched and exported as a single file. In the second backfill job, the 7 files from August 2nd will be similarly processed and exported. In the third backfill job, the first 10 files from August 3rd will be fetched and exported as a single file.Click here to know about the backfill run.
Incremental fetch for reload data
In an incremental file fetch, when a reload is configured for a pipeline, all new or modified files within the specified data interval will be fetched.
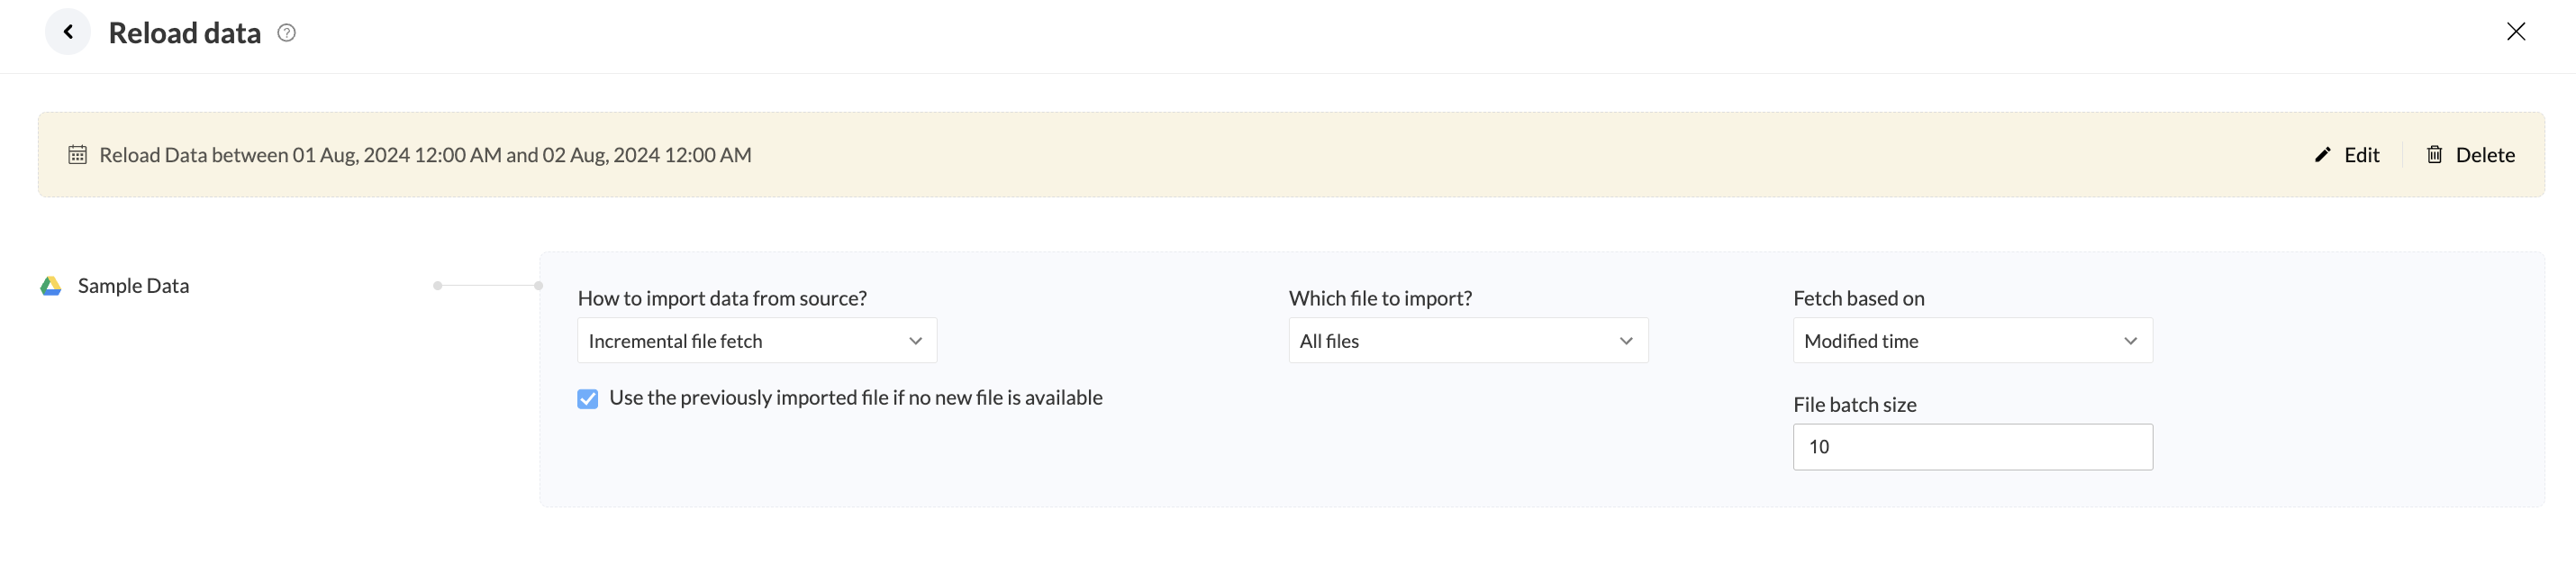
For instance, the reload is set between August 1st and 2nd.
August 1st has 3 files, August 2nd has 4 files. The import configuration is set to fetch all files incrementally with a batch size of 5 based on the oldest created time.
During the reload job, the 3 files created on August 1st, the first 2 files created on August 2nd will be fetched and exported as a single file.Click here to know about the reload. SEE ALSO