Working with Client Management

Working with Client Management

AlertNote: The Client Management feature is currently in its beta stage, with several additional components planned in the product roadmap. The client portal functionality aims to offer a high level of customization, enabling MSPs to deliver tailored services to their clients. 

The Client Management feature is not enabled by default. To use this functionality, you must contact support and request activation of the admin feature for your application. Once enabled, the Client Management options will be available under the Client Management section on the setup page.
  1. Client option - All client related operations such as adding or editing a client, enabling or deactivating a client, etc., can be performed from here.
  2. Client Portal Settings - All client portal settings related operations such as enabling the client portal, email settings, configuring custom domain, etc.,can be performed from here.

.


InfoRefer to the Understanding Client Management for more details on the feature.


Adding a Client 

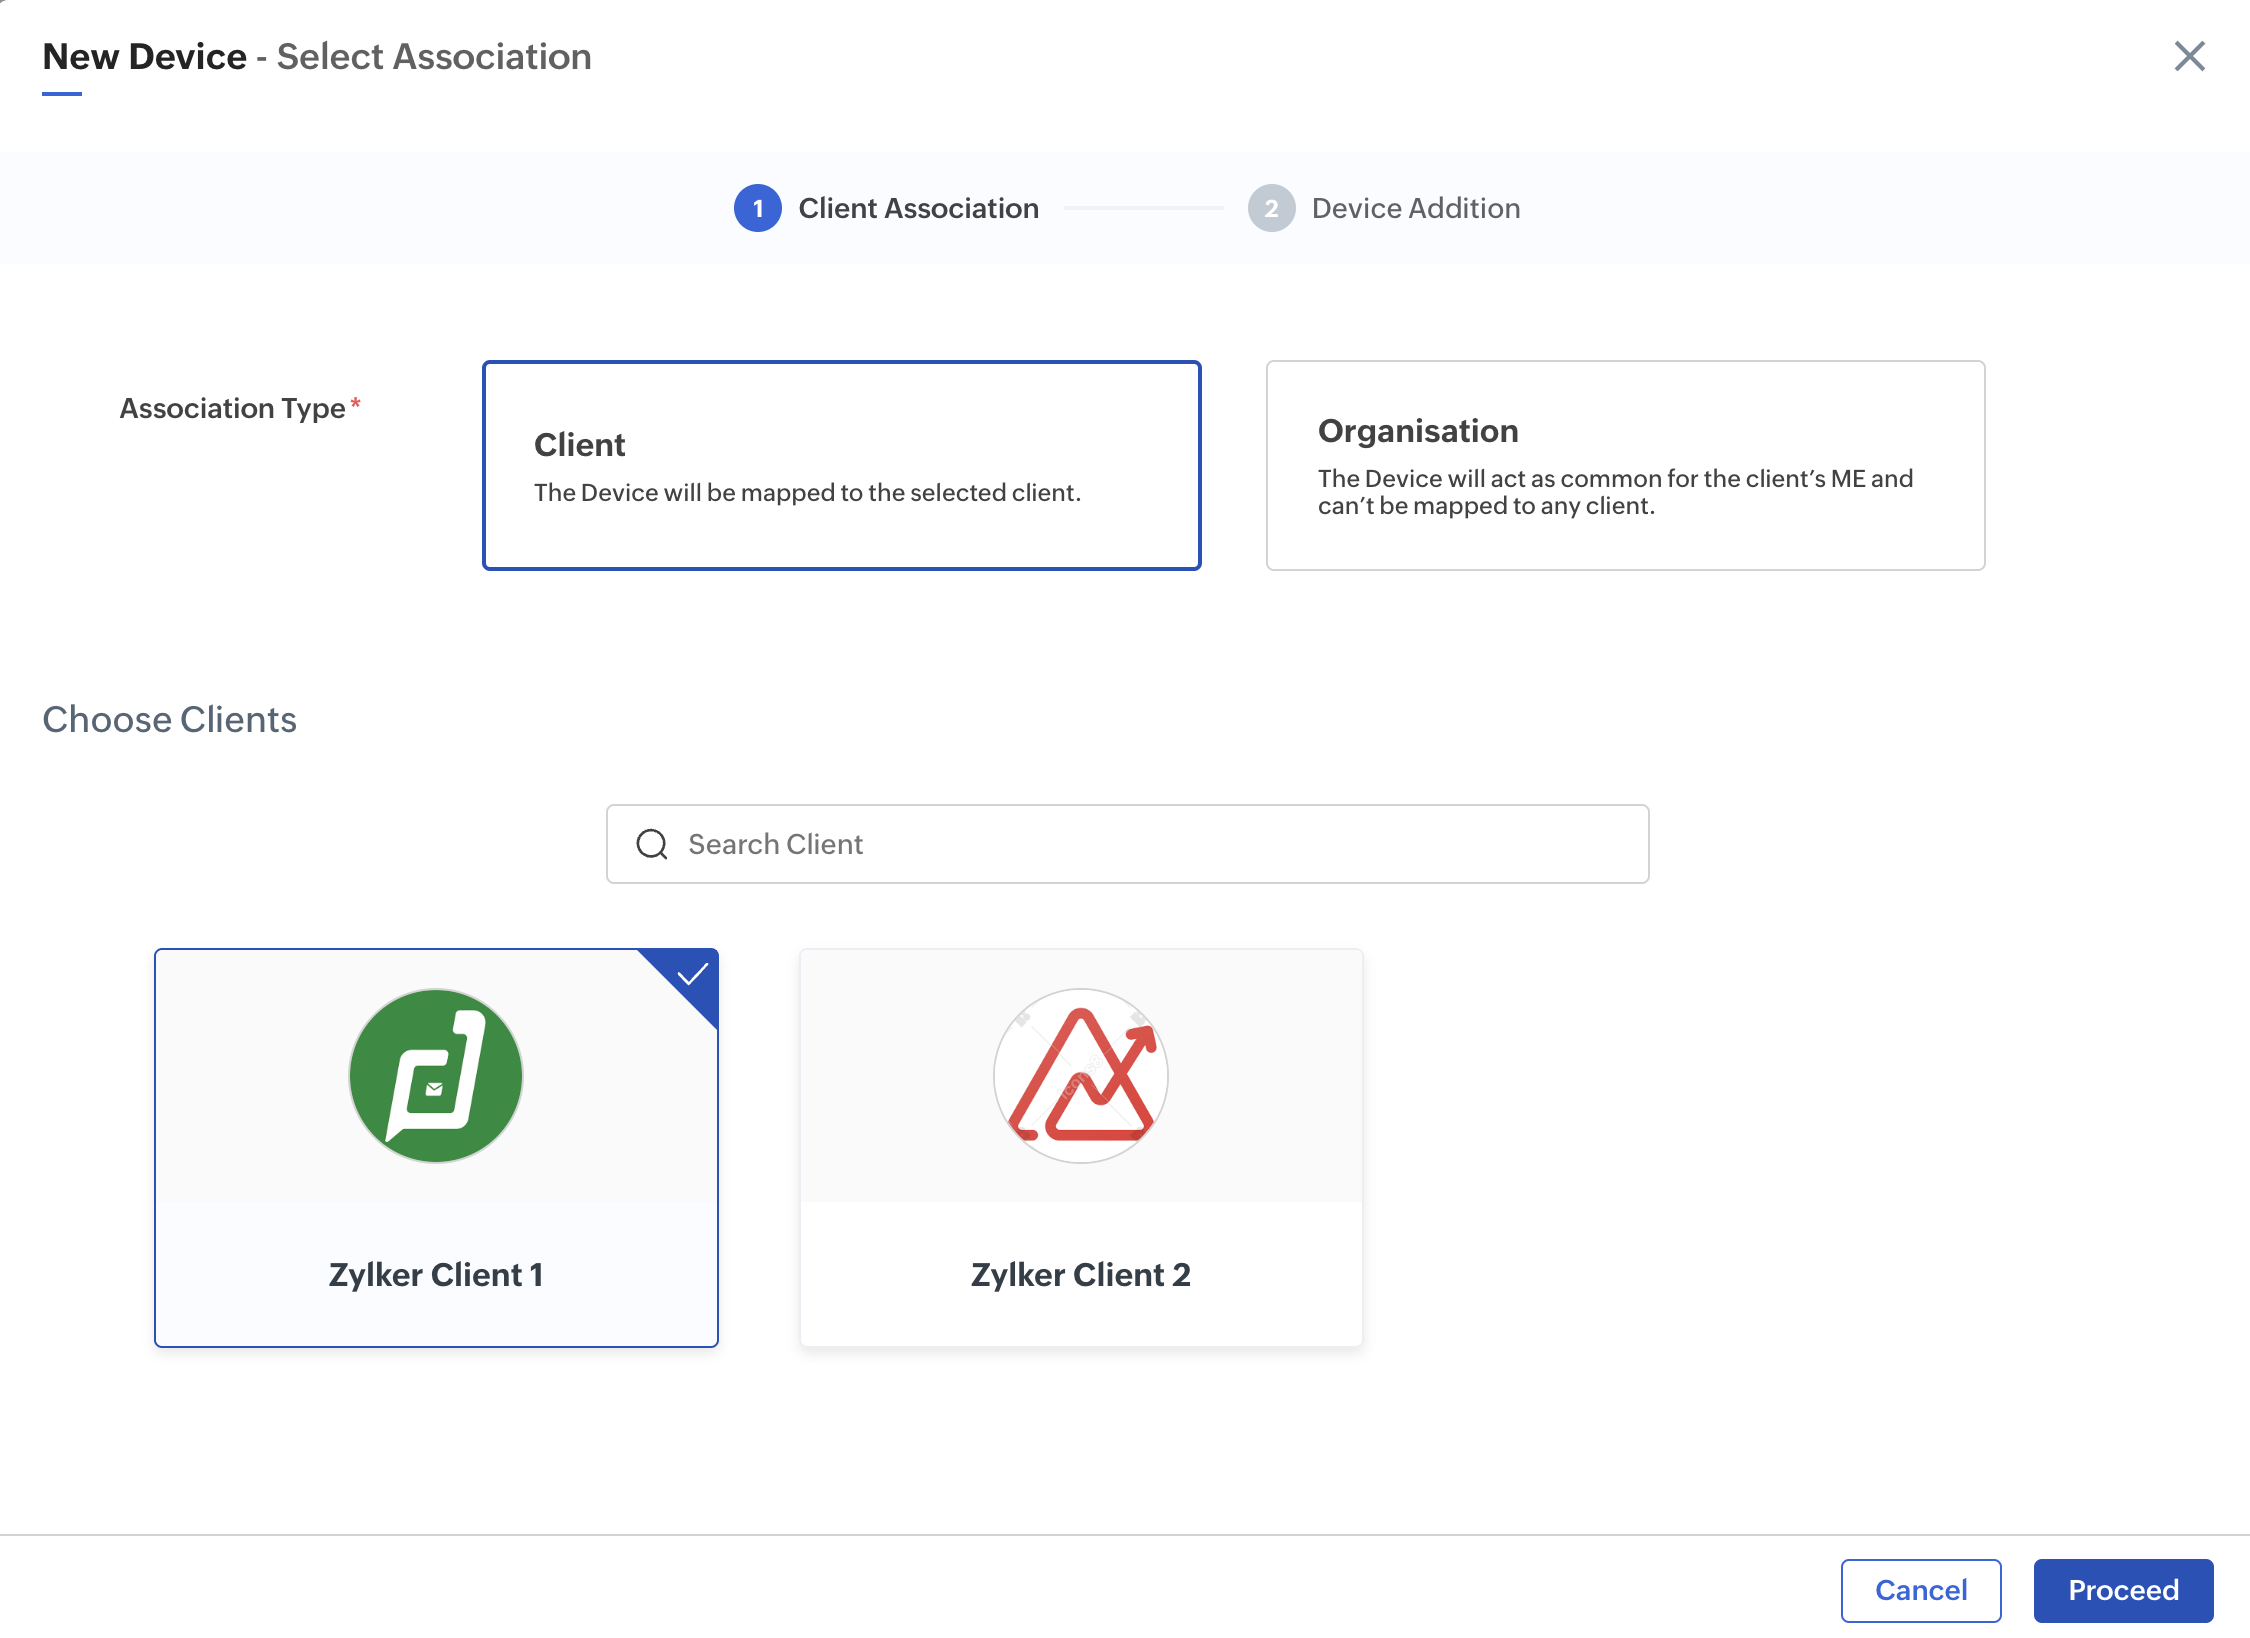
The first step to creating a client management system is to add the Clients for the MSP. Lets add two client Zylker Client 1 and Zylker Client 2 to the application.

To add a client,
  1. Click Clients in the Client Management section of the Setup page.
  2. Click the Add Clients button in the top right corner of the page. The Add Client form is displayed.


  3. Provide the required details in the New Client form.


  4. Click Add, the client is created.
To create a second client, click Add More and continue. The Clients created will be displayed in the All Clients screen.


By default, the portal will be disabled for the newly created clients. You need to enable the client portal manually.

You can proceed with adding the managed entities such as devices, assets, locations, etc., for the respective clients. 

Adding the Managed Entity 

 The Clients are set to Active mode when they are created, and they will be displayed when creating the managed entities.  


Refer to the creation documents for creating devices, assets, locations, etc.

Enabling the Client Portal  

Next step is to enable the Client Portal. Only after enabling the portal, will you be able to enable the client portal for the clients.

To enable the Client Portal,
  1. Click Client Portal Settings in the Client Management section of the Setup page.
    or
    Click Client Portal Settings in the left pane under Client Management.
  2. Click Enable Client Portal button. Once enabled, the portal cannot be disabled.
Note: On enabling the Client Portal, the MSP owner will be able to provide individual application access to its clients.


3. Click Enable Client Portal button.
4. Provide the required details in the Client Portal settings form.

Note: The portal URL once set cannot be modified. 


For more details on the settings refer to the Editing the Client Portal Settings section.

Enabling the Portal for the Clients  

Now, you need to enable the portal for the required clients.

To enable the portal for a client,
  1. Click Clients in the Client Management section of the Setup page. The available Clients are displayed.
  2. Click on the ellipsis next that appears on hovering next to the Client image.

    Note: Only clients that are active can be enabled. By default, the clients are created in Active state. Verify that the clients are active and proceed with enabling the portal for the client.

  3. Choose Enable Portal. The portal will be enabled.


  4. Alternatively, you can click on the Client name to view the client details.
  5. Click Actions > Enable Portal. The portal will be enabled.


    On enabling the Portal, the Manage Users option will be available in the ellipsis and Actions menu.


Deactivating the Client

By default, the client is active. If a client is deactivated, the data fetching from the client will be halted until activated. This option can be used to avoid deleting a client permanently.

To mark a client as inactive,
  1. Click Clients in the Client Management section of the Setup page. The available Clients are displayed.
  2. Click on the ellipsis next to the Client name and select Mark as Inactive.


  3. Alternatively, you can click on the Client name to view the client details.
  4. Click Actions > Mark as Inactive from the details screen.
The client will be marked as inactive, and data fetching from the client's managed entities will be halted

Viewing Clients 

To view the client details,
  1. Click Clients in the Client Management section of the Setup page. The available Clients are displayed.
  2. Click on a Client name to display the client details page.
  3. Click on the Details tab to view the client details.


  4. Click on the Attachments tab to view the attachments linked to the client. You can upload files, Zoho WorkDrive, cloud files, or links as attachment
  5. Click on the Relations tab to view the managed entities associated to the client.

Editing a Client  

To edit a client,
  1. Click Clients in the Client Management section of the Setup page. The available Clients are displayed.
  2. Click Actions > Edit Details to display the edit screen for the client.
  3. Modify the required values.


  4. Click Update to save the changes.

 
Editing the Client Portal  Settings

All configurations related to the Client Portal are managed within the Client Portal Settings section under Client Management in the Setup page. From this screen, you can modify the configured browser tab details for portal access, customize the login screen, manage email settings, and set up custom domain configurations for the Client Portal.
  
Client Portal  Basic and URL Settings
  1. Click Client Portal Settings in the Client Management section of the Setup page.

    Three tabs, namely, Basic Settings, Customization, and Custom Domain, are available for configuration.

  2. Select the Basic Settings tab. The enabling of the client portal and the client portal's display name can be configured from this tab. Other details, such as Portal URL details, are generated and cannot be edited.


The portal display name can be modified from this form.

3. Select the Customization tab. The following can be configured from the different expandable sections for Browser Tab, Login Screen, and Email Customizations.

To customize the Browser Tab.


To customize the Login Screen,


To customize the Email,


4. Select the Custom Domain tab. The custom domain can be created and enabled from this custom domain form. Refer to the Configuring Custom Domain document for more details.


Managing Profiles and Client Users 

A Client Portal Profile defines what a user can see and do inside the client portal. By creating profiles and assigning them to users, MSPs can control the specific privileges and access rights each user receives. Once a profile is assigned, its permissions are automatically applied to the user. This allows MSPs to design tailored profiles that meet the unique needs of each client and ensure the right level of access for every user.

For example, you can create two client portal profiles for Viewer and Manager as given below for the Energy Monitoring application. And assign multiple users to each profile as required.

Feature/Access 
Viewer Profile

Manager Profile

View Energy Data 
(Dashboards, Reports)

Yes - Can view assigned building/apartment data
Yes - Can view data for all assigned location
Download and Export Reports
Yes - Allowed for own location(s) only
Allowed for all managed locations
Configure Alarms & Notifications
Not allowed
Can create and manage alarts
Manage Devices (Energy Meters, Gateways)
Not allowed
Full control (add/remove/manage)
User Management 
Not allowed
Can assign Viewer profiles to others

Adding a Client Portal Profile
 
To add a client portal profile,

  1. Click User Profiles under USERS & CONTROL section of the Setup page.
  2. Select the Client Portal tab, and click Add Profile in the top right corner of the screen.


  3. In the Create Profile screen, select the Association Type and the Client to which you want to associate the profile. 


  4. Click Next.
  5. Provide the Profile details and click Create Profile.


    The profile has been created, and the User Profile Configuration screen is now displayed. Since this Viewer profile was cloned from the Admin profile, the current permissions shown are the same as those of the Admin profile.


    Note:  The Associated Users are 0 for a newly created profile. Next step is to create Portal users and associate them to this Client Portal profile.

  6. Modify the access rights as desired, and click Save.


Adding a Client User  


To add a client user,

  1. Click Users under USERS & CONTROL section of the Setup page.
  2. Select the Client Portal tab, and Add User in the top right corner of the screen.
  3. Provide the required details in the Add User form.


  4. Select the Profile for the new user. The Client Portal profiles available for the client are displayed in the drop down list.
  5. Click Add.
You will receive a mail for confirmation in the email ID provided for the user in the above form.
 

Accessing the Portal

The invitation to access the portal will be mailed to the email ID provided for the user.
  1. Click on the Access Application button in the mail. Alternatively, you can copy and paste the link provided to access the application.


  2. Provide the passwords, and you will be able to access the application portal.

    Note: The resultant screen on accessing the portal will be displayed as configured in the navigation menu. Refer to the Working with Navigation Menus document for more details.

      Create. Review. Publish.

      Write, edit, collaborate on, and publish documents to different content management platforms.

      Get Started Now


        Access your files securely from anywhere

          Zoho CRM Training Programs

          Learn how to use the best tools for sales force automation and better customer engagement from Zoho's implementation specialists.

          Zoho CRM Training
            Redefine the way you work
            with Zoho Workplace

              Zoho DataPrep Personalized Demo

              If you'd like a personalized walk-through of our data preparation tool, please request a demo and we'll be happy to show you how to get the best out of Zoho DataPrep.

              Zoho CRM Training

                Create, share, and deliver

                beautiful slides from anywhere.

                Get Started Now


                  Zoho Sign now offers specialized one-on-one training for both administrators and developers.

                  BOOK A SESSION


                              Quick LinksWorkflow AutomationData Collection
                              Web FormsEnterpriseOnline Data Collection Tool
                              Embeddable FormsBankingBegin Data Collection
                              Interactive FormsWorkplaceData Collection App
                              CRM FormsCustomer ServiceAccessible Forms
                              Digital FormsMarketingForms for Small Business
                              HTML FormsEducationForms for Enterprise
                              Contact FormsE-commerceForms for any business
                              Lead Generation FormsHealthcareForms for Startups
                              Wordpress FormsCustomer onboardingForms for Small Business
                              No Code FormsConstructionRSVP tool for holidays
                              Free FormsTravelFeatures for Order Forms
                              Prefill FormsNon-Profit
                              Intake FormsLegalMobile App
                              Form DesignerHRMobile Forms
                              Card FormsFoodOffline Forms
                              Assign FormsPhotographyMobile Forms Features
                              Translate FormsReal EstateKiosk in Mobile Forms
                              Electronic Forms
                              Drag & drop form builder

                              Notification Emails for FormsAlternativesSecurity & Compliance
                              Holiday FormsGoogle Forms alternative GDPR
                              Form to PDFJotform alternativeHIPAA Forms
                              Email FormsEncrypted Forms

                              Secure Forms

                              WCAG

                                      Create. Review. Publish.

                                      Write, edit, collaborate on, and publish documents to different content management platforms.

                                      Get Started Now


                                                        You are currently viewing the help pages of Qntrl’s earlier version. Click here to view our latest version—Qntrl 3.0's help articles.


                                                            Manage your brands on social media


                                                              • Desk Community Learning Series


                                                              • Digest


                                                              • Functions


                                                              • Meetups


                                                              • Kbase


                                                              • Resources


                                                              • Glossary


                                                              • Desk Marketplace


                                                              • MVP Corner


                                                              • Word of the Day


                                                              • Ask the Experts


                                                                Zoho Sheet Resources


                                                                    Zoho Forms Resources


                                                                      Secure your business
                                                                      communication with Zoho Mail


                                                                      Mail on the move with
                                                                      Zoho Mail mobile application

                                                                        Stay on top of your schedule
                                                                        at all times


                                                                        Carry your calendar with you
                                                                        Anytime, anywhere


                                                                              Zoho Sign Resources

                                                                                Sign, Paperless!

                                                                                Sign and send business documents on the go!

                                                                                Get Started Now


                                                                                        Zoho TeamInbox Resources


                                                                                                  Zoho DataPrep Demo

                                                                                                  Get a personalized demo or POC

                                                                                                  REGISTER NOW


                                                                                                    Design. Discuss. Deliver.

                                                                                                    Create visually engaging stories with Zoho Show.

                                                                                                    Get Started Now


                                                                                                                        • Related Articles

                                                                                                                        • Understanding Client Management

                                                                                                                          Note: The Client Management feature is currently in its beta stage, with several additional components planned in the product roadmap. The client portal functionality aims to offer a high level of customization, enabling MSPs to deliver tailored ...
                                                                                                                        • Working with Maps

                                                                                                                          The Maps feature helps to position managed entities at specific locations using their configured geolocation property with latitude and longitude values. And also the location type of datapoint allows to configure live tracking and location history ...
                                                                                                                        • Working with Certificates

                                                                                                                          This document provides complete instructions on working with the various operations related to certificates. Following the step-by-step procedures, you will be able to create, associate, download, activate, deactivate, revoke, edit, and delete ...
                                                                                                                        • Working with Alarms

                                                                                                                          The different views of Alarms allow users to examine alarms in detail, providing insights into their nature, severity, and history. The application also includes features to view related alarms, helping users identify connections between different ...
                                                                                                                        • Working with Widgets

                                                                                                                          Creating Widgets This section of the document provides an overview of creating and editing various types of widgets. The following are the ways to create & add widgets in a dashboard. When creating a new dashboard. Using the Actions > Add Widget ...
                                                                                                                          Wherever you are is as good as
                                                                                                                          your workplace

                                                                                                                            Resources

                                                                                                                            Videos

                                                                                                                            Watch comprehensive videos on features and other important topics that will help you master Zoho CRM.


                                                                                                                            eBooks

                                                                                                                            Download free eBooks and access a range of topics to get deeper insight on successfully using Zoho CRM.


                                                                                                                            Webinars

                                                                                                                            Sign up for our webinars and learn the Zoho CRM basics, from customization to sales force automation and more.


                                                                                                                            CRM Tips

                                                                                                                            Make the most of Zoho CRM with these useful tips.


                                                                                                                              Zoho Show Resources