Creating and Editing Forms

- The Sandbox feature allows you to test and make changes in a safe, isolated environment before applying them to your live, production setup. This ensures that any modifications to forms or other settings are thoroughly tested without affecting your live data or users.
- Once you're satisfied with the customizations in the sandbox instance, you can deploy them to the production environment for use across your organization.
Form Customization Options in Zoho People Extend Service
Create a Custom Form in Zoho People
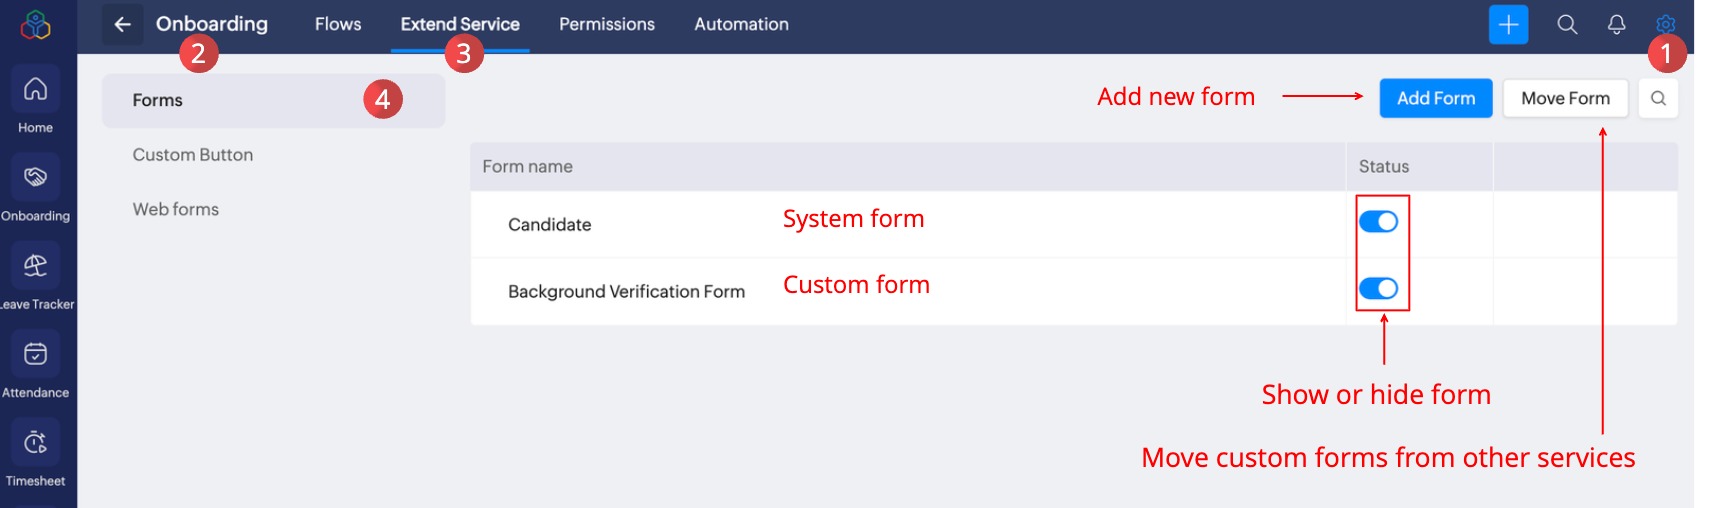
- From your home page, navigate to Settings > Select a Service > Extend Service > Forms.
- Click Add Form.
- Enter form name, form link name, and description.The Form Link name is a unique name associated with each form that helps during integration. While integrating with third-party applications, you may have more than one form with the same name. In this case, the system will take the Form Link Name to sync with third-party applications.
- Select form creation type:
- Add form from scratch: Use this option to create a new form from the start.
- Clone existing form: Clone an available system or custom form to customize and create a new form.
- Enable Auto Numbering, and enter the Record ID header name, prefix, and starting number for the Form record ID.Form Auto-Numbering is a feature in Zoho People forms, that automatically generates a unique, sequential identifier for each record added to a form. This helps maintain a structured, consistent numbering system for easy tracking and retrieval of records.For example:Name
Prefix Starts fromEmployee IDEMP1 Asset ID ASST00001 HR Help Desk IDCASE1 - Click Save.
Upon saving you will be moved to the form customization section, refer to the following topic.
Customizing a Form
- Drag-and-Drop Basic and Advanced Fields Section: This section, located on the left side of the page, contains predefined field types that you can drag and drop into the form.
- Basic Fields (e.g., Text, Number, Email, Date-Time) – Standard fields used for general data entry.
- Advanced Fields (e.g., Lookup, Formula, Multi-select) – Specialized fields for complex data needs.
- Form Section: This is the central area of the page where you build and arrange the form layout. It displays all the fields you have added, including system-generated fields. While form creation, system populates the Audit Fields by default to capture metadata about form activity such as:
- Added By – The user who created the record.
- Modified By – The user who last edited the record.
- Added Time – The timestamp when the record was created.
- Added IP Address – The IP address of the user who created the record.
- Modified IP Address – The IP address of the user who last modified the record.
If these audit fields are not required, you have the option to hide them. - Properties Section: Found on the right side of the page, this section allows you to configure settings for both the form and individual fields.
To edit an existing form, navigate to Settings > Select a Service > Extend Service > Form. Click on the form name.Form Fields
- Single Line: It is a one-line input field where the user can enter the text. It can contain any letters, numbers, or symbols. Click Form Properties to make the required changes. Example: Employee's name, Nickname, etc.,
- Multi-Line: It is a multi-line input field where the user can provide multiple texts. Ex: Address, Comments, etc., You can add a maximum of 25 multi-line fields in one form and each tabular section can contain up to 25 multi-line fields.
- Email ID: To provide the email address. Ex: Employee's personal email ID, official email ID.
- URL: To provide any web URLs. Ex: Company's website URL, Blog URL, etc.,
- Number: It is used to hold numerical values. Ex: Age, Bank account number, etc.
- Decimal: It is used to hold the decimal data. Ex: Salary details like Basic pay, HRA, etc.,
- Drop-down: It is used to hold a set of user-defined options, out of which an option can be selected and assigned as a value to the field. Ex. Employee Grade.
- Radio: Radio field is exactly the same as the drop-down field. The only difference is the display type. Drop-down list fields, as the name indicates will be displayed as a list. Radio fields will be displayed as options in the form.
- Date: It can be used to hold date values. The date picker can be used to populate the date fields while adding a record. Ex. Date of Birth, Date of Joining, etc.,
- Date-Time: It can be used to hold the time stamp value. The date-time picker can be used to populate the timestamp values for the fields while adding a record. Ex. In-Time, Out-Time, etc.,
 In Date & Date-time fields, the following validations are supported
Allow past dates
Allow future dates
Allow dates before
Allow dates after - Image: It can be used to collect image, only jpg/png/gif/jpeg formats can be uploaded.
- File Upload: It can be used to allow the users to attach a file during form submission. The file size limit can be set by the administrator (up to 5 MB).User can upload files from Zoho Docs, Google Drive, Dropbox, One drive, Box and Evernote by authenticating once with a one-time authentication.
- Gender: It can be used to store gender information.
- Blood Group: It can be used to store blood group information.
- Country: It can be used to store country information. Ex. Citizenship
- Currency: Currency fields are used to hold decimal values with the currency notation(like USD, INR, etc). This currency type can be selected during the customization of forms.For Number, Currency & Decimal fields, the display format can be customized as per user preference, the screenshot below shows the available display format options:
- Decision box: It can be used to hold Boolean values - True or false.
- Lookup fields: A lookup field is used to create a relationship between two different forms. The lookup field will look up the ID of the record in the source form. It displays a drop-down menu containing items from the source form. For example, the Employee ID lookup can be used in forms such as Salary, Performance Appraisal, and others, allowing you to select an employee’s ID from the corresponding source form.There are four different ways to make use of these lookup fields. They are the Drop-down list (Single-select), Radio Button (Single-select), Check Boxes (Multi-select), and Multiple Select List (Multi-select).Drop-down list (Single-select) and Radio Button (Single-select) lookup fields: Using a single-select lookup field, you can select a single field from the drop-down list. For example, typically an employee will be assigned to only one department and hence a relationship between the Employee and Department form is created using a single-select lookup field. The employee can view/edit the records if permission is given.Check Boxes (Multi-select) and Multiple Select List (Multi-select): Using multi-select, you can select multiple fields from the list. For example, many employees may be traveling abroad for conferences. The travel desk person can create a form using a multi-select lookup field and be able to select multiple employees in a single shot. The selected people in the list will be able to view/edit the records if given permission.
- Multi-select: Using multi-select, you can allow users to select multiple fields from the list. For example, in an Candidate Form, a multi-select field can be used to capture an user skills. The field values can include a list of skills, allowing employees to select multiple relevant options.
- Formula: It can be used to perform some basic calculations with the fields available in the form.
- Phone: It can be used to hold phone numbers. Ex. Mobile number, emergency contact number, etc.,
- Address: It can be used to collect user address with details such as city, country, state and postal code
- Add Notes: It is used for holding a descriptive help text that can be useful for the users while adding a record.
Manage Sections of a Form
- Add Linear Sections: Create sections where the fields are displayed in a simple, top-to-bottom sequence.
- Add Tabular Sections: Organize your form fields into a table format, ideal for structured data entry or when grouping related fields together.
- Reorder Form Sections: Rearrange the order of sections within your form to match your preferred flow or logic.
- Set Form Layout: Choose between a single-page layout for a concise, compact form or a multi-page layout for better organization and ease of navigation through longer forms.
Configure Rule
Rules allow you to dynamically control the behavior of form fields based on employee data or form inputs. You can automatically show fields, hide fields, or make fields mandatory when specific conditions are met, helping ensure that employees only see and complete relevant information.
Why Use Rules?
- Simplify forms by displaying only relevant fields.
- Collect location-specific or employee-specific information.
- Make important fields mandatory only when needed.
- Improve data accuracy and reduce incomplete submissions.
- Create personalized form experiences without manual intervention.
- Go to Settings > Select a Service > Extend Service > Forms and click on the required form.
- Click on the ellipsis icon > Configure Rule.
- Show Fields – Display selected form fields.
- Hide Fields – Hide selected form fields.
- Make Fields Mandatory – Require users to complete selected form fields before submitting the form.
Field Limits in a Form
- The maximum limit of fields in a linear section is 200 per form:
- The maximum limit for tabular sections is 5 per form with a maximum of 25 fields per section.
- Single line, Email, Image, Country, Gender, File upload, Blood Group, Phone, Formula - 70
- Date - 20
- Number, Lookup, Picklist, Date time, Formula- 50
- Currency, Decimal, Formula -25
- Multi-line, URL - 25
- Decision box, Formula - 15
- Notes - No limit
Marking a field as Personal Data
- Go to Settings > Select a Service > Extend Service > Forms and click on the required form.
- Select a field that you would like to identify as personal data.
- Click Field Properties tab. Enable Mark as Personal Data.
Marking a field as ePHI data
- Go to Settings > Select a Service > Extend Service > Forms and click on the required form.
- Select a field that you would like to identify as ePHI data.
- Click Field Properties tab and enable Mark as ePHI.
Enabling Encryption for Fields
- Go to Settings > Select a Service > Extend Service > Forms and click on the required form.
- Select a field that you would like to enable encryption.
- Click Field Properties tab and enable Encryption.Note:- Encryption is available only for custom fields. system fields cannot be encrypted.- Encryption can only be enabled for single line, multi-line, date fields and number fields
- Now the field will remain encrypted in all records and workflows.
- You can encrypt a maximum of 5 fields for linear sections in a form.
Data Masking
- PAN
- Aadhaar
- UAN
- SSN
Audit History of a Field
- Go to Settings > Select a Service > Extend Service > Forms and click on the required form.
- Select a field that you would like to enable Audit.
- Click Field Properties tab and enable Audit.
Enable password protection for exporting files
- Go to Settings > Select a Service > Extend Service > Forms.
- Click on the form for which you would like to enable password protection for exports.
- Click Form Properties, under Preferences, enable Password protection.
Enable Audit History and track changes

- Navigate to Settings > Select a Service > Extend Service > Forms and click on the required form.
- Select the required field, click on Field Properties tab, under General Configuration, enable Audit.
- Navigate to Operations > Select a Service > Select the Form > click on he Record.
- At the top right, click on the ellipsis icon > Audit History.
The changes made to the form record fields for which audit history has been enabled will appear.
Renaming & Hiding Form Buttons (Custom Form)
Along with other extensive form customizations, you can also rename form buttons based on your preference. The Submit and New buttons can also be hidden. These options are available only for custom forms.
To access these options, navigate to any custom form and use the Rename Buttons section under the Form Properties tab. Enable Hide Submit & New button if you want to hide this button in your form.
Form Field-Lookup
- Go to Settings > Select a Service > Extend Service > Forms.
- Drag and drop the lookup field from the left side menu.
- Enter details like Display Name etc.
- Under Display as, select the option as required.
- Under Import data, select the form from which the fields need to be picked.
- Under Field Name, select the Field name based on which the mapping has to be done - for example, if you would like to have the mapping done based on the Personal mobile number in the Employee Form, you need to select Employee Personal Mobile Number under the Field name.
- You can also click on the lookup field to customize it.
- Under Select related fields, select the other Fields that you would like to be displayed. This related fields will be displayed automatically when the main lookup field is selected in the form.
- From your home page, go to Settings (Gear icon) > Service > Extend Service > Forms. Click on the form.
- Drag the Lookup field from the left-hand side and drop it in your form section.
- Enter the details like Display Name etc - You can give the name as Travel Month here.
- Under Import Data From, give Travel Request and under Field Name, select Travel ID.
- Click Done.
- On the right-hand side, under Field Properties, Check Set Filter.
- Under Field Name, select Expected Date of Departure.
- Under Condition select Last Month.
- Click Done.
Now, when a record is added in the Travel Expense form, under Month of Travel, the Travel details of the previous month alone will get displayed.
Show/Hide Form Fields Based on Rules & Conditions
- Navigate to Settings > Select a Service > Extend Service > Forms.
- Select a specific form (for instance, the Employee Form).
- Click the three-dot (ellipsis) icon and choose Configure Rule.
- In the pop-up window, define the condition required to show or hide a field and click Save.
- You can add multiple rules by clicking the Add Rule button.