WhatsApp Integration for Zoho People
Introduction to WhatsApp Integration
WhatsApp is a widely used instant messaging application, with over 90% adoption in key markets like Brazil, India, and Spain. By integrating with WhatsApp, Zoho People aims to benefit these users by bringing notifications directly to WhatsApp.
Advantages of using WhatsApp Integration with Zoho People
Here are the benefits of using WhatsApp Integration once the setup process is completed.
- Approvals on the go
Managers can approve or reject requests directly from WhatsApp—no laptop or web login required. Once a decision is made, employees receive instant updates on WhatsApp, keeping everyone informed in real time. - Never miss important updates
Stay in the loop with timely notifications for surveys, announcements, and onboarding updates, all delivered straight to employees on WhatsApp—where they’re most likely to see them. - Saves time for everyone
Employees and managers already rely heavily on WhatsApp throughout the day. Sending approvals and key notifications directly to WhatsApp reduces follow-ups, speeds up responses, and ensures critical updates are never missed. - Organized notifications with multiple channels
Create multiple WhatsApp channels and define exactly which updates go to each one. This keeps communication structured, avoids clutter, and ensures employees receive only the notifications that matter to them.
Enabling and configuring the WhatsApp integration
Prerequisites
Let us first take a look at the prerequisites for integrating a WhatsApp Business account with Zoho People:
- A verified Facebook business manager account.
- A verified WhatsApp business account is required.
- A registered phone number.
- The mobile number field from the employee form, used for the integration, must not contain any duplicate values.
NOTE
After the setup is completed, it is mandatory to purchase IM Credits for using WhatsApp integration. i.e., each message sent to WhatsApp consumes credit. Refer to step 15 in the below section for additional details.
After the setup is completed, it is mandatory to purchase IM Credits for using WhatsApp integration. i.e., each message sent to WhatsApp consumes credit. Refer to step 15 in the below section for additional details.
Setup Process
1. Navigate to Settings.
2. Select Marketplace service.
3. Select the Third-Party Integrations tab.
4. Click Configure within the WhatsApp integration card.
5. Click Enable Integration.
6. Move to the Channels tab.
7. Click Link WhatsApp Business Account.
8. You will first be required to log in to your Facebook Business Manager account. Enter your credentials or create a new Facebook business account and click Login to proceed. Click the link below for detailed login steps (steps 9-12). After logging in, proceed with step 13.
Detailed Login Steps +
9. You will be required to authenticate using an OTP (if enabled). You can also choose to mark the device as a trusted device if required.
10. Next, you will be required to click Continue to acknowledge, and click Get started to proceed connecting Zoho service with WhatsApp (through Facebook).
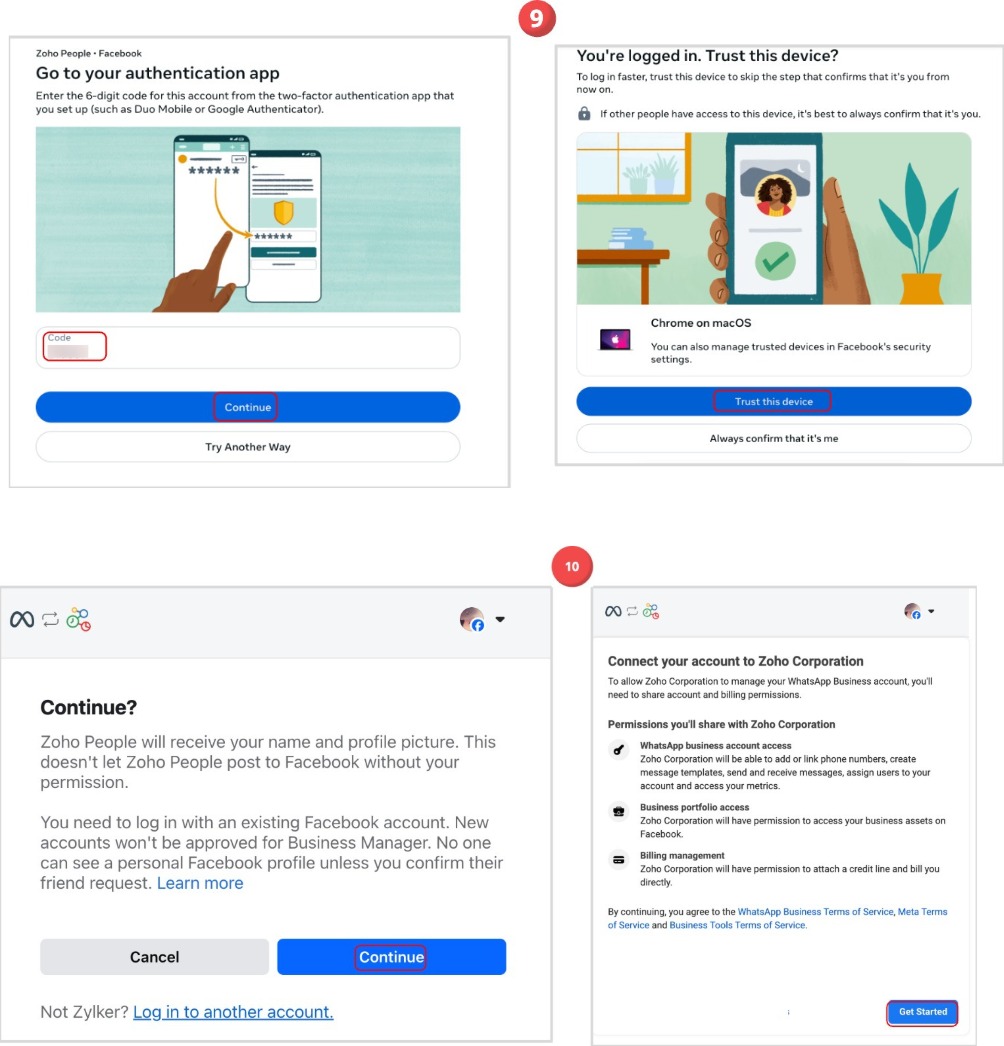
11. Next, you will be presented with a 5-step wizard that takes you through the account setup. Fill in the required details; you will also be prompted to select the corresponding Whatsapp business account, select a verified phone number (or verify a new one). Proceed through each stage to complete this process.
12. Next, you can review the details and click Finish to complete the login process.
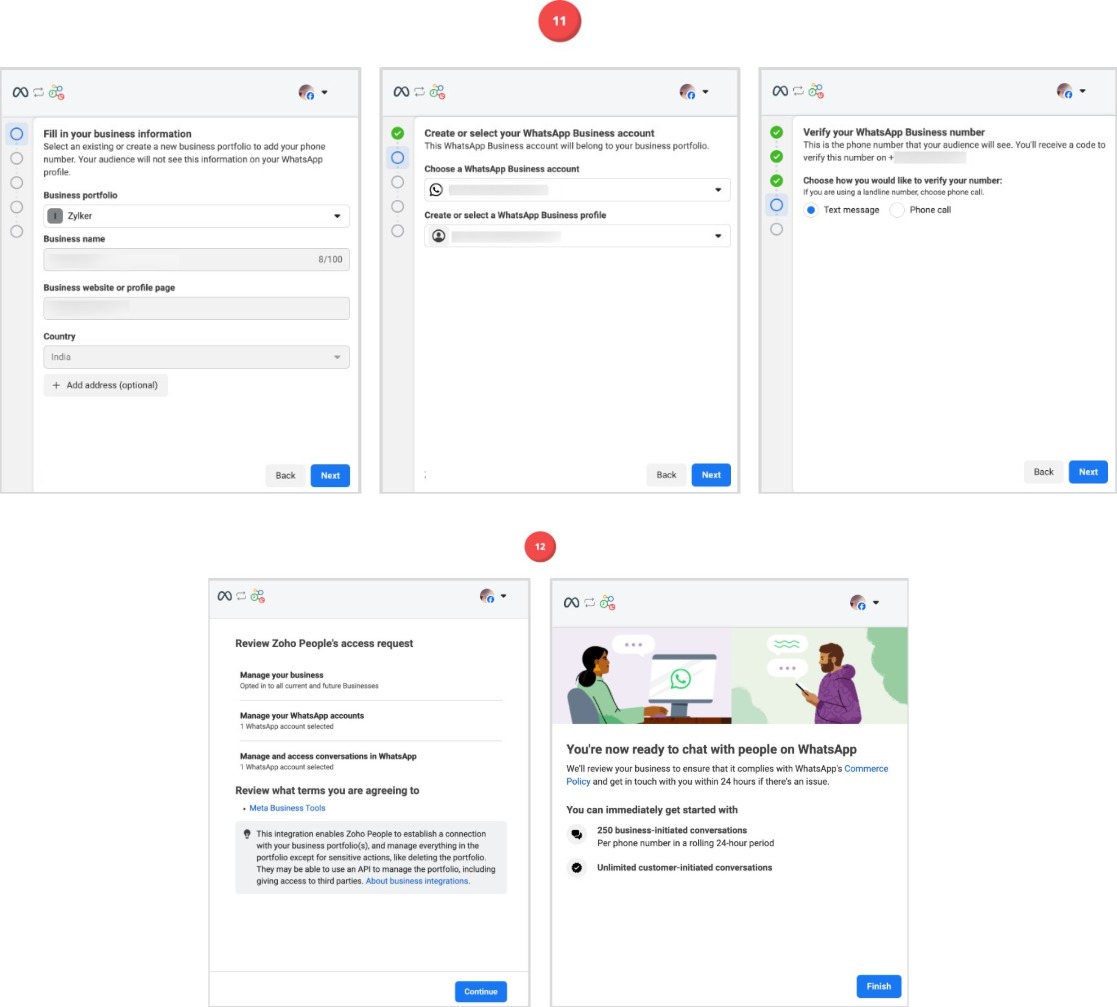
13. You will now see the "WhatsApp business account linked successfully" message in Zoho People. (Move back to the Zoho People tab in your web browser). Now proceed by clicking on the Create Channel button. (Settings > Marketplace > Third-party integrations > View Details within WhatsApp > Channels > Create Channel). During channel creation, the user will be prompted to enter the channel name and select the employee form field to be used for obtaining the employee mobile numbers. Muliple channels can be created. Additionally, you have an option to send a notification on feeds and email about the usage of WhatsApp in your organization.
14. Now the channel will be created. The next step involves enabling which approval notifications are to be sent to WhatsApp. To configure this, click on the Notifications button and include/exclude the required approvals by using the checkboxes. Learn more about setting up approvals.

If any email notifications for Employee Engagement, Onboarding, Announcement, or Approval is disabled in Zoho People, then the corresponding notification update will not be sent in Whatsapp.
15. Now, for the notifications to be sent, it is mandatory to purchase ZohoIM credits, which will be deducted for messages sent from WhatsApp. Please read the topic below for more details on pricing.
WhatsApp Integration Pricing
WhatsApp charges businesses for every outgoing message sent. In Zoho, these payments are managed using credits added to your ZohoIM wallet.
- You’ll need to top up your wallet with credits, which will be automatically deducted as you send outgoing messages.
- Zoho People notifications fall under business-initiated conversations and are categorized as "Utility" messages.
To get started:
- Use the Buy Credit link to purchase the required credits based on your messaging volume.
- Estimate your credit usage with the Pricing Calculator.
- Use the Manage Auto Recharge option to automatically top up your wallet and ensure uninterrupted messaging.
NOTE
Pricing varies based on region. Use the "Pick a Country" drop-down available within the Pricing Calculator to view the calculated region-based pricing.
Pricing varies based on region. Use the "Pick a Country" drop-down available within the Pricing Calculator to view the calculated region-based pricing.
Using the pricing calculator to calculate credit requirements:
- Click on the Pricing Calculator option to view the WhatsApp Pricing Calculator dialog box.
- Select a country using the "Pick a Country" drop-down. Currency can also be selected as required.
- Enter your expected messaging volume in the Utility space.
- Once the required volume of messages is entered, the corresponding values will be automatically updated below; this includes the credits to be purchased, total cost and equivalent currency value of the credits.
For example, the currency requirements of messaging requirements for 1000 messages are depicted in the screenshot below:
Using WhatsApp Integration | Whatsapp Notifications
Managers (approvers) will automatically receive notifications when an approval request is raised.
They can directly approve/reject the requests from within WhatsApp. This is handy in situations where approvers are carrying only their mobile phone, such as when they are traveling or when they are outside the office space. When the request is approved/rejected by the manager, the concerned employee will also be notified in WhatsApp directly.
Examples:
1. When a leave request is raised by an employee and his reporting manager directly approves it from WhatsApp.
NOTE:
Clicking on the Get Record Link option displays the access URL for the corresponding record in Zoho People. You will be required to be signed in to Zoho People to view the record using the link.

Clicking on the Get Record Link option displays the access URL for the corresponding record in Zoho People. You will be required to be signed in to Zoho People to view the record using the link.
2. When an employee raises a regularization request following an incorrect attendance record, the manager is notified, and the employee receives confirmation upon approval/rejection.
Announcements, Onboarding, and Survey notifications are also received directly in Whatsapp and employees can click on the provided link to access the corresponding pages in Zoho People.