Working with Alarm Rule Templates
Creating Alarm Rule Templates
Alarm Rule Templates can be created in both the Developer Application and the End Application. In this document, we will follow the steps in creating Alarm Rule Templates from the Developer Application.
The main steps in creating an Alarm Rule Template are:
1. Create Alarm Rule Template
2. Provide Alarm Rule Template Details
3. Create an Alarm Rule State
i. Define Stateii. Select the Alarm Triggeriii. Set the Condition Builderiv. Configure the Alarm Messagev. Customize the Alarm Actions
Prerequisites
- Define model: Ensure the device, asset, or location model is created in the developer application.
- Define datapoint: Ensure the metric based on which you are setting the alarm condition is configured as a datapoint template in the model.
Availability

All Alarm Rule operations require necessary permissions. Refer to Users and Profiles document for more details.
Check Feature Availability and Limits
Check Feature Availability and Limits
Creating Alarm Rule Templates from Summary Page
Alarm Rule Templates can be configured for Device, Asset, or Location models from the respective Summary page from the developer application.
To create an Alarm Rule Template from the Summary page,
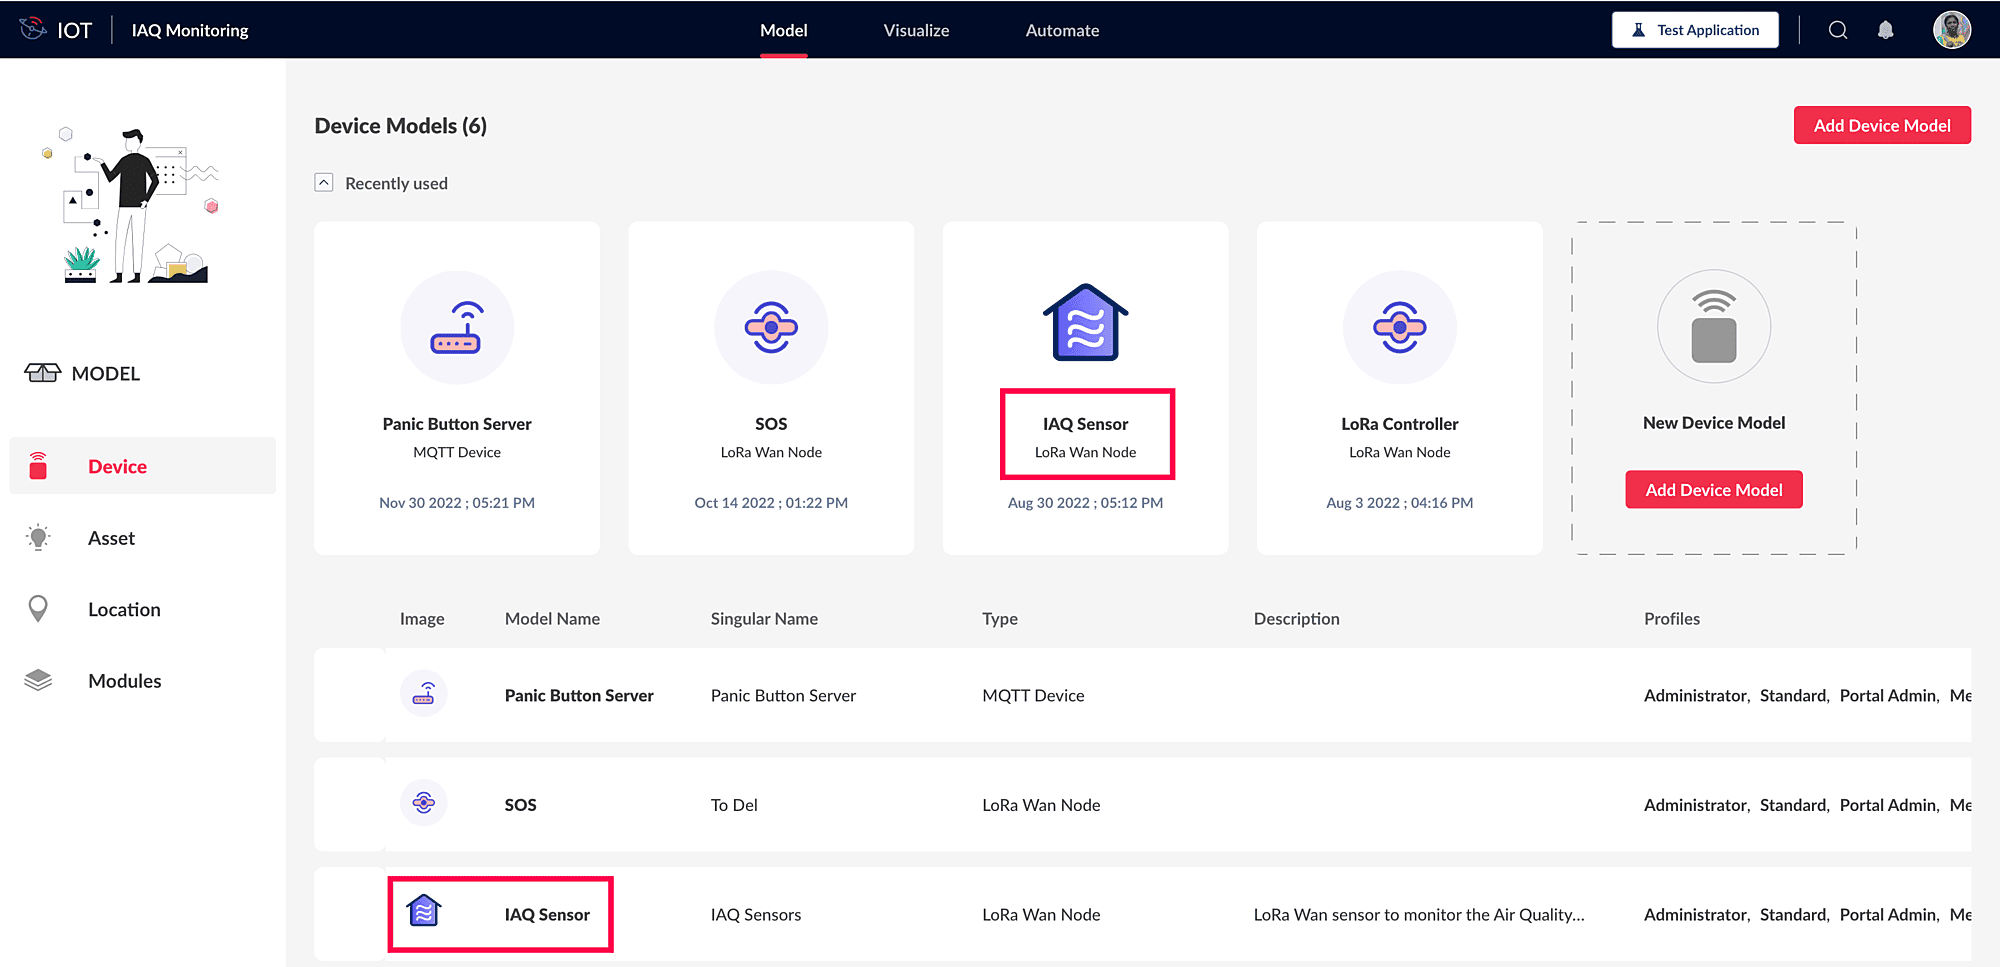
1. Click Devices in the left pane in the Model tab in the Developer App. The list of devices will be displayed in the Device Models list view.

2. Click on the device model for which you want to add/modify the Alarm Rule Template. The Summary page is displayed along with the template details.
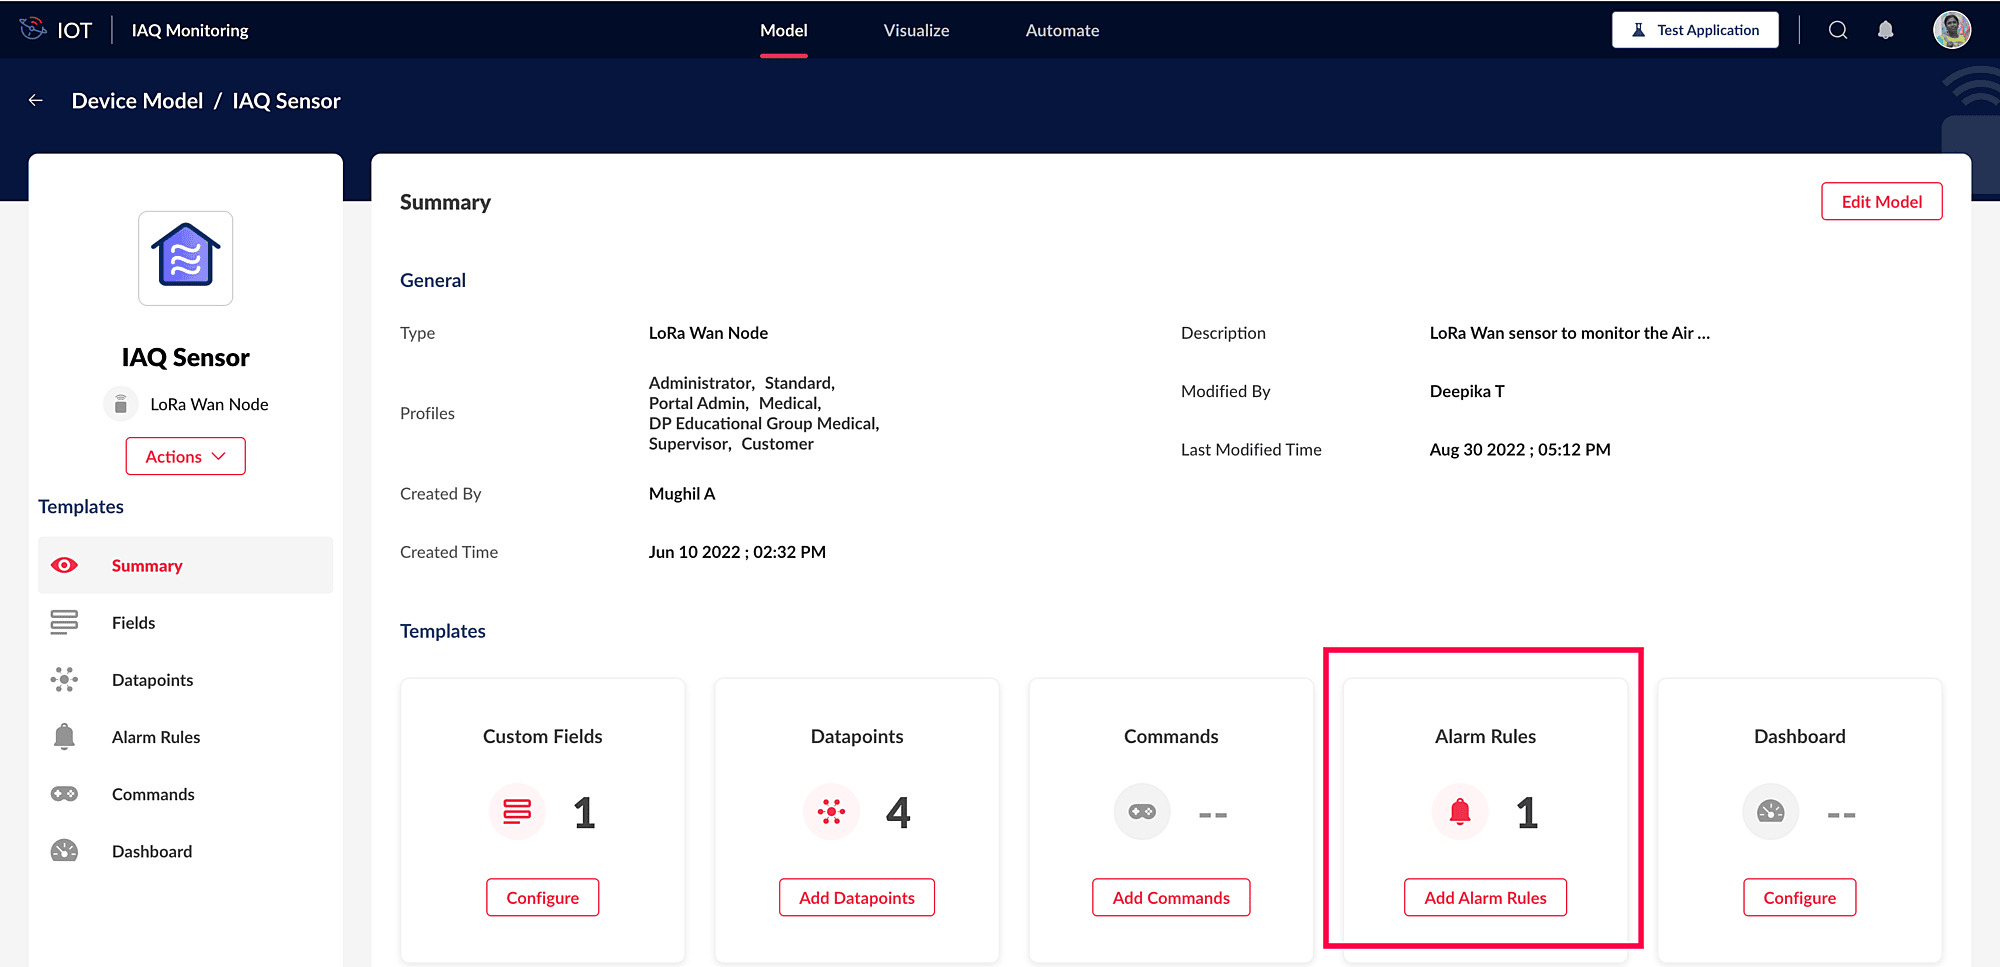
Image: Accessing Alarm Rules from the Summary Page
3. Click Add Alarm Rules to invoke the Alarm Rule Template creation wizard.
4. Provide the Alarm Rule Template details.
5. Complete the steps provided in the Creating Alarm Rule States section of the document.
Creating Alarm Rule Templates from Setup Page
To create an Alarm Rule Template from the Setup page,
1. Click the Setup icon in the left pane in the Model tab in the Developer App. The Setup page is displayed.

2. Click on the Alarm Rules option under the MONITORING & CONTROL section. The Alarm Rule Templates and Alarm Rule Instances (Alarm Rules) are displayed.
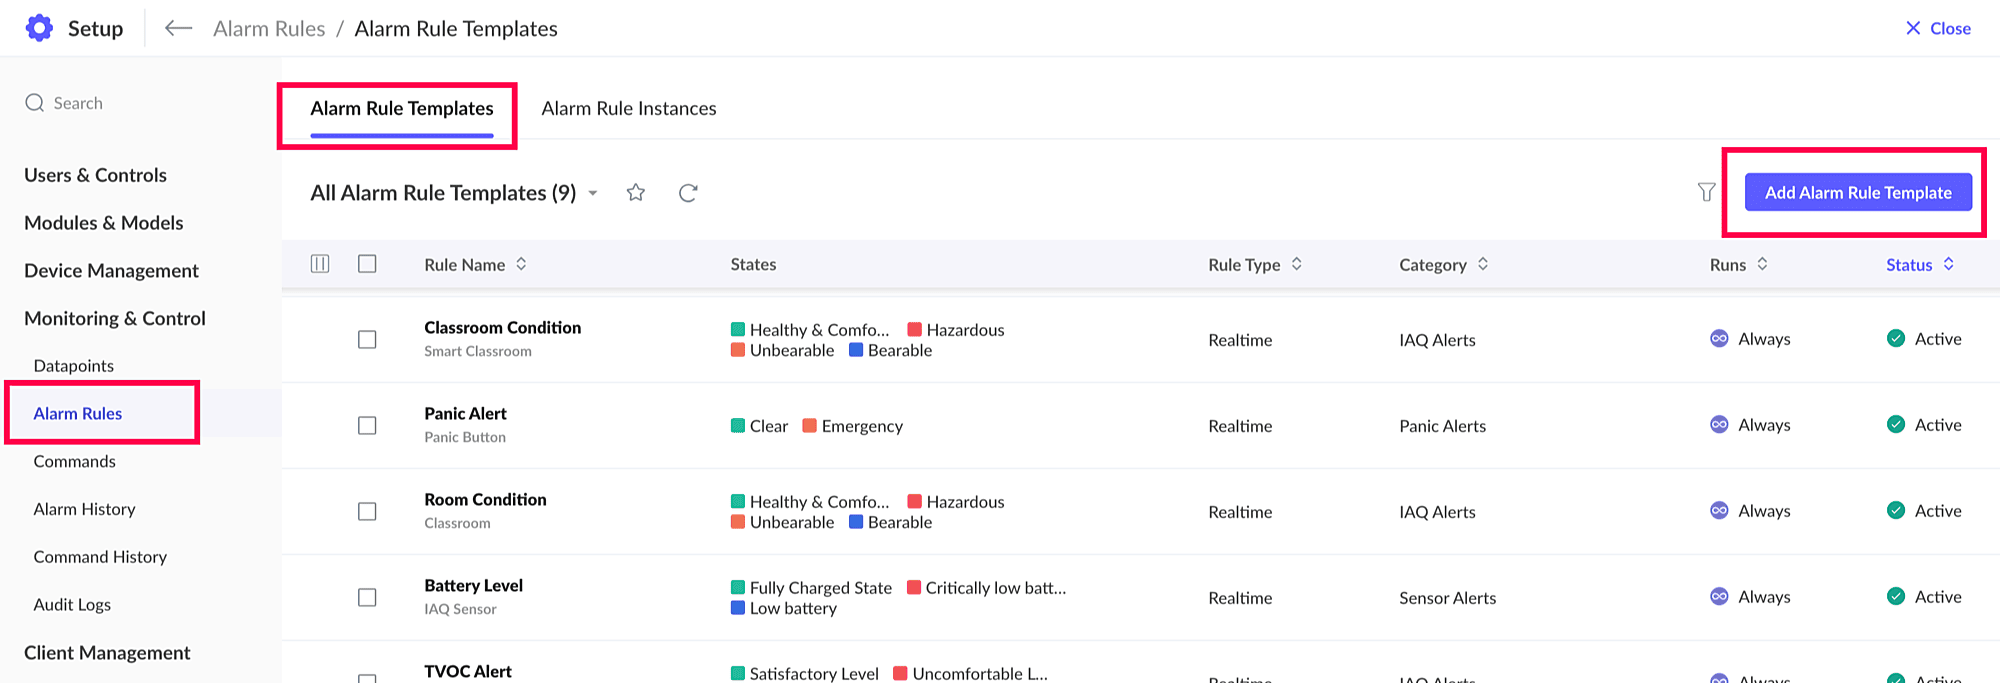
3. Click Add Alarm Rules Template in the right to invoke the Alarm Rule Template creation wizard.
4. Provide the Alarm Rule Template details.
5. Complete the steps provided in the Creating Alarm Rule States section of the document.
Creating Alarm Rule Templates from List View Page
1. Select the Automate tab on the top of the screen in the Developer Application.
2. Select Alarm Rules in the left pane. All the Alarm Rule Templates already configured are displayed on the page.
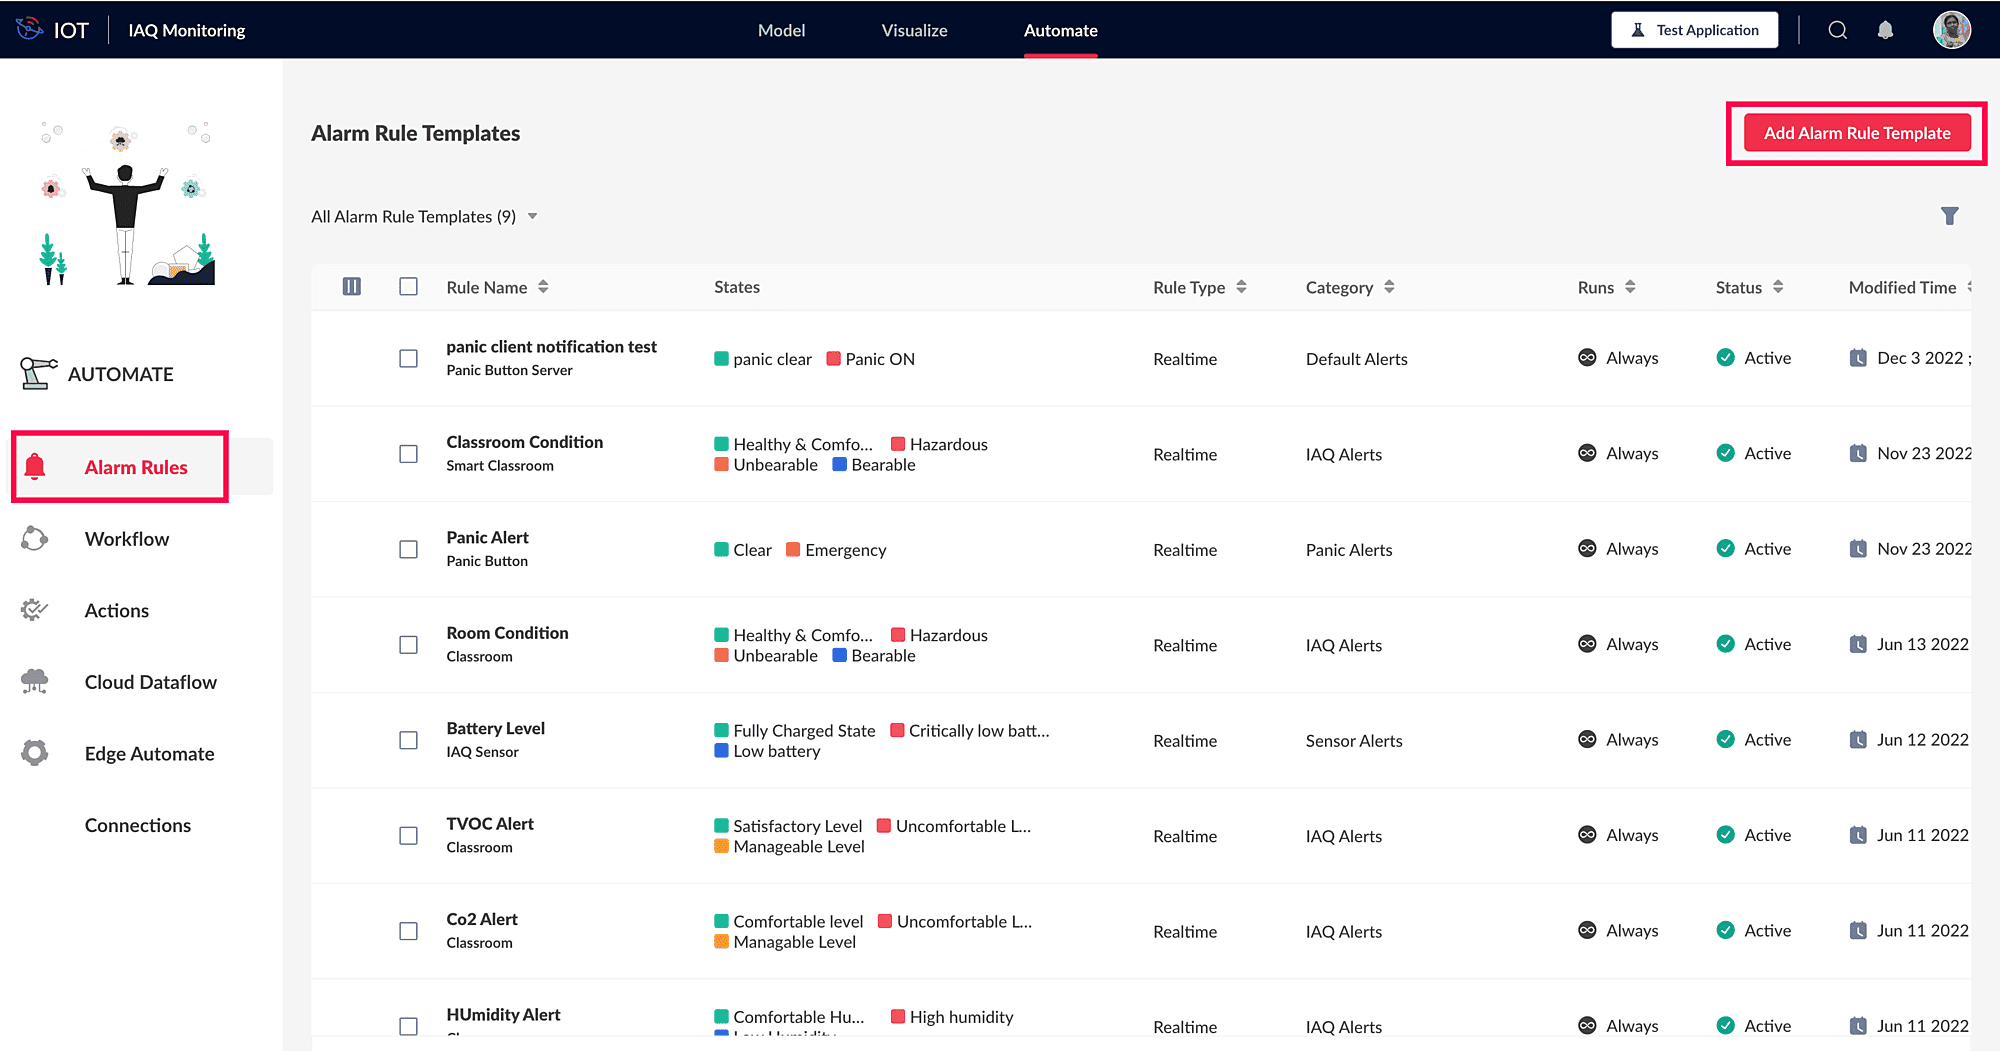
3. Click the Add Alarm Rules Template button in the top right corner. This opens the New Alarm Rule Template form.
4. Complete the steps provided in the Alarm Rule Template Creation Form.
5. Complete the steps provided in the Creating Alarm Rule States section of the document.
Alarm Rule Template Creation Form
The Alarm Rule Creation Form is displayed when the Add Alarm Rule Template button is clicked.
1. Select the rule trigger type whether Realtime Datapoint or Scheduled KPI Datapoint.
- In Realtime Datapoint, the alarm rule template is constructed based on the realtime datapoint value received from the device.
- In Scheduled KPI Datapoint, the alarm rule template is constructed based on the calculated KPI datapoint values of stored data.
Note: Scheduled KPI Datapoint option alone is available for the Location models. As the location does not have any realtime datapoints.
2. For Alarm Rule template, select the model.3. Enter the name and description of the alarm rule in the respective textboxes.Note: Rules cannot be created for peripheral devices as there are no datapoints.4. Select the alarm category to group the alarm rules for easy access. Else, click on Create New Category to create a new category if it is not already available.5. Configure the schedule for the alarm rule by choosing the Run This Rule: Always or Custom Time option.
- Always - The alarm rule is always running and will be executed whenever the conditions are met.
- Custom Time - The alarm rule runs at scheduled time. You can choose the days of the week and the time at which the alarm rule is to be run. This enables the alarm rule to not validate the incoming data always, i.e. 24*7. Not including working hours helps to avoid unwanted alarms and the actions getting executed.
6. Select the Status whether On/Off.On - The rule will be executed whenever the conditions match.Off - The rule will not be executed even when the conditions are matched. The rules will be created for the respective instances, but they will be in an inactive state.7. Click Next to add Alarm State.
Proceed to complete the steps provided in the Creating Alarm Rule States section of the document.
Creating Alarm Rule States
Any problem can have different conditions also referred to as severity to identify the specific context of the problem. These conditions are represented using Alarm States. Defining the States of an Alarm is the first step in adding an Alarm State. Let's proceed to define the Alarm State.
I. Define State
1. After providing the details in the Alarm Rule Creation form. Click Next to continue creating a new Alarm Rule State.
2. Click Add State on the left pane. This opens the Alarm Builder form.
The following screen is displayed when adding the State for the first time. Click "Do not show this screen again" if you do not want to view this screen on consequent Alarm State addition.7. Click Get Started.8. Provide the State name and the corresponding severity as given in the sample table above.9. Click Next to move to the Select Trigger screen of the Alarm Rule builder.
II. Configuring an Alarm Trigger
1. The Trigger configuration provides instructions on when to execute the Alarm Rule.
- Select Realtime Datapoint if you want to create a rule condition based on the incoming datapoint value from the device.
(or)
- Select Device Notification Alarm if you want to create a rule where the device sends the notification based on the device level code.
2. Click Next to move to the Set Condition screen of the Alarm Rule builder.
III. Providing the Alarm Condition
The alarm conditions, such as the primary condition for the alarm, occurrence condition, and noise reduction criteria, are configured in this step.1. Configure Primary ConditionThe primary condition denotes criteria that need to be verified and passed for the rule to be executed. You can configure multiple criteria and define a criteria pattern to prioritize the conditions. The condition setting options for Realtime Datapoint trigger and Device Notification are provided below:a. With Realtime Datapoint trigger option:The structure of the primary condition consists of the datapoint or field, the operator, and the desired value as given below.Image: Set Conditions configuration for Realtime Datapoint trigger option
i. Datapoint or Field SelectionNote: Ensure that the required datapoint has been created for the model you have selected.ii. Operator SelectionThe operator selection will be based on the type of the value, whether
String, Numeric, or Boolean.
iii. Value SelectionThe value selection can be any of the following:Constant: Input your own value.Datapoint: Aquire value from another datapoint.Field: Acquire data from a field in the details page.Use the + icon to add multiple primary conditions. And configure the Criteria Pattern to define the execution order in the case of multiple primary conditions.
b. With Device Notification trigger option:The structure of the primary condition consists of the datapoint or field, the operator, and the desired value as given below.Image: Set Conditions configuration for Device Notification trigger optioni. Device Alert Message Parsing Key
Note: Device Alert Message Parsing Key is the key from the incoming device event JSON that uniquely identifies the message and helps in defining the alarm. The different ways to identify the key and its value are simple and static way, or dynamic or complex for the complex device event JSON.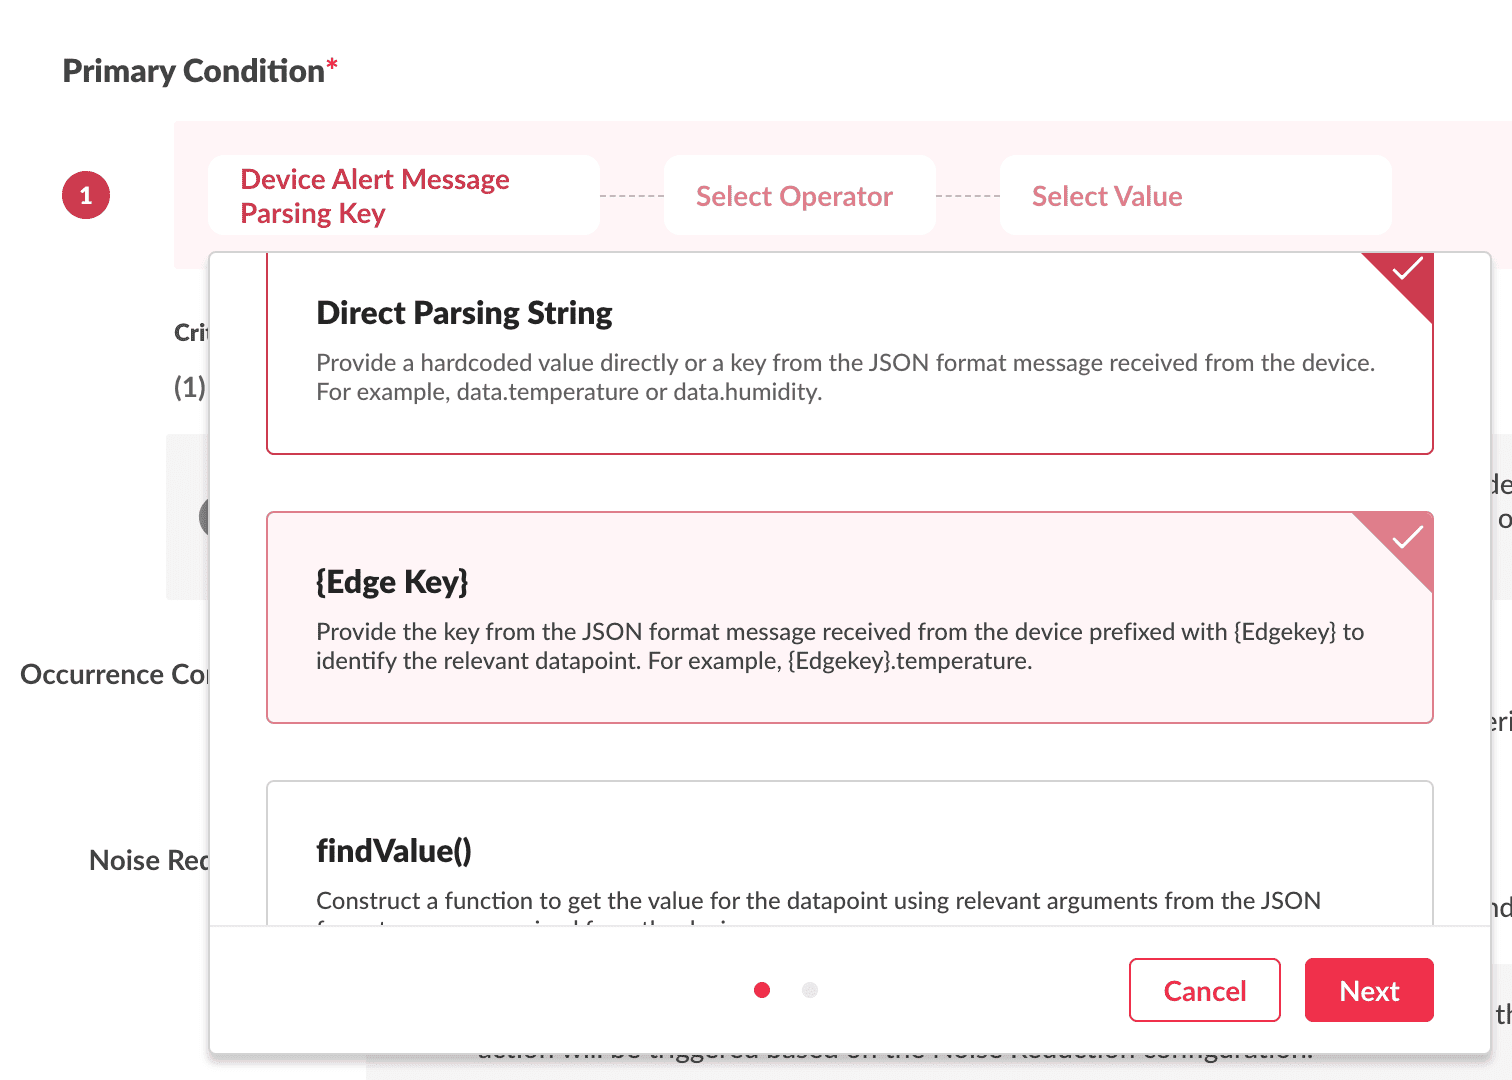 *When device is selected as the Model for the Alarm Rule, only two parsing key options i.e. Direct Parsing String and findValue() will be available.Direct Parsing String{Edge Key}findValue()ii. Operator SelectionThe operator selection will be based on the type of the value, whether String, Numeric, or Boolean.
iii. Value SelectionThe value selection can be any of the following:Constant: Input your own value.Field: Acquire data from a field in the details page.Example Primary Condition EntryUse the + icon to add multiple primary conditions.Configure the Criteria Pattern to define the execution order in the case of multiple primary conditions.2. Set Occurrence ConditionThis option lets you denote the number of times the condition needs to be repeatedly met for the alarm to be created.3. Noise ReductionThis option enables you to stop the existing alarm & trigger action from getting updated if the same state condition is matched back-to-back.
Note: If you want to pause repeated alerts and associated actions for the same state for acknowledged alarm, you can use the Suppress updates for acknowledged alarms in this state option. This prevents redundant notifications until a state change occurs.
4. Click Next to move to the Configure Message screen of the Alarm Rule builder.IV. Configuring the Alarm Message
1. The message to be attached to the alarm being generated is provided in the Message textbox.Note: Typing # inside the textbox will display the list of placeholders that you can include in the message.
If you have used the parsing key to check the condition, you can include the parsing key in the message by using the Parsing Key option in the drop down list and selecting Condition<no>.
2. Click Next to move to the Configure Actions screen of the Alarm Rule builder.
V. Configuring Alarm Actions
The action to be performed, such as sending an email notification to the concerned user when the alarm is generated or updated for the State, is configured in this final step of the wizard.
1. Select Everytime Action - The actions will be executed whenever the alarm is created/updated.2. Click Add Action and choose to perform any of the below operations everytime the conditions are met.
(or)1. Select State Transition Action - Execute the set of actions based on the previous state condition.2. Click Add Transition Condition and provide the corresponding action to be performed.3. Click Finish to complete the Alarm State addition.Note: Every Alarm State should have a Clear State and a non-Clear State to be saved.4. Continue the steps to create a non-Clear State.5. Click Save to save the Alarm Rule State.

Refer to Understanding Actions documents to learn more about the actions that can be configured in the application. The actions can be configured directly from the features such as Alarm Rules, Notification Profiles, and Workflow Rules or created as separate actions and assigned to features by using the category option in the respective forms.
Viewing Alarm Rules Templates
Alarm Rules Templates can be viewed from multiple locations on the client interface in the Developer Application portal.
- Model details page
- Automate tab
- Setup page
Model Details Page
Alarm Rule Template for a particular model can be viewed from the Model Detail's page.
1. Click Devices in the left pane in the Model tab in the Developer App. The list of devices will be displayed in the Device Models list view.
2. Click on the device model for which you want to add/modify the Alarm Rule Template. The Summary page is displayed along with the template details.
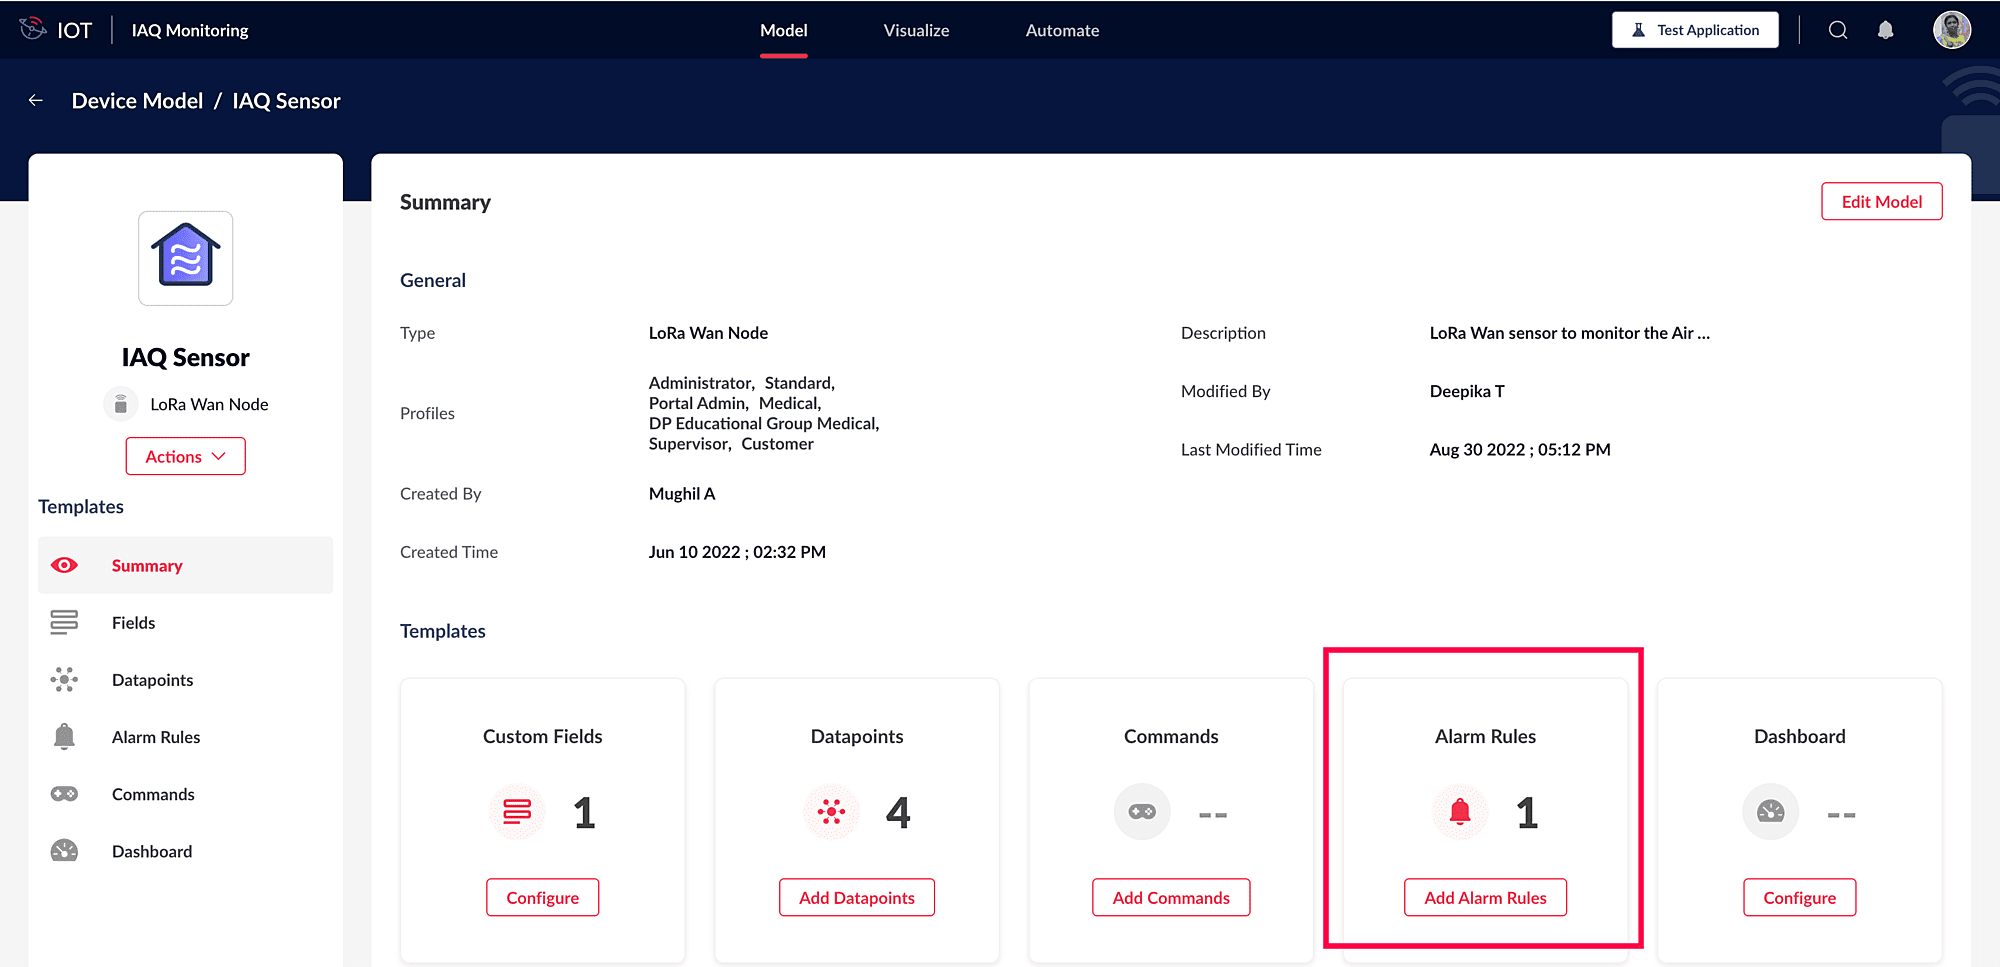
Image: Accessing Alarm Rules from the Summary Page
3. Click on the Alarm Rule count number.

Note: The State and Trigger conditions of the alarm rule template can be modified or deleted in both the Basic and Details views.
Automate Tab
1. Select the Automate tab on the top of the screen in the Developer Application.
2. Select Alarm Rules in the left pane. All the available Alarm Rule Templates are displayed on the page.
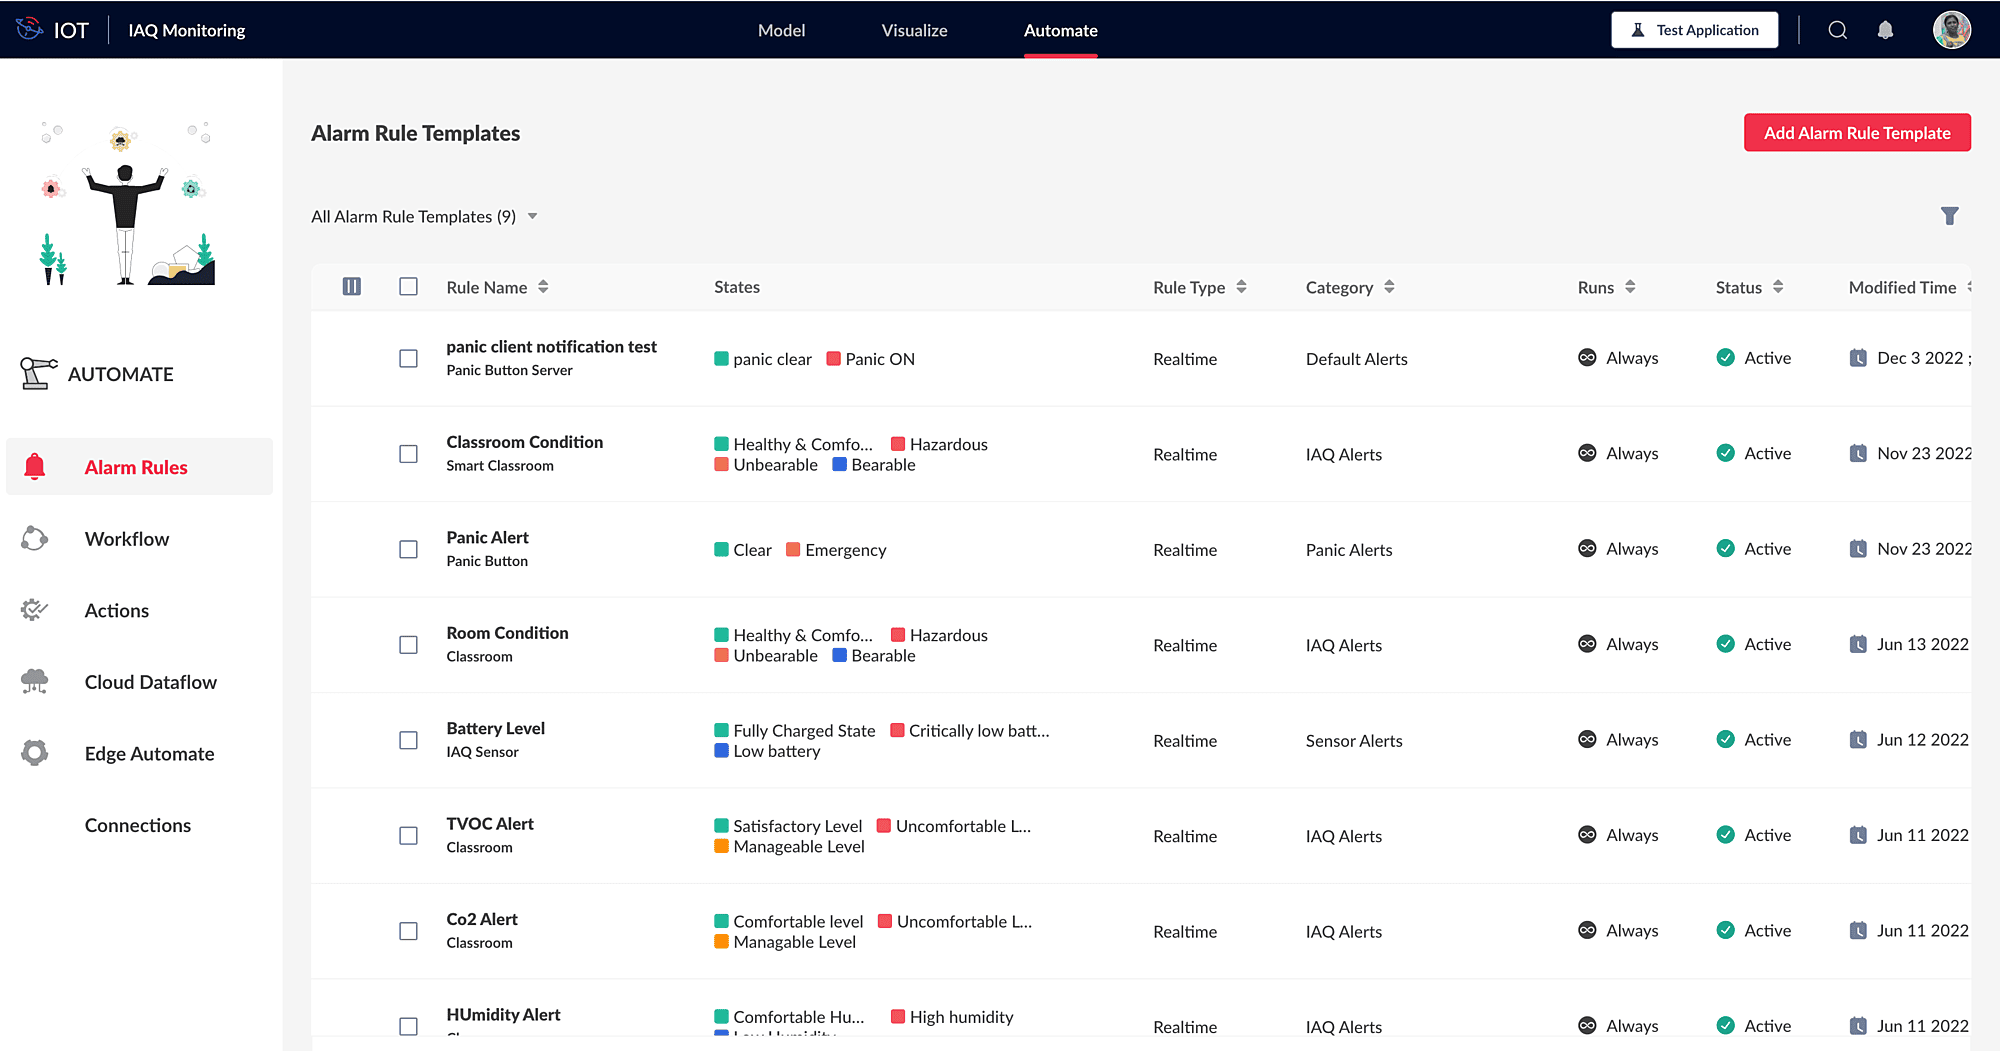
In the Alarm Rule Template list view, click on the name of the alarm rule template to view its details.
Note: The Alarm Rule template for a particular device, asset, or location can be viewed from the respective Alarm Rules in the Summary page.
Setup Page
1. Click the Setup icon in the left pane in the Model tab in the Developer App. The Setup page is displayed.

2. Click on the Alarm Rules option under the MONITORING & CONTROL section. The Alarm Rule Templates and Alarm Rule Instances (Alarm Rules) are displayed.
View Formats
1. Basic and Detailed View
You can view the details in two formats: Basic and Detailed view.
Basic View
Detailed View
Note: The State and Trigger conditions of the alarm rule template can be modified or deleted in both views.
2. Custom Views
Apart from the default All Templates view, IoT Application provides additional default Custom Views that provide you with a filtered view of the Alarm Rule Templates. In addition, you can create your own custom view based on your choices. The details of the custom views are provided below.
Custom View Name | Description |
All Alarm Rule Templates | Displays all the Alarm Rule Templates available in the application. |
<Model Name> Rule Templates | Displays Alarm Rule Templates available for the model. |
Schedule KPI Rule Templates | Displays Alarm Rule Templates with rule type as Schedule KPI Datapoint. |
Realtime Rule Templates | Displays Alarm Rule Templates with rule type as Realtime Datapoint Realtime datapoint. |
Device Notification Trigger Rule Templates | Displays Alarm Rule Templates which contain a Device Notification Trigger. |
Inactive Rule Templates | Displays Alarm Rule Templates which are marked as inactive. |
Active Rule Templates | Displays Alarm Rule Templates which are active. |
Note: You can perform Edit and Delete operations from the views.
Editing Alarm Rules Templates
Sections of the Alarm Rules Templates, State Info, Trigger, Condition, and Action details can be modified from the Alarms Rules view page in the Developer Application portal.
To view & edit the Alarm Rule Templates,
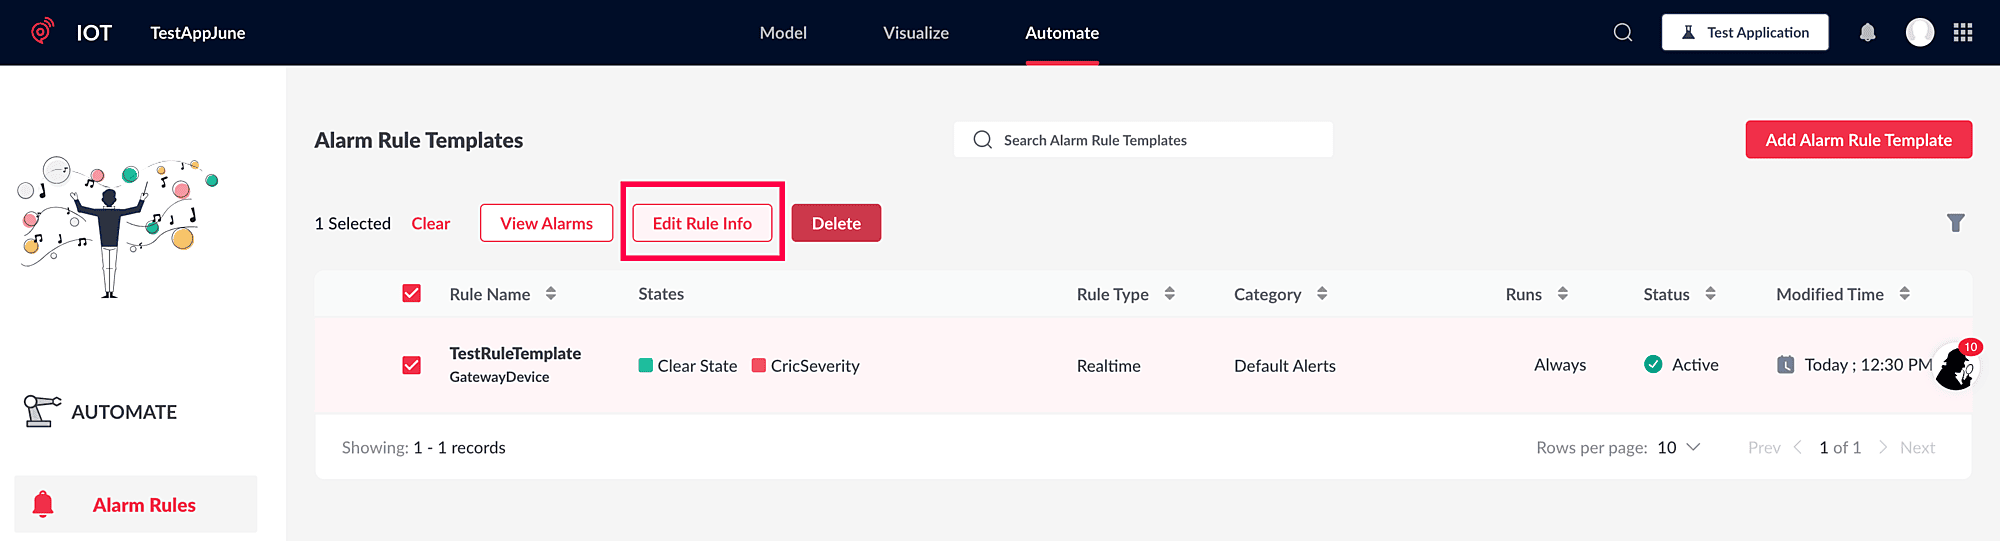
1. Select the Automate tab on the top of the screen in the Developer Application.
2. Select Alarm Rules in the left pane. All the Alarm Rule Templates already configured are displayed on the page.
3. In the Alarm Rule Template list view, click on the name of the alarm rule template whose details you want to modify.
You can view the details and edit from the Basic view as given below.
You can view the details and edit from the Basic view as given below.
3. Click the Edit icon next to the State name and severity to modify the State Name or Severity.
4. Click the Edit icon inside the Trigger details section to modify the Trigger info, Condition, or Actions configured for the template.
Editing Alarm Rules Template Info
The name, description, category, etc., are the basic information of an Alarm Rule. You can modify the Description, Category, Run This Rule, and Status options anytime in the application.
Follow the below steps to modify the Alarm Rule details,
1. Select the Automate tab on the top of the screen in the Developer Application.
2. Select Alarm Rules in the left pane. All the Alarm Rule Templates already configured are displayed on the page.
3. Select the checkbox against the name of the Alarm Rule Template whose details you want to modify.
4. Click on the Edit Rule Info text link on the top of the screen.
5. Modify the required details in the Alarm Rule Edit page and click on the Update button to save the changes.

Ensure the Alarm Rule Status option is set to ON. The rule will be executed only when the status is enabled.
Deactivating An Alarm Rule Template
Any Alarm Rule can be in an Activated or Deactivated state. The alarm process will be able to receive any incoming occurrence and execute the actions only if the Alarm Rule is in Active state. So, if you want to deactivate any Alarm Rule, study the conditions in the rule and verify that deactivating the rule will not affect the Alarm Notification system in your setup.
Note: The Alarm Rule will be deactivated when Alarm Rule Status opton is set to OFF. The rule will not be executed even when the conditions defined in the rule are met.
Follow the below steps to deactivate an Alarm Rule:
1. Select the Automate tab on the top of the Developer Application portal screen. The Alarm Rules option is selected on the left by default, and all the Alarm Rule Templates already configured are displayed in a list view on the page.
2. In the Alarm Rule Template list view, click on the name of the alarm rule template that you want to deactivate. The Alarms Rule view is displayed.
3. Click on the Deactivate button at the top right corner of the screen to deactivate the alarm rule template.
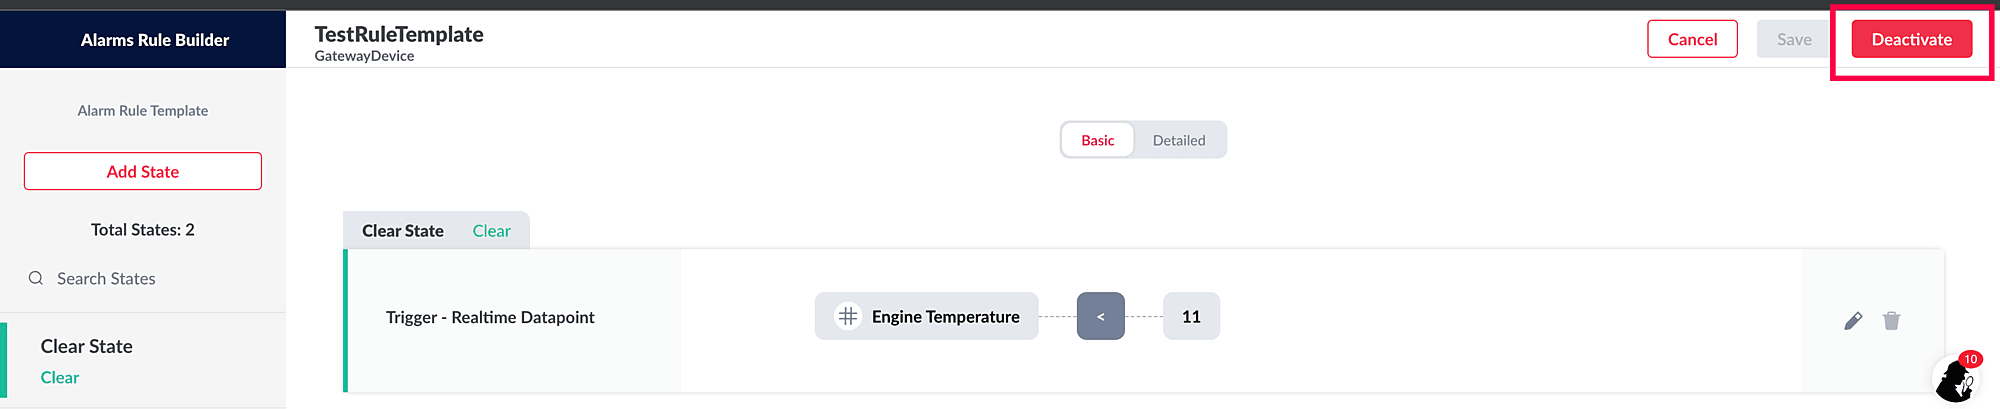
Note: You can perform the same steps and click on the Activate button, that is now present instead of the Deactive button to activate the alarm.
Deleting Alarm Rules Templates
Any Alarm Rule Template can be removed from the system by using the Delete option. You need to ensure that the template does not have any associations before deleting it. Actually, the system checks for any dependent entries for the template before allowing to delete the template.
Follow the below steps to delete an Alarm Rule Template:
1. Select the Automate tab on the top of the screen in the Developer Application.
2. Select Alarm Rules in the left pane. All the Alarm Rule Templates already configured are displayed on the page.
3. Select the checkbox against the name of the Alarm Rule Template that you want to delete.
4. Click on the Delete button at the top of the list view to delete the template. The delete validation screen is displayed to check for any dependencies.
5. Click Check Dependencies to check for dependencies. Click the View Dependencies link to display the list of dependent entries.
(or)
6. If there are no dependencies, click Delete in the confirmation dialogue to delete the template.
See Also