Schedules
In a nutshell
Schedules let you create reusable working hour templates that can be assigned to multiple event types. This helps maintain consistent availability across your workspace while reducing the effort of setting up working hours for each event type individually.
Schedules let you create reusable working hour templates that can be assigned to multiple event types. This helps maintain consistent availability across your workspace while reducing the effort of setting up working hours for each event type individually.
Feature availability
- Super admin and admins can create schedule for all workspaces
- Workspace admins can create schedule for their assigned workspaces
- Managers and staff can only view the schedule under their assigned workspaces
1. Overview
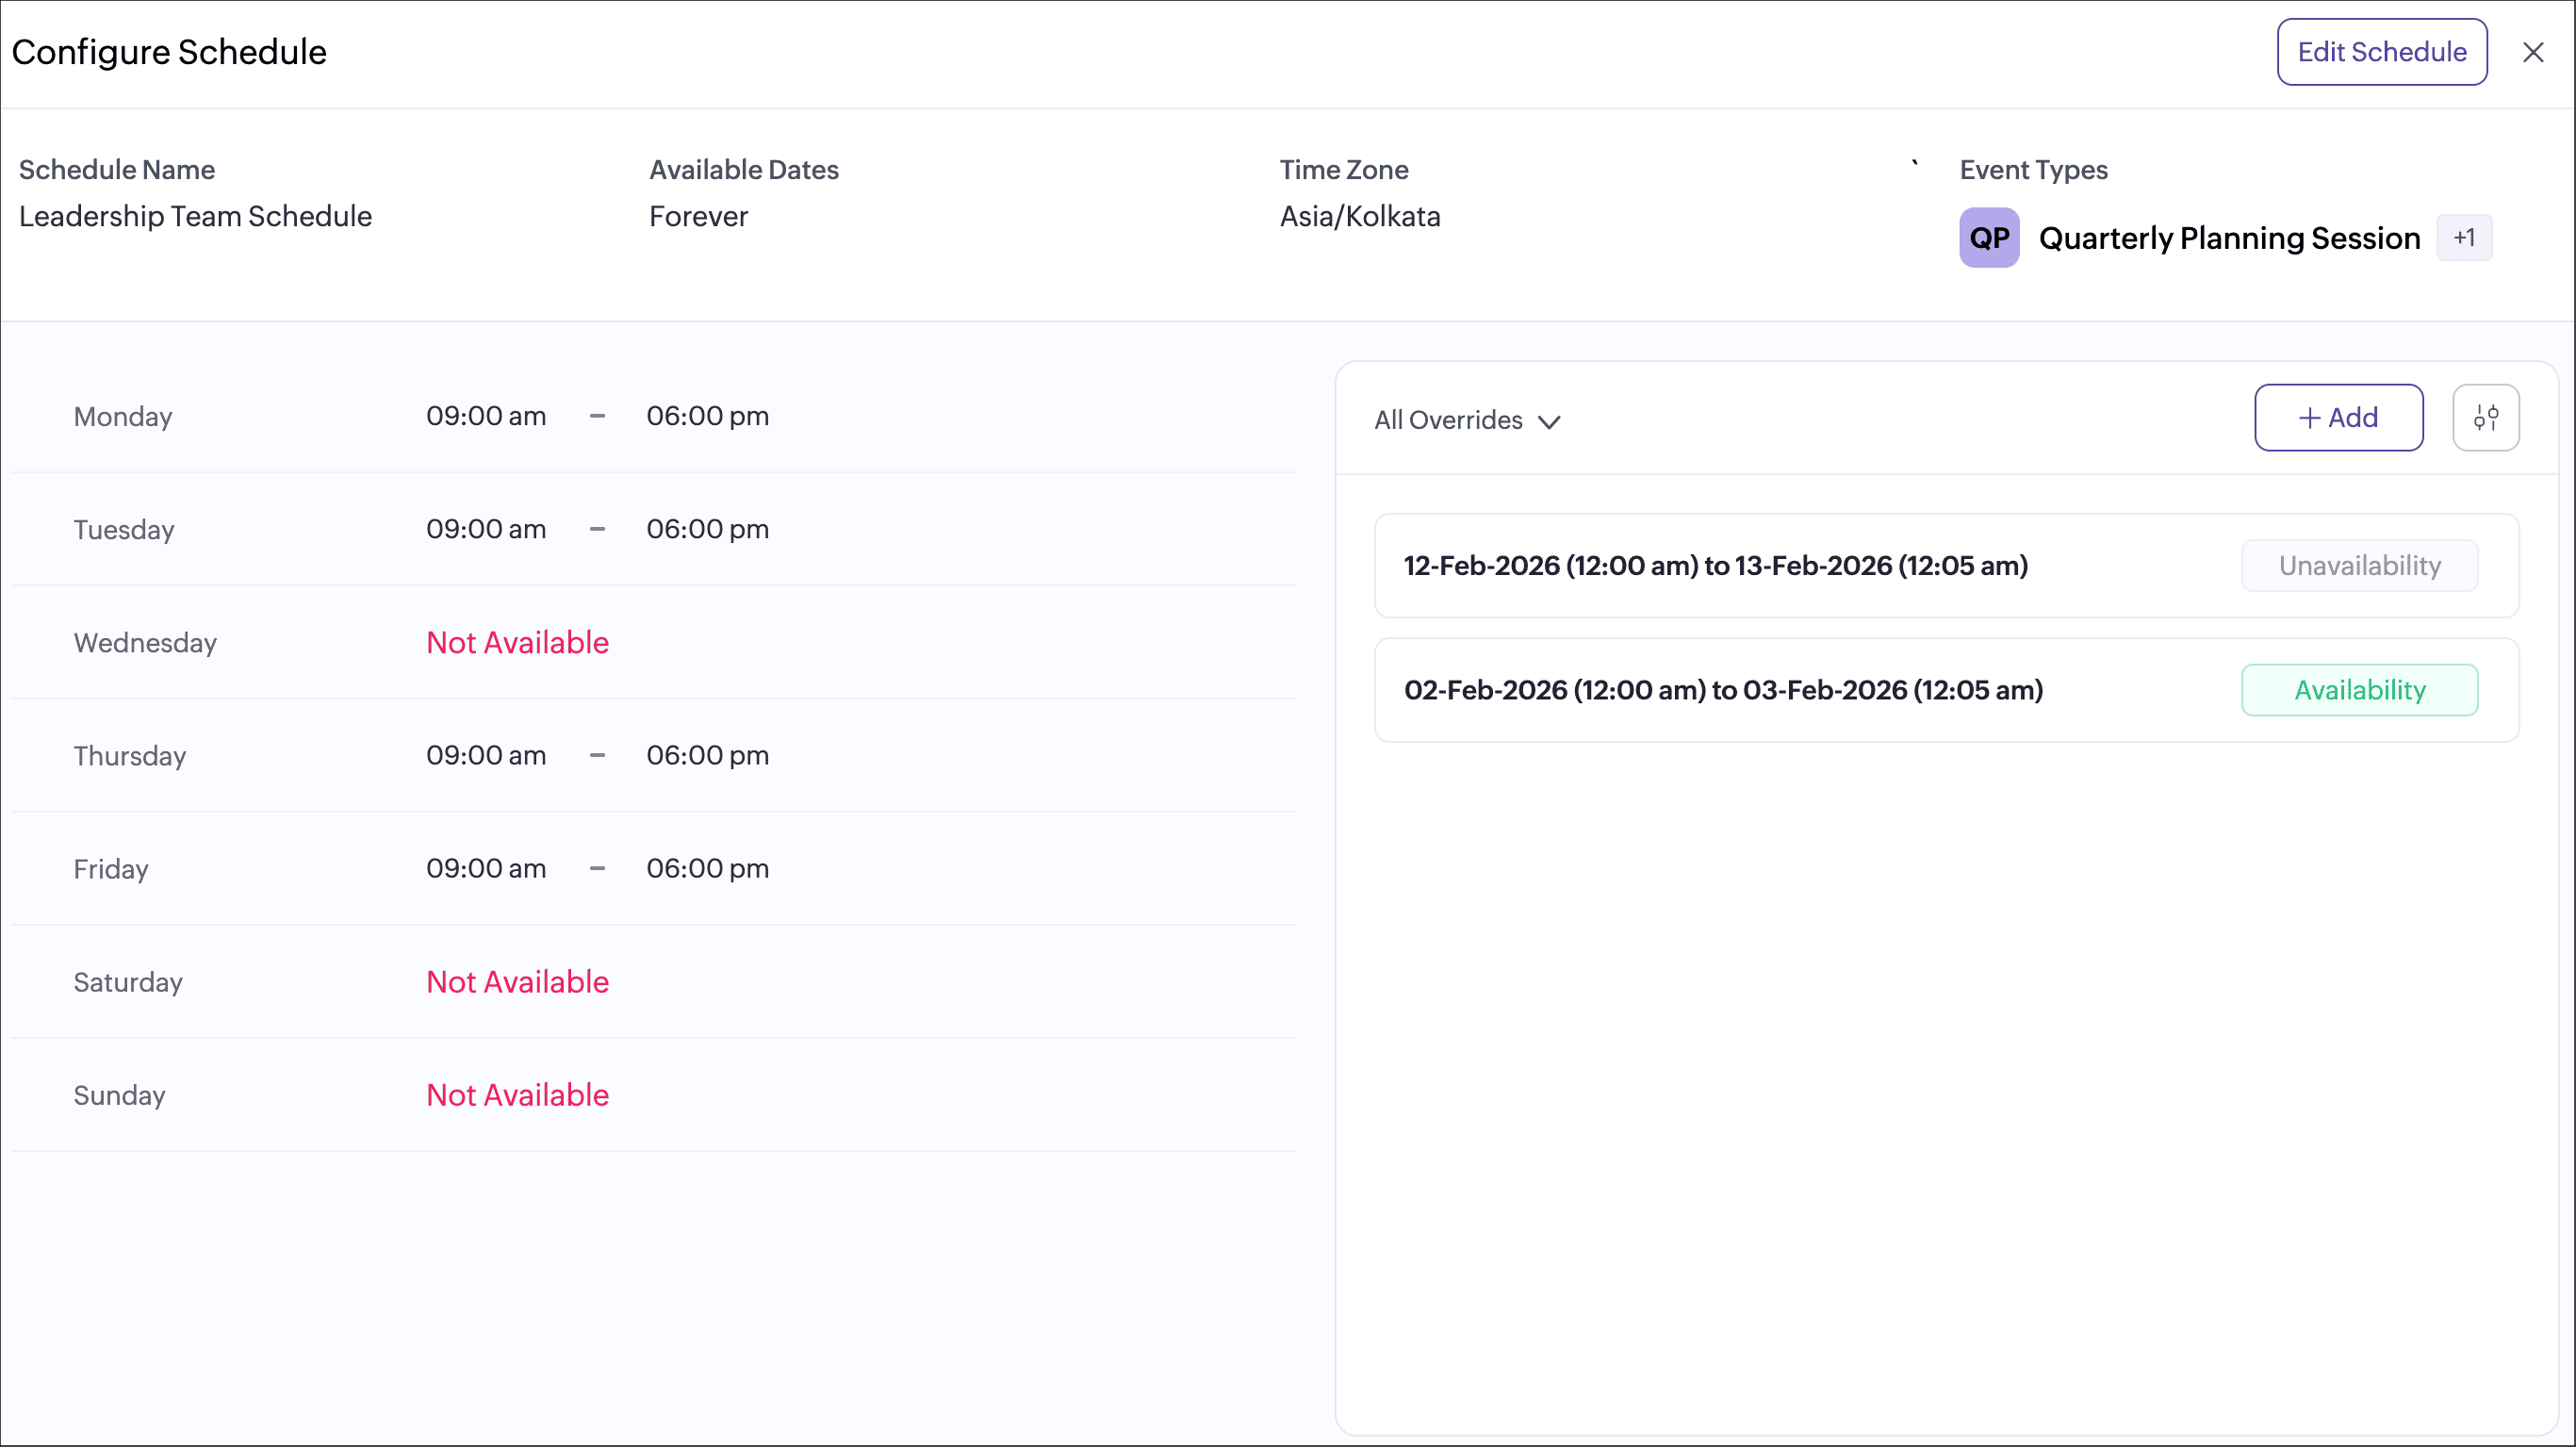
A schedule defines when bookings can happen by setting clear days, dates, and time slots for availability. It helps you plan and ensures appointments are booked only during intended working hours.
In Zoho Bookings, a schedule is a reusable working-hours template where you define the working days, time ranges, and time zone. Once created, the same schedule can be assigned to multiple event types, and any event type linked to it will be available for booking only during the times defined in the schedule.
Schedules are designed to keep availability consistent across a workspace. Instead of setting working hours separately for each event type, you can create a schedule once and reuse it wherever needed. If the schedule is updated, the changes automatically apply to all associated event types, keeping everything in sync.
Lets assume your workspace has multiple event types such as consultations, demos, and follow-up calls and all of them are offered only on Monday, Wednesday, and Friday from 9 AM to 12 PM and 4 PM to 7 PM, you can create a single schedule with these hours in the workspace and assign it to all those event types. This ensures every event type follows the same availability without separate configuration, and any future change needs to be made only once in the schedule.
In addition to regular working hours, schedules support date overrides, which let you temporarily add extra availability or block time for specific dates or date ranges without changing the base schedule. This makes it easy to handle exceptions like special working days or holidays.
By using schedules, you can reduce repetitive setup, maintain consistent availability, and manage complex scenarios such as multiple event types sharing the same working hours while keeping bookings accurate, conflict-free, and aligned with real-world operations.
2. Use cases
A wellness center operates with different working hours across event-types. Instead of setting availability for each event type individually, they create a schedule called “Evening Care Schedule” with timings from 4pm to 9pm on weekdays. This schedule can then be assigned to multiple event types such as physiotherapy, counseling, and massage therapy and also mapped to the staff who work during those hours. By using schedules, the center ensures consistent availability across event-types and avoids redefining the same timings repeatedly.
A corporate training company conducts multiple workshops such as Leadership coaching, Communication skills and Project management every week. Instead of configuring availability for each workshop separately, they create a schedule called “Weekday Training Hours” with timings from 10am to 6pm, Monday to Friday. This schedule is then assigned to all relevant event types and trainers who follow the same working hours. By using a reusable schedule, the company maintains consistent availability across sessions and reduces the effort spent on managing individual event timings.
3. Steps to create a schedule
- Navigate to the required workspace in your Bookings account.
- Click Schedules in the left sidebar, then click the +New Schedule button to create a new schedule.
- In the create schedule screen, enter the below details.
- Schedule Name: Enter a name for the schedule. Each schedule within a workspace should have a unique name.
- Available Dates: You can set the availability by choosing any one option:
- Forever: Select this option to make schedule always available. (without a start and end date).
- Custom Range: Select this option to make the schedule available for a specific period. Choose the start date and end date to define the date range during which the schedule should be available.
- Time Zone: Select the timezone for the schedule to follow.
- Event Types: Select the event types to assign this schedule to. A schedule can be assigned to multiple event types.
- Available Times: Choose the weekly days and hours this schedule should be available.
 Info: To add exceptions to the schedule, click Add beside Date Overrides to include additional available and unavailable hours.
- Click Save. The new schedule template will be created.
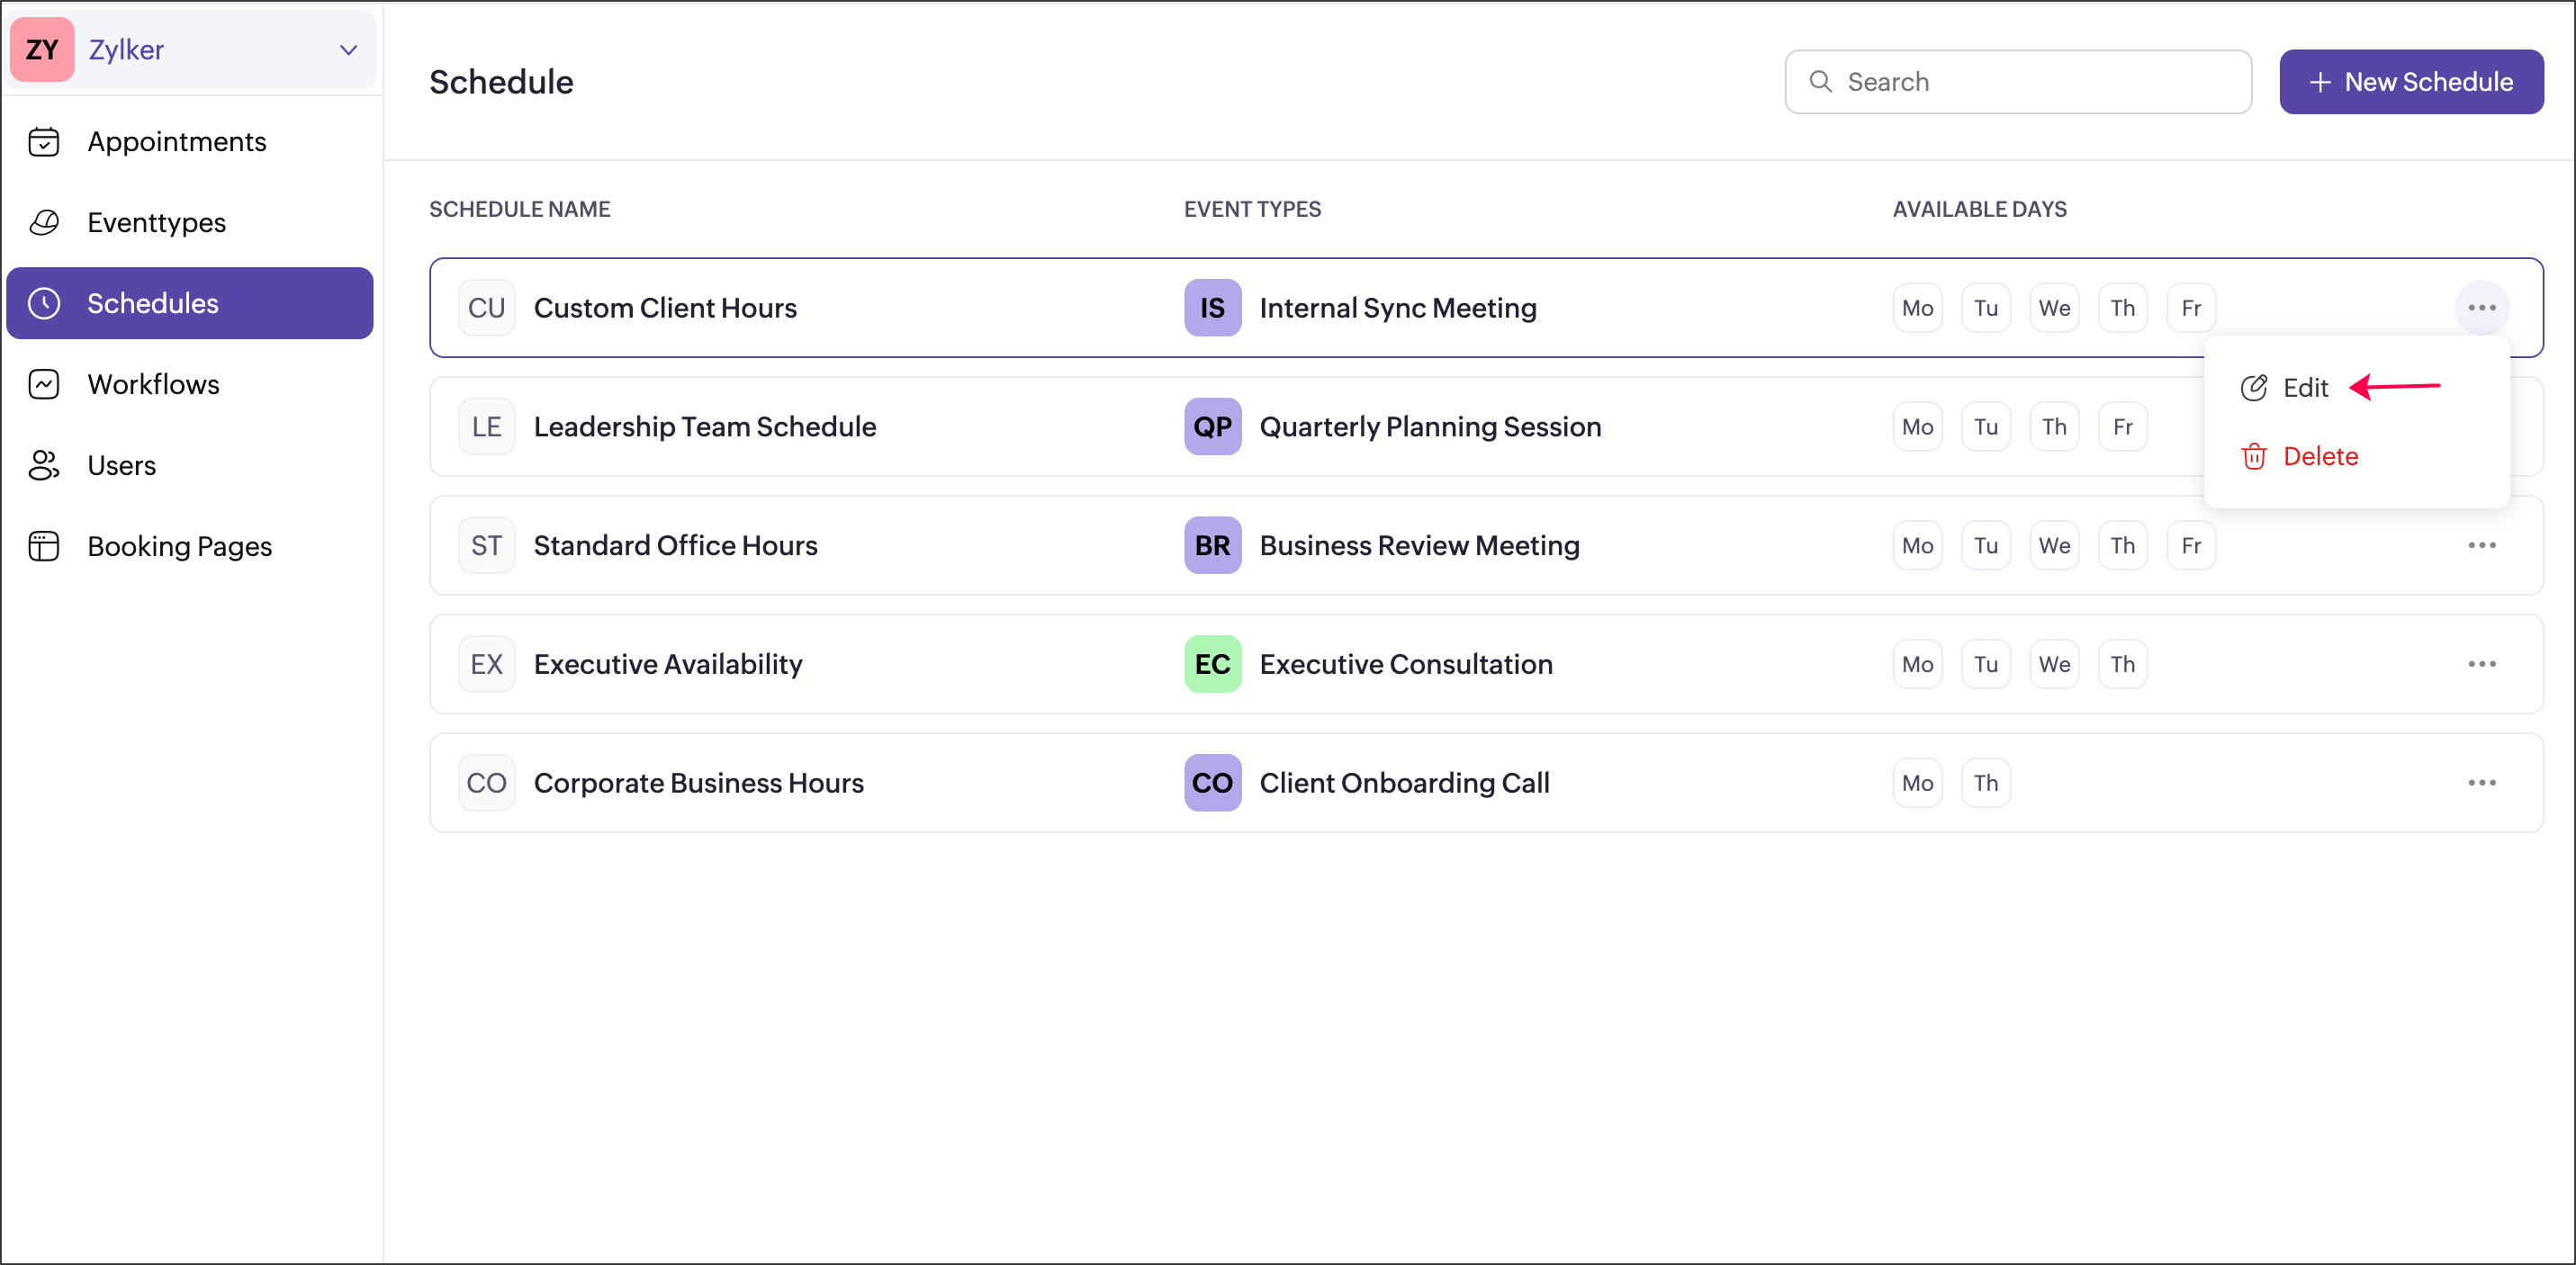
The created schedules will be listed in every workspace. Every schedule created can be assigned to multiple event types.

4. Date overrides
Date overrides allow you to make temporary exceptions to a schedule by adding or blocking availability for specific dates. These overrides help you handle holidays, extended working hours, or special availability without modifying the default schedule.
Steps to add a date override
- Open the required schedule and click Add under the Date Overrides section. A pop-up window will appear.
- Choose Additional availability or Unavailability.
- Choose one of the following options from the dropdown in the top-right corner of the pop-up.
- Specific dates – Select this option to override the schedule for individual dates.
- Enable the All day checkbox to apply the override for the entire day.
- Disable the All day checkbox to apply the override only for the selected time range.
- Date range – Select this option to override the schedule for a continuous range of dates.
- Custom range – Select this option to override the schedule for a continuous range of dates by defining one or more chunks of hours for each day.
- Enable the All day checkbox to apply the override for the entire day.
- Disable the All day checkbox to apply the override only for the selected time range.
4. Enter a reason for the override and click Apply.
All added overrides will be applied to the schedule and listed under the Date Overrides section. Once an override is added, it automatically applies to all event types that follow this schedule.
4.1 Manage date overrides
- View date override: You can use the dropdown filter
to view overrides by type.
- All Overrides: Shows all overrides added to the schedule.
- Additional Availability: Shows only the extra days and hours added outside the regular schedule.
- Unavailability: Only shows the days and time slots that are blocked.
- Sort date override: You can click on the sort icon
to switch between upcoming and recently added overrides to view them accordingly.
- Upcoming overrides: Shows the overrides that will take effect in the future.
- Recently added overrides: Shows the latest overrides you have created, regardless of their date.
- Edit date override: You can edit the added overrides using the edit option
shown nearby the schedule. Any changes updated in the override section will be applied to the schedule and will automatically reflect across all event types to which the schedule is assigned to.
- Delete date override: You can delete the added overrides using the delete option
shown nearby the schedule. The overrides will be deleted across all event types to which the schedule is assigned to.
5. Manage schedules
5.1 View schedule
You can view schedules in two ways, depending on what you want to check.
View all schedules in a workspace
- Go to Schedules from the left pane of the required workspace. All schedules created in the workspace are listed here.
- For each schedule, you can see the schedule name, the event types it is assigned to, and the available days at a glance.
- Click a schedule to view complete details, including available times, time zone, and any date overrides.
View the schedule assigned to an event type
- Select the required event type and open the Availability and Limits tab.
- Select Available Dates and Times and click Customize besides Default Hours.
- Under Default Hours, you can see the schedule currently assigned along with the available dates, days and time zone at a glance.
- Click View schedule to see the full schedule details, including available times, assigned event types, and any date overrides.
5.2 Edit schedule
You can edit a schedule by clicking the options icon  next to it. Any updates made such as modifying available times, overrides, time zone, assigned users, or the schedule name will be automatically applied to all event types using this schedule.
5.2.1 Update time zone
When you edit a schedule template and change its time zone, all overrides set for future dates will be automatically adjusted to the same local time in the new time zone.
Example: If an override is set for 6:00 PM (IST) on 1.2.2026, it will be converted to 7:30 AM (EST) on 1.2.2026 when the time zone is updated.
Example: If an override is set for 6:00 PM (IST) on 1.2.2026, it will be converted to 7:30 AM (EST) on 1.2.2026 when the time zone is updated.
5.3 Delete schedule
You can delete a schedule by clicking the options icon next to it. Event types that were using the deleted schedule will automatically fall back to the working hours of the users assigned to that event type.

6. Points to note
- Any changes made to a schedule will affect all the event types to which that schedule is assigned to.
- Schedules can only be assigned to the event types.
- You can copy or move the event type from one workspace to another with the same assigned schedule.
- Any additional available hours added for a user will not be reflected in the schedule.