Tip #18: Organize a group workshop in a few steps

It's the season for workshops—they're everywhere, catering to diverse interests and needs. Whether for more professional goals like leadership development or creative endeavors like painting, there's an abundance of workshops offered every day.
A scheduler is indispensable for workshop providers, as it handles the nitty-gritty of scheduling and streamlines the registration process. It provides smoother experiences for both attendees and organizers. It also relieves administrative burdens by allowing organizers to track registrations, manage attendee information, send automated confirmations and reminders, collect payments, share video conferencing links, and much more.
If you're a workshop provider seeking an efficient scheduler, then Zoho Bookings is the right place for you. With just a few simple steps, you can set up your workshop, and Zoho Bookings will seamlessly handle the scheduling aspect for you.
Steps to organize a group workshop
Create a group booking service
Share the booking page link
1. Create a group booking service
Add the details of the workshop that you'll be offering by following the below steps.
Navigate to the Services tab, click the Add icon
 , and choose Group Booking.
In the pop-up that appears:
Enter the name of the workshop that you'll be conducting in Name of the Service.
Enter the date and time that the workshop starts in Date & Time.
Specify the duration that the workshop will happen in Duration.
Mention the number of seats that are available for the workshop in No. of Seats.
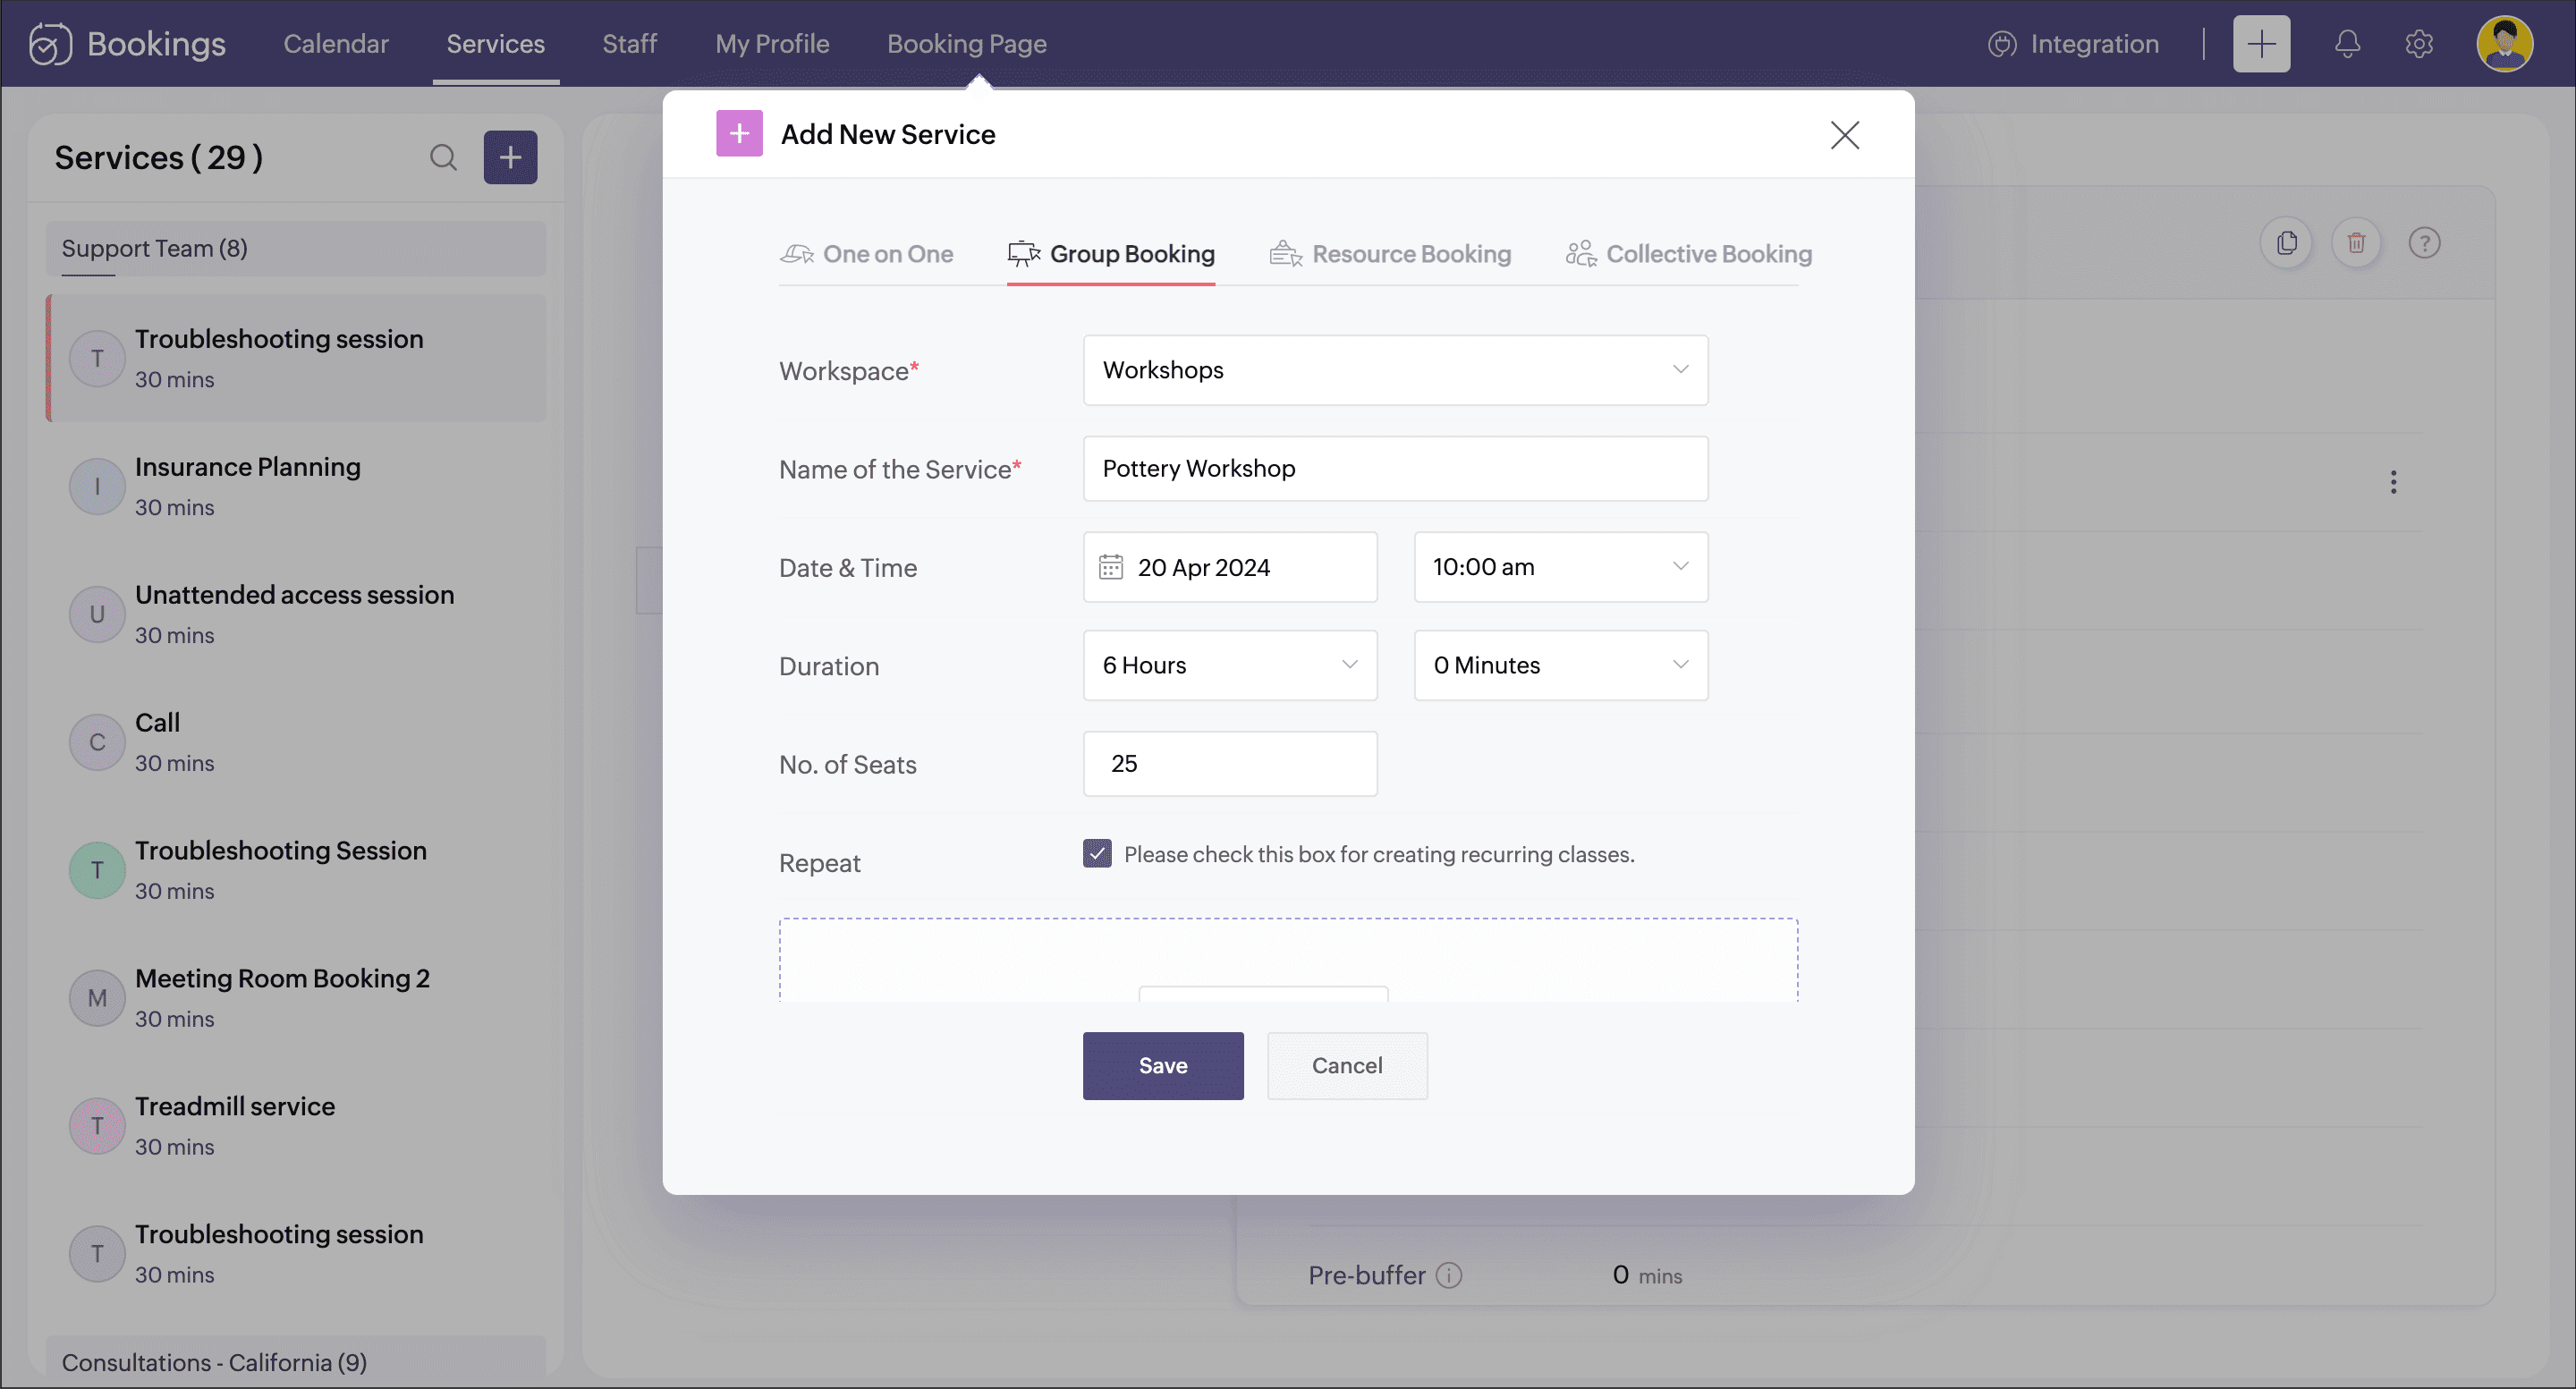
If this workshop happens for a day, you can skip this step. Otherwise, you can select the checkbox for the Repeat option. A pop-up appears to define the days that the workshop will span.
Under Booking Type, choose Series if the workshop is a continuous session that has to be booked as a whole. Or choose Drop-in if the workshop happens for a few days, but each day can be booked separately.
Under Repeat, choose the frequency if it is Daily, Weekly, or Monthly.
Under Repeat Until, you can set any of the two options
Set Date: Specify the last date of the workshop.
No. of Classes: Specify the no.of days the workshop happens.
Click Add.
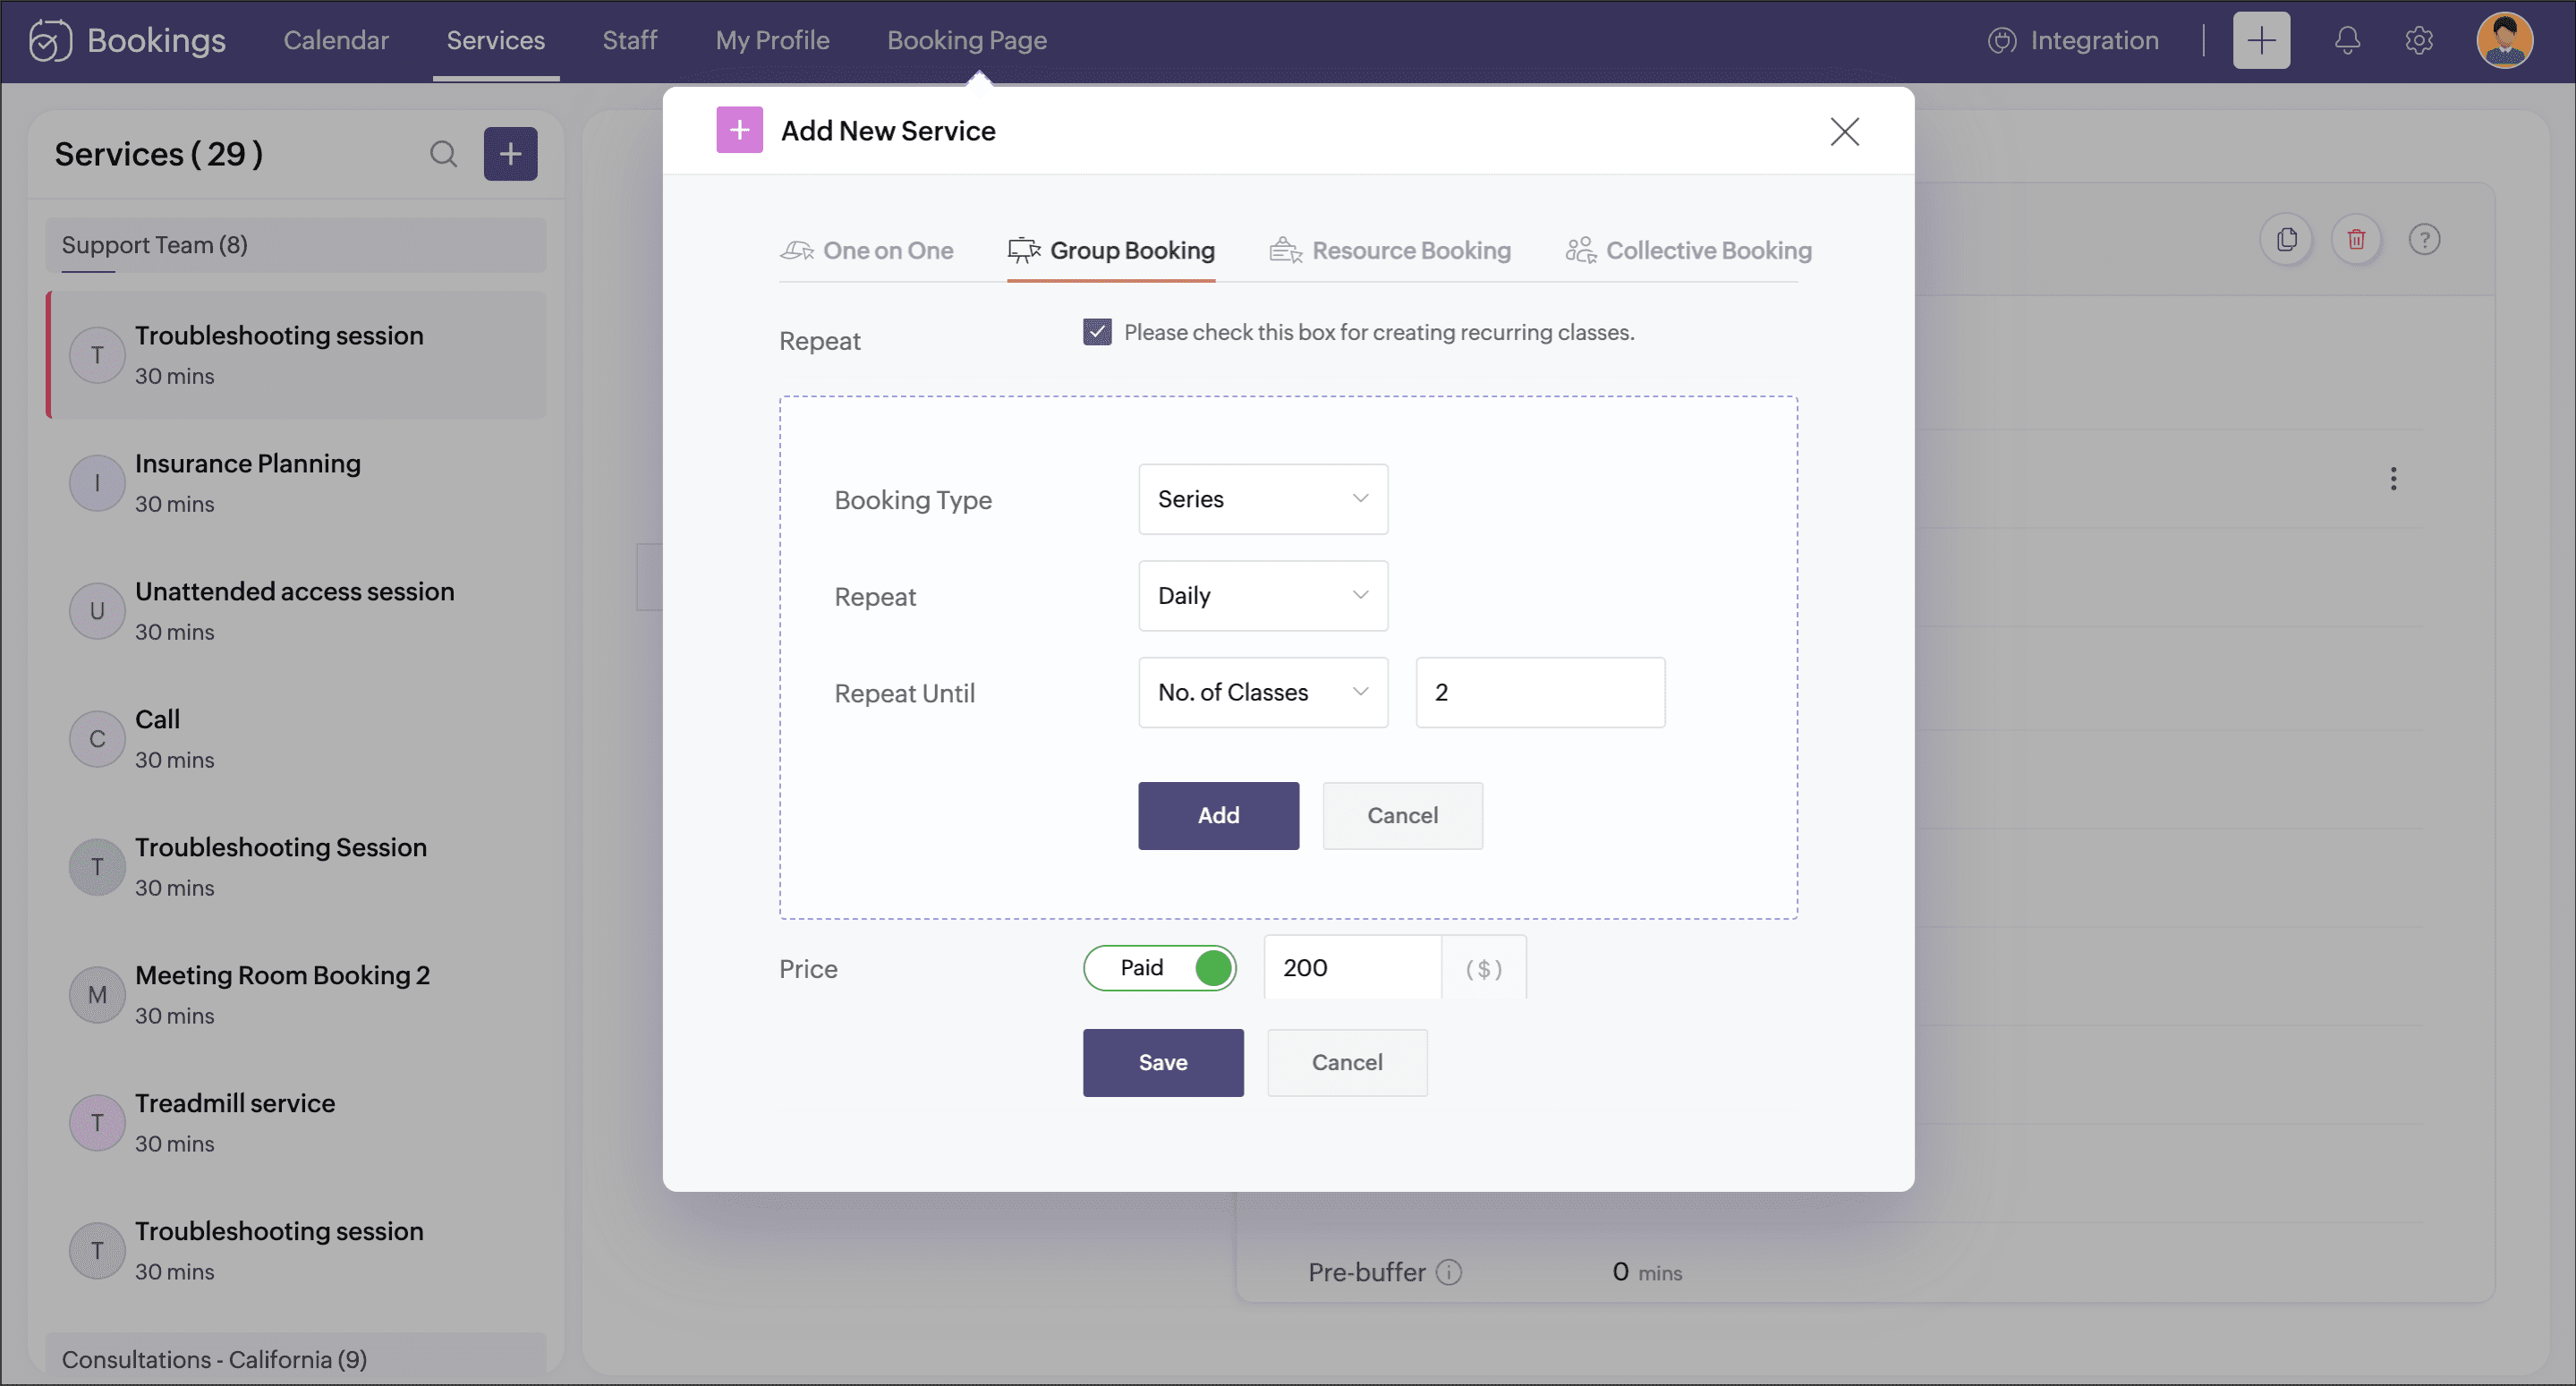
Enter the cost of the workshop under Price.
Add the staff who will be conducting this workshop under Staff Assigned.
Click Save.
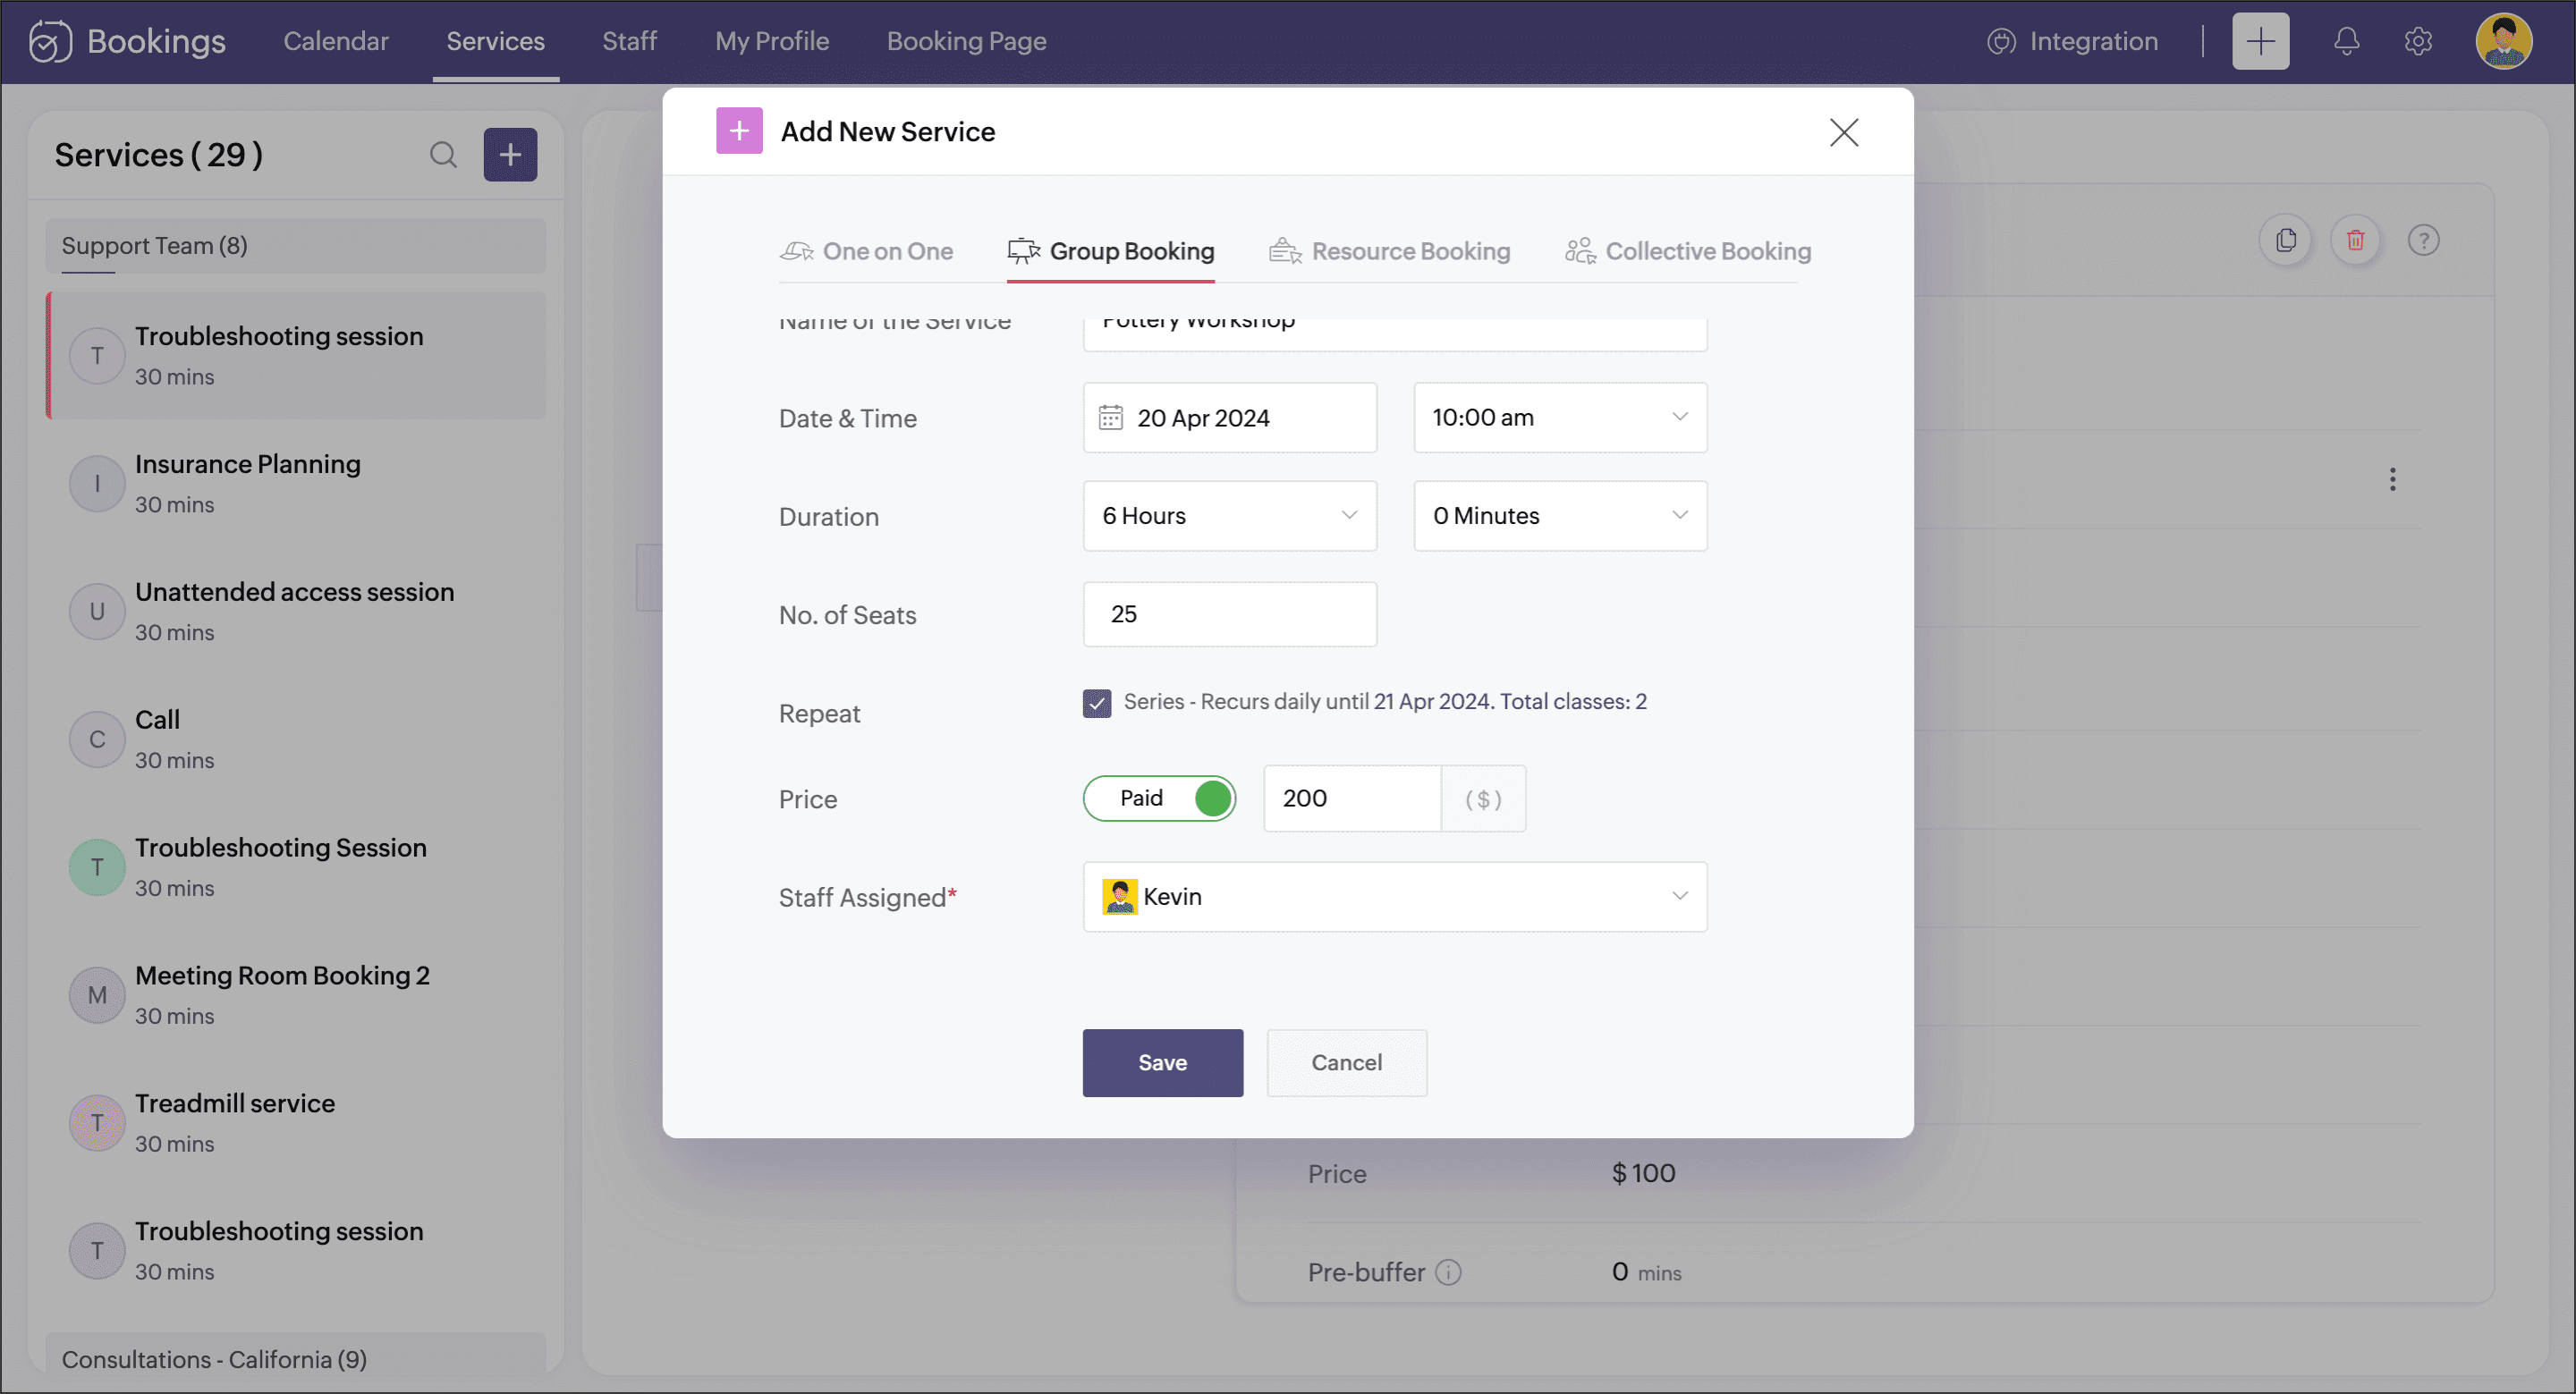
Your group booking workshop is now set up.
2. Share the booking page link
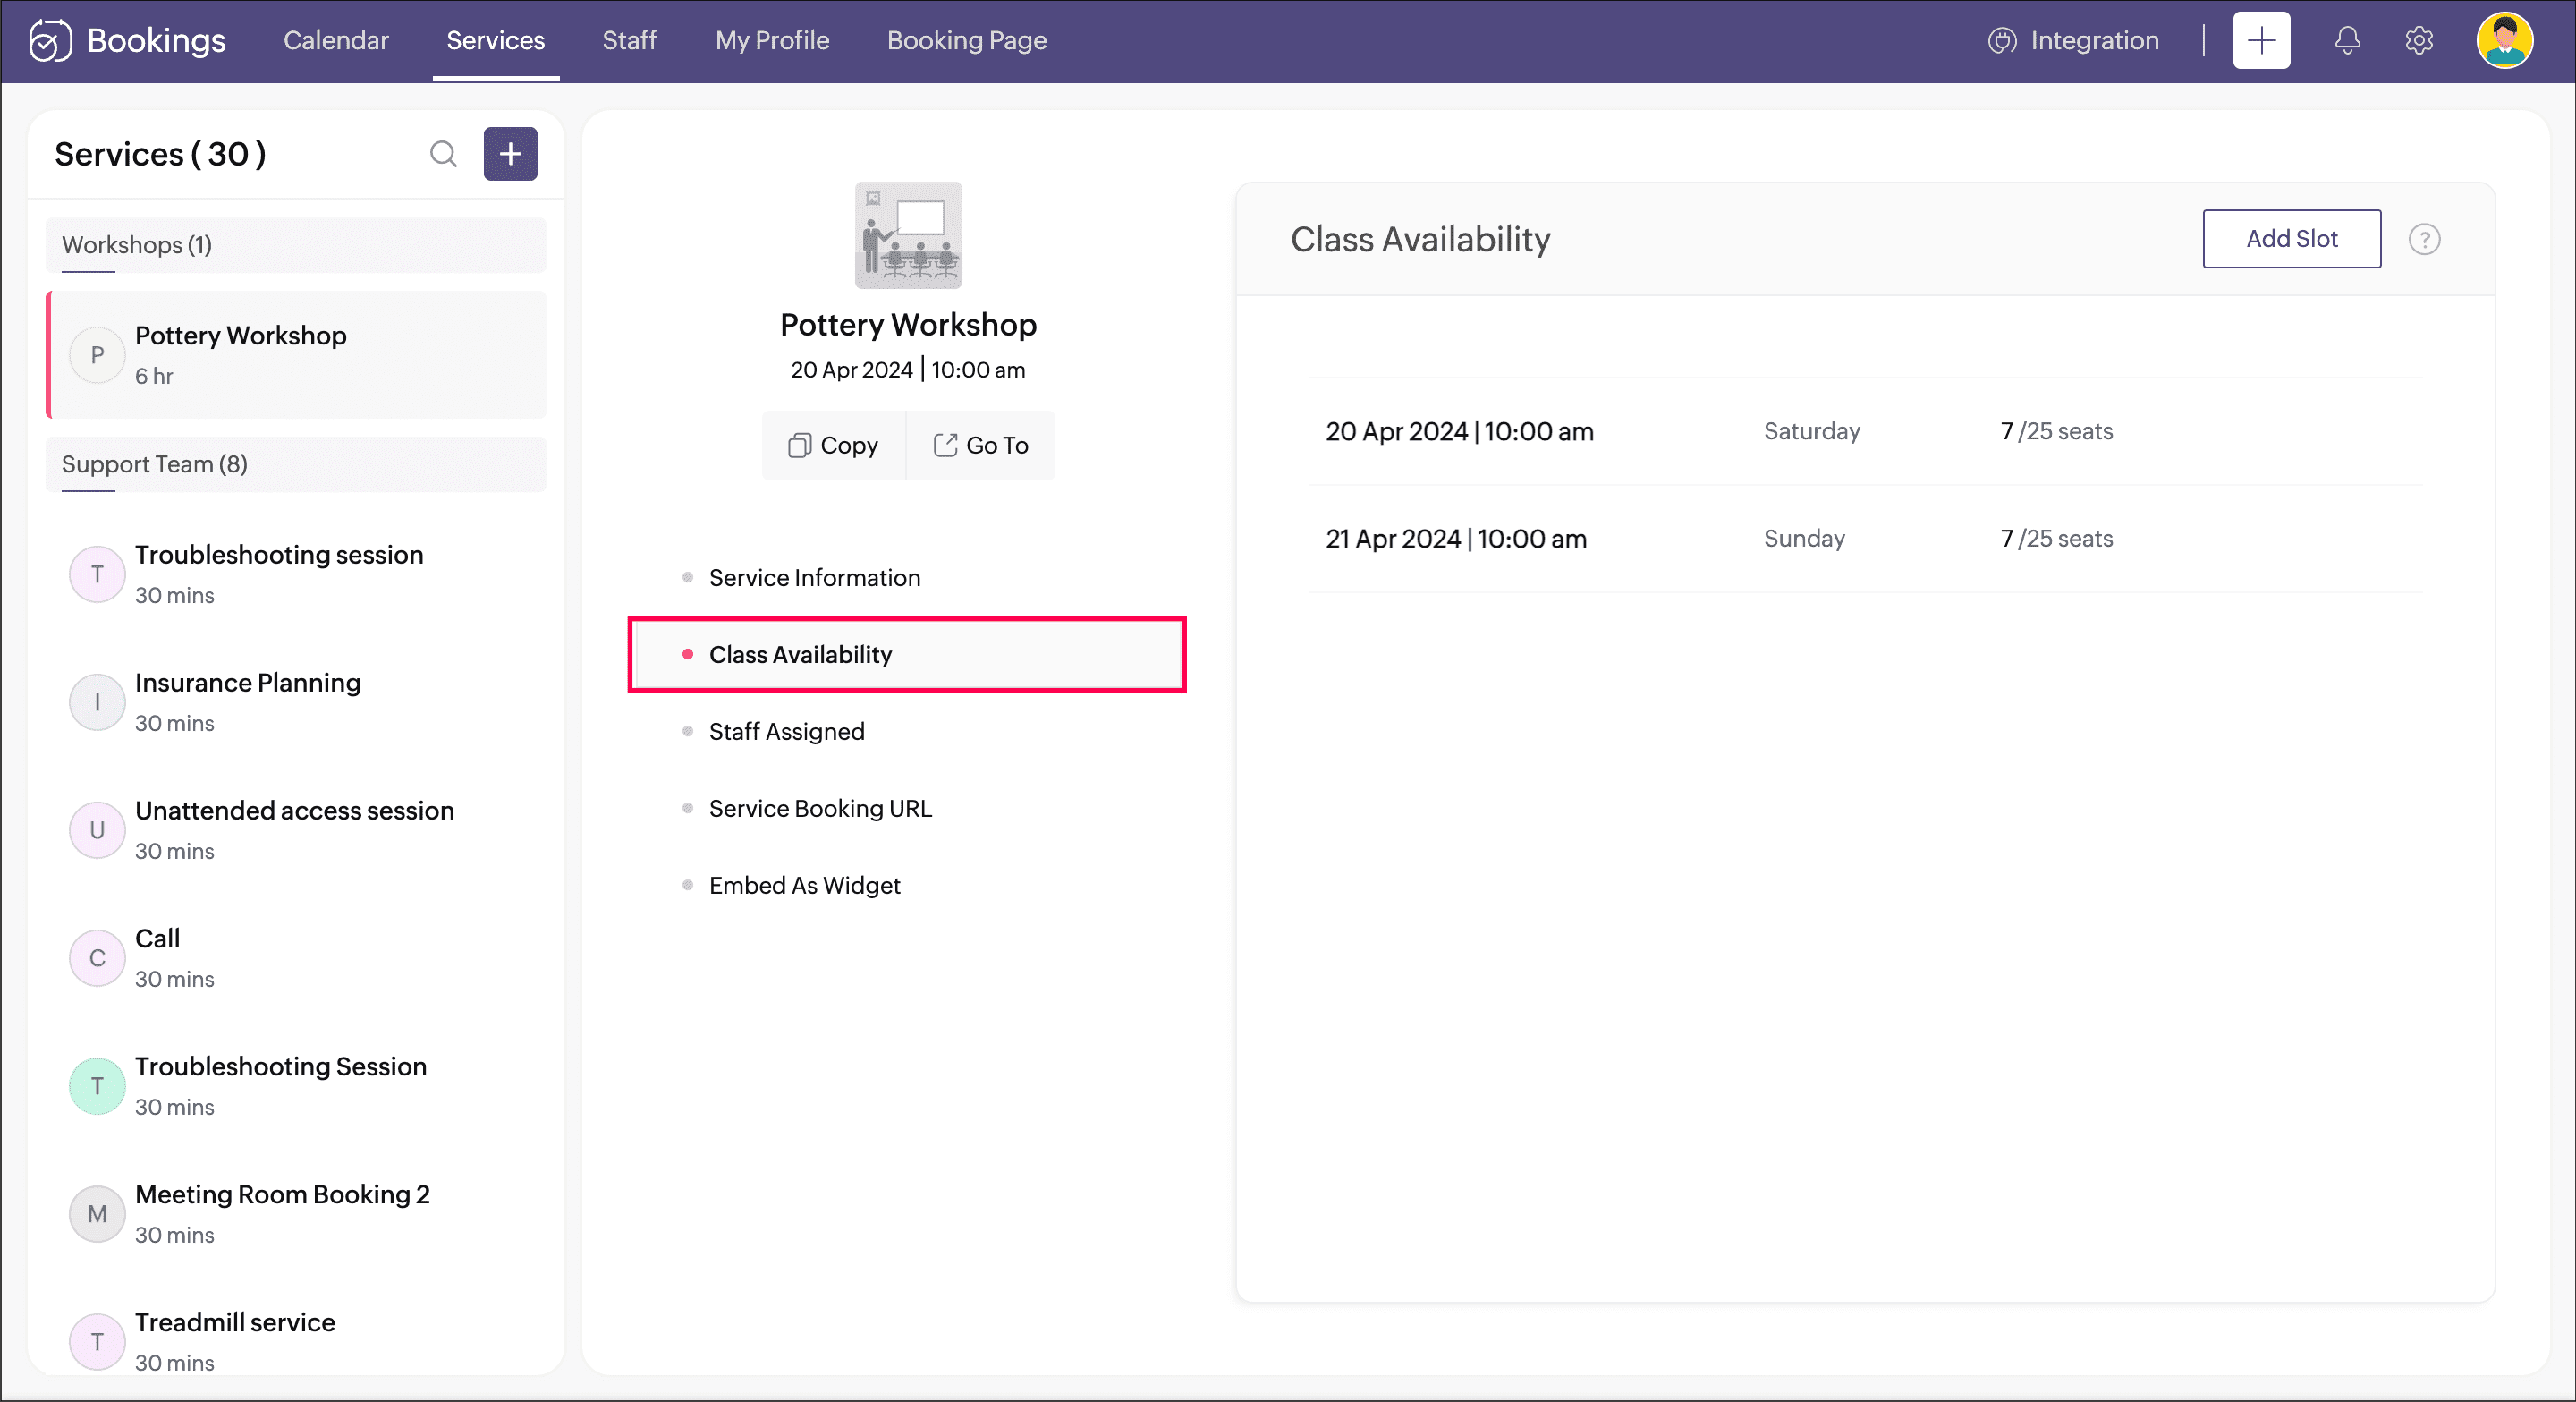
You can now share this workshop's booking page link with your customers. The booking page link can be accessed by navigating to Booking Page in the menu bar and selecting the Service tab, then clicking the Copy option near the respective group booking service.

 Note : Be sure to include this link wherever you promote your workshop across channels like social media, email marketing, referral programs, podcasts, and any other relevant platforms.
Learn how to customize this booking page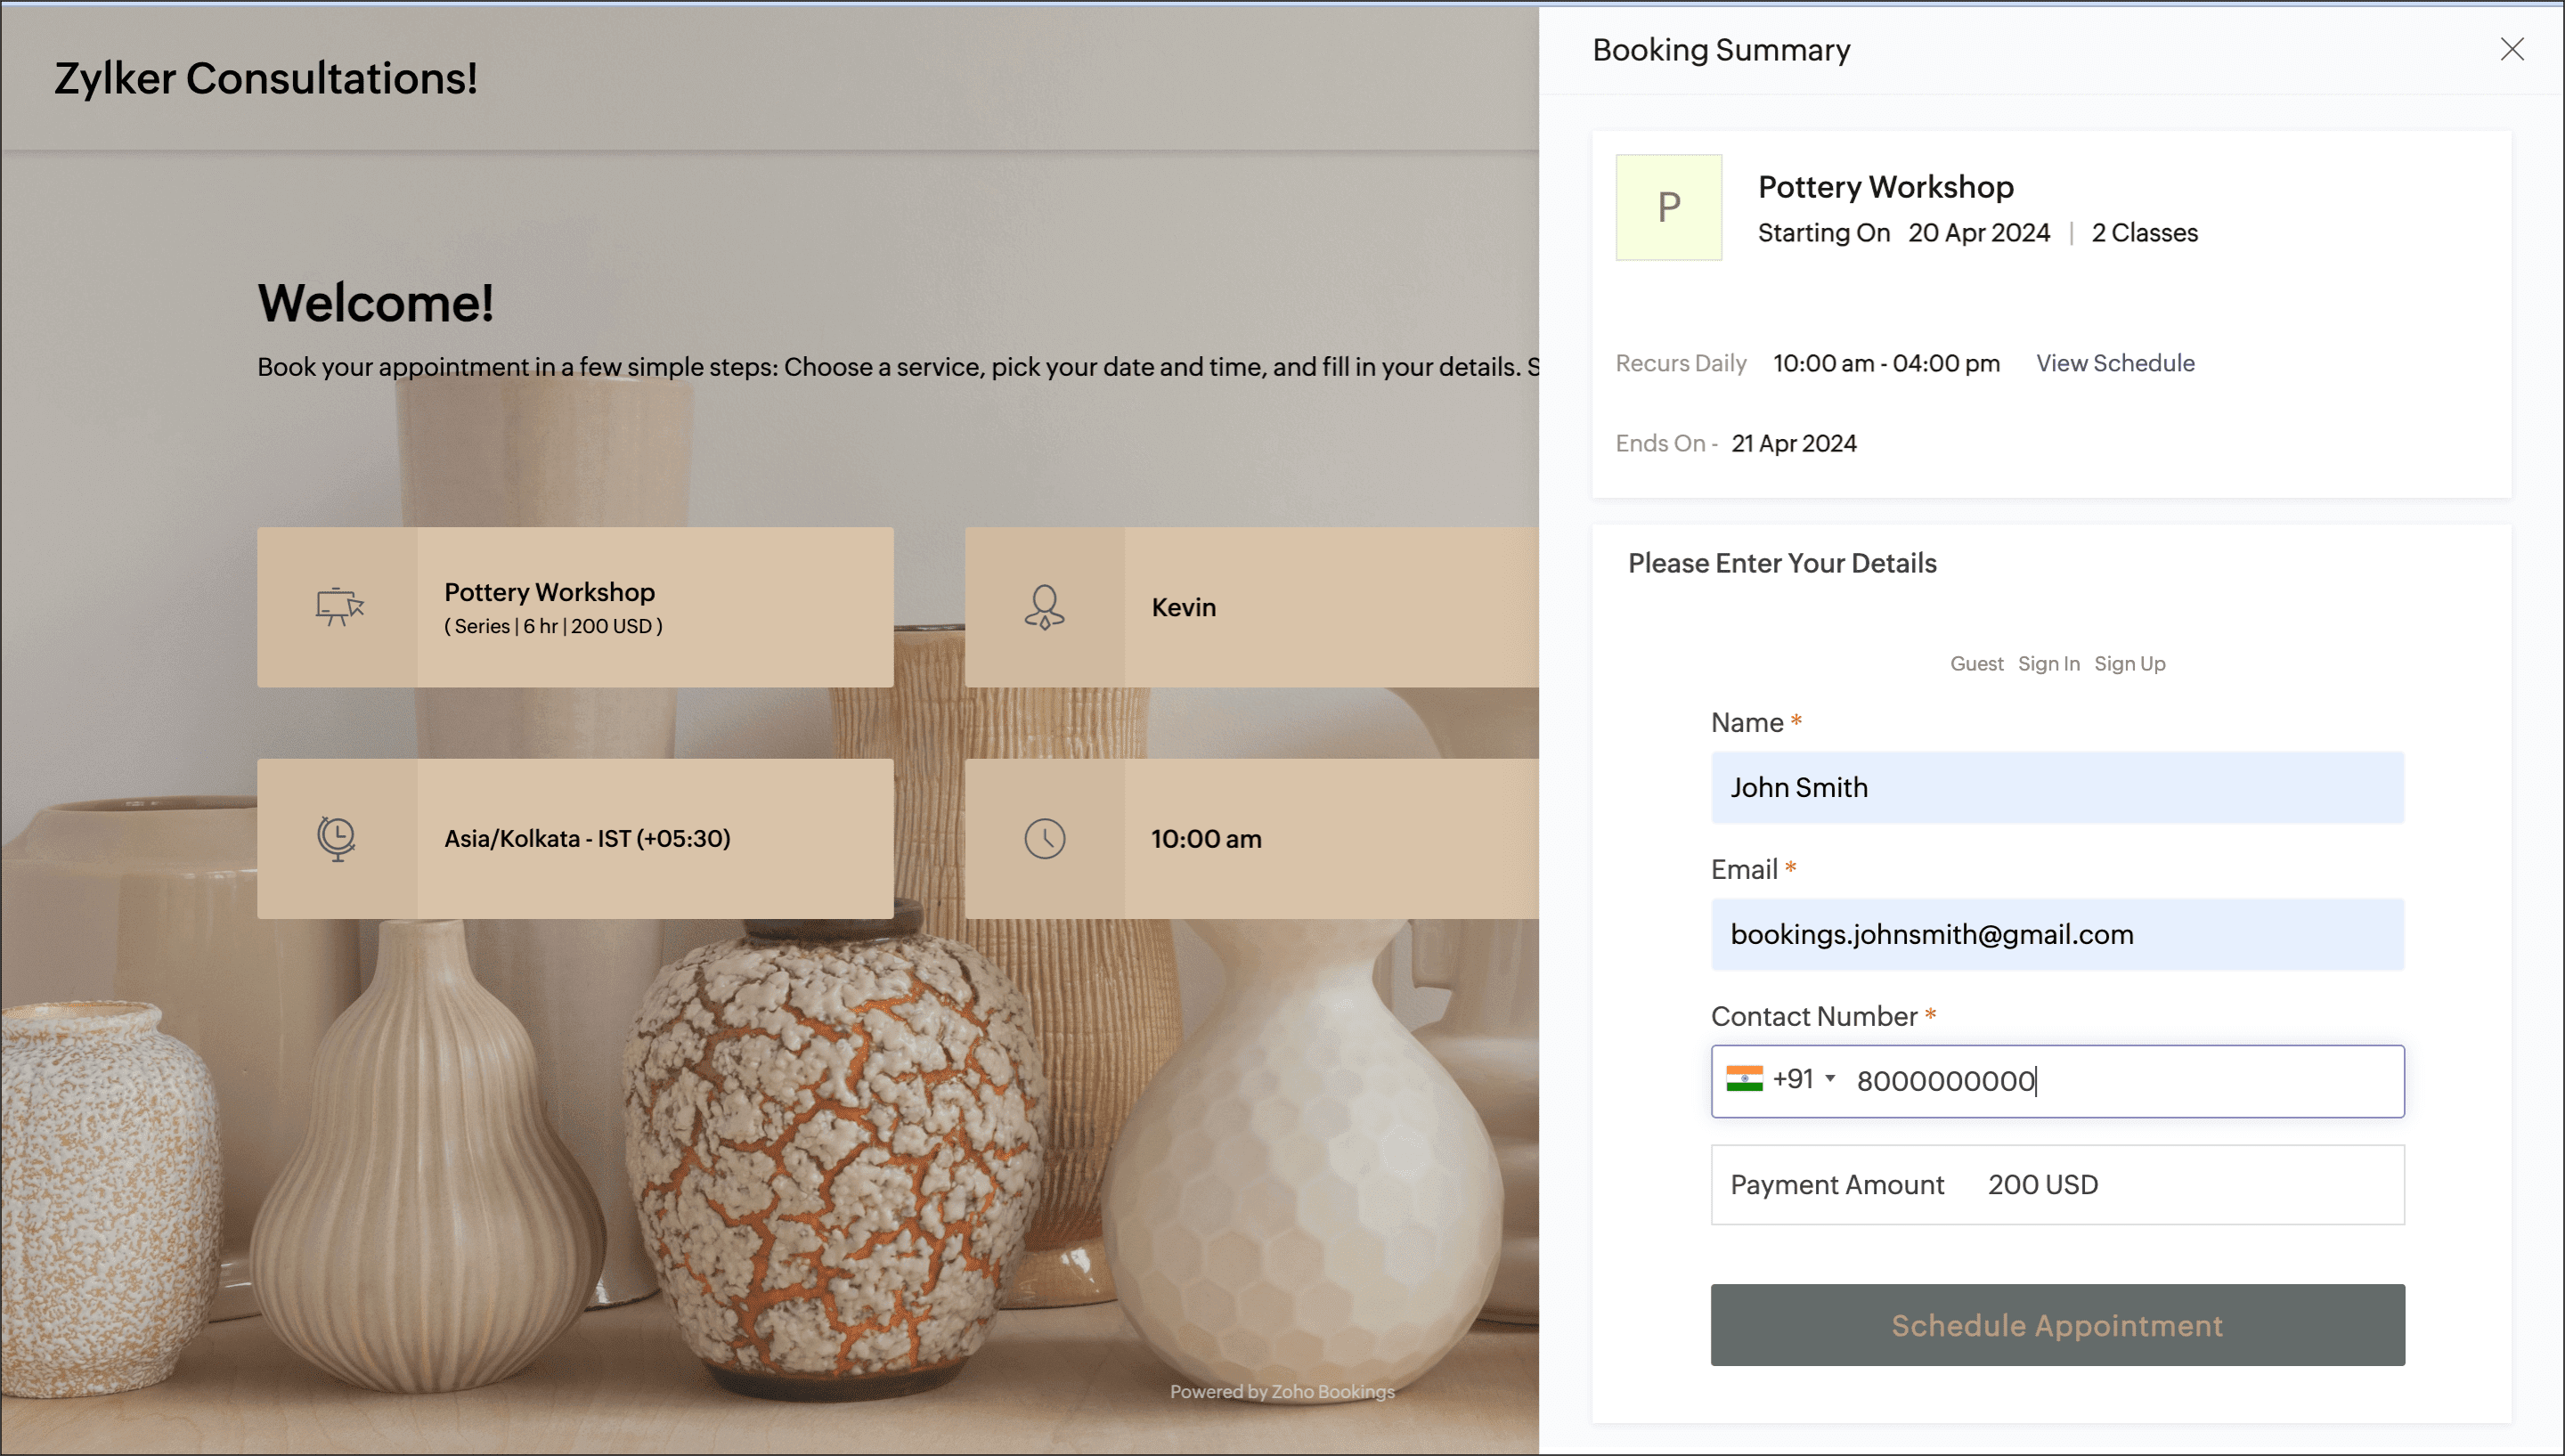

Other options to explore
Configure email and SMS notifications and modify the contents that goes into them.
Collect payment during the booking process. You can set if you want to collect a partial or full amount.
Customize the booking page for a better branding feel.
Thanks for reading this post. Please share your suggestions in comments or write to us at support@zohobookings.com.
Related articles
All-in-one knowledge management and training platform for your employees and customers.
Zoho Developer Community
Topic Participants
Praveena Chandran
Sticky Posts
Tip #13: Identify where your bookings come from with Source Tracking
Source tracking is the practice of identifying where your bookings originated. This is important, because online bookings come from a wide variety of sources like social media platforms, your website, email and ad campaigns, partner websites, organicTip #17: How to mandate partial payment for your appointments
When you require partial payments during the booking process, customers can only schedule with you after paying a certain amount in advance. This deposit acts as a commitment between both parties. Apart from that, it has many more advantages. BenefitsTip #18: Organize a group workshop in a few steps
It's the season for workshops—they're everywhere, catering to diverse interests and needs. Whether for more professional goals like leadership development or creative endeavors like painting, there's an abundance of workshops offered every day. A schedulerTip #16: Custom labels for staff, service, and resources
Every industry uses its own jargon. Take healthcare, for example; when you visit a doctor, it's not just an appointment, it's a consultation. The people who provide consultations are the providers. Similarly, in the tranquil world of a spa, a massageTip #15: Customize service prices for each staff member
It's common practice for a service to be priced differently based on the staff member providing it. For example, an experienced hair stylist may charge more for a haircut compared to the other stylists. This pricing strategy allows businesses to charge
Zoho TeamInbox Resources
Zoho CRM Plus Resources
Zoho Books Resources
Zoho Subscriptions Resources
Zoho Projects Resources
Zoho Sprints Resources
Qntrl Resources
Zoho Creator Resources
Zoho CRM Resources
Zoho Show Resources
Get Started. Write Away!
Writer is a powerful online word processor, designed for collaborative work.
-
オンラインヘルプ
-
Webセミナー
-
機能活用動画
-
よくある質問
-
Ebook
-
-
Zoho Campaigns
- Zoho サービスのWebセミナー
その他のサービス コンテンツ
Nederlandse Hulpbronnen
ご検討中の方
Recent Topics
Can't edit Segments
Happening with 2 different Zoho One environments, in different browsers. Please fix.Zoho Sheet for Desktop
Does Zoho plans to develop a Desktop version of Sheet that installs on the computer like was done with Writer?From Zoho CRM to Paper : Design & Print Data Directly using Canvas Print View
Hello Everyone, We are excited to announce a new addition to your Canvas in Zoho CRM - Print View. Canvas print view helps you transform your custom CRM layouts into print-ready documents, so you can bring your digital data to the physical world withTransfer ownership of files and folders in My Folders
People work together as a team to achieve organizational goals and objectives. In an organization, there may be situations when someone leaves unexpectedly or is no longer available. This can put their team in a difficult position, especially if thereConsumer Financing
Does Zoho currently have a payment gateway (such as Stripe, Square, etc) which offers financing for customers? So, let's say the estimate we give the customer is greater than what they can afford at the time, but we can sell the service now, letting themHow can Data Enrichment be automatically triggered when a new Lead is created in Zoho CRM?
Hi, I have a pipeline where a Lead is created automatically through the Zoho API and I've been trying to look for a way to automatically apply Data Enrichment on this created lead. 1) I did not find any way to do this through the Zoho API; it seems likevalidation rules doesn't work in Blueprint when it is validated using function?
I have tried to create a validation rule in the deal module. it works if I try to create a deal manually or if I try to update the empty field inside a deal. but when I try to update the field via the blueprint mandatory field, it seems the validationSubform edits don't appear in parent record timeline?
Is it possible to have subform edits (like add row/delete row) appear in the Timeline for parent records? A user can edit a record, only edit the subform, and it doesn't appear in the timeline. Is there a workaround or way that we can show when a userZoho CRM - Option to create Follow-Up Task
When completing a Zoho CRM Task, it would be very helpful if there was an option to "Complete and Create Follow-Up Task" in the pop-up which appears. It could clone the task you are closing and then show it on the screen in edit mode, all the user wouldMandatory Field - but only at conversion
Hello! We use Zoho CRM and there are times where the "Lead Created Date & Time" field isn't populated into a "Contractor" (Account is the default phrase i believe). Most of my lead tracking is based on reading the Lead Created field above, so it's importantZoho CRM for Everyone's NextGen UI Gets an Upgrade
Hello Everyone We've made improvements to Zoho CRM for Everyone's Nextgen UI. These changes are the result of valuable feedback from you where we’ve focused on improving usability, providing wider screen space, and making navigation smoother so everythingFile Upload field automatically replaces spaces with underscores – support experience
Hi everyone, I want to share my recent experience regarding the File Upload field behavior in Zoho Creator and my interaction with the Zoho support team. When a user uploads a file, the system automatically renames the document by replacing spaces inDeluge function to copy parent record file upload field to child record file upload field
I'm stuck trying to write a deluge function that is triggered via automation in child record "Appointments," confirms if a file is in file upload "Report" field of parent "Contacts" record via Contacts lookup field "Contact_Name". If no file is in parentZoho Books Sandbox environment
Hello. Is there a free sandbox environment for the developers using Zoho Books API? I am working on the Zoho Books add-on and currently not ready to buy a premium service - maybe later when my add-on will start to bring money. Right now I just need aMake panel configuration interface wider
Hi there, The same way you changed the custom function editor's interface wider, it would be nice to be able to edit panels in pages using the full width of the screen rather than the currently max-width: 1368px. Is there a reason for having the configuration panel not taking the full width? Its impossible at this width to edit panels that have a lot of elements. Please change it to 100% so we can better edit the layouts. Thanks! B.Image Compression Options
Much better if we have level of options to compress the image [20%, 40%...] We are dealing with service reports daily that has before and after photos (image field)- the file size too large and one thing, the current limit is 10mb or 15mb for reportCannot get code to work with v2.mergeAndStore!
Please can someone help me pass subform items into a repeating mail merge table row using v2.mergeAndStore? I have a mail merge template created in Writer and stored in Workdrive. This template is referenced by a custom CRM function which merges all ofHow to hide or archive a blog post temporarily in Zoho commerce website builder?
I would like to temporarily hide or archive a blog post in zoho commerce website builder so that it doesnt appear on my website till I enable it again. I tried to look for this option but could not find it. It only allows me to permanently delete a blogFounders using Zoho — are you leveraging Zoho Campaigns + Zoho Social for thought leadership… or just sending emails?
I’ve noticed something interesting in the Zoho ecosystem. Many founders use Zoho Campaigns and Zoho Social for basic marketing—newsletters, scheduled posts, and announcements. But very few are using these tools strategically to: • Position themselvesWATERFALL CHART IN ZOHO ANALYTICS
Hi Team, I would like to know whether Zoho Analytics currently supports a Waterfall Chart as a built-in visualization type. If yes, could you please share the steps to create one? If not, is there any workaround or recommended method to build a WaterfallHow to mix different types of inputs (such as dropdown list and textbox)
Hi, I'm creating a form called "Room Reservations" for a company. I created a "table" using "Matrix Choice". I created "Room 1", "Room 2" and "Room 3" with the "Questions". I would then like to create two columns with the "Answers", one called "Department"Full Context of Zoho CRM Records for Zia in Zoho Desk for efficient AI Usage
Hello everyone, I have a question regarding the use of Zia in Zoho Desk in combination with CRM data. Is it possible to automatically feed the complete context of a CRM record into Zia, so that it can generate automated and highly accurate responses forAbility to assign Invoice Ownership through Deluge in FSM
Hi, As part of our process, when a service appointment is completed, we automated the creation of the invoice based on a specific business logic using Deluge. When we do that, the "Owner" of the invoice in Zoho FSM is defaulted to the SuperAdmin. ThisReply to Email for SO/PO
Hello, We are new to Zoho Books and running into an issue. Our support@ email is our integration user. When our team is sending out PO/SO's we are updating the sender email, but for some reason many of our responses are coming back to our support@ emailHow to Convert NSF to PST Format Effortlessly? - SYSessential
It is highly recommended to obtain the error-free solution of the SYSessential NSF to PST converter to convert NSF files from Lotus Notes. Using this professional software, it becomes easier to convert all NSF database items, including emails, journals,Zoho Commerce - Poor Features Set for Blogging
Hi Zoho Commerce team, I'm sure you will have noticed that I have been asking many questions about the Blogs feature in Commerce. I thought that it would be useful if I share my feedback in a constructive way, to highlight the areas which I feel needPass shipping info to payment gateway Zoho Books to Authorize.net
For some reason the integration from Zoho books to Authorize.net does not pass the shipping address. Authorize.net is ready to receive it, but zoho books does not send itMassive Zoho Books failure
We have not received any communication or notification from Zoho, but we have detected that Zoho Books is not working for all our users. We cannot access or use Zoho Books. This is critical. We are trying to contact Zoho on the Spain telephone number,Does the Customer “Company Name” field appear anywhere in the Zoho Books UI outside of PDFs?
Hi everyone, I’m trying to understand how the Company Name field is actually used in Zoho Books. There is a Company Name field on the customer record, but when viewing transactions like a Sales Order in the normal UI (non-PDF view), that field doesn’tEmail outbox is now available in the sandbox
Hello all! Testing emails without visibility has always been a blind spot in the sandbox. With the new Outbox, that gap is closed. You can now view and verify every email triggered from your sandbox, whether it’s through workflows, approvals, or massZoho Desk blank screen
opened a ticket from my email, zoho desk comes up blank, nothing loads. our receptionist also gets the same thing under her login on her computer. our sales rep also gets same thing on zoho desk at his home on a different computer. I tried clearing cache/history/cookies,Looking For Recruit Developer
Hi everyone, I am looking for a Zoho Certified Developer to assist with a development project for MetalXpert. We are building a software system designed to bridge the gap between a candidate mobile app and an employer web portal using Zoho Recruit assales IQ issue on website
i integrated the zoho sales IQ code on the website but it is comming in distroted form i am sharing the screenshot below the website is bulit in wix platformMulti-currency and Products
One of the main reasons I have gone down the Zoho route is because I need multi-currency support. However, I find that products can only be priced in the home currency, We sell to the US and UK. However, we maintain different price lists for each. ThereDeprecation of the Zoho OAuth connector
Hello everyone, At Zoho, we continuously evaluate our integrations to ensure they meet the highest standards of security, reliability, and compliance. As part of these ongoing efforts, we've made the decision to deprecate the Zoho OAuth default connectorI need to know the IP address of ZOHO CRM.
The link below is the IP address for Analytics, do you have CRM's? IP address for Analytics I would like to know the IP address of ZOHO CRM to allow communication as the API server I am developing is also run from CRM. Moderation Update: The post belowImportant Update: Google Ads & YouTube Ads API Migration
To maintain platform performance and align with Google's newest requirements, we are updating the Google Ads and YouTube Ads integrations by migrating from API v19 to the newer v22, before the official deprecation of v19 on February 11, 2026. Reference:Importing into the 'file upload' field
Can you import attachments into the file upload field. I would expect it to work the same way as attachments do, But can't seem to get it to work.Zoho recruit's blueprint configuration is not functioning as mapped
Current Status: Zoho Blueprint is not functioning as configured. Issue: We are moving a Candidate status in Zoho Recruit "for active file" but we encountered: "Status cannot be changed for records involved in Blueprint." This happens to various clientSuper Admin Logging in as another User
How can a Super Admin login as another user. For example, I have a sales rep that is having issues with their Accounts and I want to view their Zoho Account with out having to do a GTM and sharing screens. Moderation Update (8th Aug 2025): We are workingNext Page


