Customer Feedback with Location Capture and Interactive Visualization
1. Requirement
Capture the location of the user and visualize it in a map by using the location capture feature in Zoho Creator form.
2. Use Case
Consider an organization offering courier, package delivery, express mail, and logistic services, where Zoho Creator is employed for customer feedback surveys. Enabling the location capture feature in this form enhances the understanding of localized customer experiences and preferences. By organizing the gathered location data based on zip codes and utilizing pivot report in map format, the organization can filter and visually represent customer reviews. This enables the identification of specific areas where customers may perceive the service as poor, facilitating targeted improvements in those regions.
3. Steps to Follow
3.1. Create Form
- Create a form with the following details to collect customer reviews.
Form
Form Link Name
Field Type
Field Name
Field Link Name
Customer Review
Customer_Review
Name
Customer Name
Customer_Name
Phone
Phone
Phone
Email
Email
Email
Radio
How are you satisfied with our product/service?
Very Satisfied
Satisfied
Neutral
Unsatisfied
How_are_you_satisfied_with_our_product_service
Multi Line
How was your overall experience with our product/service?
How_was_your_overall_experience_with_our_product_service
Decimal
Latitude
Latitude
Decimal
Longitude
Longitude

Note: Update the default Decimal Points setting for the decimal-type Latitude and Longitude fields to 6 in the field properties to ensure precision in the values.
3.2. Enable Capture Location
Note: Location data is regarded as personal information and will only be captured with the user's explicit consent. Refer to understand capturing location to learn more.
- Select Capture Location option in the form properties as shown below.
- Create a workflow to execute on the successful submission of the Customer Review form and name the workflow as Autofill Coordinates. This workflow uses the Capture location property to fetch the customer's postal code. The zip code will then be used to populate the corresponding geo-coordinates in the Latitude and Longitude fields of the form.
- Add the following code in the Deluge editor.
- //Fetch the postal code of the captured location form the form and use the Geocode task to get the geographic coordinates corresponding to that postal code
- geo_coordinates = zoho.map.geoCode(Added_Location.postal_Code); //The Added_Location is a system field that gets created automatically when the location capture feature is enabled in the form.
- //Populate the Latitude and Longitude fields with the fetched values
- input.Latitude=geo_coordinates.getJSON("latitude");
- input.Longitude=geo_coordinates.getJSON("longitude");
3.3. Hide Fields
- Create another workflow to hide the auto-populated Latitude and Longitude fields of the Customer Review form.
- On the subsequent page, click Add New Action > Hide fields, set this action to run always, and select the Latitude and Longitude fields.
3.4. Publish the Form
- Publish the Customer Review form to make it publicly accessible.
- Share the permalink with customers through your preferred mediums, such as the website, QR codes, and blogs, to gather their reviews.
3.5. Create Pivot Chart
- Navigate to the Design page of your application and click create icon (+) at the top of the Design page.
- Select Report and choose Pivot Chart.
- Select the Customer Review form and name the report Customer Review Location Map. Click Create Report.
- In the next page, drag and drop the Latitude field from the left pane to the X-axis.
- Select the dropdown near the X-axis and choose Latitude under Geo Location, as shown.
- Drag and drop the Longitude field from the left pane to the Y-axis and select Longitude under Geo Location in the dropdown, as shown.
- Drag and drop the How are you satisfied with our product/service? field to the color field. This will differentiate the customer reviews based on the color.
- After configuration, click Click Here to Generate Graph.The geo-coordinates will be pointed on the map with the appropriate customer response.
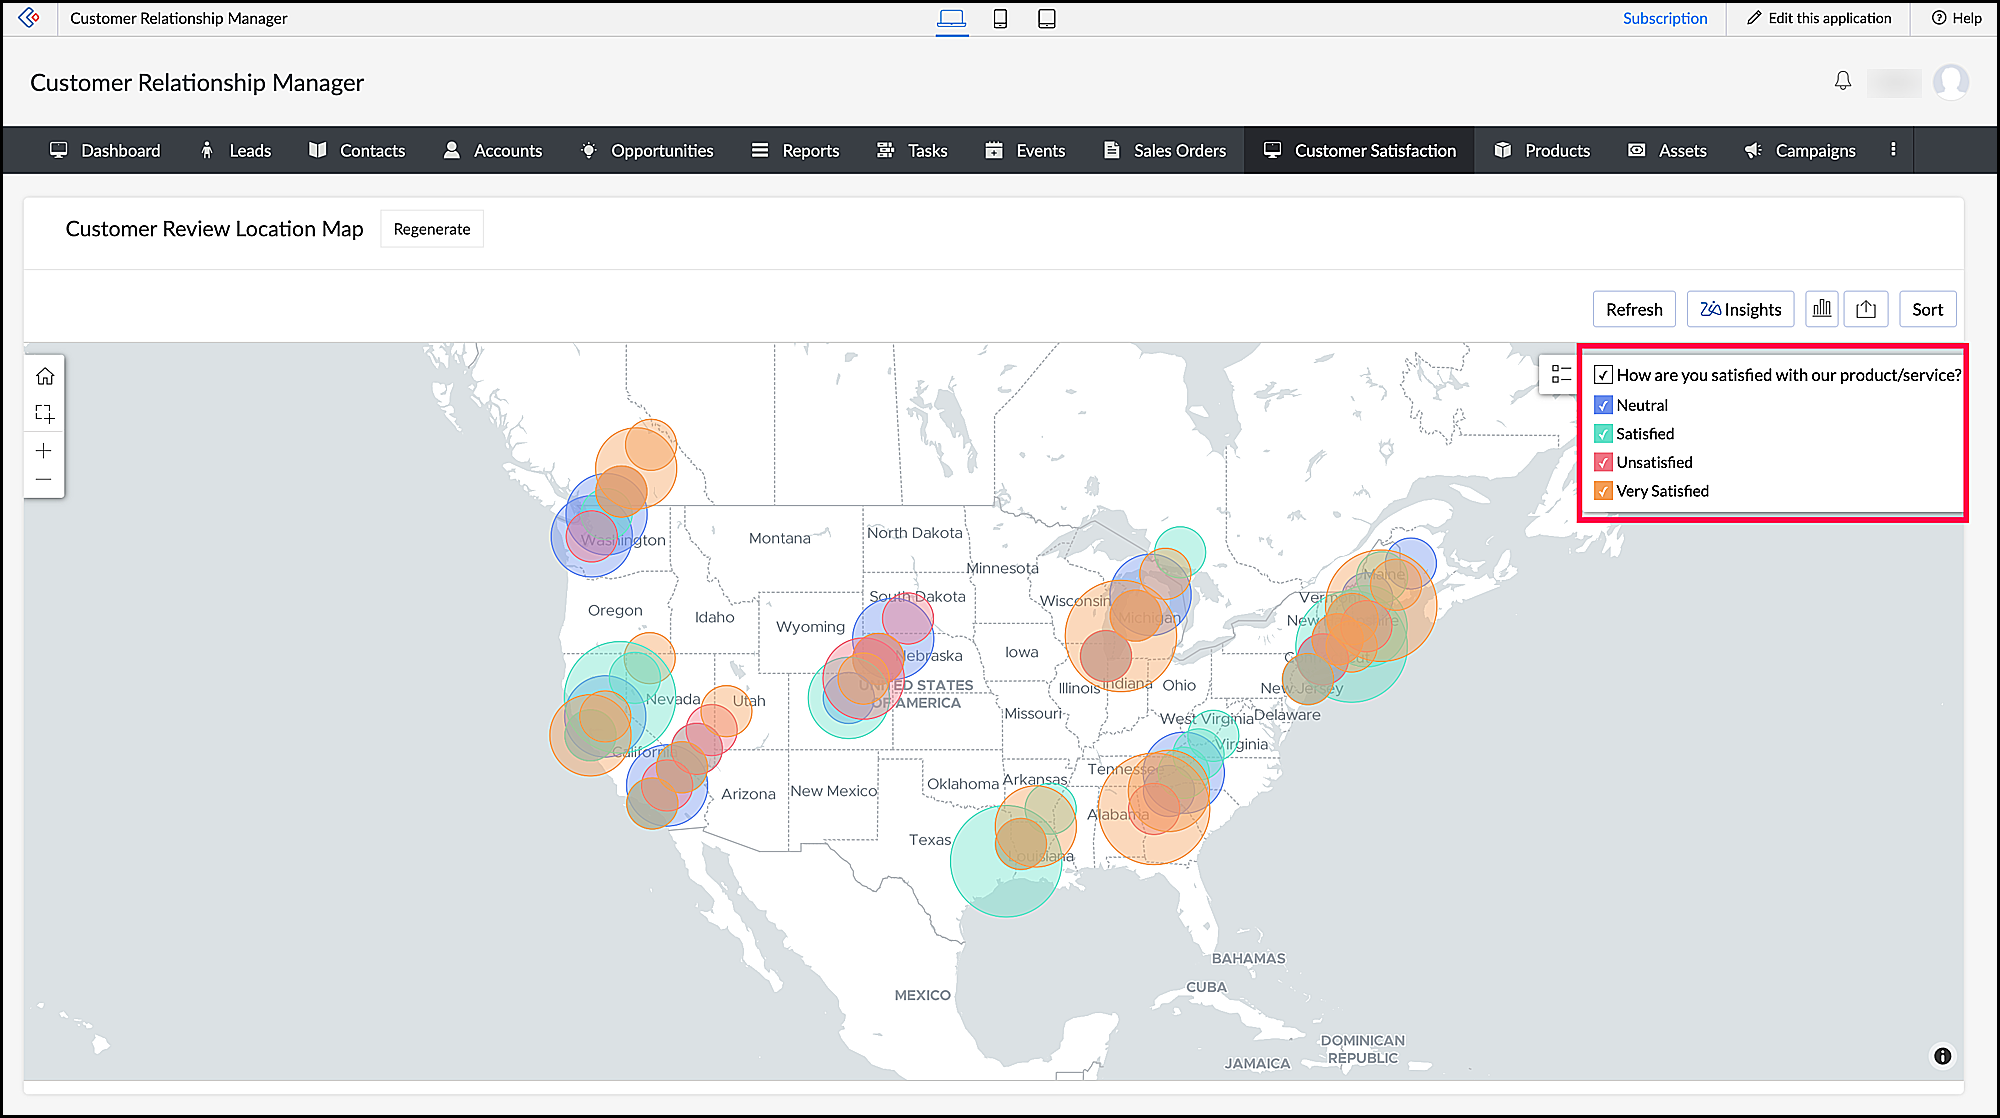
- Choose the appropriate map chart type to visualize the data with more details. For our use case we have chosen Map - Bubble as shown below.
- Click Done to save your configurations.
Access the map report in live mode to view and interact with the map. You can also filter the data points on the map based on the customer reviews such as Very Satisfied, Satisfied, Neutral, and Unsatisfied using the filter option.