Zoho FSM Mobile App
The Zoho FSM mobile app empowers on-the-go field agents with all the information they need, to be efficient at work and delight contacts with every appointment. It helps them to be on time for their appointments, attend more appointments in a single day, and complete their appointments in a single visit. It also enables them to update their appointment statuses as they progress with their work.
The FSM mobile app can be downloaded from the links below:
Key Features
- Real time notifications to field agents informing them of their service appointments and any changes in their work schedule
- Easily manage appointments for the day in a simple calendar view
- Field agents can find accurate navigation to the appointment location using Google Maps
- Has detailed view of what services need to be carried out and the products required for the service
- Ability to reach out to contacts through call, email, and SMS
- Instantly create a service report and capture the contact’s signature once work is done
- Easily capture time taken to complete each appointment
- Make changes to services rendered and products needed before invoicing
- Capture photos/files from the service location and add it as Notes in the service appointment
- Field agents can create Trips, which track the distance they traveled and the route taken for each appointment
- GPS location tracking for field agents
- Log time spent working on an appointment using Time Sheets
- Offline mode enables users to use the app even without an internet connection
Supported Devices
Requires Android: 6.0 and up
Requires iOS: iOS 16 and up
Permissions Required
Users with any profile can access the FSM mobile app. However, the features and records that the user can access in the mobile app will depend on the profile assigned to them.
Checking-in
- Log in to Zoho FSM mobile app.
In the Home screen, the following details will be shown:
- Ongoing Service Appointments or Upcoming Service Appointments
- Overdue Service Appointments
- Running Trip - Click Check-in.
A timer will start to record the time logged in. After the field agents check in, location tracking will be enabled. Their GPS location will be visible in the Map view of the Dispatch Console in the Zoho FSM web app. This location will be updated every 15 minutes.
View Service Appointments
When a service appointment is dispatched, a push notification is sent to the field agents assigned to the service appointment. To view the service appointments assigned to them, the field agents need to do the following:
- Open your Zoho FSM mobile app.
If the user has checked-in, they will be taken to the All Service Appointments list view screen for the current date. Besides the current date, you can view the service appointments for a period of 120 days, i.e. 60 days before the current date and 60 days from the current date. Select a date from the carousal to view the service appointments for that date. You can also view this screen by clicking All Service Appointments in the left menu. From this menu, you can also navigate to Ongoing Service, Upcoming Service, Overdue Service and other custom view screens.
In the All Service Appointments list view screen, the list of service appointments for the current date is displayed with the following details:
a. Name
b. Status
c. Start Time and End Time, Scheduled Date.
d. The Scheduled Start/End time is shown until the work has been completed. Once the work is started/completed, the actual Start/End time is shown.
e. Duration
f. Description
You can hide the calendar view by clicking on. The All Service Appointments list view screen will be displayed. Click on
to switch to the calendar view.
- Click
to view the All Service Appointments map view screen. The service location [
] for the service appointments are displayed here. Click
to switch to the All Service Appointments list view screen.
- Click Directions in the appointment details tile (located at the bottom of the All Service Appointments map view screen) to find the navigation path to the location of the service appointment. Click More Details to view the Appointment Details screen.
In the All Service Appointments map view screen, the details of the appointments are shown in tiles at the bottom of the screen. Clickto view the current location of the user on the map. If Location is not turned on, then
is shown.
Standard List Views
The standard list views provide you with useful groupings of the service appointments. These help you easily find a service appointment. To view the list views:
- Select View More in the left menu.
All the available list views will be displayed.
Create Work Orders and Appointments
To create a work order:
- Select Work Orders, in the left menu.
- In the Work Orders screen, click the add [+] icon.
- In the Create Work Order page, enter the details of your work order.
To use a record template, click on More Options [] in the top right corner, select Create by Template and choose a template.
- Click add [+] for Service Line Items.
A default tax will be set for the line items. - In the Add Service Line Item page, provide the following details and click Save:
a. Select a Service.
The associated service tasks (if any) will get populated.
b. Enter a Quantity and select its unit.
c. Select a Tax Preference.
You can add additional service tasks to the service line item that will get added only for this work order. Click add [+] for Service Tasks.
In the Add Service Task page, add the Service Task Name and click Save. - Add the necessary work order details and click Save.
The created work order can be edited. To edit a work order:
- Click the Edit [
] icon on the top right side.
- Make the necessary changes and click Save.
While editing a work order, its service and billing addresses can be updated, or new ones can be added.
In the list view swipe left on a record for the Edit, and Delete options.
Manage Work Order Addresses
To add an address in a work order:
- Click the more options [
] icon of the address you want to add the new address to.
- In the Add Address screen, do the following and click Save:
- Enter the address details.
From the Address relation dropdown, select the contact or company you want to link the address to. - Enter the tax details, if required.
- Click Locate Address to obtain the GPS (Latitude and Longitude) coordinates of the entered address.
- In the Select Geo Code screen, you can pinpoint the exact GPS (Latitude and Longitude) coordinates and click Save.
To edit an address in a work order:
- Click the more options [
] icon of the address you want to edit.
- In the Edit Work Order screen, change the desired details.
If the Also update this address in the module checkbox is selected, the modified address will be updated in the parent (Company or Contact) module as well.
Create Appointments
Once the work order is created, appointments can be created for it. The created appointment will get assigned to the logged in user.
To create a service appointment:
- Click Manage Appointment in the Work Order Details screen.
You can also add an appointment by clicking the add [+] icon under the Appointments tab. If the work order has service appointments, then on clicking Manage Appointment, you will be taken to the Appointments tab. The option to create appointments will be available only if there are service line items in the New status. - In the Create Service Appointment screen, add the necessary details and click Schedule or Schedule and Dispatch.
Tap on the Service Resource lookup to select an agent or crew. One or more resource can be assigned to the appointment. If more than one Service Resources is assigned, you can select one of them as the Lead else the assigned field agent will be deemed the lead. If you schedule an appointment without assigning it to a service resource, then the appointment created will be in New status.
Click on a service to see the list of the component service tasks. Retain the ones you want to be part of the appointment. Uncheck the rest. - Click Schedule or Schedule & Dispatch in the confirmation message.
Link Service
You can link a service (for which an appointment isn't created) present in a parent work order, to one of its service appointments. Following are the steps to link a service to an existing service appointment:
- Select the service appointment of the work order to which you want to add the newly added service. Under the Service And Parts tab, click Link Service.
- Select a service and click Okay.
- Click Save.
The service will get added to the service appointment.
Delete Appointments
The Delete option is now available in the Service Appointment Details page. It is available under the more options [  ] menu.
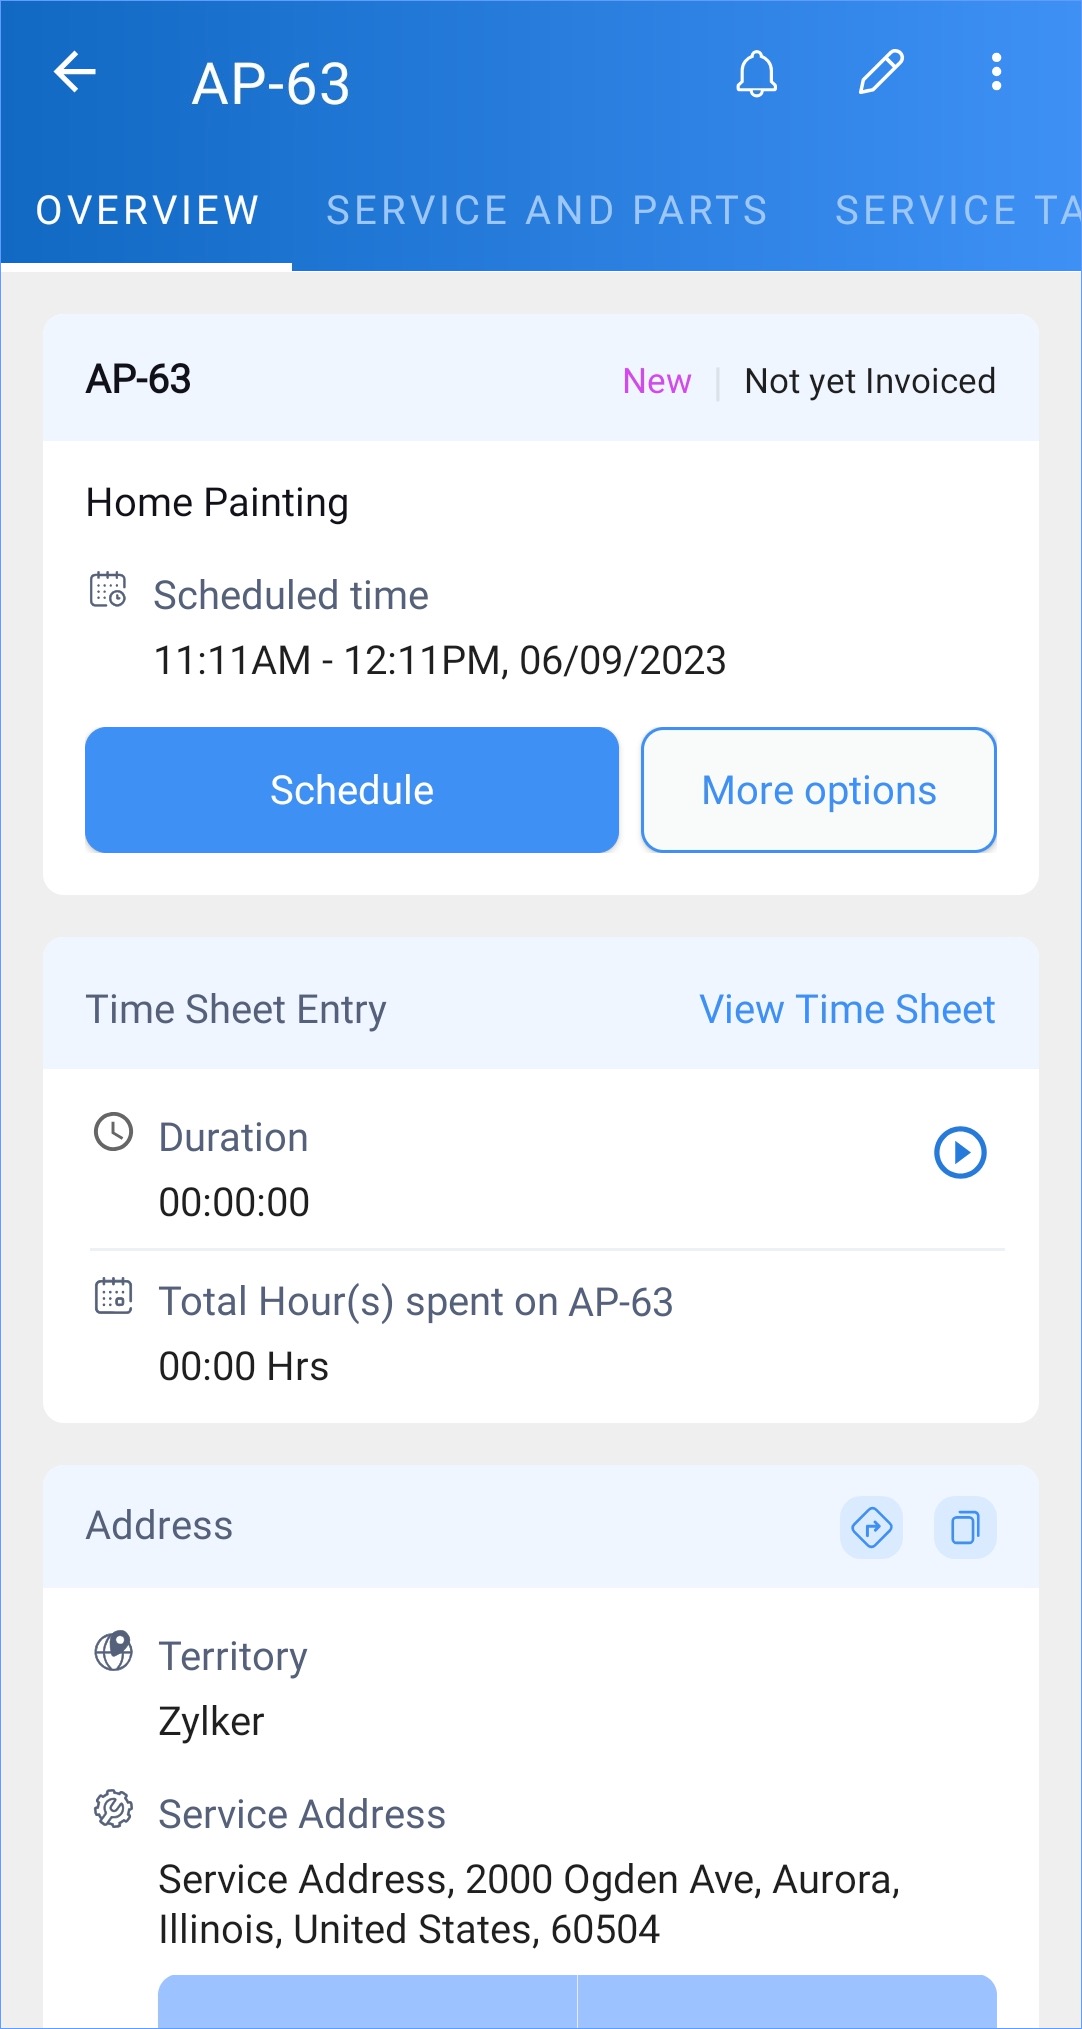
Work on Appointments
The field agents assigned to the service appointment can update the status of a service appointment. To view the details of the service appointment and to update the status of the service appointment, the field agent has to do the following:
- Select the service appointment from the All Service Appointments list view screen.
The service appointment can also be selected from under the Appointments tab of a work order. - Under the Overview tab, the following details about the service appointment are listed:
- Service Address
- Contact Details
- Assigned Resources
- Work Order details
- Asset Details
- The current transition for the service appointment is displayed alongside More Options.
- Under the Overview tab, the following actions can be performed:
- The logged in user can do the following:
- Get in touch with the Contact through call, email, or SMS. These options are available in the Contact card. If a value is not present for an option, then the respective icon will be disabled.
- Get in touch with the Company through call, or SMS. These options are available in the Company card. If a value is not present for an option, then the respective icon will be disabled.
- Get in touch with the resources assigned to the appointment. These options are available in the Assigned Resources card. Those options will be listed for which there is a value. - Click
in the Address card to find the navigation path to the location of the service appointment.
- SR location: In the Assigned Resources section, click
to view the last known locations of the agents and the service location of the service appointment. The following locations will be denoted by the respective icon:
Service location:
Assigned Field Agent:
Logged in user:
- The logged in user can do the following:
- Under the Service And Parts tab, the following actions can be performed:
- Edit Service and Part Line Items: Tap the Service or Part Line Item you want to edit. In the Edit Service Appointment screen, select the Service or Part line item you want to edit. In the screen for the line item, make the necessary changes and click Save.
- Add Service or Part Line Item: Click the Add [
] icon for a Service or Part Line Item. In the Add Service Line Item or Add Part Line Item screen, make the necessary changes and click Save.
- Delete Service or Part Line Item: Click the Edit [
] icon for a Service or Part Line Item. In the Edit Service Appointment screen, tap the Delete icon [
] to remove a Service or Part line item.
- Service Reports will be listed under the Service Report tab.
- In the Service Tasks tab of the Work Order details screen, you can view the appointment associated with a service task. Click on
to view the associated appointments.
Points to remember
- The details of the parent work order can be viewed by clicking in the Work Order details card.
Schedule Appointment
Click Schedule. Only appointments in the New status will have the schedule option.
Modify the Scheduled Start/End Date Time if required. Tap on the Service Resource lookup to select an agent or crew. Click Schedule.
Click Schedule in the confirmation message.
Dispatch Appointment
Click Dispatch. Click Dispatch in the confirmation message.
Start Work
Click Start Work to commence the work for the service appointment. In the confirmation message, click Start Work to continue. A timer will start to record the duration of the work. If you want to view the timesheet before starting the work, click Edit Details in the confirmation message.
In the New Time Sheet page, click on a service to see the list of the component service tasks. Retain the ones you want to be part of the appointment. Uncheck the rest. You can also start work from this page.
Start work for a service line item
Under the Service And Parts tab, click Start Work for the service line item you want to work on. In the confirmation message, click Start Work to continue. A timer will start to record the duration of the work. If you want to view the timesheet before starting the work, click Edit Details in the confirmation message.
In the New Time Sheet page, click on the service to see the list of the component service tasks. Retain the ones you want to be part of the appointment. Uncheck the rest.
Start work using time sheets
You can also start work on an appointment or service line items by creating a time sheet. Under the Timesheets tab, click the add [+] icon. In the New Time Sheet page, click on a service to see the list of the component service tasks. Retain the ones you want to be part of the appointment. Uncheck the rest. Click Save.
Start work on individual service tasks
You can start work on individual service tasks in a service appointment. Under the Service Tasks tab, click Start Work for the service task you want to work on. In the New Time Sheet page, click Save.
Complete Work
Select this transition when the tasks for the service appointment have been completed. The timer recording the work duration stops. You have the option to mark the parent work order as complete.
The above confirmation message will appear if the status of the service line items is either In Progress, or Completed.
If the status of one of the service line items is Partially Completed, then when you complete the service appointment, you will have two options:
- Complete all the services
- Do not complete partially completed services
Complete all the services: If you choose this option, the status of the service line items will change to Completed and the status of the service appointment will change to Completed.
Do not complete partially completed services: The status of the service appointment will change to Completed. The status of the Partially Completed service line items will remain as is and the status of the other service line items will change to Completed. You can Resume Work on the Partially Completed service line items at any time.
Partial Completion
A service line item or service task once started can be partially completed.
Click Partially Complete in the confirmation message.
Choose Keep it in "In Progress" in the confirmation message.
This message will be shown only if the status of the service appointment is In Progress.
This message will be shown only if the status of the service appointment is In Progress.
The status of the service task will change to Partially Completed. The status of the service appointment will remain as In Progress.
If you choose Complete Appointment in the above confirmation message, then the status of the service appointment will change to Completed. The status of the service task will remain as Partially Completed.
If a service task is partially completed, then the following actions can be performed on the service task:
- In the parent work order, you can create a new service appointment for the partially completed service task
- Resume work
- Complete work
Create new service appointment
When a service task is partially complete, you can create a new service appointment for it under the parent work order. In the original appointment, the status of the service task will continue to be partially complete.
Resume work
You can resume work for a partially completed service task at anytime. In the confirmation message, click Resume Work to continue. A timer will start to record the duration of the work. If you want to view the timesheet before resuming the work, click Edit Details in the confirmation message.
Complete work
You can complete work for a partially completed service task at anytime. In the confirmation message, click Complete Work to continue.
In case there are partially completed line items in the service appointment and the status of the service appointment is In Progress, then you will be shown a confirmation message.
The status of the service task will change to Completed. If you choose Keep it in "In Progress" the status of the service appointment will remain as In Progress. If you choose Complete Appointment in the above confirmation message, then the status of the service appointment will change to Completed.
Force Complete Work Order
You can force complete a work order even when its line items are only partially completed.
Reschedule Appointment
A service appointment can be rescheduled (i.e. the Scheduled Start/End time and the assigned field agent/crew can be changed). To reschedule an appointment:
- Click More options and select Reschedule.
- Make the required changes and click Reschedule.
- Click Reschedule in the confirmation message.
Remove Service Tasks
You can remove the service tasks from a service appointment or a work order in the following ways:
- Delink from appointment
- Delete from work order
- Delete service tasks
Delink from appointment
You can delink a service task from an appointment from the Edit Service Appointment page. When you delink a service task from an appointment, it will be removed from the appointment, and its status in the work order will be changed to New.
Delete from work order
From the Edit Service Appointment page, you can delete a service task from the work order.
Delete service tasks
You can remove service tasks from the Edit Work Order page. Click on the remove icon [ ] to delete the service task from the work order.
Generate Invoice
To create an invoice:
- Select Work Orders, in the left menu.
- In the Work Orders screen, select the work order whose service line items you want to create the invoice for.
- Select the Invoices tab and click the add [+] icon.
- In the Generate Invoice screen, select the service line items you want to create the invoice for and click Next.
If an invoice has been generated for a service line item, then that service line item cannot be selected. - Provide the necessary details and click Done.
- Select the Invoices tab. Click the invoice to open the invoice draft. Click
to send the invoice to the contact. In the Send Invoice screen, click
to send the invoice. If payment gateways are configured in Zoho Invoice/Books, then the customer can make payments online.
You can also record the payment. - In the top-right corner of the invoice, click the more options [
] icon and select Record Payment. In the Record Payment screen, click Save.
Any custom field added to the Payments Received form in Zoho Books/Invoice will also be listed under the Custom Fields section.
The status of the invoice will change to Paid.
The billing status of the service line item will be displayed along with the status of the service line item.
The status, and billing status of the work order will also be displayed in the Work Order List screen and Work Order Details screen.
Similarly, the status, and billing status of the appointment will also be displayed in the Appointments List screen and Appointment Details screen.
Click the more options [ ] icon in the top-right corner of the invoice for the following options:
- Open in Zoho Books/Invoice
- Download: You can download the invoice as a PDF
- Share: You can also share the invoice externally

The maximum number of invoices that can be created for a work order will depend on your FSM edition. For a work order, you can create as many invoices as the service line items allowed for a work order .
Create Service Report
Service reports can be created for the service appointments.
Follow-up Work Order and Estimate
You can create a follow-up work order or estimate for an work order.
To create a follow-up work order:
- Select the Related List tab of the work order you want to add the follow-up work order to. Click + for Follow Up Work Orders.
- In the New follow-up Work Order page, enter the necessary details and click Save.
The created follow up work order will be listed under the Related List tab.
To create a follow-up estimate:
- Select the Related List tab of the work order you want to add the follow-up estimate to. Click + for Follow Up Estimates.
- In the New Estimate page, enter the necessary details and click Save.
The created follow up estimate will be listed under the Related List tab.
Add Notes
Adding notes is essential to keep all parties informed of important information about the job, facilitate communication and collaboration, and share helpful tips and best practices.
To add a note:
- Select the Notes tab within the record you want to create the note.
- Click the add sign (+) at the bottom of the screen.
- Enter a Title for the note.
- Add the contents of the note.
- Click Add attachment and choose an option.
You can attach a maximum of 20 attachments with a combined size of 150 MB. Please note that the size of the attachments will depend on the Image Upload Resolution chosen.
- Click Save.
The added note will be displayed under the Notes tab.
Long press the attachment to find the option to Save (Download), Preview, or Delete. You can also tap the attachment for its preview.
The notes added from the mobile app will reflect in the Notes tab of the Service Appointment Details page. This means the notes added by the field agent can be viewed by other users (with permissions).
Adding Attachments
You can add the following types of attachments to the notes:
- Image
- Video
- Audio
For images and videos, you can choose the Image Upload Resolution based on which the size of the files will differ.
Images
The file types supported for images are .png, .jpg, and .jpeg. You can either capture an image using the Take photo option and add it as an attachment or choose existing images from your phone's Gallery or My Files.
Video
The file types supported for videos are .mp4, .mov, .3gpp, .3gp, .wmv, and .mkv. You can either record a video using the Take video option and add it as an attachment or choose one from your phone's Gallery or My Files. The video recorded using the Take video option will be in the .mp4 file format.
Audio
The audio files supported are .mp3, .ogg, and .wav. You can either record an audio using the Record audio option and add it as an attachment or choose a recording from your phone's Gallery or My Files. The video recorded using the Record audio option will be in the .wav file format.
Trips
The field agent can initiate trips that will capture the journey undertaken for travelling to a contact service location.
To record a trip:
- Select the Trips tab within the service appointment you want to create the trip for.
- Click the add sign (+) at the bottom of the screen and choose either of the following:
- Create a trip if you want to manually enter the trip details
- Start a trip
Detail of the current ongoing trip is shown in the Home screen too. Click on a completed trip to see the distance travelled.
The trip distances will be displayed either in Kilometers or Miles depending on the Distance Unit chosen in the organization profile.
The trip details can be seen in the service report of an appointment. Ensure that the Trips section is selected in the Page Layout of the service report template.
The consolidated details of the trips undertaken by the field agents can be viewed in the Trips Report.
Create a Trip
Enter the following and click Save:
- Select the Service Resource for whom you want to add the trip details.
All the service resources assigned to the appointment will be listed here. - A Start Time for the trip
- The Start Coordinates.
Click onif you want to select the current latitude and longitude.
Click onif you want to choose the latitude and longitude from the map.
- An End Time for the trip
The duration of the trip will be displayed at the bottom of this field. - The End Coordinates.
Click onif you want to select the current latitude and longitude.
Click onif you want to choose the latitude and longitude from the map.
- The Distance Travelled during this trip.
The unit used here will be the one that is set in the Organization Profile page. - A Description for the trip.
Start a Trip
- Click Start.
- Click
to stop the trip.
Time Sheets
Field Agents can record the hours they spent for an appointment in Time Sheets.
Apply Time Off
The field agents can apply for time off in days or in hours. To apply for time off:
- Select Time Off, in the left menu.
- In theTime Off List screen, click the add [+] icon.
- Enter the following details and click Save:
a. The Service Resource for whom you want to add the time off details.
b. Time Off Type
If you select DateTime, you can apply for time off in hours by providing the Start Date Time and End Date Time.
If you select Date, you can apply for time off in days by providing the Start Date and End Date.
c. Any Reason for the time off.
d. Any Comments, if needed.
The time off entries can be edited. From the Time Off list view page, tap on the entry you want to edit and click the Edit [ ] icon. On the Edit Time Off page, make the required changes and click Save.
You cannot create a new time off whose duration is in conflict with an existing one.
Add Contacts
Refer to this page for details.
Add Companies
Refer to this page for details.
Add Requests
Refer to this page for details.
Add Estimates
Refer to this page for details.
Add Services And Parts
Refer to this page for details.
Add Assets
Refer to this page for details.
Barcode And QR Code Scanning
While creating a work order, you can search the following lookup field values using their Barcode or QR codes:
- Search Assets. The data in the barcode or QR code should be present in the Name, Asset Number, or GIAI field of the asset.
- Search Services and Parts. The data in the barcode or QR code should be present in the SKU field of the service/part.
To search using the barcode or QR codes, do the following:
- In the Create Work Order screen, tap Scan QR/Barcode under the field.
You can also scan the barcode/QR code from the Search screen. - Enable the camera permission for the FSM app.
Click Yes.
Click Allow.
From your FSM app, at any time you can manage the Camera permission from Settings > Permission settings > Permissions > App permissions. - Point the camera at the barcode/QR code.
The data in the barcode/QR code will be captured. - Tap on the select [
] icon.
Records whose value matches with the barcode/QR code value will be listed. Tap on the search result to select it. Tap on None if you do not want to select any search result. In the Create Work Order screen, the selected record's value will be populated in the lookup field.
If there is no matching result, then No results found will be displayed.
Disable Pricing
Use the Show Pricing profile permission to determine whether the user will be able to see the prices of Services and Parts. If you disable the Show Pricing profile permission, in the Work Order and Service Appointment screens, the prices of Services and Parts will not be displayed.
Profile Details
Details about the logged in user can be viewed by clicking the profile icon in the left menu. The user and address information will be displayed under the Personal tab. Under the Work tab, you will find details of the territories and skills assigned to the user, and the crews the user is part of.
The profile details can be changed by clicking on the Edit [ ] icon. In the Edit profile page, make the necessary changes and click Save.
You can assign territories to a user by clicking on the Add [+] button. In the New Territory page, enter the necessary details and click Save.
You can assign skills to a user by clicking on the Add [+] button. In the New Skill page, enter the necessary details and click Save.
View Notifications
To view the notifications in the mobile app:
- Click the notifications [
] icon at the top right corner.
- Click a notification to view the details.
Advanced Lookup Search
In every lookup field, you can perform a search for the lookup value using multiple fields associated to the lookup entity. For example, you can perform a search in the Contact lookup field using the Full Name, Email, and Phone of the contact.
To perform the search:
- Tap the lookup field for which you want to perform the search.
- From the Search by field dropdown, select the field with which you want to perform the search.
- Enter the search value.
The matching results will be displayed below. Tap on the desired search result to select it.
If there are no matching records, then No results found will be displayed.
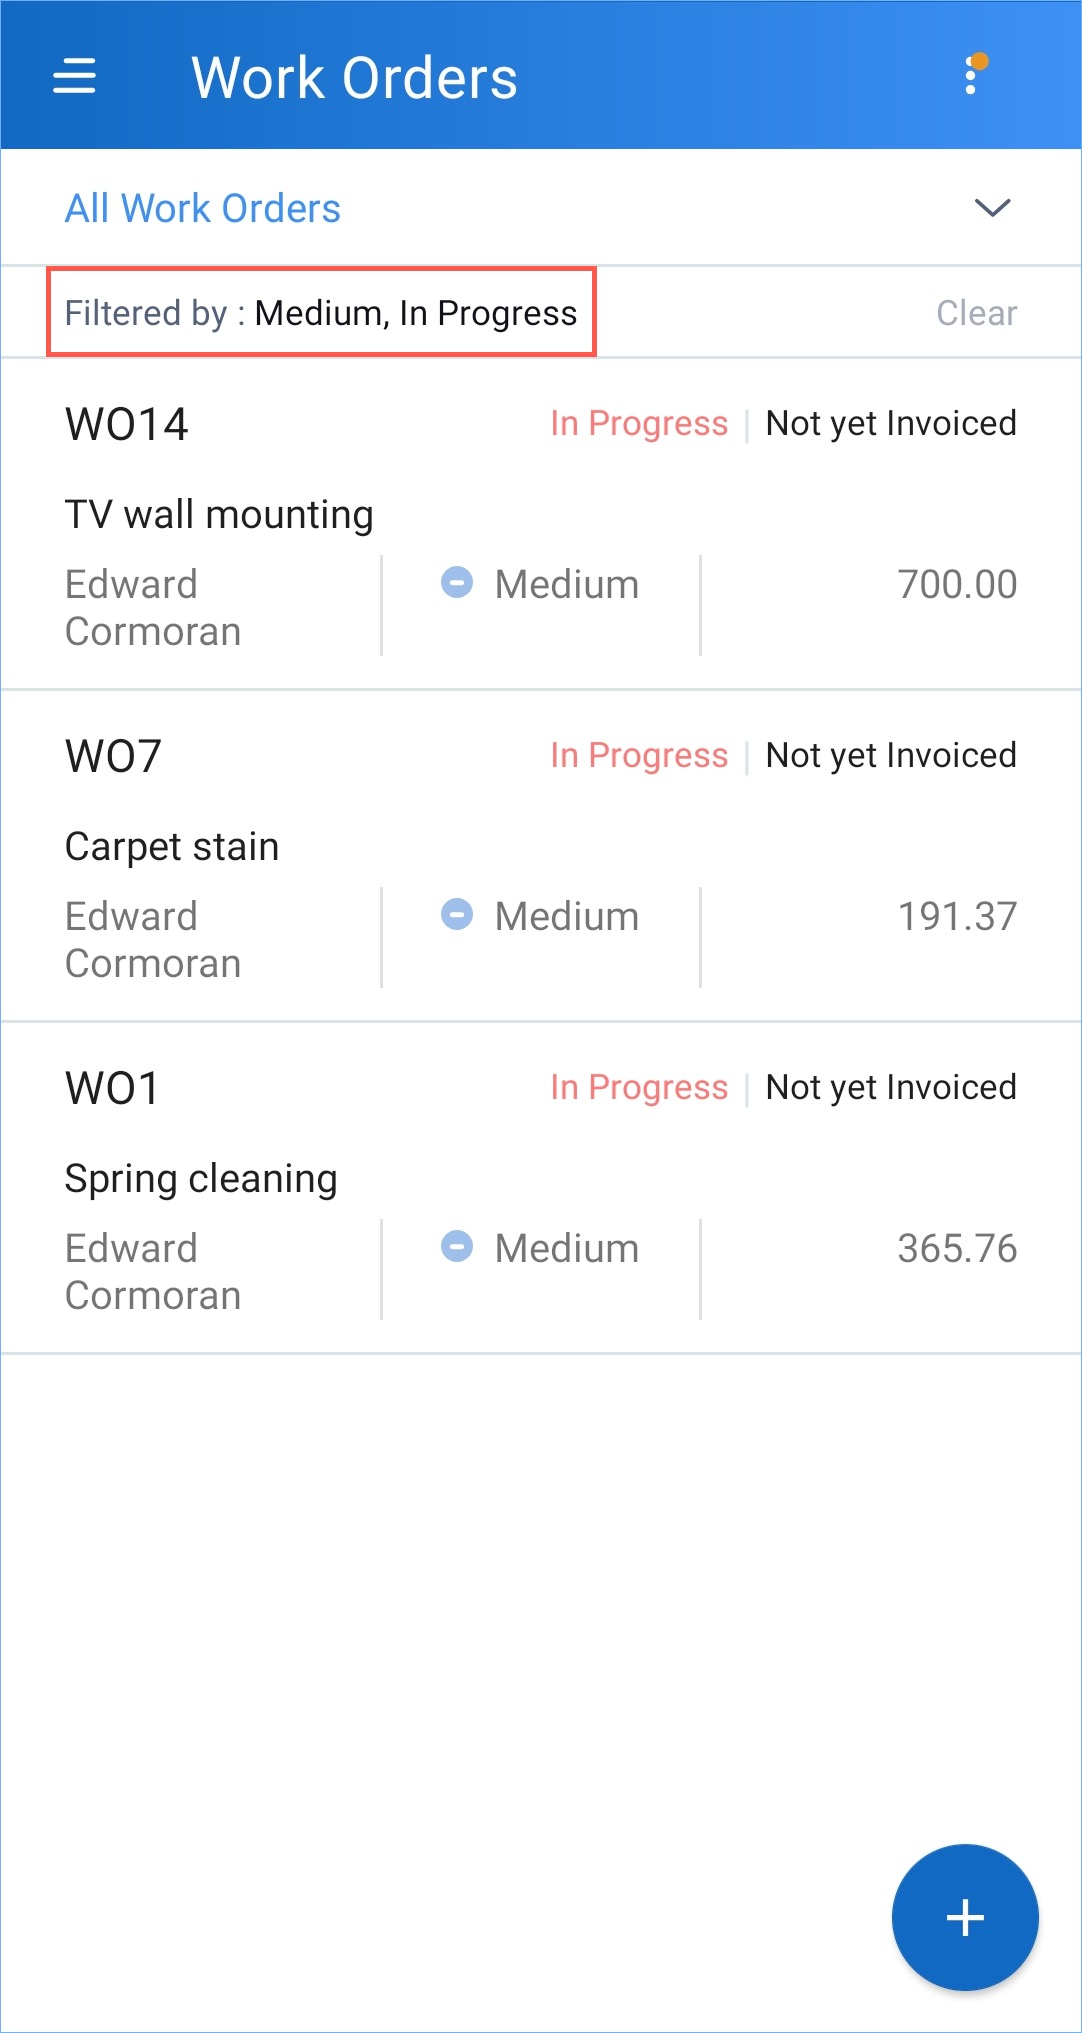
Filters
You can use simple or advanced filters in the list view pages of Work Orders and Service Appointments.
Simple Filters
- Select All Service Appointments/Work Orders, in the left menu.
- In the List screen, choose Filter from the more options [
] icon.
- Enter the filter criteria and click Apply Filter.
The filtered records will be displayed. The filter criteria will be mentioned at the top of the results.
Advanced Filters
- Select All Service Appointments/Work Orders, in the left menu.
- In the List screen, choose Filter from the more options [
] icon.
- Click Advanced Filter.
- Select the necessary filter criteria and click Apply Filter.
The filtered records will be displayed. The filter criteria will be mentioned at the top of the results.
Points to remember
- Even if you apply the filter from the calendar view of the Service Appointments screen, the filter will be applied to all the service appointments, and not just those listed under the calendar view.
- From the filter results screen, if you move to the calendar view, then the selected filters will be cleared.
- For some of the filter criteria, you can choose more than one value. Choose the required values and click Save.
- To remove the filters, click Clear.
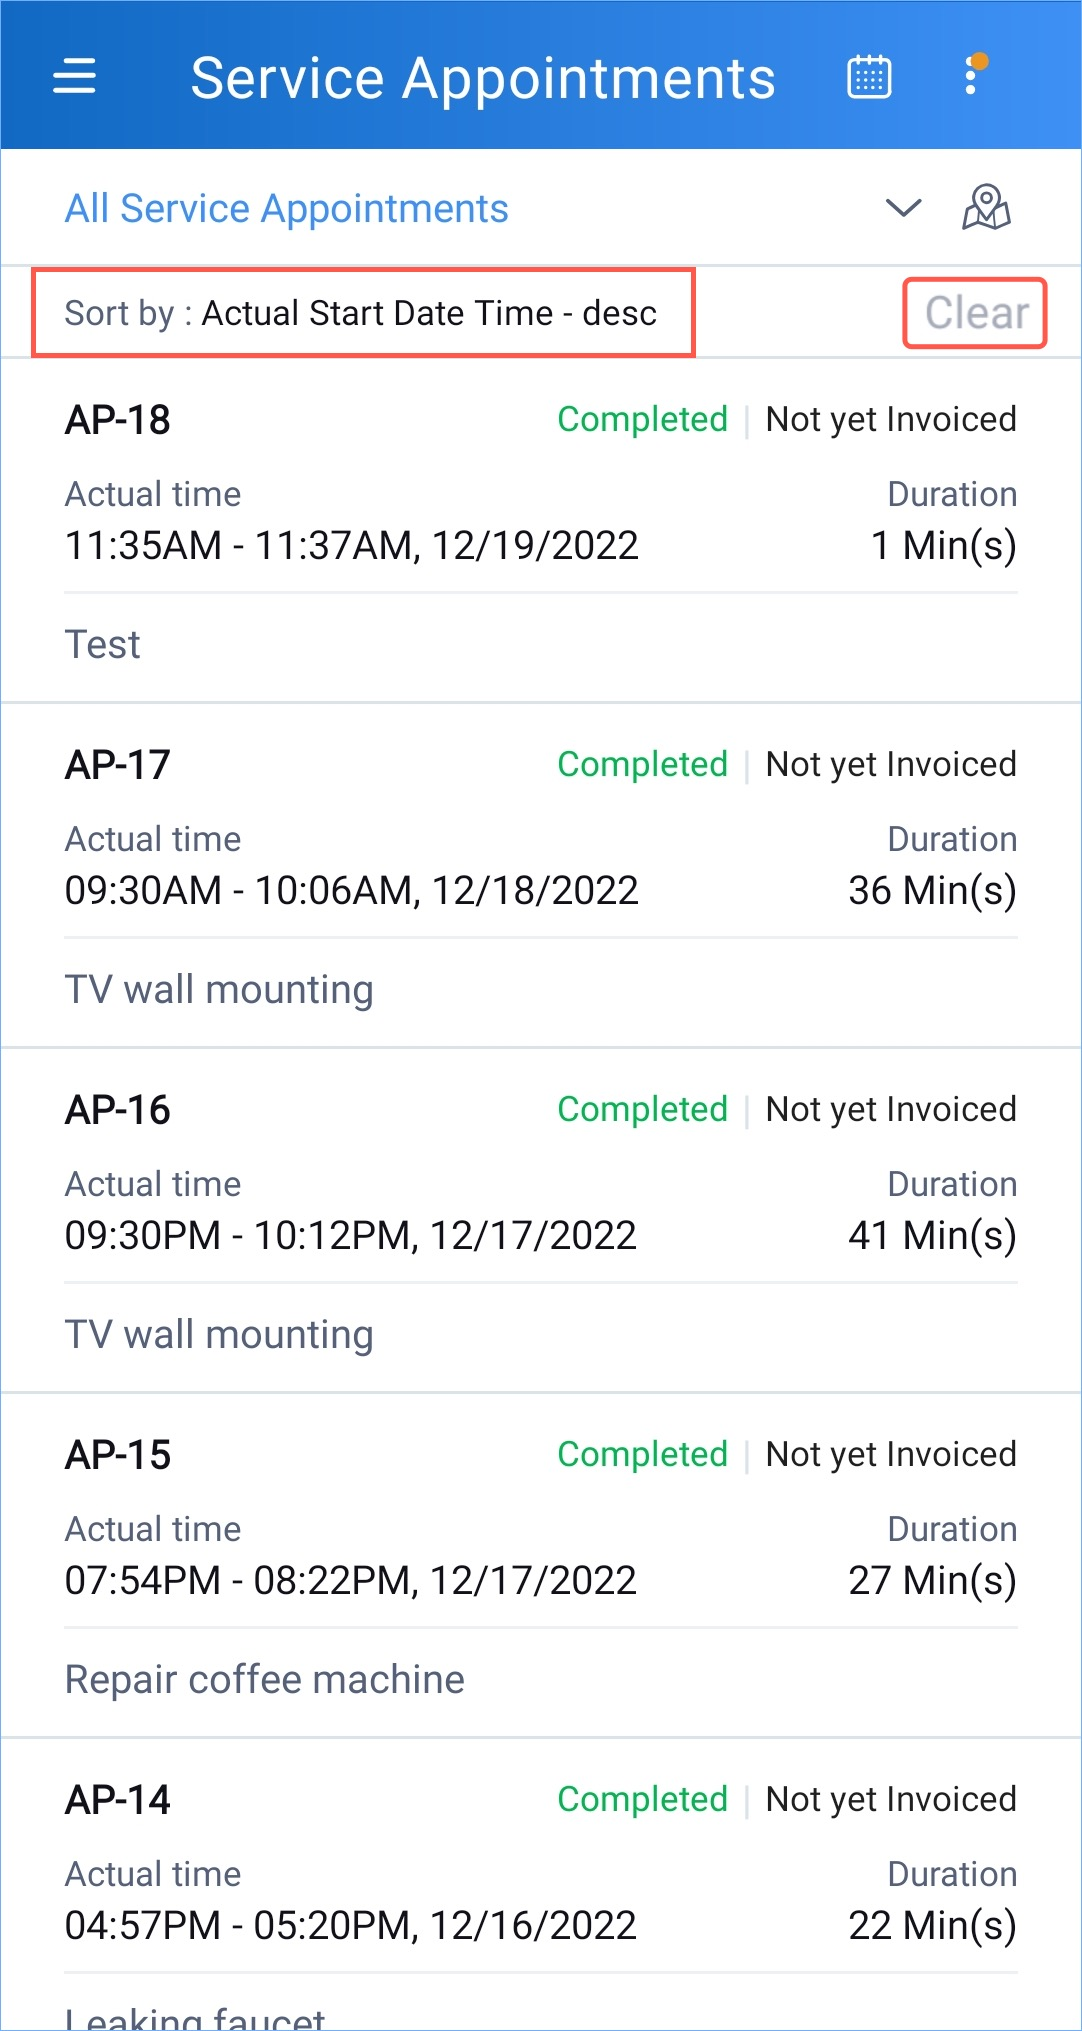
Sorting in List Views
You can sort the Work Orders and Service Appointments in their list view pages.
- Select All Service Appointments/Work Orders, in the left menu.
- In the List screen, choose Sort by from the more options [
] icon.
- From the Choose the Service Appointment field dropdown, select the field with which to sort the list view.
- Select the order (ascending or descending) in which you want the sorting to be done and click Apply.
The records will be sorted. The sort criteria will be mentioned at the top. Click Clear to remove the sorting.
Location Spoofing Detection
Location spoofing in mobile apps involves tricking the app into believing that the user’s device is located somewhere other than its true location. This can be achieved by using various software tools or GPS location spoofing apps that allow users to modify their device’s GPS location data. Location spoofing can have negative consequences, such as enabling fraudulent activity, hacking, and cheating. Therefore, it is essential to restrict location spoofing.
If the Zoho FSM mobile app user tries to manipulate location data on the device, the system will flag the user. The following actions will be taken:
- The user will be checked-out of the app
- Any ongoing trip if present will be ended
- The Super Admin of the account will also be notified of such activity.
Troubleshooting
Incorrect Device Time
If you encounter the Incorrect Device Time error, try the following methods:
- Switching your network: Switch to a different network and try logging in.
- Restarting the device: You can restart your device and try logging in to FSM Mobile.
Login Issues
If you encounter issues while logging in such as being unable to enter your credentials or being unable to proceed past the login screen, try the below methods:
- Validate OneAuth
- Clearing cookies
Validate OneAuth
In case you have configured OneAuth in the same device as the one in which you are using FSM Mobile, kindly check the push notification sent to your mobile device during sign in. You will need to accept it to verify yourself.
Clearing cookies
Clear the "accounts.zoho.com" cookies from the FSM Mobile app. This will clear the saved usernames and passwords (only Zoho credentials will be cleared, other site data will be retained). To clear the cookies:
- Click the More icon of three vertical dots.
- Click the Info icon.
- Click Cookies.
- Click the Clear Cookie icon.
Negative Time Duration
In places where time duration is displayed in the mobile app, you might see a negative value for the time duration in some scenarios. Click on the Info icon [ ] to know more details.
The likely places where you might encounter this scenario are:
- Time Sheet
- Trip
- Check-In
The duration is the difference between the current time and the start time.
Duration = Current Date/Time - Start Date/Time
So if the value of the Start Date/Time is greater than the Current Date/Time, then the duration will have a negative value.
Time Sheet
Consider the case where the current time is 12:22pm and you provide the Start Date/Time as 1:13 pm. Here the Start Date/Time is greater than the Current Date/Time, so the duration will be shown as -51:-35 (refer the screenshots below).
Trip
If you start a trip and the device time changes to a past time, then the duration of the trip will have a negative value.
Check-In
If you check-in and the device time changes to a past time, then the checked-in duration will have a negative value.
Settings
The Settings in Zoho FSM mobile app contains options for managing permissions, privacy settings, notifications, storage, etc thus giving users control over their app experience and ensuring that they can tailor the app to meet their preferences and needs.
You can find the Settings menu in the left menu of the app.
The following sections detail the options available in Settings.
Timezone
If the time zone of your mobile differs from the user's (used in Accounts) time zone, then you will have the option to choose the time zone from Settings.
Image Upload Resolution
You can set the resolution for the images and videos added as attachments in the notes. The size of the attachment will change based on the resolution setting. By default, Original will be selected. Based on the resolution chosen, the size of the original file will reduce as follows:
- High: 75%
- Medium: 50%
- Low: 25%
To set the resolution:
- In Settings, tap on Image Upload Resolution.
- Choose a resolution.