Zoho People - Japan Compliance Guide
Introduction
In this guide, we will explore how Zoho People, a comprehensive Human Resource Management System (HRMS), supports organizations' in meeting Japan’s labor compliance requirements. From automating routine HR tasks to enabling precise tracking of work hour regulations (Article 36), late-night work hours, working calendars, holiday classification, and more. Zoho People is designed to help businesses align with legal obligations while improving internal HR operations.
Key Japan Labor Laws
Features to Configure
Working Hour Regulations (Article 36)
Under Article 36 of the Japan Labor Law (often referred to as Article 36 Agreement or 36-kyotei) it allows employees to work beyond the statutory 8 hours per day and 40 hours per week. This agreement is essential for companies regularly assigning overtime work and must be renewed annually.
Overtime Limits:
Even with an Article 36 Agreement, there are legal limits to overtime work. Generally, overtime should not exceed 45 hours per month and 360 hours per year.
Overtime Pay:
Employees must be provided with extra pay for overtime work—usually 1.25 times the regular hourly wage. If an employee’s overtime crosses 60 hours in a month, the pay rate must increase to 1.5 times the regular wage.
Feature Explanation
To add overtime policy:
- Navigate to Settings > Attendance > Configuration > Overtime Policy.
- Click Add Overtime Policy.
- For Japan's overtime policy, you can use the prefill option and customize it as needed.
- Enter the Policy Name.
- Select policy applicability based on location, department, or employment type.
 When an employee qualifies for multiple overtime (OT) policies, the applicable policy is determined based on the following priority order:(I) Employment Type-Based Policy (Highest Priority): If an OT policy is assigned based on the employee’s employment type, such as full-time, part-time, or contractual, it takes precedence over all other applicable policies.(II) Department-Based Policy (Second Priority): If no employment type-based policy is assigned, the system checks for an OT policy linked to the employee’s department, such as Sales, Engineering, or HR.(III) Location-Based Policy (Third Priority): If neither employment type-based nor department-based policies are assigned, the system applies the OT policy associated with the employee’s work location, such as Chennai or Bangalore.
 - Set specific overtime rules for daily, weekly, monthly, and weekend work based on your organization’s needs. Learn more about how each rule works
- Enable the overtime policy report to view consolidated overtime data of applicable employees. This action will show or hide the Overtime Policy Report under Reports > Organization Reports > Attendance > Overtime Policy Report.
Learn more about the overtime policy and Article 36 reports
Notification - Turn on the following notifications to alert employees and their reporting managers when the overtime limit is reached.
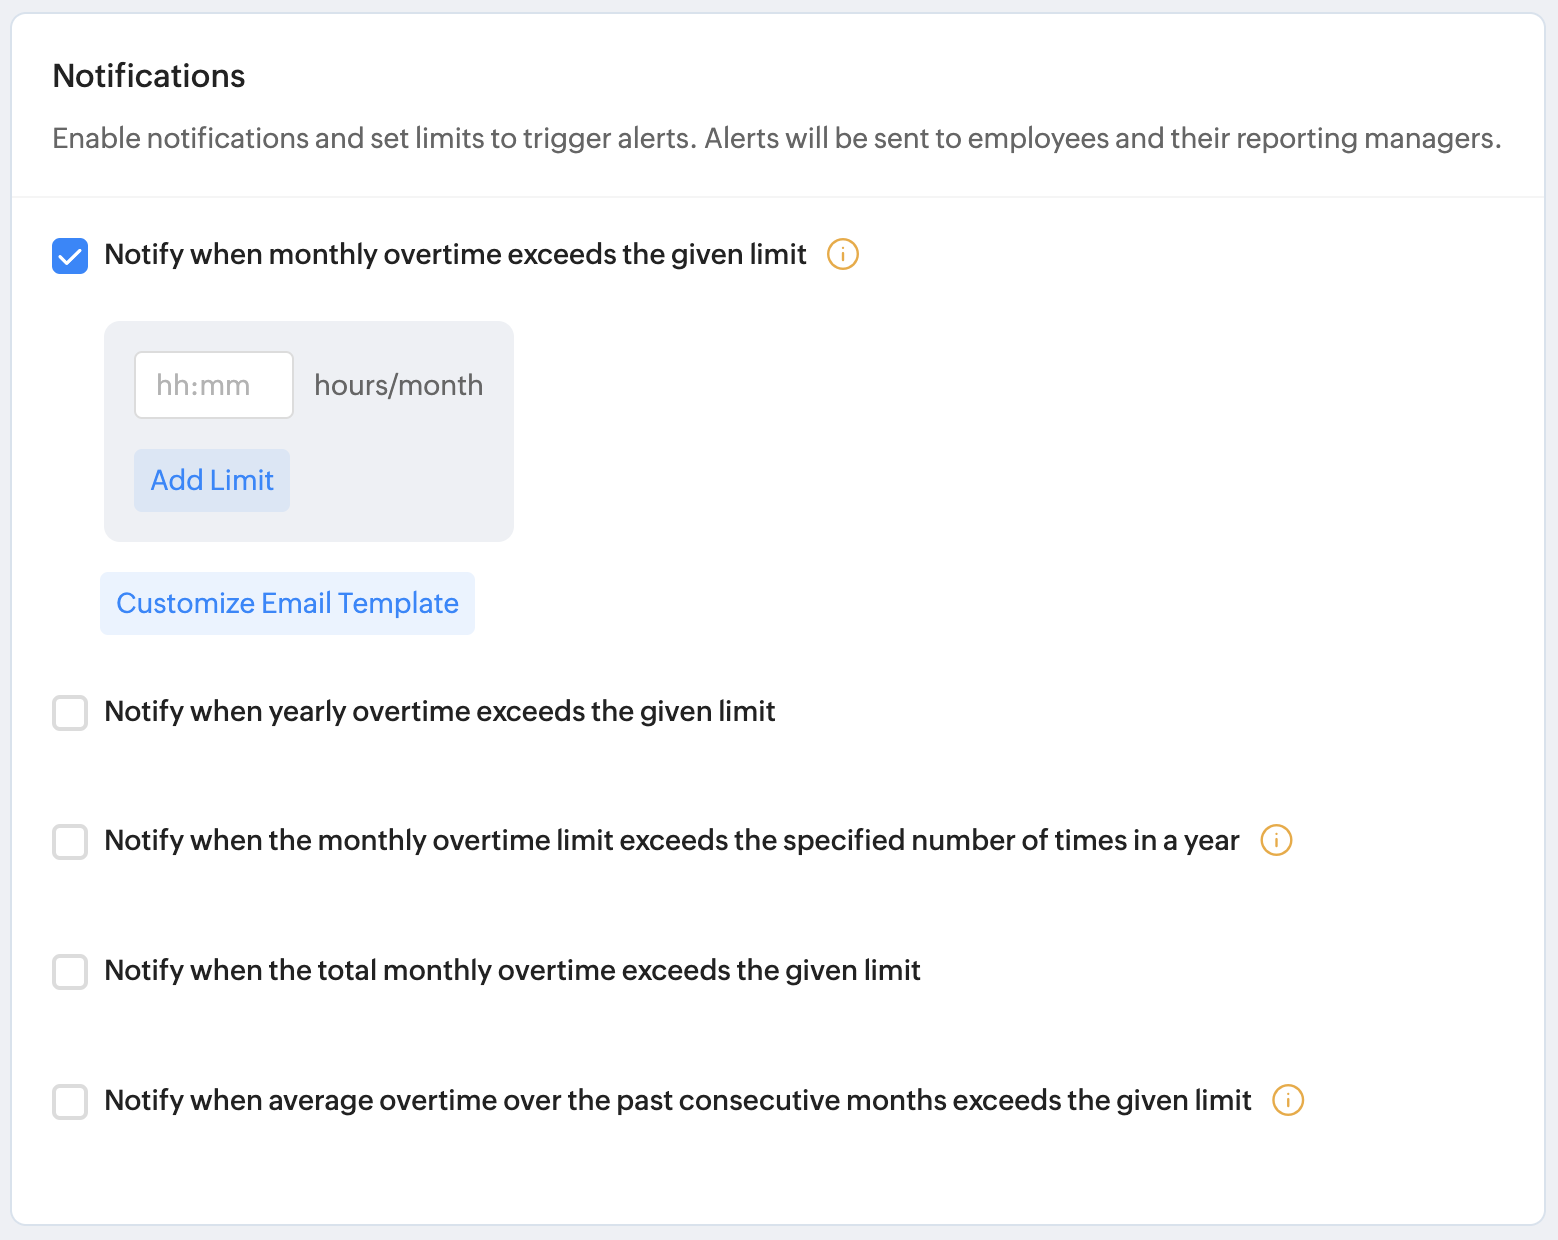
There are five different alerts that can be triggered and sent to employees and their reporting managers:
- Notify when monthly overtime exceeds the given limit.For this alert, weekend extended overtime hours are excluded for limit calculation.
- Notify when yearly overtime exceeds the given limit.
- Notify when the monthly overtime limit exceeds the specified number of times in a year.
- Notify when the total monthly overtime exceeds the given limit.For this alert, all overtime hours for the month are included for limit calculation, which also includes weekend extended overtime hours.
- Notify when average overtime over the past consecutive months exceeds the given limit.The validation to trigger this notification is based on rolling averages calculated within the calendar year. For example, for a two-month notification, the system will validate the limit each month by checking if the average for the consecutive two months is within the allowed limits.
- Click Save to add the overtime policy. The policy will be immediately effective for the applicable employees, and their overtime hours will be recorded as per the configuration.
Late-Night Work Hours
Late-night work is defined as any work performed between 10 PM and 5 AM. Employers must pay the employees atleast 25% more than the regular hourly wage for these hours. If this late-night work is also considered overtime, an additional 25% premium applies, resulting in a total of 50% or more than the regular pay.
Feature Explanation
The late-night work hours feature in Zoho People lets you define location-based late-night time ranges (e.g., 10 PM - 5 AM). This helps track the employee’s work hours during late nights separately so that additional pay can be calculated based on those hours.
- To configure this, navigate to Settings (gear icon) > Attendance > Configuration > Attendance Policy.
- Enable late-night work hours option.
- Select the Location.
- Set the From and To for late-night time range.
- Any work done during this time is automatically tracked and shown in reports like Presence hours break-up and Attendance data for payroll. (To view reports, navigate to Reports > Organization Reports > Attendance)
Rest Periods (Article 34)
Under Article 34 of Japan’s Labor Standards Law, employees must be given proper break time during their workday. If someone works more than 6 hours, they should get at least a 45-minute break. If they work more than 8 hours, the break must be at least 1 hour. Rest periods must be uninterrupted and separate from work.
Feature Explanation
With the break management feature in the attendance service, administrators can set the rest period for employees.
To configure breaks for a shift,
- Navigate to Settings (gear icon) > Attendance > Configuration > Break. Click Add Break.
- Enter a name for the break, and select the color and icon for it.
- Select the type as Paid or Unpaid to categorize the breaks logged by employees during their work shift hours.
- Select the mode as Automatic or Manual.
- Allocate break time as Fixed time or Based on hours worked.
- Set break duration and select the applicable shifts for the break.
- Click Save.
Learn more about configuring breaks for rest periods.
Annual Paid Leave (Article 39)
Under Article 39 of Japan’s Labor Law, employees who have worked for six months and attended at least 80% of their scheduled workdays are entitled to paid leave. The number of leave days increases with years of service. Employers are required to grant this leave, but they can adjust the timing to ensure it doesn’t affect business operations.
Feature Explanation
Using the leave type gallery feature in leave service, administrators can define the annual leave policy with accrual options to specify how many days are granted and when they are credited. The rest option lets you set rules for leave reset, carry forward, and encashment.
With the leave type gallery in settings, administrators can select a predefined leave policy template specific to the Japan region.
To configure this, go to Settings (gear icon) >. Leave > Configuration > Leave Policy > Leave Type Gallery.
Labor Union Representative
A labor union representative in a Japan-region IT company is an employee selected or appointed to represent workers’ interests in negotiations with management over working conditions, wages, and labor rights.
In Zoho People, you can add Labor Union Representatives who may either be internal or external. Internal representatives are employees within the organization, while external representatives are from outside the organization. Each representative serves for a defined tenure, and at any given time, the position can be held by an internal representative, an external representative, or both simultaneously.
Feature Explanation

Only Administrators have access to view/add/edit Labor Union Representative-related records.
Follow the steps bellow to add a new Labor Union Representaitve record:
- Navigate to Operations and select the Attendance service.
- Select the Labor Union Representative tab.
- Click on the Add Representative buton.
- Use the drop-down menu to select the representative type.
– If you choose Internal, select an employee from within your organization.
– If you choose External, enter the representative’s details such as name, email, and address.
– If you choose Internal & External, select an internal employee and also provide the external representative’s details.
Proceed by defining the representative tenure by using the date-range selection options. - Click on Add Record. The Labor Union Representative record will now be successfully added.
Click here to learn more about managing and viewing labor union representative records.

For the same tenure, you will not be able to add multiple records.
Extra Agreement Handling
Extra Agreement Handling feature allows administrators to record special clauses. These clauses define periods during which designated employees are legally permitted to work extended overtime.
For each employee a maximum of 6 special clauses (extended overtime) records can be added within a year, i.e, the system will not allow adding more than six instances within a year.
Feature Explanation
Only Administrators have access to view/add/edit special clause records.
Administrators can add special clauses, which are records that legally permit extended overtime for a designated employee. Follow the steps below to add a record:
- Navigate to Operations and select the Attendance service.
- Select the Extra Agreement Handling tab.
- Click on the Add Special Clause button.
- Use the drop-down to select a specific employee. Use the date range selection option to define the period of extended overtime.
- Click Submit. The record will now be added.
Click here to learn more about viewing special clause records.
Minimum Wage Act
The Minimum Wage Act ensures that workers are paid at least a fixed minimum wage set by law. It aims to protect low-paid workers and improve their living conditions. Employers must follow this rule, and any agreement to pay less than the minimum wage is legally unacceptable.
Wage rates are based on data published by the Ministry of Health, Labour and Welfare (MHLW). You can refer to this link for year-wise wage rates.
Feature Explanation
Revise Employee Salary (Salary Revisions)
To add a salary revision, navigate to Operations > Compensation > Employee Salary > Select an employee in the salary list.
- Go to the Salary Revision tab, click on Revise Salary button.
- Select the applicable salary package at the top-right corner.
- Enter the revised salary.
- Enter the difference in the revision either as an amount or as a percentage.
- Enter the date this revised salary is effective from.
- Enter the reason for revising the salary.
- Add other remarks if required.
- Click Save.
- When a salary revision is submitted, the system automatically validates the revised salary against the government-mandated minimum wage rates.
- If the revised salary falls below the applicable minimum wage on the effective date, the system will prevent submission of the revision request.
- The government-provided value represents the hourly pay rate and will be automatically multiplied to derive daily, monthly, or annual figures as needed.
Public Holidays
Japan has 16 public holidays recognized under its Public Holiday Law.
To manage and import the holidays:
- Navigate to Operations > Leave > Holidays, click the Add Holidays drop-down and select the Holidays Gallery option.
- Select Japan using the region drop-down to view and list the corresponding regional holidays.
- Use the checkboxes (left corner) to select the holidays that you want to add.
Learn more about adding holidays manually.
These holidays can also be added/imported to Zoho People, and can be assigned to users based on their location or shift.
Working Calendar
The work calendar in Zoho People refers to establishing the workdays, weekends, annual year, and statutory weekends specific to your organization rules. You can also create a different working calendar for the employees who are in different location or shift.
To setup work calendar for Japan region:
- Navigate to Settings (gear icon) > Leave > Configuration > Work Calendar.
- You can click on any work calendar to make changes or define your own work calendar by clicking on Add Work Calendar.
- Learn more about adding a new work calendar.
Variable Working Hours
Manage Shifts
Administrators can configure employee shifts within the organization using a flexible shift scheduling system. Learn more about adding and editing shifts.
To manage shifts, navigate to Operations > Shifts > Manage Shifts. This space allows you to create, delete, edit shifts, import and export, and all of its associated preferences.
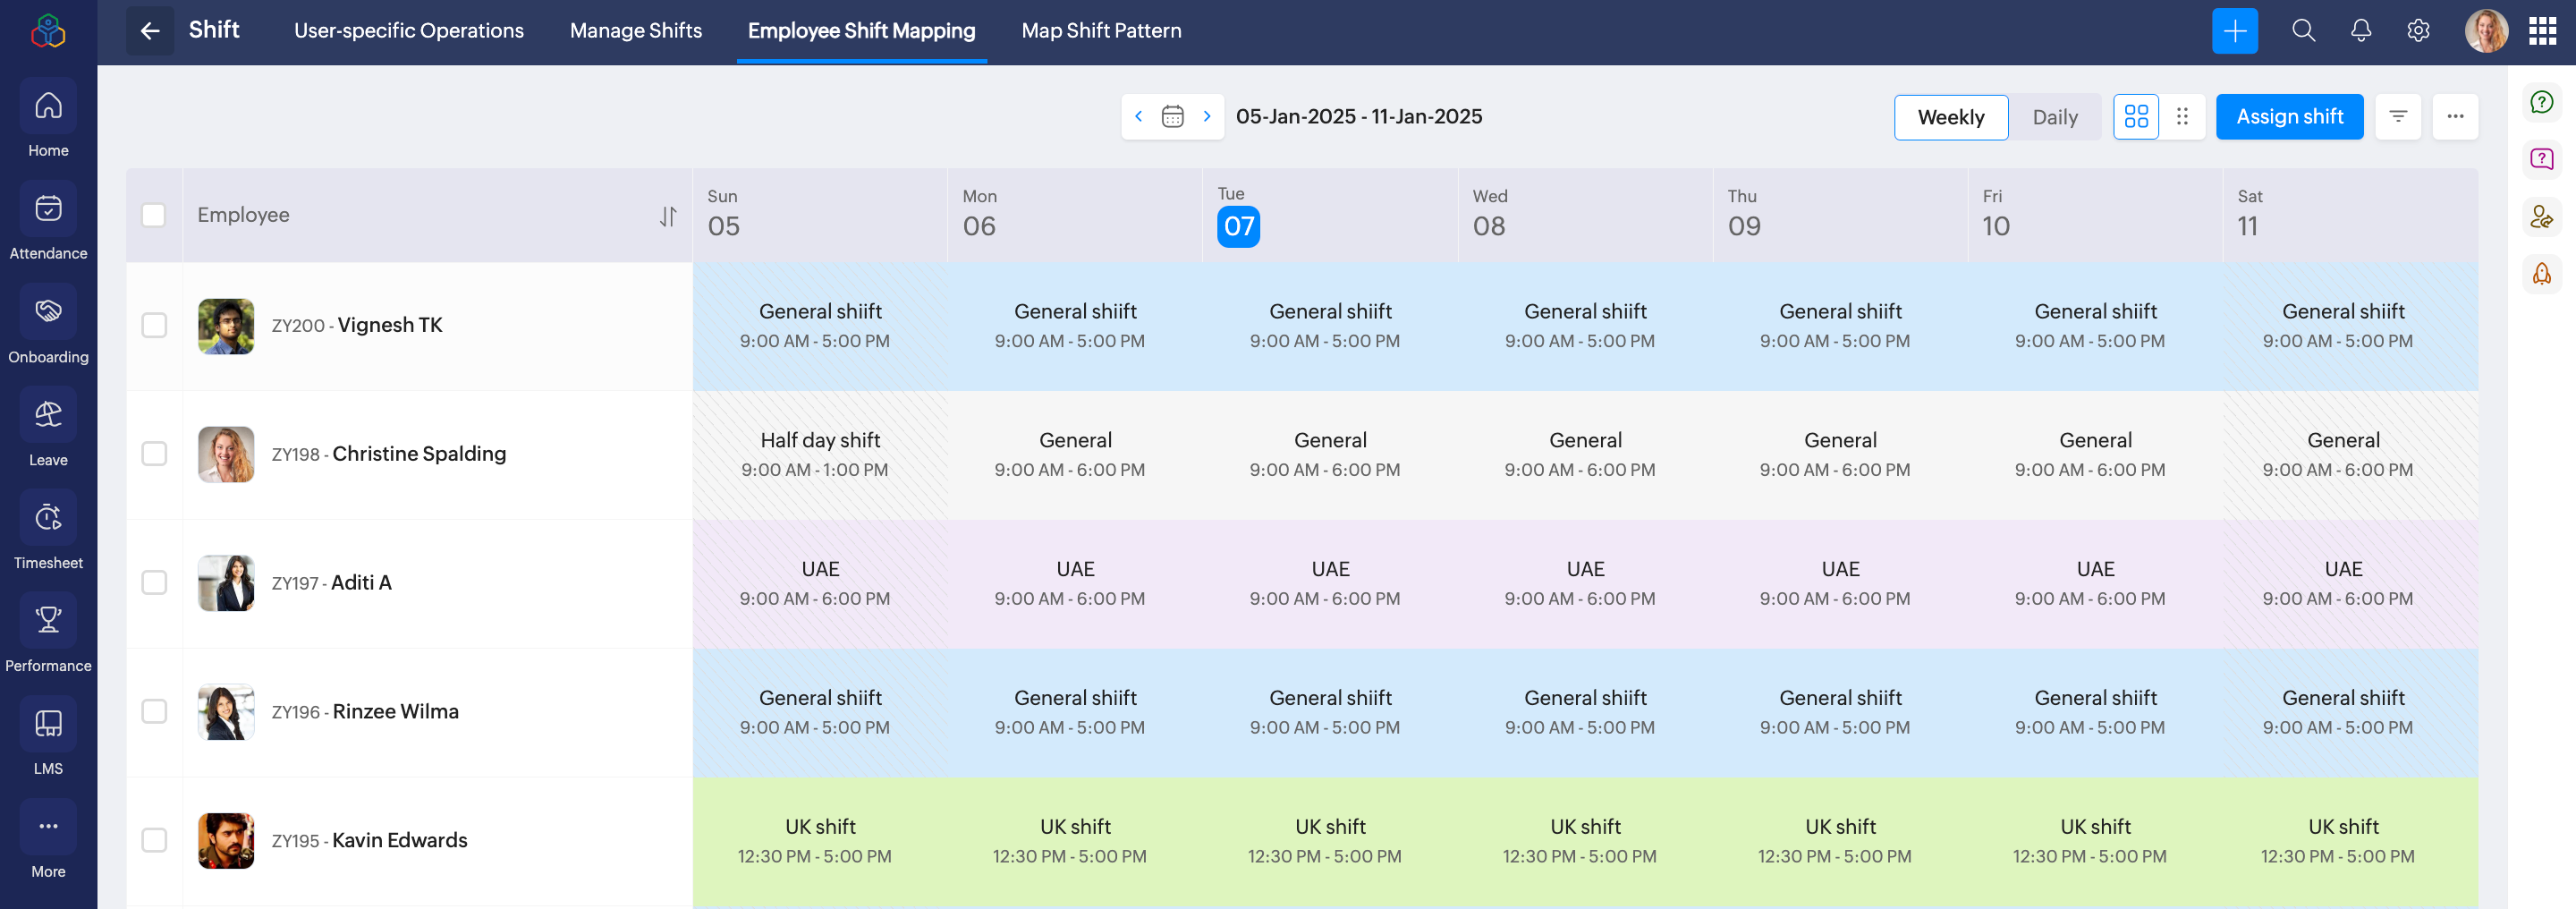
Employee Shift Mapping
Employee shift mapping is assigning employees to specific working shifts. This process helps manage and complete work on time by ensuring the right resources are allocated to the appropriate shifts. Learn more about employee shift mapping.
To perform employee shift mapping, navigate to Operations > Shifts > Employee Shift Mapping tab.
Shift Pattern
This feature allows you to create shift patterns with a custom shift schedule for a week, month, or custom days based on your organization's operational requirements. Learn more about creating shift patterns for weekly or monthly types.
To perform this action, navigate to Settings (gear icon) > Shifts > Configuration > Shift Patterns > Add Shift Pattern.
Weekly Shift Pattern - The shift pattern changes weekly based on the selected pattern change week and the set shift pattern.
Monthly Shift Pattern - The pattern changes monthly based on the selected pattern change month and the set shift pattern.
Lenient Attendance System
Administrators can enable lenient mode in the attendance service, allowing the system to calculate total working hours based on valid check-in and check-out. With this setup, employees only need to check in at a specified time to be marked present for the entire day. You can manually set the expected working hours for employees or set them with their assigned shift timings. Learn more.
To cofigure this, navigate to Settings (gear icon) > Attendance > Configuration > Attendance Policy.
Core Working Hours for Flexi Shift
Core working hours are the fixed time period within a shift during which employees are required to be actively working, even if their shift allows for flexible start or end times.
For Example: If a shift runs from 9:00 AM to 5:00 PM and the core hours are 10:00 AM to 3:00 PM, employees can begin earlier or later, however must be present during the 10:00 AM to 3:00 PM window for team collaboration and to support operational efficiency.
Learn more about core working hours.
To configure this, Settings (gear icon) > Shifts > General > Manage Shifts > Add Shift.
In Attendance, administrators can enable the grace period policy to set allowed deviations for core working hours. Once the limit is exceeded, a specific type of leave can be deducted as a consequence.
Learn more about the grace periods policy.
Navigate to Settings (gear icon) > Attendance > Configuration > Specific Policies > Add Specific Policy .
Restrict breaks during core working hours
When Restrict breaks during core working hours option is enabled, you can prevent employees from availing manual or automatic breaks during the specified core working hours.
Example scenario 1: Restrict breaks during core working hours - Configuring and availing breaks restricted within core working hours
If core working hours is set for General Shift as 10:30 AM to 2:00 PM, and if Restrict break during core working hours is enabled:
- Administrators cannot configure the new break within the core working hours.
- Employees cannot avail manual breaks, and automatic breaks will not be logged during core working hours.
Example scenario 2: Restrict breaks during working hours – Employee started break before core hours and ended after core hours (notification)
If an employee starts a break before core working hours and it ends during or after the core hours, a system-generated email will be sent to the employee, their reporting manager (RM), and the admin, notifying them that the employee availed break during core working hours. This is a system default action.
Example:
- Shift: General (9:00 AM – 6:00 PM)
- Shift Core Hours: 4:00 PM – 4:30 PM
- Restrict Break During Core Working Hours: Enabled
- Break Hours Configured for Employee: 1 hour
Scenario:
- Employee starts break at 3:45 PM
- Employee resumes work at 4:45 PM
Outcome:
Since the break overlaps with the core hours, a notification is automatically sent to the employee, reporting manager, and administrators, informing them that the employee availed a break during core working hours.
Holiday Classification
Set up holiday classifications to categorize holidays in your organization. These classifications help you organize holidays by type, such as national holidays, optional holidays, and special observances. Once set up, you can tag each holiday in your organization’s calendar with the appropriate classification, making it easier to manage schedules and track different kinds of holidays throughout the year.
- To configure this, navigate to Settings (gear icon) > Leave > Configuration > Additional Options.Employees can view the holiday along with its classification type, and the classification is also included in related Leave service reports.
- In addition to the system classifications, you can click Add Classification to add new holiday classification.
- To view the new classification, navigate to Leave (left side bar) > Holidays. Click on the filter option (right corner) and select the holiday classification you added.

Example holiday classifications include: Public Holiday, Bank Holiday, Regional Holiday, Weekend Holiday, and more.
Late Arrival & Early Exit Reminders
By enabling the required notifications to alert the reporting manager if their reportees check in late, check out early, or fail to check in based on their shift schedule.
To configure this,
- Navigate to Settings (gear icon) > Attendance > Configuration > Check In and Check Out.
- For every late check-in: The reporting manager will receive an instant notification.
- For early check-outs: A notification will be sent to the reporting manager at the end of the shift, listing all employees who checked out early.
- For missed check-ins: A notification will be sent at the configured time, listing all employees who have not checked in.
- To customize Email Template to your organizational preference, click Customize Email Template.
Break Regularization
The break policy in Zoho People enables employees to submit requests to add missed break entries or update their record in case of any inaccuracies. Such discrepancies may arise when the recorded break details do not match the actual break taken. Through the break regularization process, employees can provide the correct information along with a reason for the update, ensuring their break records remain accurate.
To configure break policy, navigate to Settings > Attendance > Configuration > Break Policy.

Here you can configure settings for break regularization:
- Allow employees to regularize their manually logged break entries: Employees can raise regularization requests for their manually logged break entries- Add missed break entries: Allow employees to add a break entry incase they forgot to log.
- Edit break entries: Allows employees to modify their existing manually logged break entries. - Defining Reasons that employees can select when raising regularization requests can also be managed here.
- The Restriction section includes options for how early the requests must be raised and how often they can be raised.
- Notify about missed breaks: When an allocated break is partially or fully missed, the system triggers a notification at the end of the employee’s shift. You can specify who needs to receive this email.- Employee: Sends the notification directly to the employee who missed the break.- Employees’ reporting manager: Notifies the reporting manager of the employee.- Specific employees: Only the selected employees will be sent a notification.
- Customize Email Template - This allows you to customize the missed break notification email for employees, reporting manager, and specific users.
Raise a Break Regularization Request:
- Navigate to Attendance (left-side tab) > My Data > Regularization.
- Click Add Request.
- Select Break under regularize and the respective Date you want to regularize break for.
- Click Add missed break entries.The same steps to be followed if Edit break entries is selected in Break regularization options.
- Select the Break type. Enter the new Start time and End time of the break.
- Enter the Reason.
- Click Submit.
To manage break regularization request for a reportee or team member, navigate to the Team tab. Only users with the appropriate permissions can submit and approve break regularization requests.
Approve Break Regularization Request:
- Navigate to Attendance (left side tab) > Team > Regularization > Break (use the filter option).
- Click on the request.
- Click Approve.
Manage Break Regularization Requests:
Administrators can manage the break regularization request for the entire organization in Operations > Attendance > Regularization > Break (use the filter option).
Break Audit History
To configure attendance breaks for your employees, refer to Breaks - Attendance.
The Audit History in attendance break configuration helps you track all changes made to attendance breaks. It records actions such as adding, updating, enabling, disabling, and deleting breaks, along with the name of the user who performed the action.
- Navigate to Settings > Attendance > Configuration > Break.
- Click on the eye icon at the top right of the page to view break Audit History.
Missed Break Exception
The Missed Break Exception setting allows employees to submit exception requests when they are unable to take their allocated break during a working day. Based on your configuration, missed breaks can be handled in one of the following ways:
- Take missed break later the same day
- Treat missed break as overtime
- Record only for compliance with no compensation
To enable and configure missed break exception request:
- Navigate to Settings > Attendance > Configuration > Break Policy, and scroll down to the Missed break exception settings section.
- Enable Allow employees to raise missed break exception requests to allow employees to submit a missed break exception request if they miss their allocated break time. Reporting managers can also submit requests on behalf of employees.To add an approval workflow for these requests, configure Approvals. For more information, refer to Approvals - Overview & Use Cases.
- Select Break Exception Options, choose how missed break requests should be processed. Employees can select one of the enabled options when submitting a request.
- Take missed break later the same day: Allows employees to take the missed break later on the same working day.
- Treat missed break as overtime: Converts the missed break duration into overtime. The Missed break are captured as Missed Break Overtime in the Article 36 agreement report.
- Record only for compliance with no compensation: Records the missed break for compliance purposes without providing compensatory time or overtime pay.
- Click Save.- The Take missed break later the same day option will be available for breaks that have a defined time range (start and end time). When selected, missed breaks can only be taken later on the same working day and within the shift hours.
- If a missed break is selected to be treated as overtime, it will be recorded in the Article 36 agreement report.
Raise a Break Exception request
To raise a missed break exception request:
- Navigate to Attendance (Left side tab) > My Data > Missed Break Exception.
- Click Add Request.
- Select date and missed break.
- Select the exception option.Take missed break later the same day option is only allowed for current day. Employees are allowed to take the missed break later on the same working day.
- Enter the reason and click Submit.
Manage Break Exception Request:
Administrators can manage all employees break exception request in Operations > Attendance > Missed Break Exception tab.
Approve Missed Break Exception Request
To approve missed break exception request:
- Navigate to Attendance > Team > Missed Break Exception tab.
- Click on the missed break exception request and click Approve.
Missed Weekend Alerts
Missed weekend alert monitors employee weekend offs and triggers notifications when they fail to take the required weekend break, helping maintain work-life balance and compliance.
To enable missed weekend alerts:
- Navigate to Settings > Attendance > Configuration > Check In and Check Out.
- Scroll to the end of the page to find the Missed Weekend alert settings.
- Enable the required alert options:
• Weekly weekend off alert: Enable this option to trigger a notification when an employee has not taken at least one weekend off during the week.
• 4-week weekend off alert: Enable this option to trigger a notification when an employee has not taken at least four weekend offs within a 4-week period. - In the Notify only when missed section, choose which type of weekends should be considered when tracking missed weekends:
• Statutory weekends: Only the official company-declared statutory weekends will be checked for missed weekend offs.Example: If your organization sets Sunday as the statutory weekend and Saturday as the non-statutory weekend in the work calendar or shift, working on Sunday will trigger a notification.• Non-statutory weekends: Only non-statutory weekends will be checked for missed weekend offs.
Example: If your organization sets Sunday as the statutory weekend and Saturday as the non-statutory weekend in the work calendar or shift, working on Saturday will trigger a notification.• All weekends: Both statutory and non-statutory weekends will be checked for missed weekend offs.Example: If your organization sets Sunday as the statutory weekend and Saturday as the non-statutory weekend in the work calendar or shift, working on both days will only trigger a notification.Weekend Alert Trigger Rules:WeekWeekend Taken?Weekly Weekend Alert4 - Week Weekend Off Alert1NoAlert triggered for not taking weekendNo Alert - Missed 1 Weekend in 1 Week2YesNo AlertNo Alert - Missed 1 Weekend in 2 Weeks3NoAlert triggered for not taking weekend No Alert - Missed 2 Weekends in 3 Weeks4NoAlert triggered for not taking weekend Alert Triggered - Missed 3 Weekends in 4 Weeks Any overtime recorded on a weekend is considered a workday for missed weekend alerts. - Consider compensatory offs as weekend offs: Enable this option to treat any approved compensatory off leave as a valid substitute for a weekend off.Example: If an employee works on a Saturday but takes a compensatory off on Monday, the compensatory off will be counted as their weekend off, and no missed weekend alert will be triggered.
- Select who should receive the missed weekend notifications:• Employee• Reporting Managers• Specific Users
- Click on Customize Email Template to edit the content and format of the email notifications sent for missed weekend alerts based on your organizational preference.If an employee checks in or logs overtime on a weekend, it will be considered as a missed weekend, and a notification will be triggered.
Break Summary Report
The Break Summary Report provides a detailed overview of employees’ break patterns for a selected month. This report helps managers and HR teams monitor break compliance, identify missed or partial breaks, and calculate average break durations.
To view employees break summary report:
- Navigate to Reports > Team Reports / Organization Reports > Attendance.
- Click on Break Summary Report.
- Average Break Duration (minutes) - This shows the average total break time taken per day by an employee during the selected period.How it is calculated: Total break time taken (mins) / Total number of days consideredExample (for 2 consecutive days)If an employee takes:Day 1 → 20 mins + 10 mins (2 breaks = 30 mins total)Day 2 → 15 mins + 5 mins (2 breaks = 20 mins total)Total break minutes = 30 + 20 = 50 minsNumber of days = 2Average Break Duration = 50 / 2 = 25 mins
So, the Average Break Duration for 2 days is 25 minutes. - Days with Partial or Missed Breaks - This shows the number of days where the employee either: Missed a scheduled break ortook less time than the assigned break duration (partial break).Example (for 2 consecutive days)If an employee is assigned two breaks per day, with first break scheduled for 20 mins and second break for 10 mins.Day 1 → Employee took both breaks for a total of 30 minutes.Day 2 → Employee took the first break for 20 minutes and the second break for only 5 minutes (Partially missed).So, the Days with Partial or Missed Breaks is 1 day.
- Average Number of Breaks per Day - This shows the average number of breaks taken by an employee per day during the selected period.How it is calculated: Total number of breaks taken / Total number of daysExample (for 2 consecutive days)If an employee takes:Day 1 → 2 breaksDay 2 → 3 breaksTotal breaks in 2 days = 5Number of days = 2Average Number of Breaks per Day = 5 / 2 = 2.5 breaks per days.
So, the Average Number of Breaks per Day is 2 breaks per day. - Average Duration per Break (minutes) - This shows the average time spent per break during the selected time period.How it is calculated: Total break time taken (mins) / Total number of breaks takenExample (for 2 consecutive days)
If an employee takes:
Day 1 → 20 mins and 5 mins (2 breaks)
Day 2 → 15 mins and 10 mins (2 breaks)
Total break minutes = 20 + 5 + 15 + 10 = 50 mins
Total breaks taken = 4
Average Duration per Break = 50 / 4 = 12.5 mins
So, the Average Duration per Break for 2 days is 12 minutes.
You can use the filter option to view break details for a specific period. Click on the ellipsis icon and select the desired option if you would like to Export, Print, or Download this report.
Learn more about exporting break entries.
Missed Break Reports
View Missed Break Report
To view missed break report:
- Navigate to Reports > Organization reports > Attendance > Missed Break Report.
- This report displays employees’ missed break details, including the date, break type, missed duration, and how each missed break was handled—for instance, taken later, treated as overtime, recorded for compliance, or when no exception request was raised.
Missed Break Overtime Report
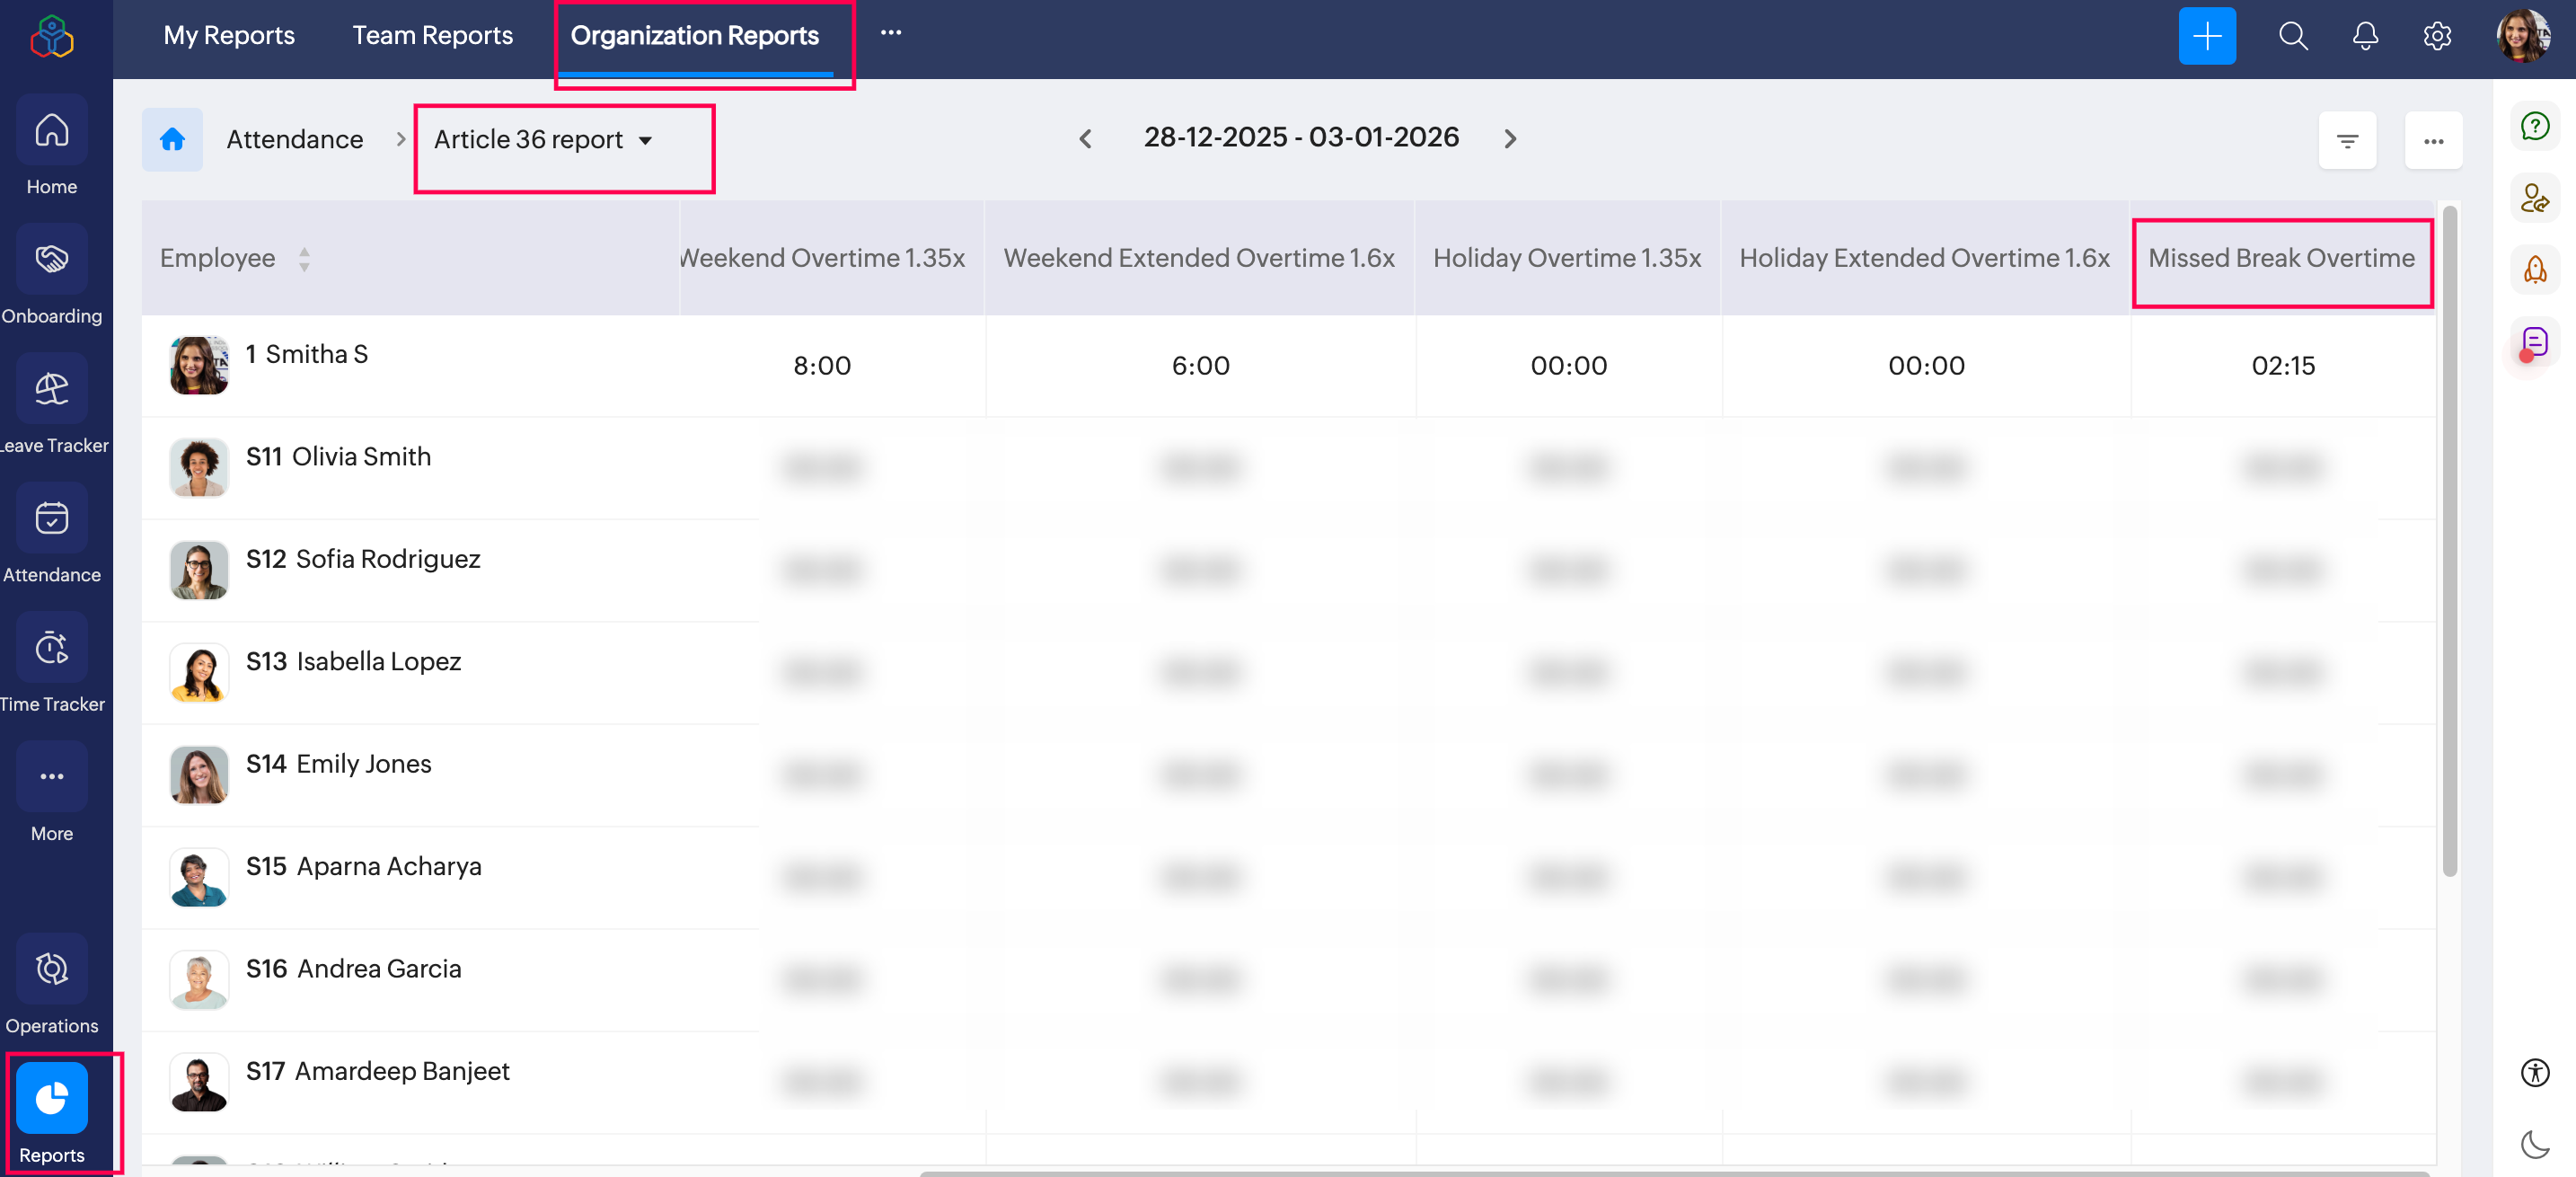
Breaks treated as overtime are recorded in the Article 36 Agreement report. To view and export missed break overtime data:
Navigate to Reports > Organization Reports > Attendance > Article 36 report.
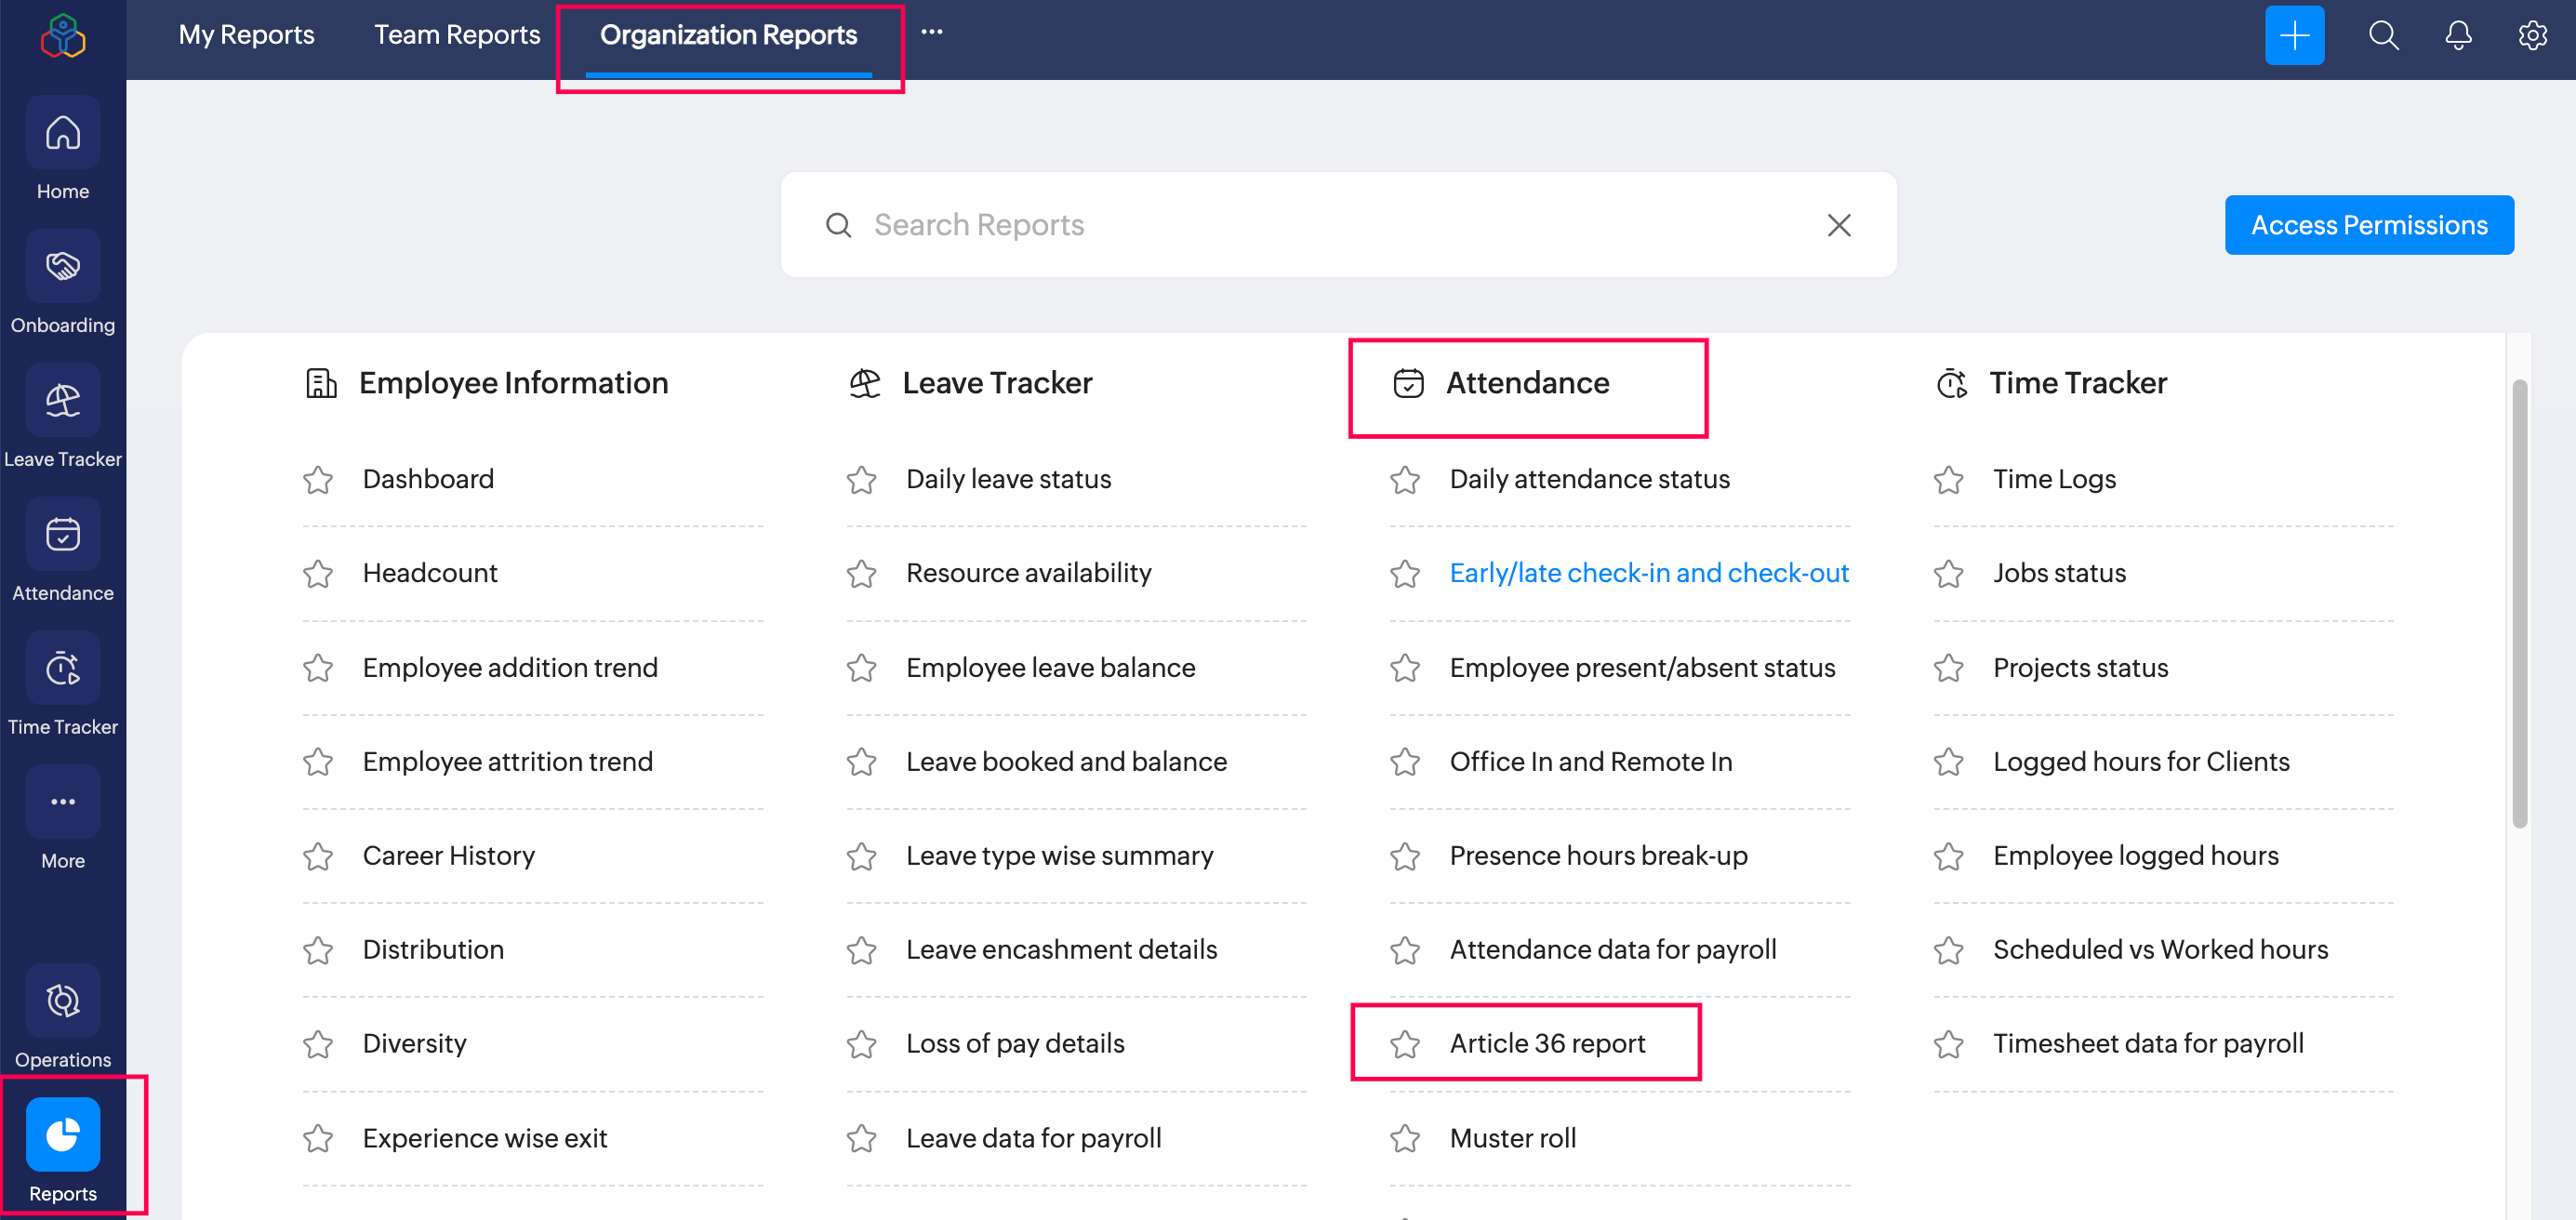
The Missed Break Overtime data for all employees is displayed in the rightmost column of the table
Early Clock-in Adjustment (Round-off)
The Round-off option automatically adjusts employees’ attendance times, such as check-in, check-out, and total working hours to the rounded time. It helps standardize attendance data by rounding times up or down within a small margin, making payroll calculations and time reports more consistent.
To enable round off feature, navigate to Settings > Attendance > Configuration > Attendance Policy > Round-off.
All the following examples are based on a general shift of 9:00 AM to 6:00 PM, with 8 hours as the expected working hours for employees.
1. Round off first check-in time
Automatically adjusts the employee’s first check-in to the shift start time based on the configured buffer.
For early check-in, select any one of the following option as required:
- You can round off any early check-in time to the shift start time by selecting the Round off to the shift start time option.
Example: If the shift starts at 9:00 AM, any check-in time before 9:00 AM will automatically be recorded as 9:00 AM, regardless of how early the employee checks in. - You can round off an early check-in time to the shift start time if the employee checks in before the shift starts, within the specified number of minutes.
Example: If the shift starts at 9:00 AM and an employee checks in at 8:50 AM with a 15-minute buffer, their check-in time will be recorded as 9:00 AM, if early check-in was made before 8:45 AM it will not be rounded off.
For late check-in, select any one of the following option as required:
- You can round off any late check-in time to the shift start time by selecting the Round off to the shift start time option.
Example: If the shift starts at 9:00 AM and this option is selected, any check-in time after 9:00 AM will automatically be recorded as 9:00 AM, regardless of how late the employee checks in. - You can round off a late check-in time to the shift start time if the employee checks in after the shift starts, within the specified number of minutes.Example: If the shift starts at 9:00 AM, and an employee checks in at 9:10 AM with a 15-minute buffer, their check-in time will be recorded as 9:00 AM, if late check-in was made after 9:15 AM it will not be rounded off.
2. Round off last check-out time
Automatically adjusts the employee’s last check-out to the shift end time based on the configured buffer.
For early check-out, select any one of the following options as required:
- You can round off any early check-out time to the shift end time by selecting the Round off to the shift end time option.
Example: If the shift ends at 6:00 PM, any check-out time before 6:00 PM will automatically be recorded as 6:00 PM, regardless of how early the employee checks out. - You can round off an early check-out time to the shift end time if the employee checks out before the shift ends, within the specified number of minutes.
Example: If the shift ends at 6:00 PM and an employee checks out at 5:50 PM with a 15-minute buffer, their check-out time will be recorded as 6:00 PM. If the check-out was made before 5:45 PM, it will not be rounded off.
For late check-out, select any one of the following options as required:
- You can round off any late check-out time to the shift end time by selecting the Round off to the shift end time option.
Example: If the shift ends at 6:00 PM and this option is selected, any check-out time after 6:00 PM will automatically be recorded as 6:00 PM, regardless of how late the employee checks out. - You can round off a late check-out time to the shift end time if the employee checks out after the shift ends, within the specified number of minutes.
Example: If the shift ends at 6:00 PM and an employee checks out at 6:10 PM with a 15-minute buffer, their check-out time will be recorded as 6:00 PM. If the check-out was made after 6:15 PM, it will not be rounded off.
3. Round off total working hours to expected work hours
Rounds off the total working hours to the expected working hours if the difference is within the specified number of minutes.
Example: If the expected working hours are set as 8 hours and an employee works for 7 hours and 55 minutes with a 10-minute buffer, their total working hours will be rounded off to 8 hours.
Overtime Approval
Configure Overtime Schedulers to automatically submit employees’ overtime hours for approval at defined intervals. This ensures accuracy, consistency, and timely submission of overtime records without manual intervention. By automating the process, it streamlines the overtime approval workflow, reduces administrative effort, and provides employees with greater transparency and reliability in the submission of their overtime hours for approval.
To configure overtime schedulers, at least one Overtime Policy must have overtime approval enabled, with an approval flow configured for it in Approvals.
To configure a overtime scheduler:
- Navigate to Settings > Attendance > Automation > Overtime Scheduler.
- Click Add Overtime Scheduler.
- Enter a unique name for the overtime scheduler.
- Select the overtime policies to which the scheduler applies.
- Select the scheduler frequency as one of the following:
- Weekly: Runs weekly on a selected day of the week.
Example: Employee overtime hours recorded for the previous week can be submitted for approval on every Sunday at 18:00 (6:00 PM). - Monthly: Runs monthly on a selected day of the month.
Example: Employee overtime hours recorded for the previous month can be submitted for approval between the 1st and 10th (only specific day within this range can be selected) of the following month at (00:00) 12:00 AM. - Pay Period: Runs on every pay periods - payroll processing day
Example: Employee overtime hours recorded for the pay period can be submitted for approval on the payroll processing day.Limitations:
- Overtime hours approval requests submitted via schedulers cannot be auto-approved or auto-rejected based on the pay period configuration.
- Ensure your pay period configuration allows sufficient time between payroll processing and report generation to approve overtime, for pay period configuration, refer to Pay Period.
- The scheduler execution time for the Pay Period will follow the payroll processing day schedule, which is 11:59 PM on the payroll processing day. - Select the scheduler execution time.
- Click Save. The scheduler will be saved, and overtime hours will be submitted automatically for approval according to the configured frequency and execution time.
Non-Working Hours in Shift Configuration
This feature is enabled on demand, please contact support@zohopeople.com to enable this for your organizational account.
The Non-working Hours setting allows you to define time periods outside an employee’s scheduled work hours, during which employees are not expected to work. If any attendance activity is recorded during these hours, such as attendance entries, on-duty entries, regularizations, or overtime, the system notifies relevant stakeholders to ensure visibility and compliance.
This helps track unexpected check-ins, monitor policy violations, and maintain accurate attendance records.
Non-working hours cannot be set for time periods already defined as shift hours.
How Non-Working Hours Help:
- Ensure employees adhere to defined work schedules
- Get notified of unusual check-in or check-out activity.
- Improve attendance accuracy and monitoring
- Enable managers to take timely action on irregular attendance
Enable Non-Working Hours:
To enable non-working hours and notify employees when attendance is recorded during this time:
- Navigate to Settings > Shifts > Configuration > General tab.
- Enable Non-working hours toggle button.
- Define the non working hours time range and enable the required notification settings to notify relevant stakeholders.
- Click on Customzie Email Template to update the email template based on your organizational preference.
Substitute Holiday/Weekend
The Substitute Holiday/Weekend feature allows employees to request a day off on a working day in exchange for working on a holiday or weekend. This ensures flexibility while maintaining accurate leave tracking and helps organizations compensate employees without impacting leave balances.
How to Enable Substitute Holiday/Weekend
To enable this feature:
- Go to Settings > Leave > Configuration > Methods.
- Enable Substitute Holiday/Weekend.
- After enabling the feature, navigate to the Substitute Holiday/Weekend tab to configure additional options.
- Enable Make reason mandatory for substitute holiday/weekend requests, if required.
- Configure the approval workflow for substitute holiday/weekend requests. For more details, refer to Approvals.
Employees can now request substitute holiday/weekend and avail them.
How Employees Can Submit Substitute Holiday Weekend Request
To avail a Substitute Holiday/Weekend, employees must submit the request in advance before working on a weekend or holiday.
To raise request:
To raise request:
- Navigate to Leave (user service) > My Data > Substitute Holiday/Weekend tab.
- Click on Add Request.
- Select the holiday/weekend work date.
- Select the substitute day-off.
- Enter the reason.
- Click Save.
The request will be submitted. If approval is configured, the request will be sent for approval. Once approved, the substitute holiday/weekend will be granted for the selected date.
Managers can manage their direct and all reportees substitute holiday/weekend request in Leave (user service) > Team > Substitute Holiday/Weekend tab.
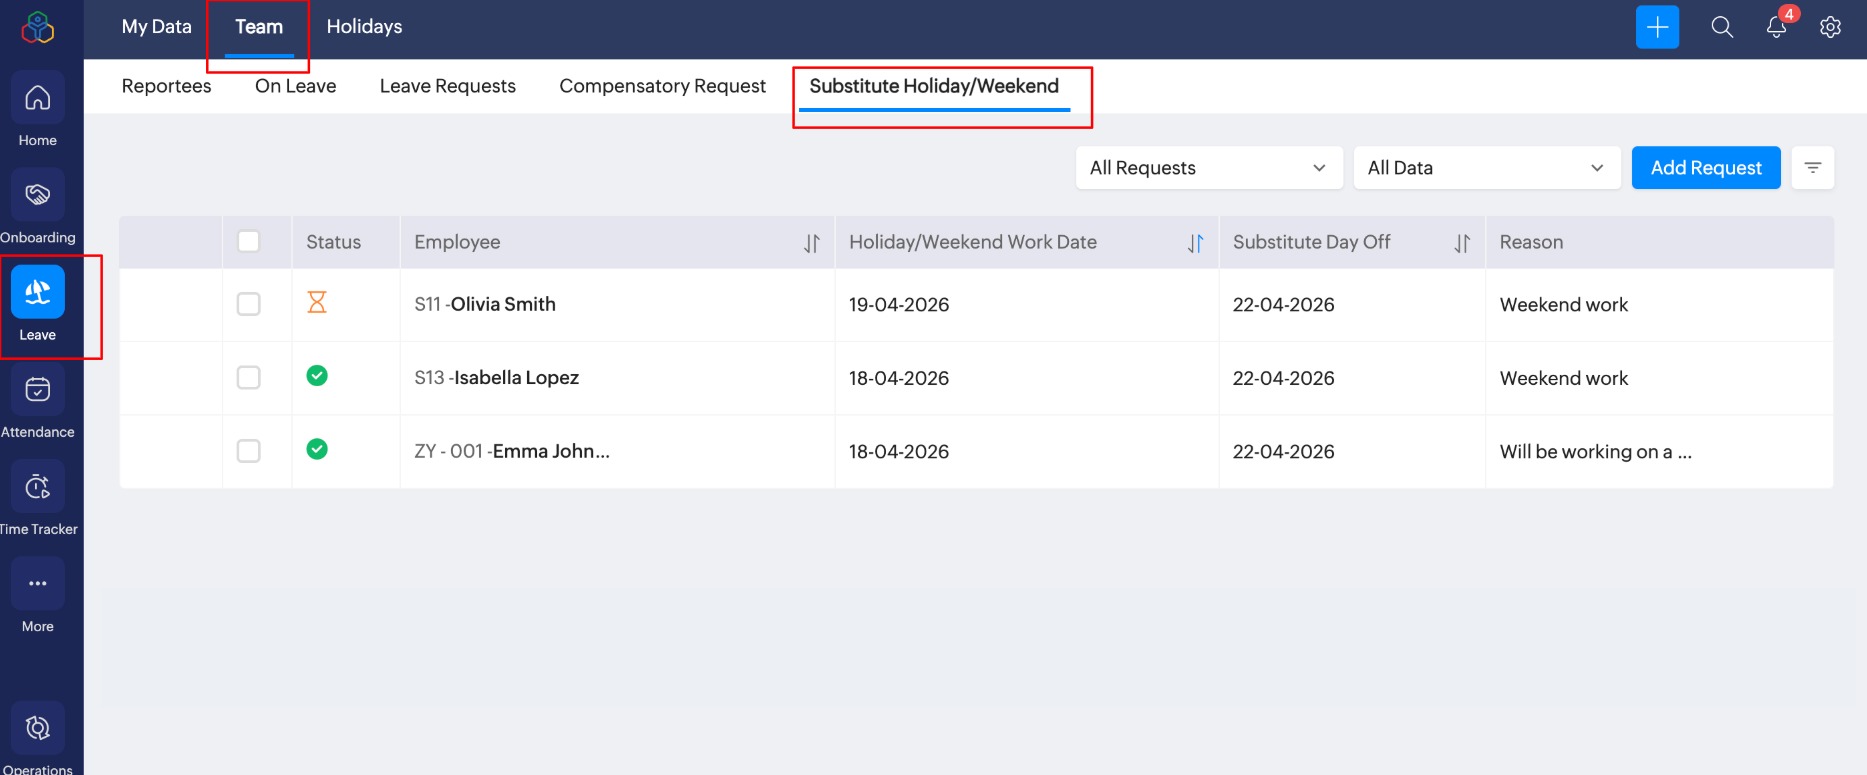
What managers can do here?
- View their team or department members substitute holiday/weekend request
- Raise a substitute holiday/weekend request on behalf of their team or department members
- Approve or reject their substitute holiday/weekend request
- Delete request
Admin Operations - Substitute Holiday/Weekend
Administrators can manage the entire organization's Substitute Holiday/Weekend reqeusts in Operations > Leave > Substitute Holiday/Weekend tab.
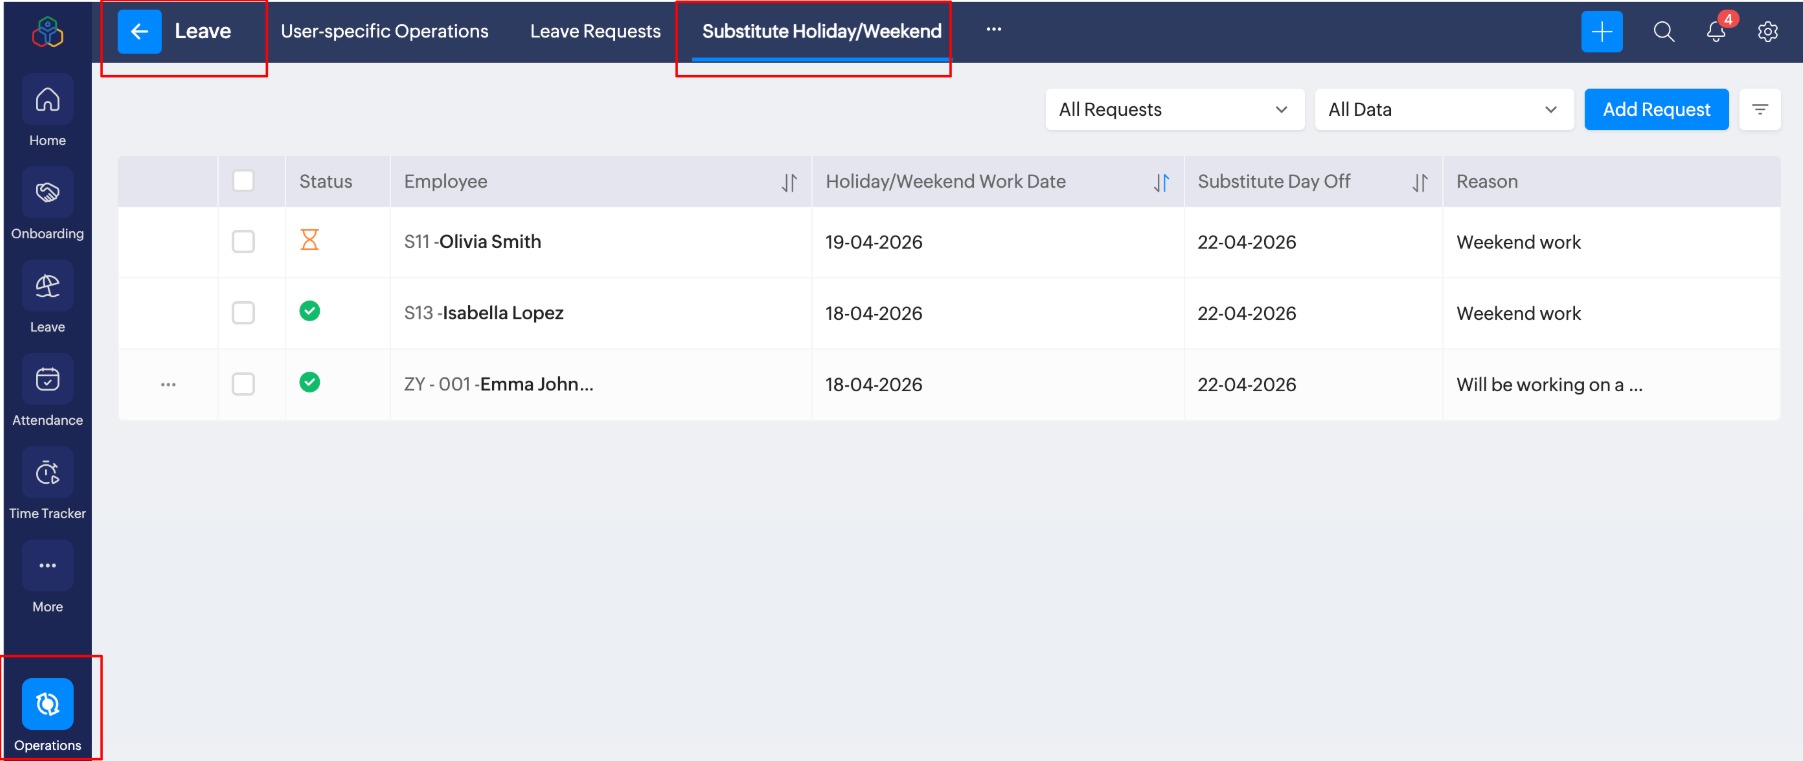
What administrators can do here?
What administrators can do here?
- View entire organization's substitute holiday/weekend requests
- Raise a substitute holiday/weekend request on behalf of any employee in the organization
- Approve or reject substitute holiday/weekend requests
- Delete requests
Recycle Bin
The Zoho People Recycle Bin feature retains deleted records for up to 7 years for Japan date center, allowing users to restore them if needed. This reduces the risk of losing important records due to accidental deletion.
Recycle Bin is intended for Administrators and HR Personnel.
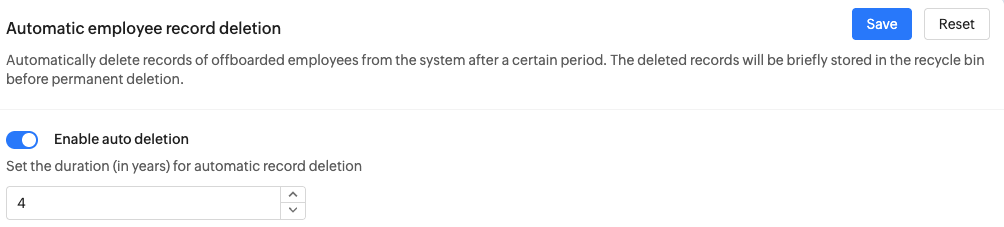
Data retention can be configured in years (e.g., 4 years), and automatic employee data deletion can also be enabled via Settings > Manage Accounts > Organization Setup > Organization Policy > Automatic employee record deletion.
To restore a deleted record:
- Navigate to Operations > Data Administration.
- Select a form using the drop-down provided.
- Use the checkboxes to select the records you would like to restore.
- Click Restore.
- Confirm by clicking Restore again in the pop-up window.
Learn more about recycle bin here.