Understanding build agent

In a nutshell
Build agent is an AI-powered development assistant in Zoho Creator that lets you modify existing applications using natural language prompts. Available in both edit mode and live mode, it interprets your requirements, generates a preview of all the proposed changes as Change Summary for your review, and applies the approved changes to the application. By leveraging the AI provider configured in Zia , build agent converts your modification instructions into Creator components and configurations, helping speed up application development and reducing the need to manually configure in individual builders.

Availability
- Available for all paid plans of Creator 6.
- Can be enabled by a Super Admin or Admin from Operations > Zia.
- Accessible to Super Admins, Admins, and Developers for modifying applications.
- Build agent cannot be configured to use Google Gemini as the LLM provider in Zia.
- LLM availability differs across data centers (DCs). Refer to the Zia document for the list of supported LLMs and their availability in each DC.
1. What is build agent?
Build agent is an AI-powered development assistant in Zoho Creator that lets you modify your application using natural language prompts. Instead of manually configuring application components, describe the changes you want to make, and the build agent implements the requested changes in the application. You can perform supported operations such as creating forms, reports, and workflows, adding fields, modifying field properties, or generating HTML and Deluge code using build agent. Beyond configuring application components, the build agent extends its capabilities and provides implementation guidance and best practice recommendations helping you achieve the desired outcome more effectively. Whenever additional information is required, the build agent prompts you for the necessary details to ensure the requested changes are implemented accurately.
When you submit a request to modify a feature, Build Agent analyzes your requirements and generates a Summary that outlines the proposed changes. In addition to the requested changes, it may recommend related updates, such as adding supporting fields, generating reports, or updating other application components, to implement the requested functionality more effectively. Review the change summary and approve it to let Build Agent apply the proposed changes to your application.

Note: If you are modifying a published application, the changes may affect the live user experience. So the Build Agent recommends creating a development environment. When you choose this option, Build Agent automatically creates an environment where you can implement, test, and validate the changes before publishing them to production.
Build agent is available in both edit mode and live mode of the application and can be accessed through the build agent icon ( ) in the application interface. Unlike manual configuration, the build agent lets you make changes to your application in live mode, which allows you to test your application, identify improvements, and add or modify components without switching back to edit mode.
The Build agent is powered by the LLM provider configured in Zia, which serves as the underlying intelligence for interpreting user requests and generating the corresponding application component, configuration and code.
Note: Before using Build Agent, ensure that it is enabled in Zia under the Operations section of the admin dashboard.
2. Prerequisites
Configure Zia
To use build agent, configure Zia to manage AI features across your Creator account. Zia is configured with the Zoho GenAI LLM provider by default, so no additional setup is required. If you prefer a different provider, you can integrate Zia with any of the supported LLM providers (OpenAI and Anthropic). Setting up Zia is a one-time process that grants access to all Zia features, including Build Agent. Learn how to configure Zia.
Security tip: Zoho GenAI LLM is available for free and processes all prompts within Zoho, while external LLM providers process data in their own systems. Avoid sharing sensitive or regulated information in your prompts when using external providers.
Enable Build Agent feature
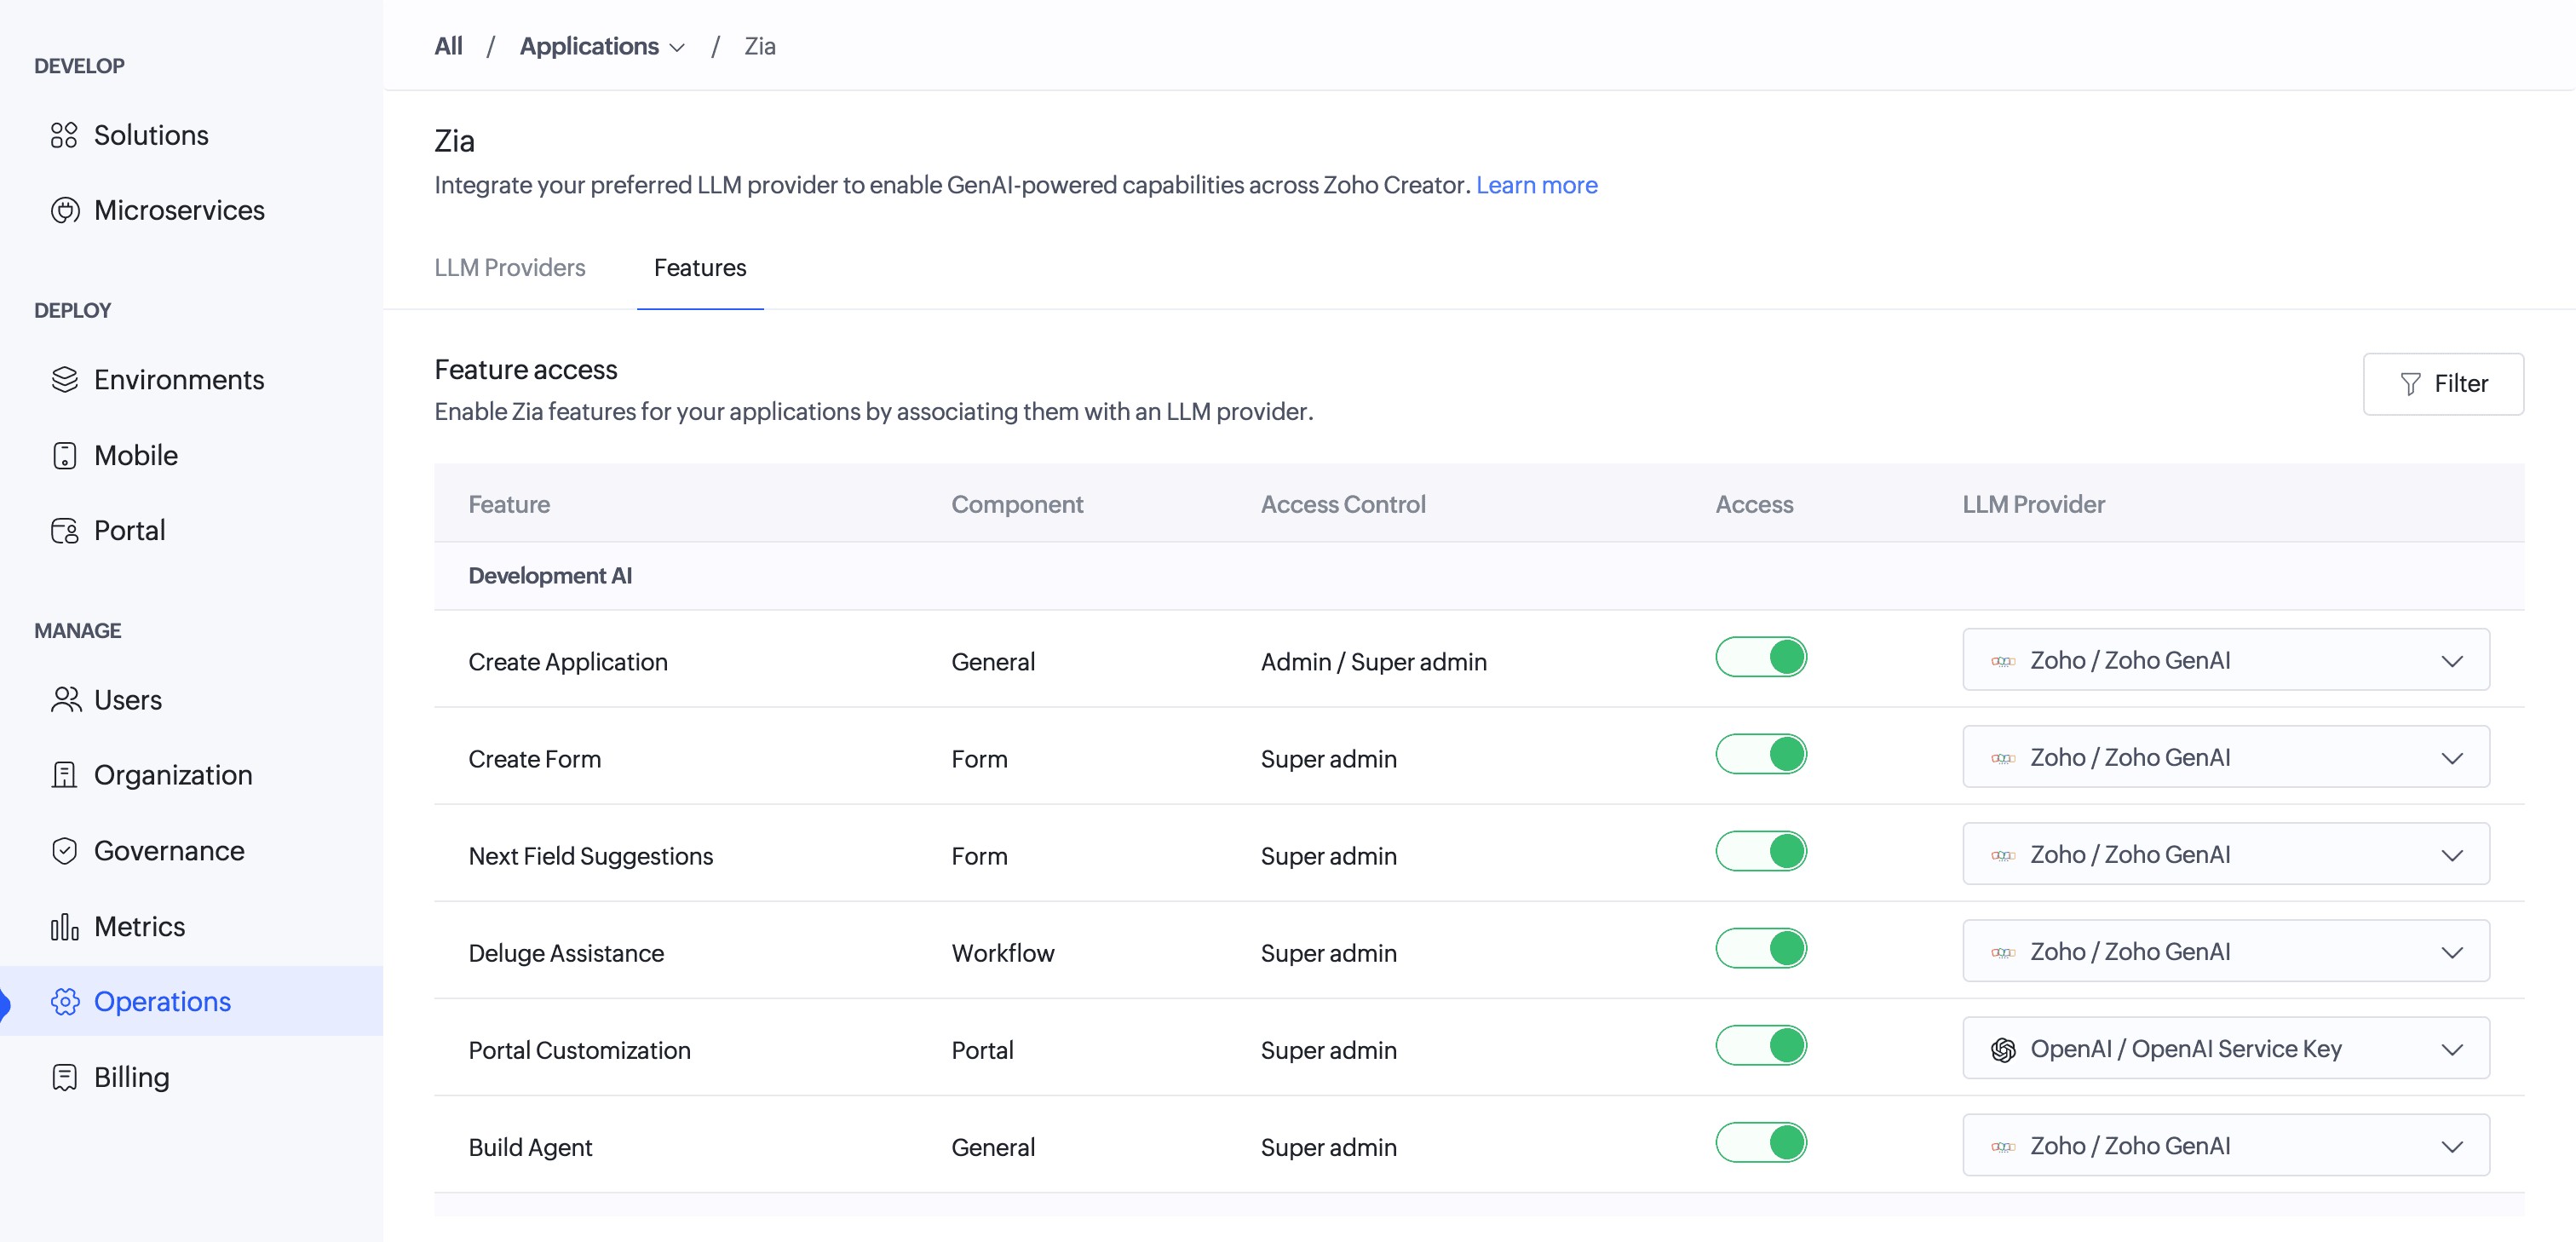
1. Navigate to Operations > Zia > Features. The Features tab displays a list of all available Zia features.
Enable Build Agent feature
1. Navigate to Operations > Zia > Features. The Features tab displays a list of all available Zia features.
2. Enable the Access button beside Build Agent under Feature access section and choose a configured LLM provider for the feature.
Note:
- Only a super admin can enable or disable, and configure an LLM provider for Build Agent feature in Zia.
- Build agent is not supported when Google Gemini is configured as the AI provider. Switch to a supported provider in Zia settings to access this feature.
3. Navigation guide to build agent
The build agent icon ( ) appears in different locations depending on which mode you are in.
In edit mode
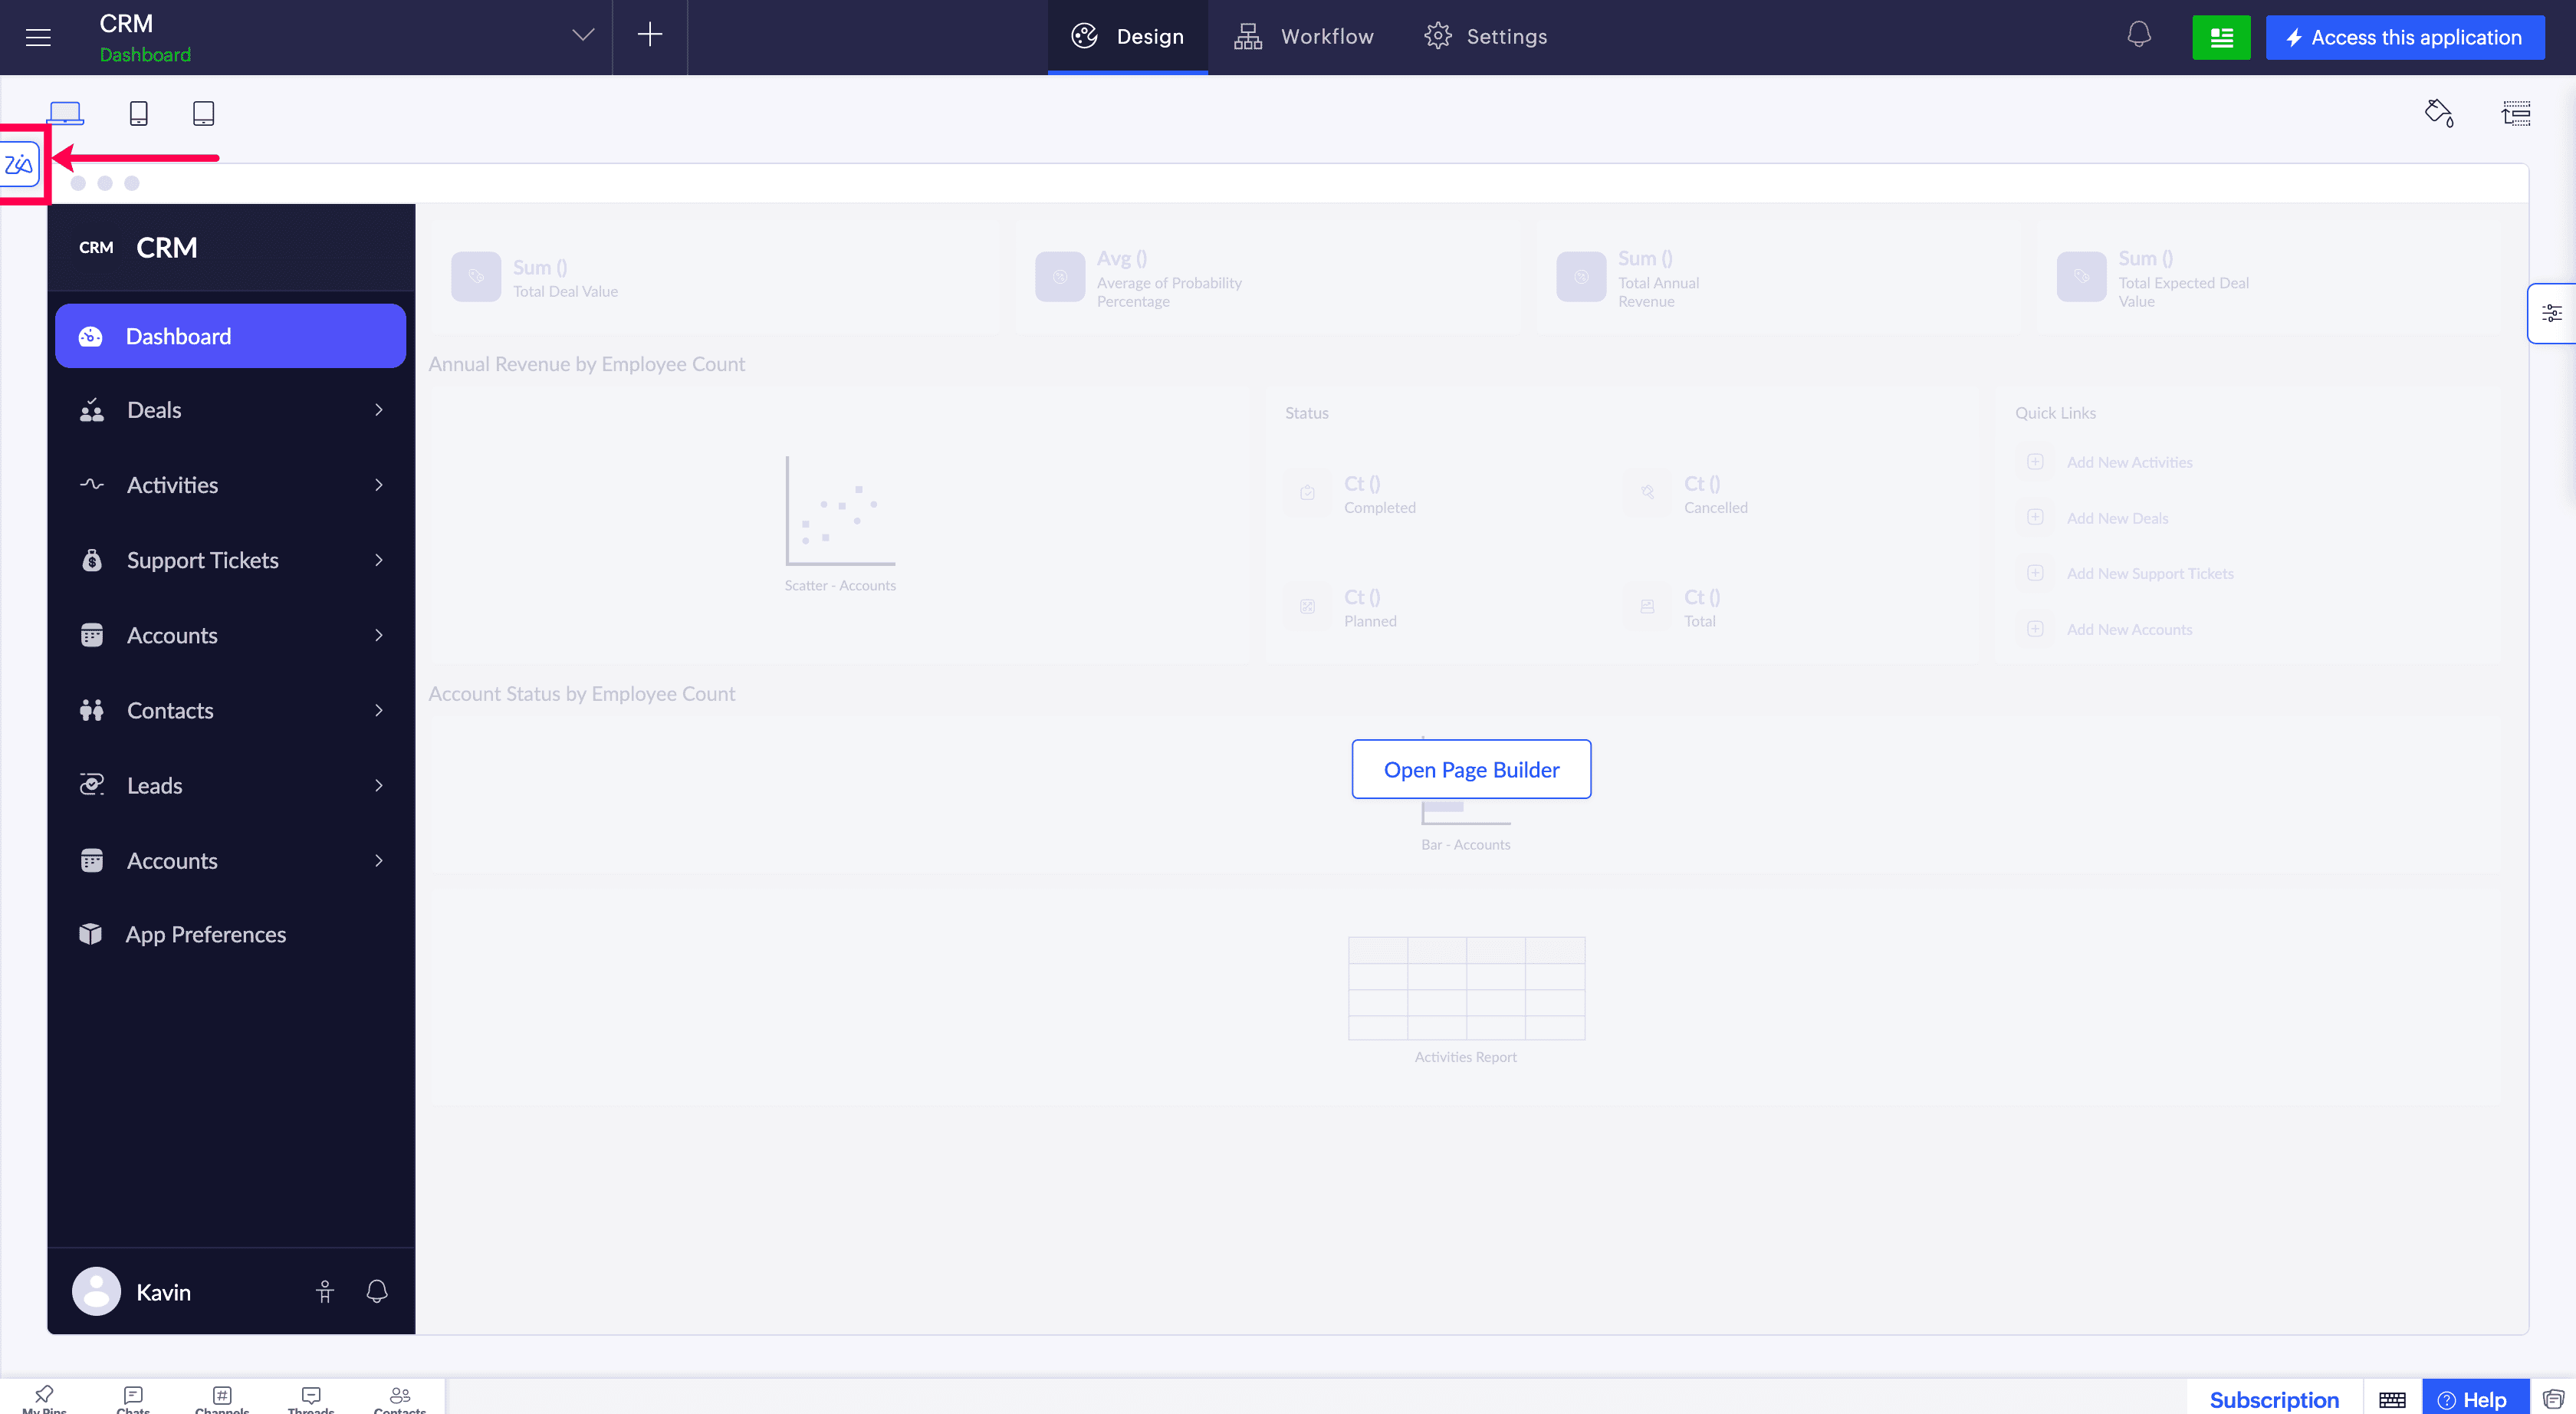
The build agent icon ( ) appears on the left edge of the screen. Click it to open the chat panel as a left-side slider.
The build agent icon (
In live mode
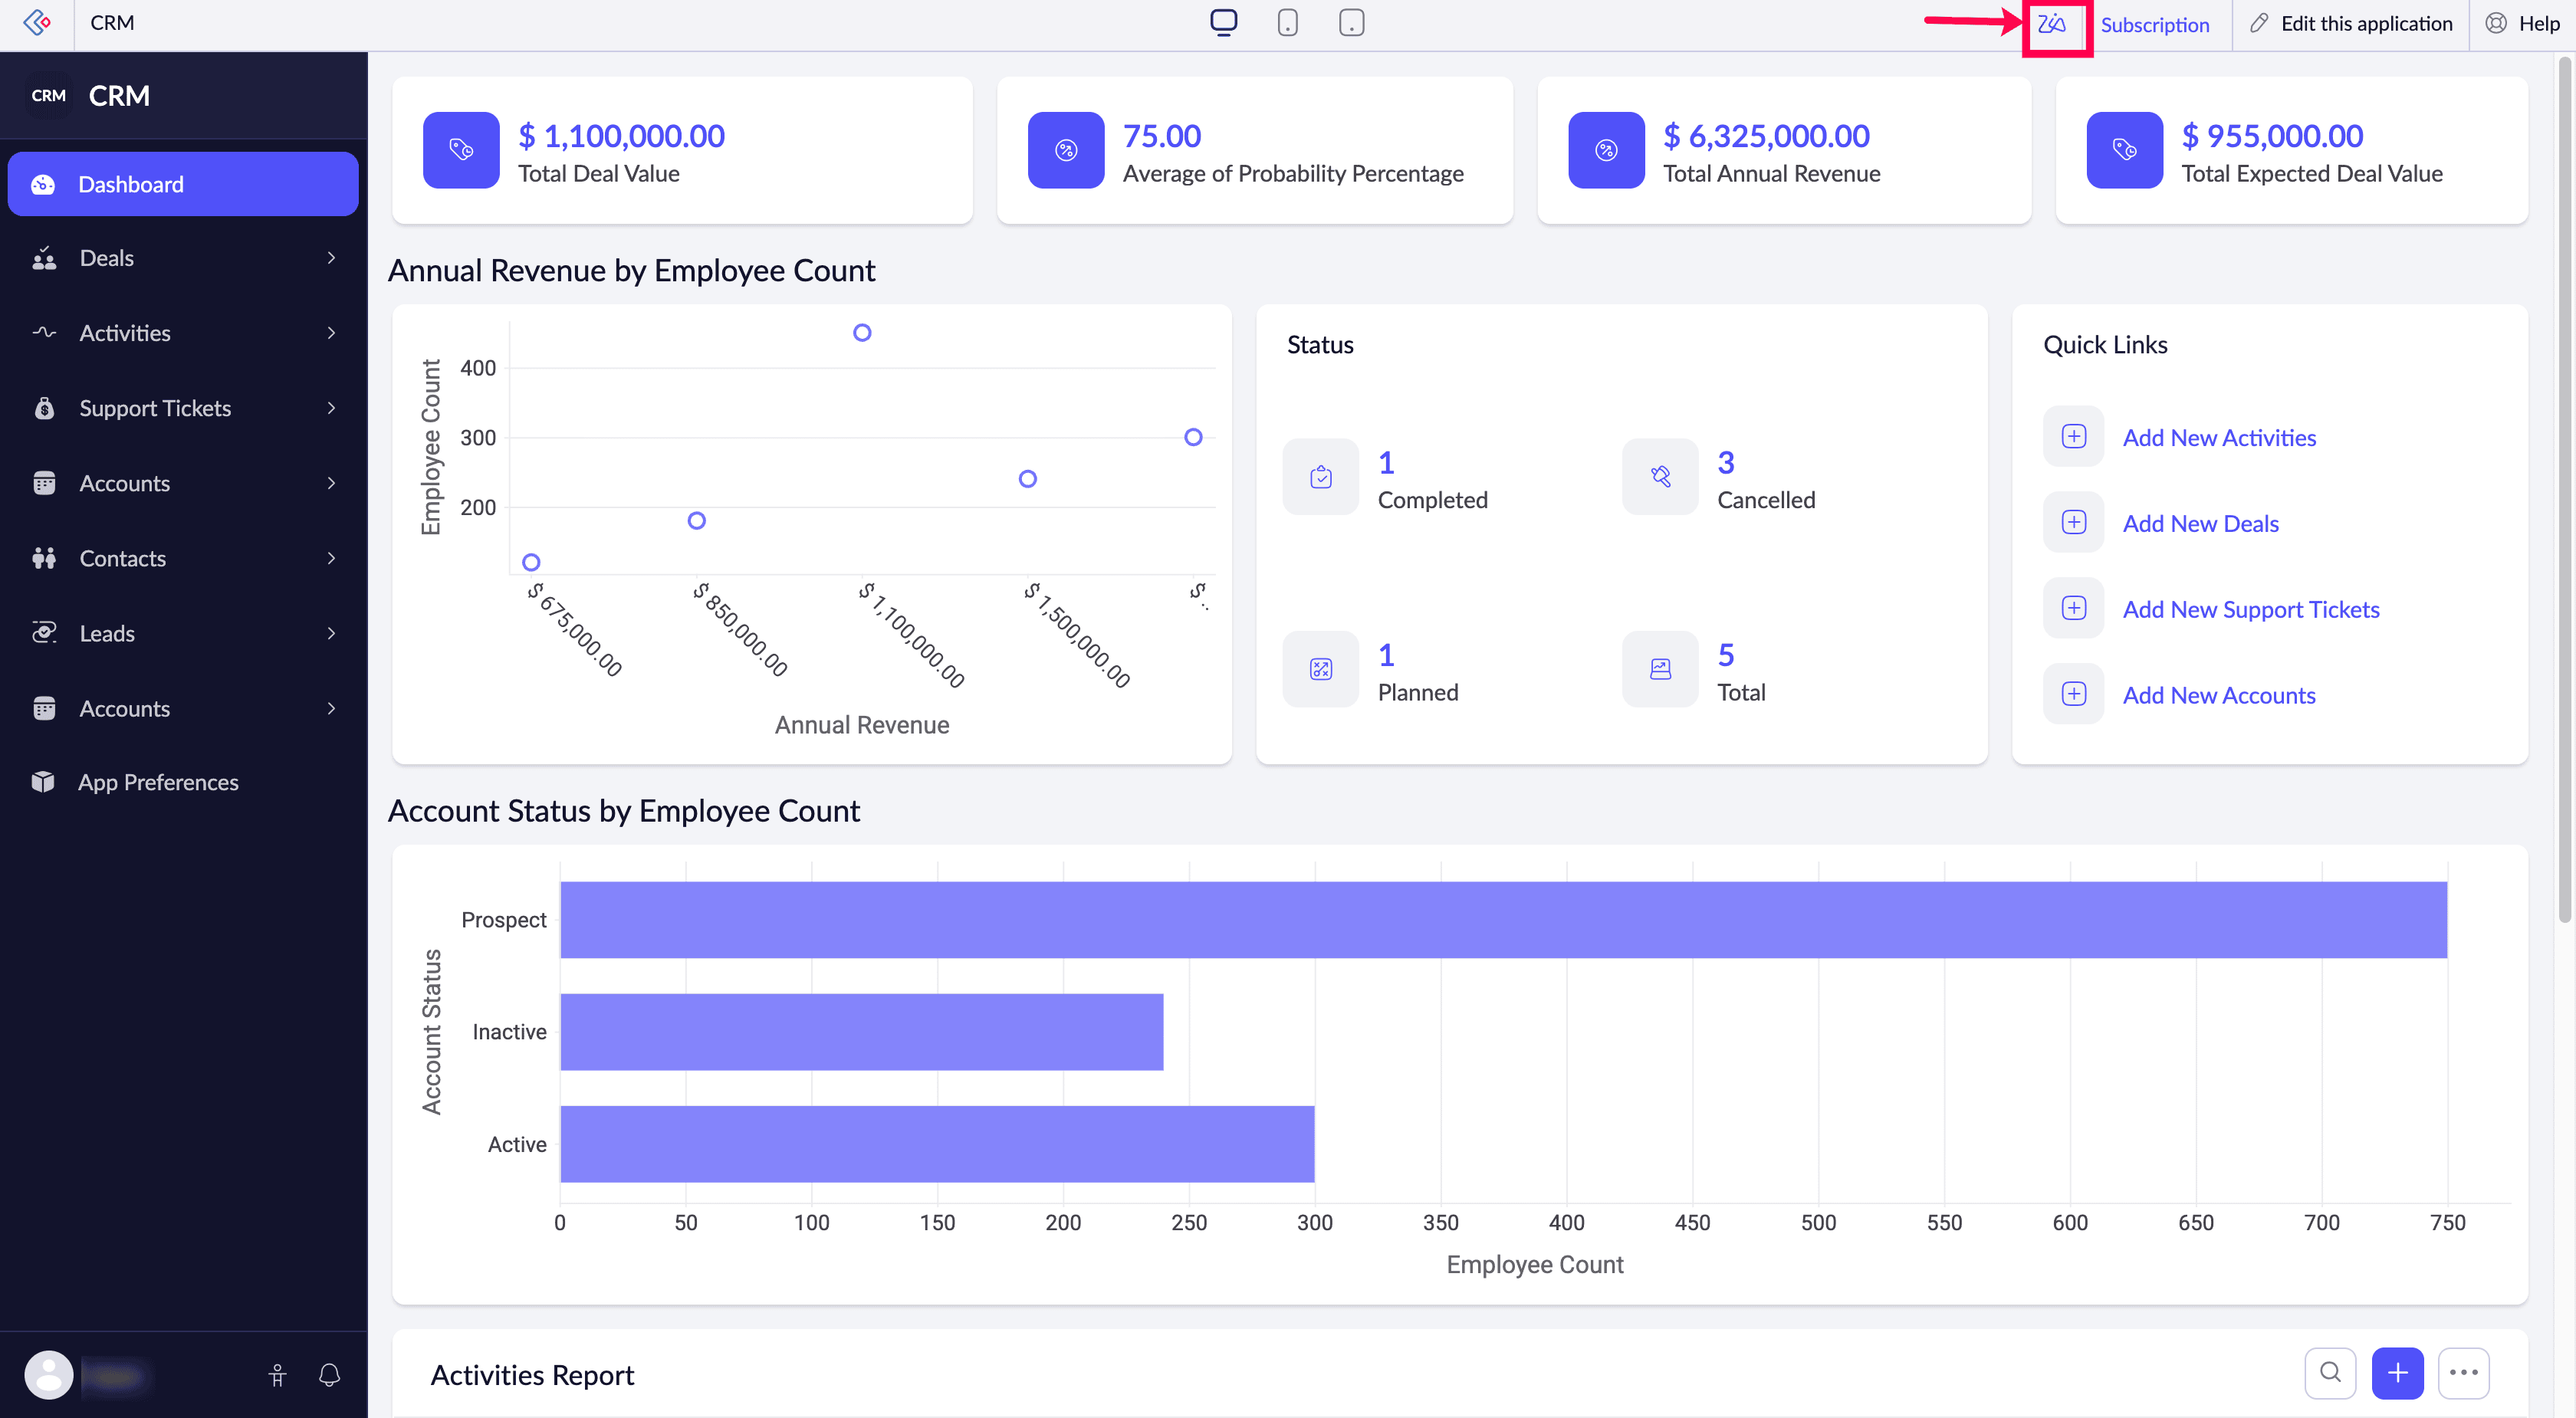
The build agent icon ( ) appears in the top navigation bar. Click it to open the chat panel on the right side of the screen.
The build agent icon (
4. What operations can be done using build agent?
|
Component
|
Supported
|
Not supported
|
|
Form properties: Role hierarchy (Record owner), Send email notification on form submission, field alignment, Hide and show buttons, disable capture location and disable capture IP address.
Customization: Form customization for phone.
Fields: Enable/disable encrypt data, Change field type, look up field from another application.
Delete forms and fields is not supported.
|
||
|
Create and modify supported reports
|
Report types: Pivot chart and pivot table.
Properties: Live mode custom order sorting, live mode custom order grouping, create template.
Note: Custom order sorting and grouping can be done in edit mode of the application.Customization: Change quick view layout, custom layout creation for both quick view and detail view, report customization for phone.
Delete reports is not supported.
|
|
|
Add pages and supported page elements.
Supported page elements: Panel, chart, board, gauge, search, form, report, HTML snippet and embed snippet.
Page properties: Page variables and scripts, Change background color, enable/disable pdf and print.
|
Customization: Page customization for phone.
Page elements: Widgets, AR viewer, ZML snippet generation and update configuration of panel elements.
Delete page and page elements is not supported.
|
|
|
Create and modify supported workflows. Generate Deluge scripts for workflows.
Supported workflows: On a form event and On a function call.
|
Types: Blueprints, approval, payment, batch and schedule workflows. Functions written in Node.js and Java.
Delete workflow is not supported.
|
|
|
Create and modify chat agents.
|
Change chat agent name, chat agent link name and avatar
Connectivity: Associate or remove AI agent.
Delete chat agent is not supported.
|
|
|
Configure below app settings:
App menu, app icon, rename app, user permissions, portal user permissions, localization, change app time format and update application theme and color.
|
User permission: Roles, data sharing, delete user permission.
Portal user permission: Delete portal user permission.
Other settings: App variables, Contextual messages, Record templates, schema builder and export app via application IDE.
|
|
|
Application records
|
—
|
Create, modify, and delete operations on application records is not supported.
|
5. Build agent interface
The build agent comprises the following elements: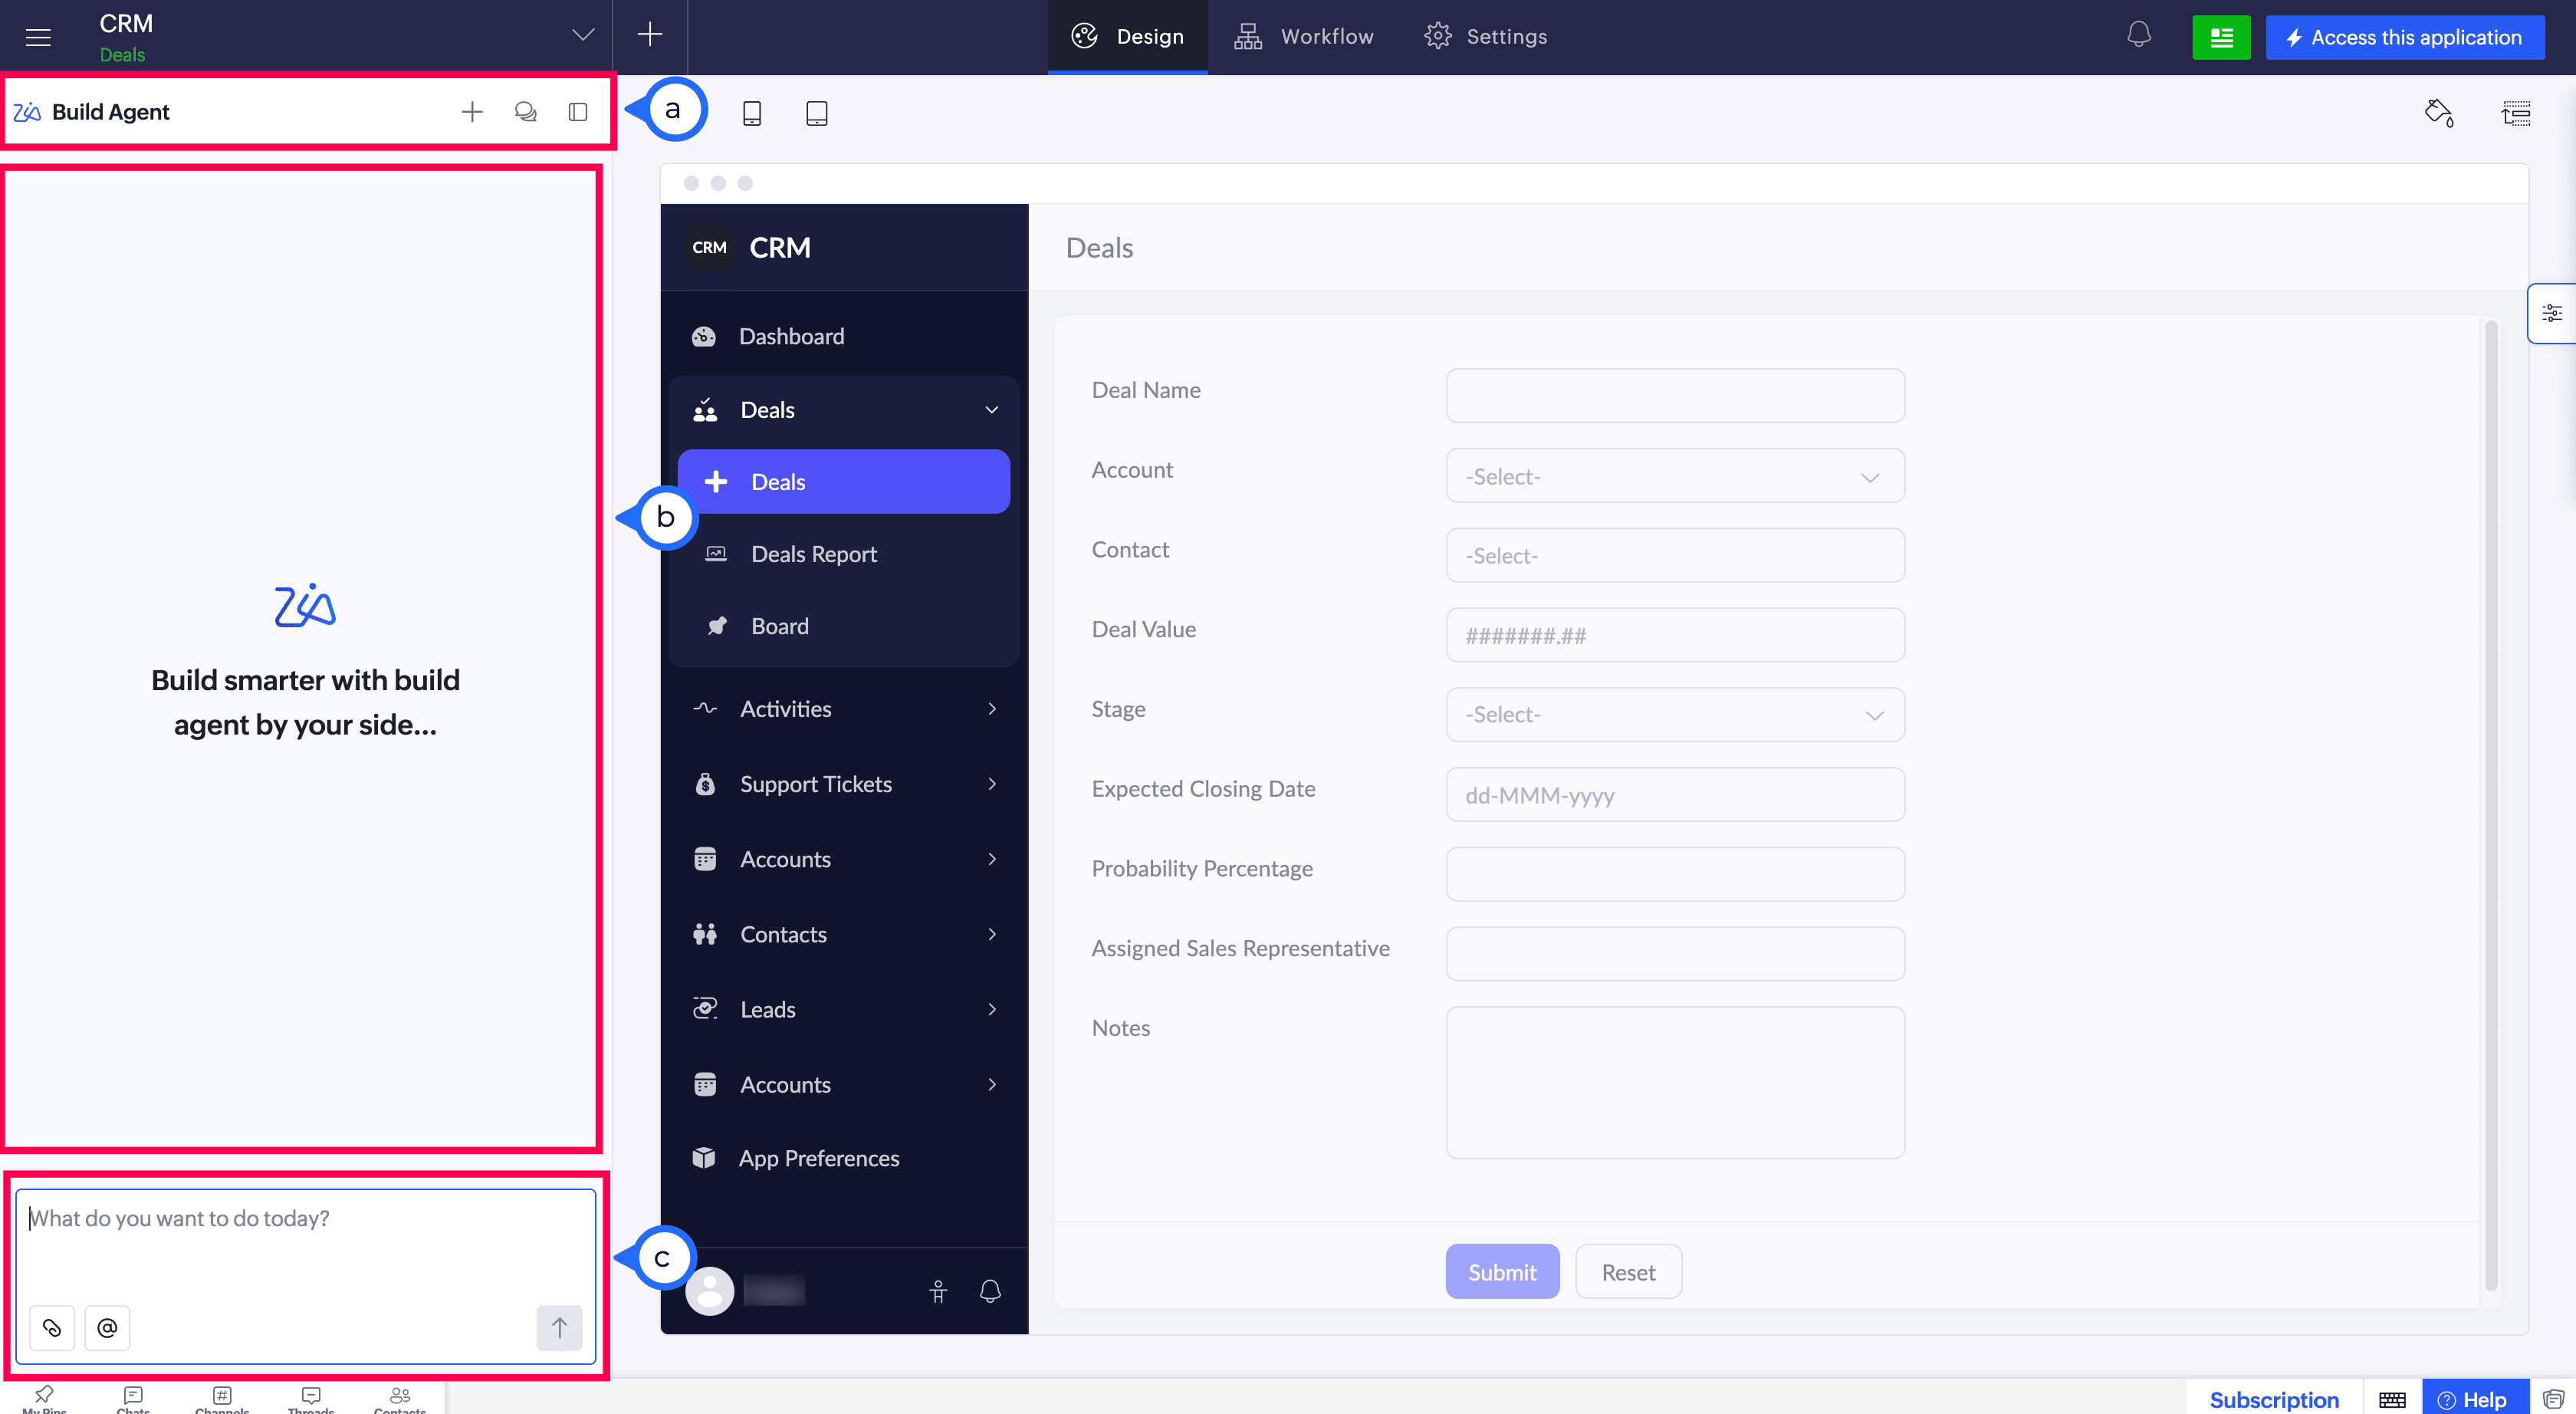
- Session toolbar
Located at the top of the panel, the toolbar contains three controls: - New chat (
): Starts a fresh conversation. Use this when switching to an unrelated task or when the context from the current session is no longer relevant.
- History (
): Opens a list of your previous conversations for the current application. Select any conversation to resume it or review the changes made.
- Minimize(
) / Close (X): In edit mode, minimize icon collapses the chat panel back to the left edge of the screen. In live mode, the (X) icon closes the chat panel. In both cases, your session is preserved.
- Conversation area
The main body of the panel where build agent responds to your prompts. It shows the exchange between your requests and build agent's responses, along with the change Summary when changes are proposed. - Prompt field
The input area at the bottom of the panel. Type your requirement here in plain language. The prompt field also includes two additional controls: - @Mention: Type @ or click the @ icon and select a component to reference it in your prompt. This helps Build Agent identify the exact component of the application you want to modify.
- File upload (
): Attach files such as screenshots, sample data, or reference documents to your prompt to provide additional context. Supported file formats include images, PDFs, CSV, and text files.
Note: You can attach up to 10 files per prompt. Each file can be up to 10 MB in size, except PDF files, which are limited to 2 MB each.
6. How to modify app components using build agent ?
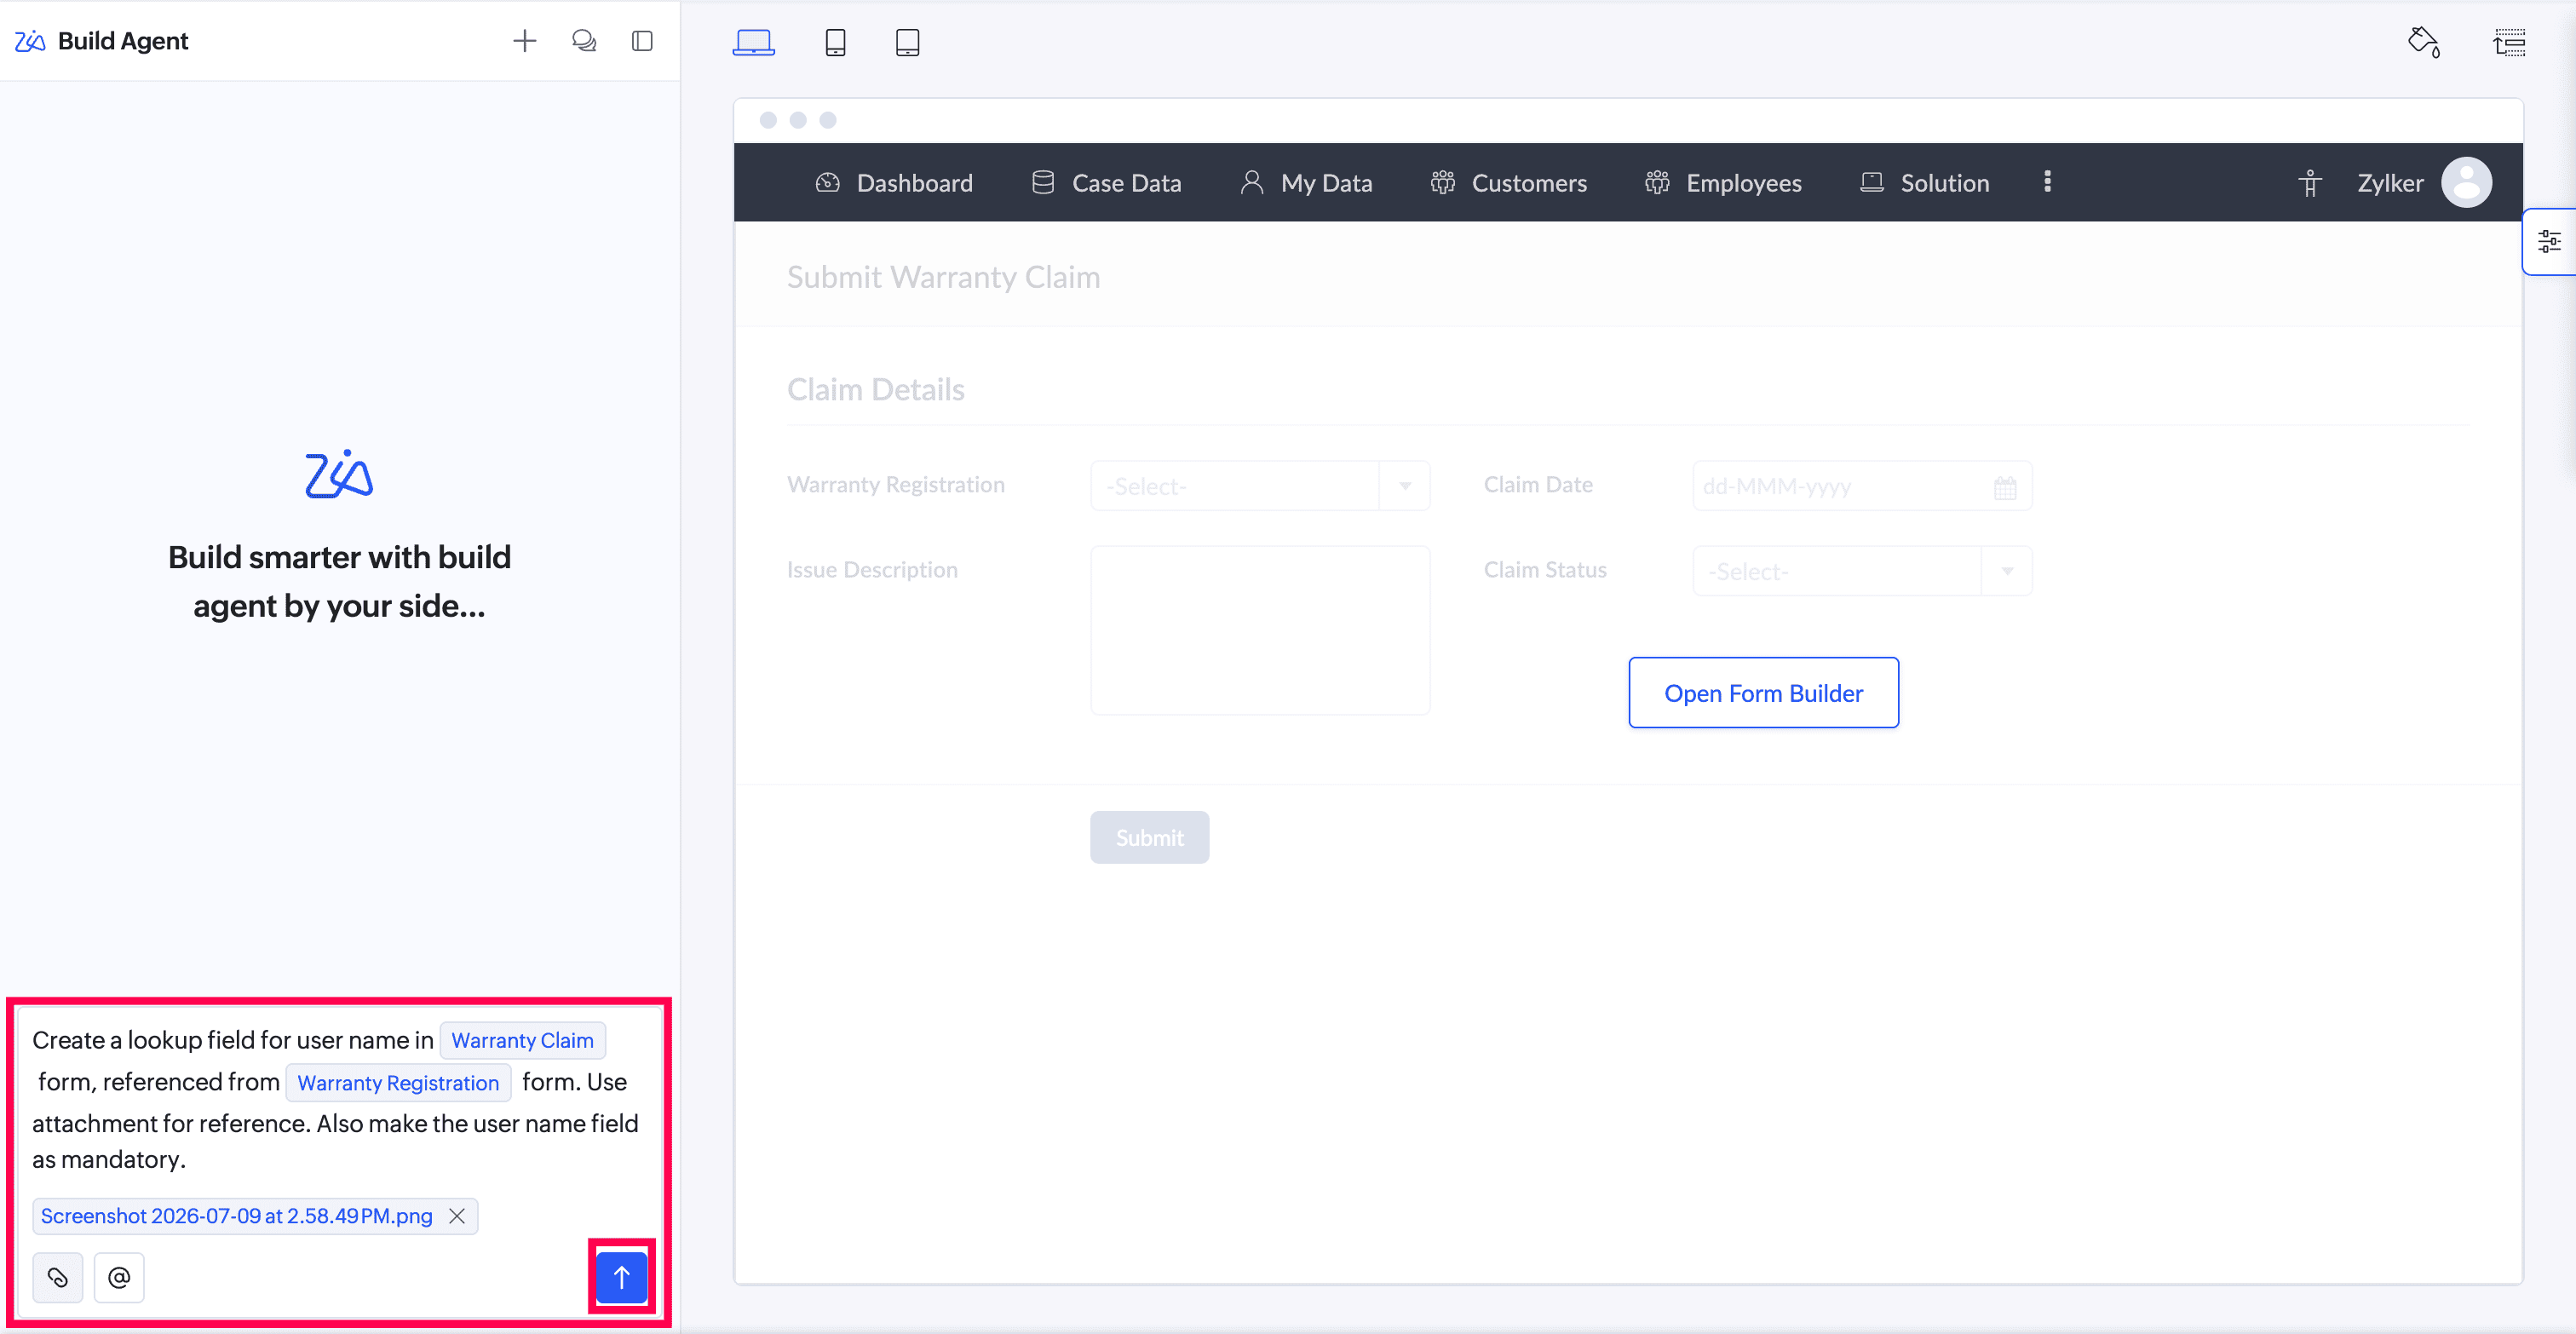
Step 1: Describe the changes you want to make
Open build agent from the application's edit mode or live mode and describe the changes you want using natural language. You can also upload relevant files, such as requirement documents or screenshots, and @mention forms, reports, pages, and other components to provide additional context and improve accuracy. Click the send (  )icon to submit the prompt.
Step 2: Review the Change Summary
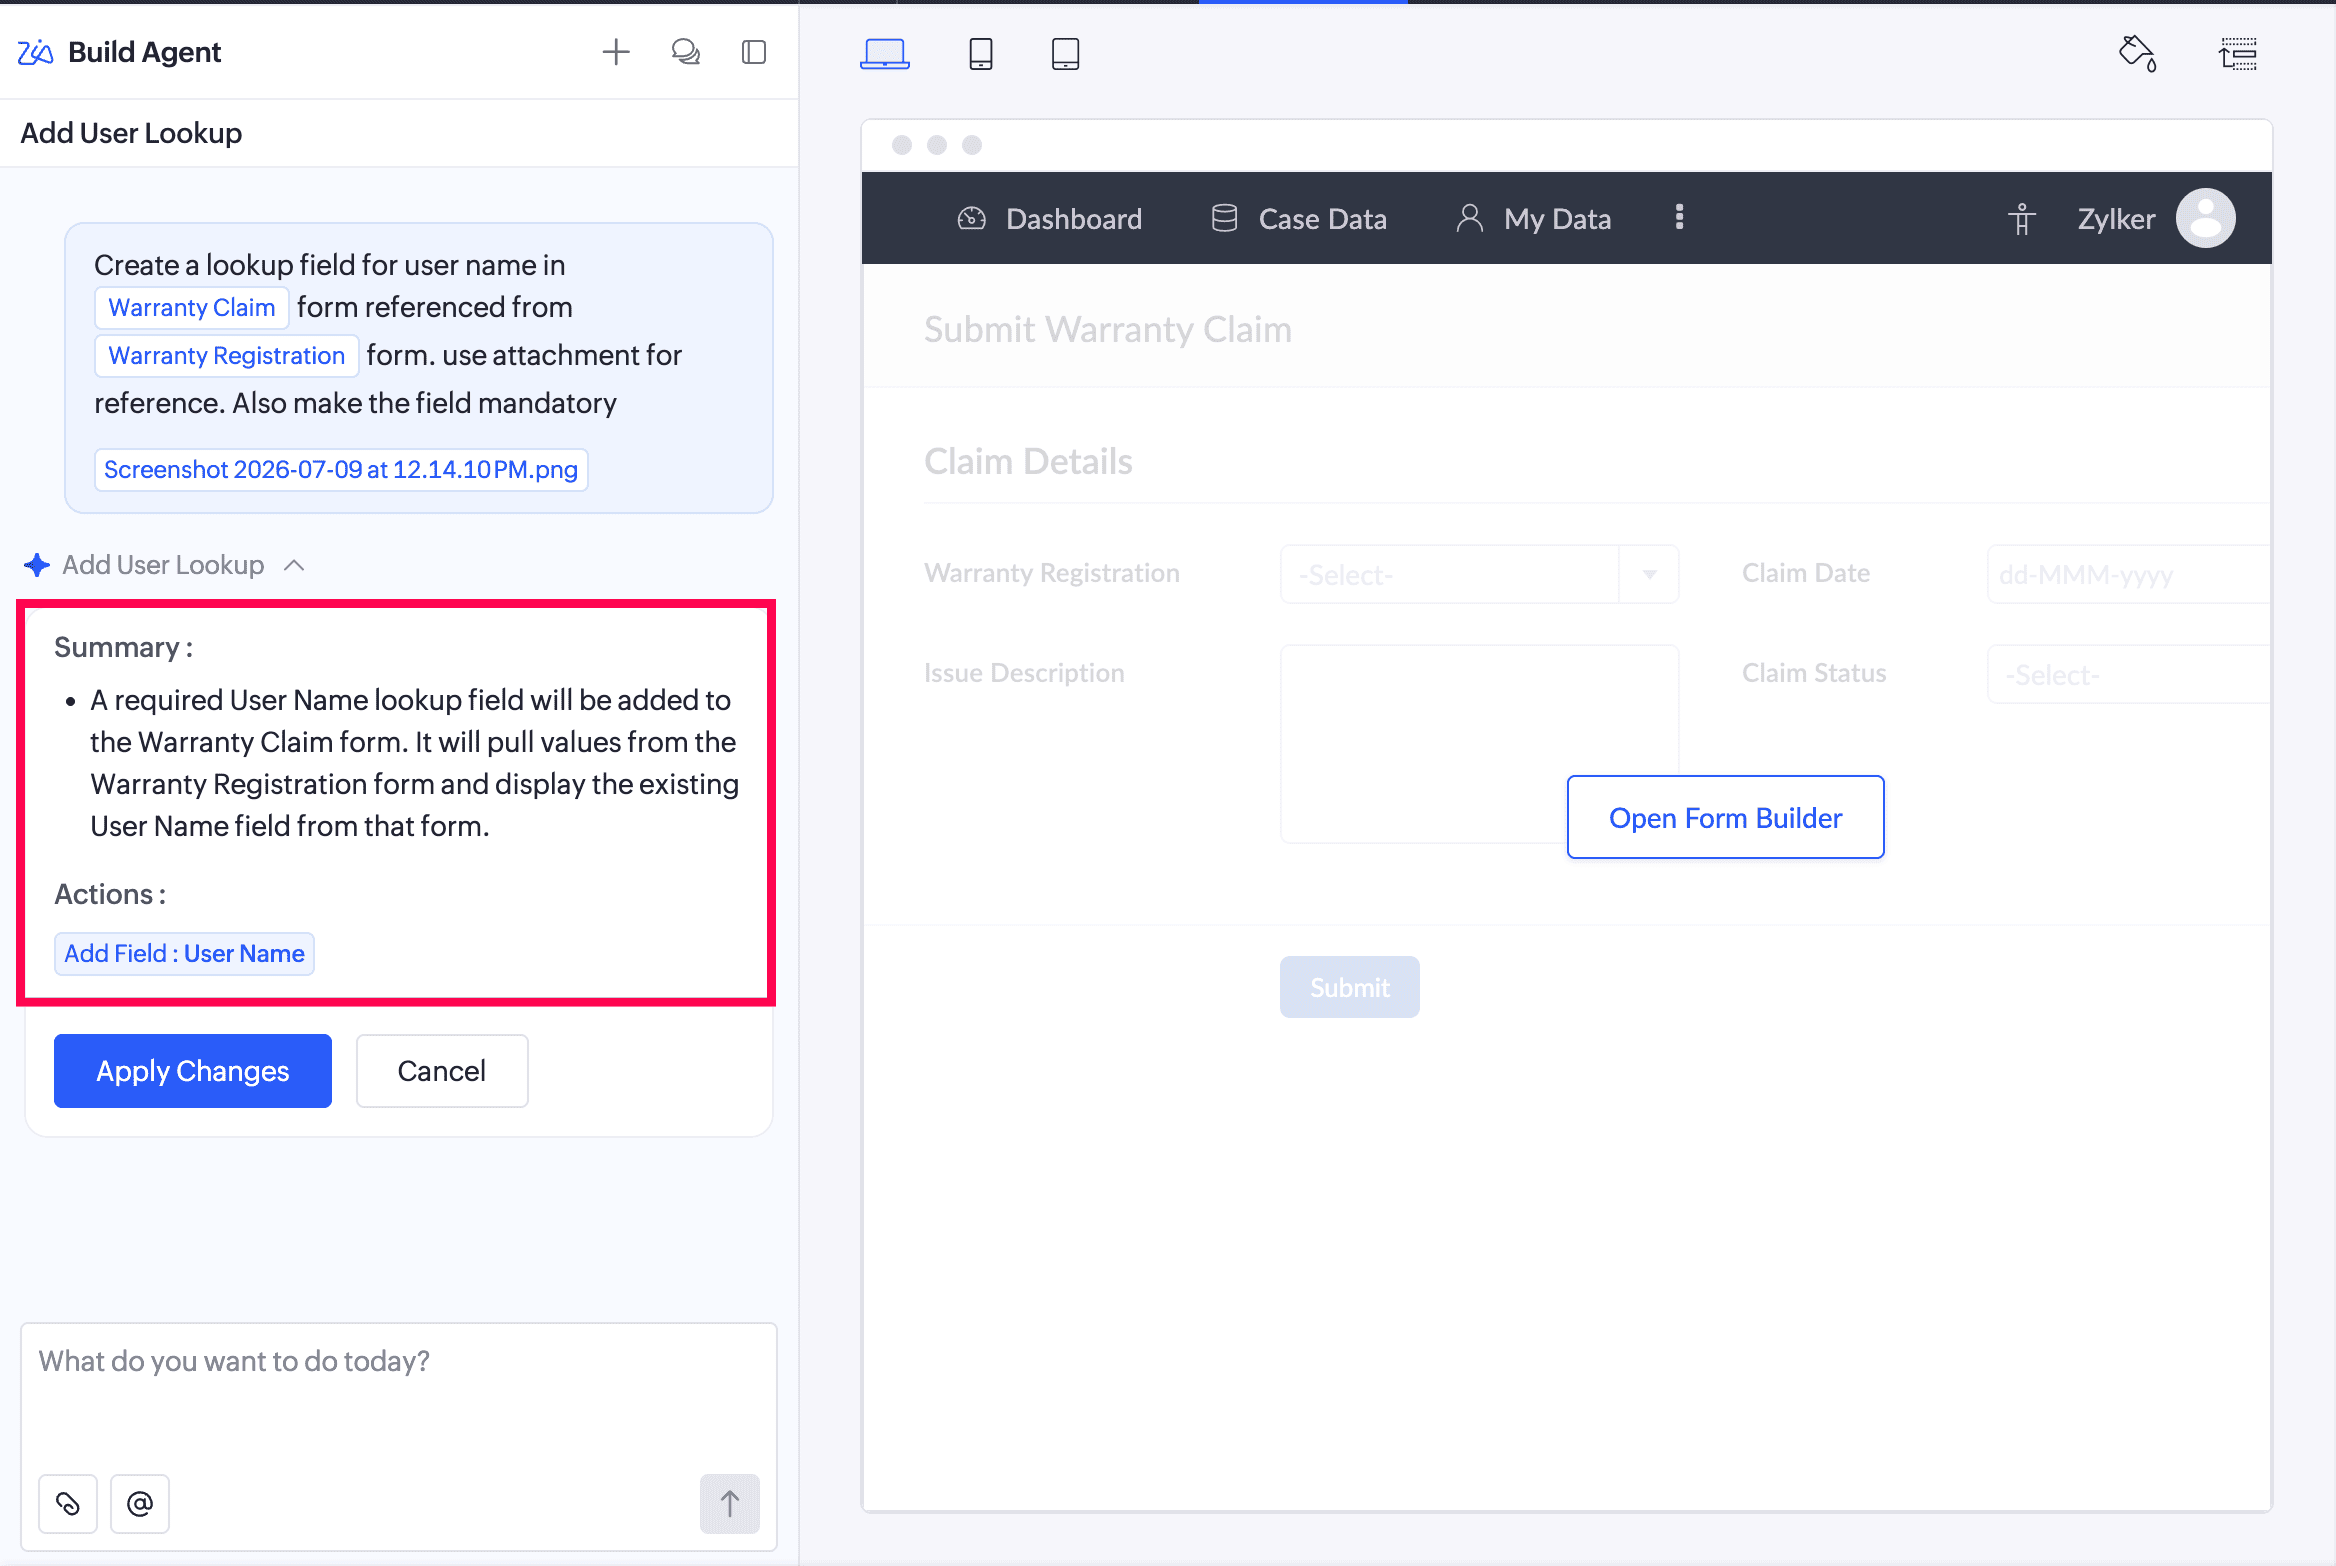
Build agent converts the generated output into proposed Creator components and configurations and presents a change summary. The Summary provides an overview of the planned changes, while the Actions section lists the specific actions grouped by component, allowing you to verify what will be modified before applying the changes.
For example, if your prompt adds a field to a form, the summary shows the affected form, the field that will be created, and any related configurations.
Step 3: Apply the changes
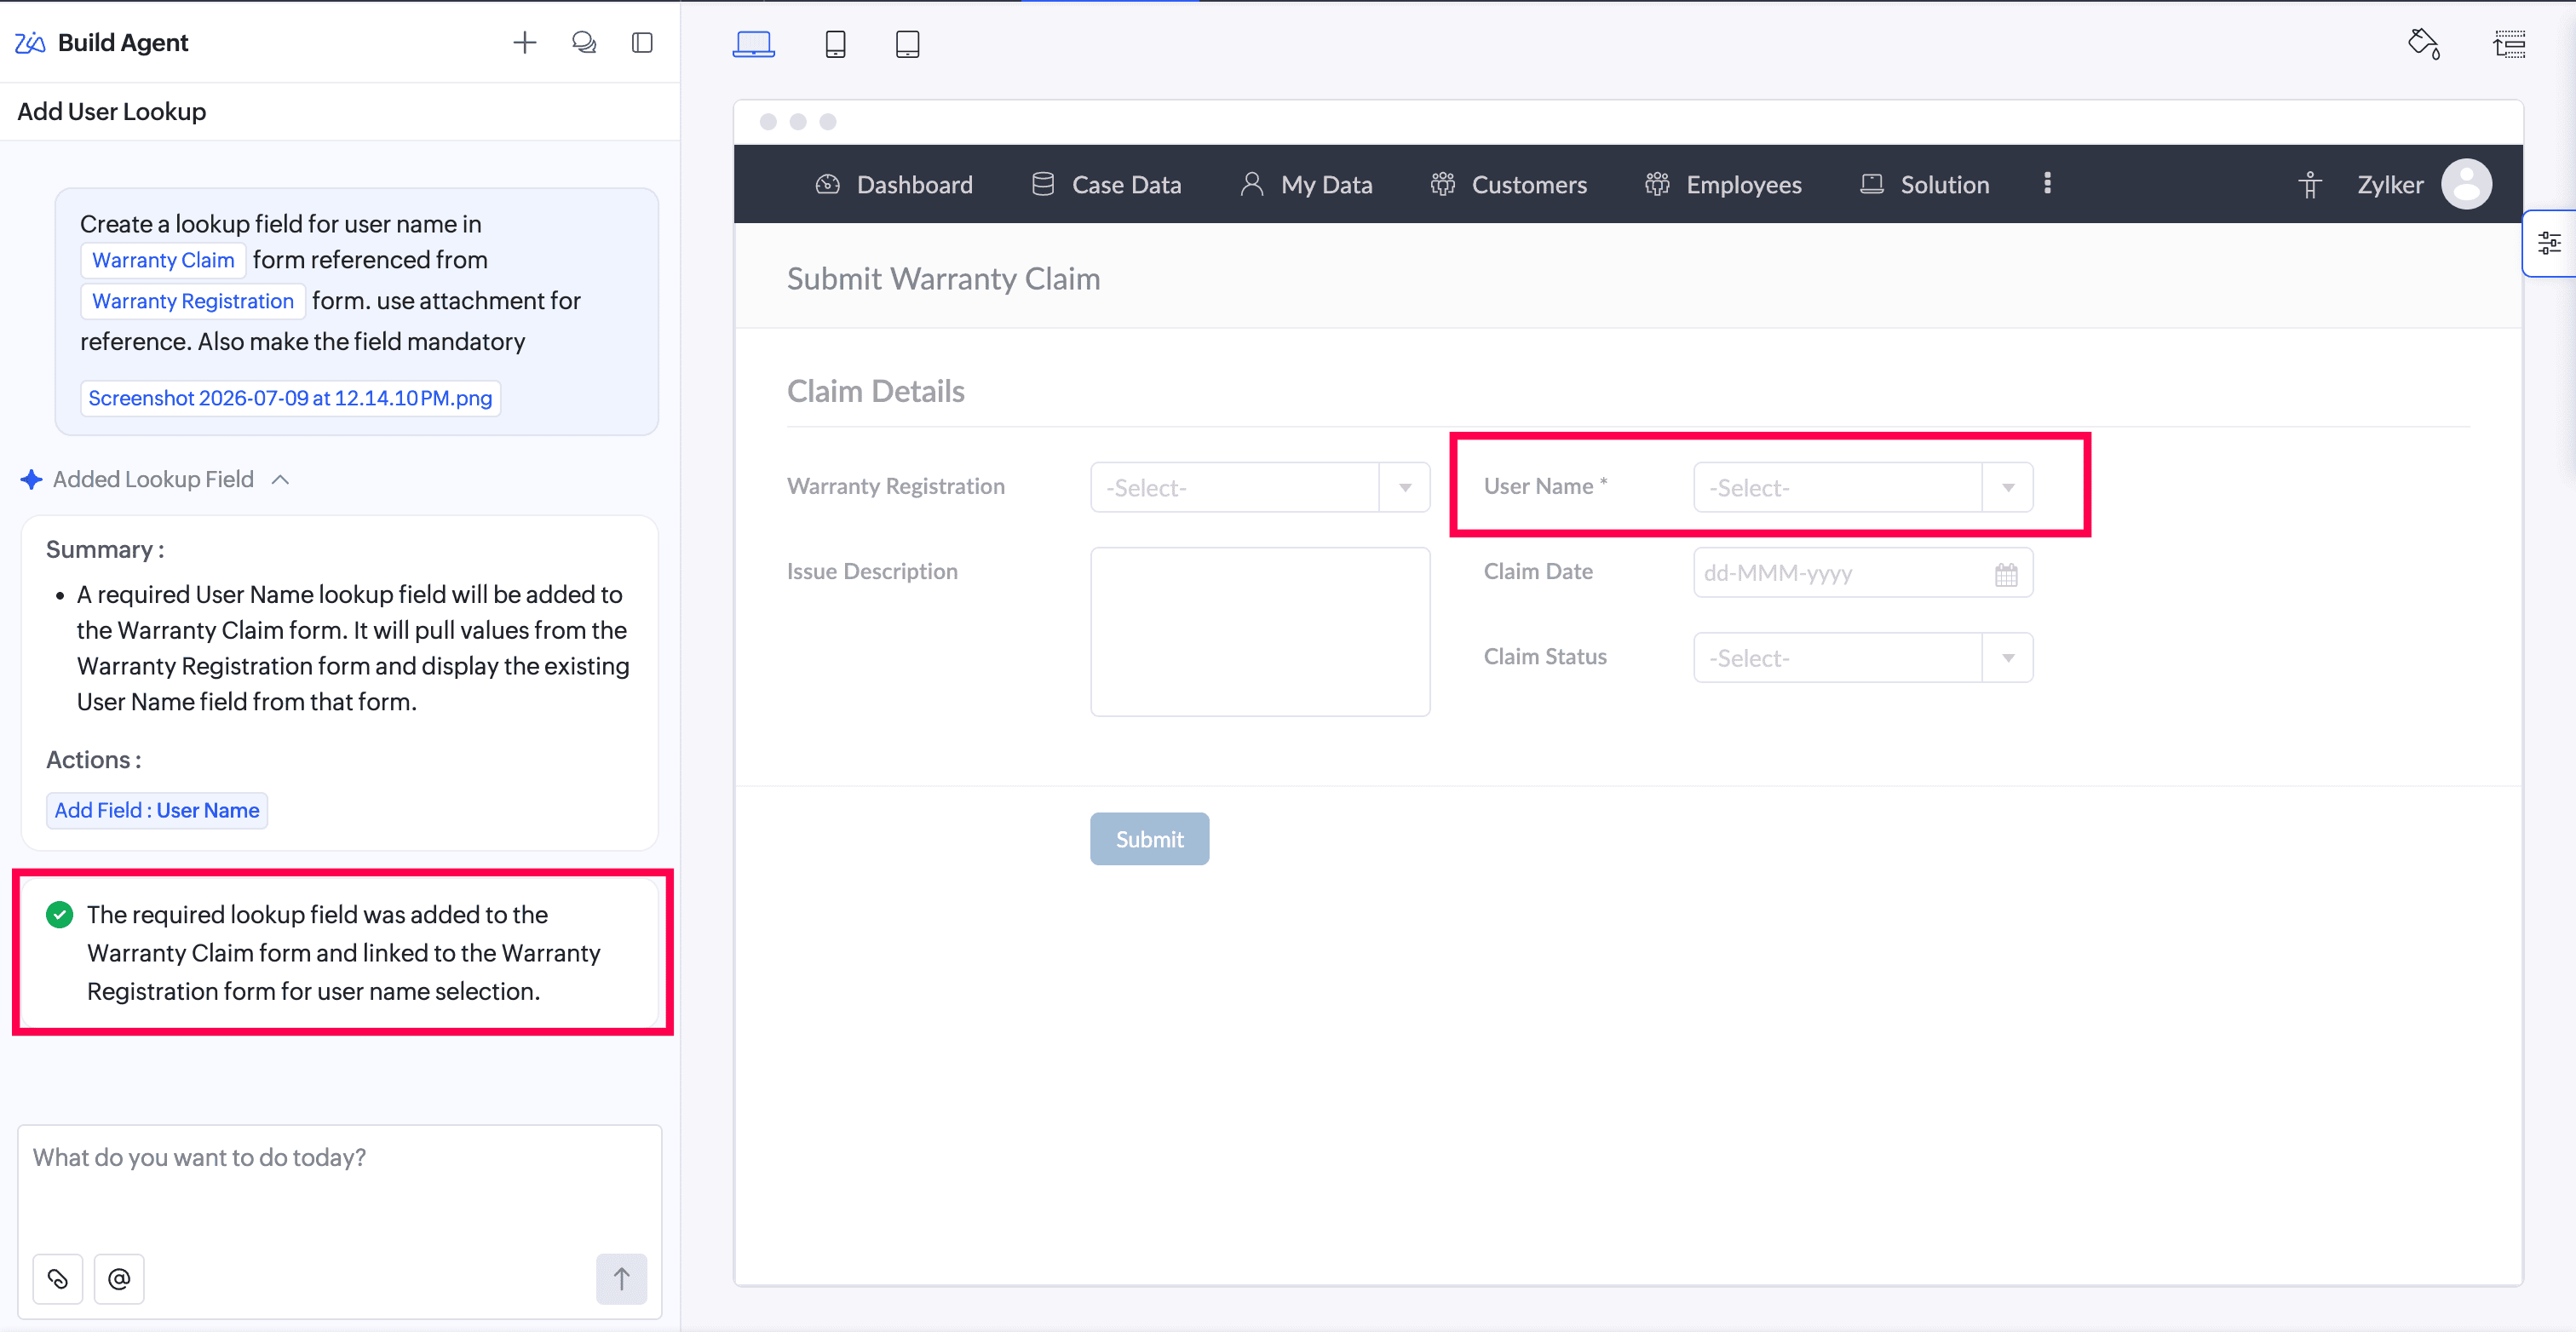
After reviewing the Summary, click Apply Changes to implement the proposed changes or Cancel to discard them. Build agent updates the relevant application components accordingly.
Note:
- Changes applied through the build agent cannot be reverted. Review the Summary carefully before applying the changes.
- If you submit a new prompt without applying the changes from the previous summary, the pending changes will be discarded.
Build agent updates the relevant application components and displays a success message summarizing the applied changes. If the developer is viewing a different component, the build agent automatically opens the updated component for review.
6.1. How it works
The following video demonstrates how Build Agent generates and modifies application components in both edit and live modes of the application based on user prompts.
In edit mode:
In edit mode:
In live mode:
7. Use cases
Zylker technologies uses a customer support application built with Zoho Creator to manage customer support tickets. As the company expands its after sales services, the support team needs a Warranty Management module to maintain warranty records for customer purchases, allow customers to submit warranty claims, and streamline the claim approval process.
Instead of manually creating the required components, the developer opens Build Agent, describes the requirement in natural language, and lets it generate the required application components and scripts.
7.1. Adding forms to the existing application
The developer uses the following prompt to generate forms required for warranty management:
"Add Warranty Registration, Warranty Claim, and Warranty Approval forms to the existing customer support application. Use the Warranty Registration form to store warranty details for purchased products, the Warranty Claim form to submit claims for registered products, and the Warranty Approval form to review and approve or reject submitted claims" The Build Agent summarizes the changes it will make to the application, such as creating the requested forms for warranty management. It also recommends the key fields required to capture warranty details, claim details, and approval decisions. It proposes generating the corresponding reports and updating the application menu with the forms and reports as part of the implementation.
After reviewing and approving the changes, the developer adds the forms, its fields and corresponding reports to the application.
7.2. Setting up workflows
The developer uses the following prompt to automate the warranty claim approval process:
"Create a workflow to automate the warranty claim approval process. Validate the warranty, send the claim for approval, update the claim status, and notify the customer of the approval decision."
The Build Agent generates a change summary indicating that it will create the required workflows for the Warranty Claim and Warranty Approval forms. The summary confirms that warranty claims will be validated before submission, new claims will be moved to review, approval records with a decision date will be created, claim results will be updated after approval, and customers will be notified once an approval decision is recorded. After reviewing and approving the changes, the developer adds the generated workflows to the application.
7.3. Creating and modifying deluge functions
The developer provides the following prompt to generate a function for calculating the warranty expiry date:
"Create a reusable Deluge function to automatically calculate the warranty expiry date when the Purchase Date field is updated in the @Warranty Registration form."
The change summary shows that Build Agent will generate a reusable Deluge function named calculateWarrantyExpiry() to calculate warranty expiry dates based on the purchase date and warranty duration. It also confirms that a form rule will be added to the @Warranty Registration form to automatically populate the Warranty End Date field when the Purchase Date field is updated. After reviewing and approving the changes, the developer adds the generated function and form rule to the application.
7.4. Creating dashboards with metrics
The developer provides the following prompt to create a Warranty Management dashboard:
"Create a Warranty Management dashboard that displays key metrics for warranty registrations, claim status, approval decisions, and expiring warranties."
The build agent generates a change summary indicating that it will create a new Warranty Management dashboard page. The summary confirms the addition of KPI panel and proposes charts to visualize key warranty metrics and trends. It also confirms that the dashboard will be added to the warranty section of the application menu. After reviewing and approving the changes, the developer adds the generated dashboard to the application.
7.5. Adding HTML snippet s to a page
The developer uses the following prompt to create a personalized welcome banner for the Warranty Management dashboard:
"Add an HTML snippet to the Warranty Management dashboard that displays a personalized welcome message with the current user's name, the current date, and a summary of pending warranty claims."
The change summary indicates that the build agent will add a welcome banner to the Warranty Management page using HTML snippet. It also recommends including a quick navigation link to the warranty approval form in the banner. Since the build agent cannot modify the existing page layout, the snippet will be placed in any available space on the dashboard. After reviewing and approving the changes, the developer adds the generated HTML snippet to the application.
8. Points to note
Operational behavior/ Capabilities and constraints
- Applied changes cannot be reverted. Review the Summary carefully before clicking Apply Changes, as approved changes take effect immediately.
- Only application components such as forms, fields, reports, pages, workflows, and functions can be created or modified. Records stored in forms are not affected.
- Build agent operates only within the application from which it is accessed and cannot directly access other Creator applications or external systems.
- If integrations are already configured and authorized in the current application, Build agent can use them to perform the requested operations.
- If the submitted request is off topic or unsupported, build agent rejects the request and prevents any partial implementation of changes.
- Requests are based on your prompt and any components you @-mention. If no components are specified, build agent uses contextual understanding of your prompt to identify the component to modify.
- Requests that are too complex for a single session should be broken down into smaller tasks. For instance, a large request such as creating multiple workflows on a form should be split into separate prompts instead of being combined into a single prompt. This helps prevent incomplete execution and improves accuracy and reliability of results.
AI usage and data
- Zoho GenAI LLM is available for free and it processes all prompts within Zoho, while external LLM providers process data in their own systems. Avoid sharing sensitive or regulated information in build agent when using external providers with Zia.
- Build agent does not consume any AI calls or API calls from Zoho Creator. However, using Zoho GenAI with Build Agent consumes Development AI Credits, while usage with external LLM providers is accounted by the respective service provider. You can view your Development AI Credits usage in the Billing section. Learn more
- External LLM providers configured with Zia Build Agent may still enforce API rate limits. These limits are restrictions that the LLM provider imposes on the number of times a user or client can access their services within a specified period of time and vary based on their usage tier and the model consumed. Rate limits for LLM providers can be referred by their respective official documentation.
- OpenAI rate limits
- Google Gemini rate limits
- Anthropic rate limits
- DeepSeek rate limits
- SiliconFlow rate limits
- Along with your prompts, the system may add supplementary prompts to enhance the accuracy of build agent responses. These system-generated prompts are also counted toward AI usage by the LLM provider configured in Zia.
9. Related topics
- Configuring Zia
- Understand Zia features in Creator
- AI features in Creator powered by Zia
- Modes of an application
- Early access features